

The goal of this handbook is to quickly introduce you to the basics of JavaScript so you can start programming applications.
Instead of covering all the theories and concepts of JavaScript, I'll be teaching you only the most important building blocks of the language. We'll cover things like variables, data types, functions, objects, arrays, and classes. You'll also learn how to mix them all to build a small but solid program.
We're also going to leave out HTML, CSS, and using JavaScript in the browser. This tutorial focuses only on JavaScript as a programming language and uses the terminal to run the code.
This tutorial also has exercises for each section which gives you time to practice what you learned and "drill" the knowledge into your brain.
This handbook is completely free right here in this webpage. If you want the Kindle or paperback version of this tutorial, you can pay a small fee for it. It'll help support me in creating an in-depth JavaScript Tutorial that will help you build a complete web application.
Table of Contents
1 - JavaScript Introduction
JavaScript was created around April 1995 by Brendan Eich. At the time, he was working to develop a browser for a company called Netscape. He was told that he only had 10 days to design and code a working prototype of a programming language that could run on the browser.
He needed to create a language that appealed to non-professional programmers like Microsoft Visual Basic.
The reason he was given only 10 days was that Netscape needed to release its browser, which at the time was in competition with Microsoft.
In the beginning, JavaScript was not as powerful as it is today, since it was originally designed to add interaction and animation for web pages. It wasn't until 2005 when jQuery and AJAX were released that JavaScript began to be used in every website.
People simply didn't have an easy alternative to jQuery and AJAX for DOM manipulation and sending asynchronous requests. Plus, an active community of JavaScript developers kept adding new features to the library.
Then Google launched its modern Chrome browser, and Facebook started getting more people online. JavaScript began to grow to accomodate the ambitions of these giant internet companies.
Browsers began developing APIs that you could use in JavaScript. JS could retrieve information such as IP addresses and geographic locations from the browser, adding more power to internet companies to localize the features of their websites.
Then another innovation happened to make JavaScript even more powerful.
A server-side environment named Node.js was released in 2009, allowing JavaScript to run on the server side like PHP, Java, Python, Ruby, and many more. It also enabled devs to develop full-stack web applications using only JavaScript.
Today, JavaScript is a language that can power the web, desktop, and mobile applications.
Here's a quote from Tim O'Reilly, the founder of O'Reilly Media:
Learning JavaScript used to mean you weren't a serious developer. Today, not learning JavaScript means the same thing.
Learning JavaScript is now critical for people who want to be web developers.
Why learn JavaScript?
There are 4 good reasons why you need to learn and deeply understand JavaScript:
JavaScript is the only language that works in the browser
It's fairly easy to learn (but hard to master)
It's an essential language for making web applications
There are many career opportunities for JavaScript devs
Learning JavaScript opens tremendous opportunities where you can be a frontend, backend, or mobile developer.
Basically, learning JavaScript is a gateway to career improvements in tech.
JavaScript vs Java
In the beginning, JavaScript was actually named LiveScript. It was renamed to JavaScript because Java was a very popular programming language.
Since most software developers were already familiar with Java, the name JavaScript was thought to help in marketing JavaScript as a great programming language and draw the interest of developers at the time.
Just to be clear, JavaScript and Java are two completely different programming languages. You don't need to know Java to learn JavaScript (or the other way around). :)
2 - How to Set Up Your Computer
To write a program using JavaScript, you need to install 2 free tools that are available for all operating systems.
The first tool to install is Visual Studio Code.
How to Install VSCode
Visual Studio Code or VSCode for short is a text editor program created for the purpose of writing code. Aside from being free, VSCode is open source and available on all major operating systems.
You can use VSCode on Windows, macOS, and Linux, so if you don't have a text editor on your computer, I recommend that you install VSCode here.
Now that you have a text editor to write JavaScript code, you need a software to run JavaScript code. Let's install Node.js next.
How to Install Node.js
To run JavaScript outside of the browser, you need to install Node.js, which is essentially a JavaScript runner.
Simply go to the Node.js website at nodejs.org and download the latest LTS version for your computer. Once the download is complete, install it on your system.
You need to run Node.js using the console, so open your command line or terminal application and run the following command:
node -v
This command will output the version of your freshly installed Node.js into the console.
3 - Quick Console Introduction
The console is a text-based interface that you can use to type and run commands on your computer. On Windows, it's called the Command Line. On macOS and Linux it's known as the Terminal.
You're not going to use all the commands available within the console. In fact, you only need to know 7 basic commands to help you run JavaScript code.
First, open the console program on your computer and type the pwd command:
pwd
This is the command you use to find out which directory your terminal is currently on. pwd is short for print working directory.
To change the working directory, you need to run the cd command.
Here's an example to move into a child directory:
cd directory_name/directory_name
To move up to a parent directory, you specify .. next to the command:
cd ..
To go up more than one directory, use ../..
To clear your console from previous commands and output, use the clear command:
clear
To print out the list of files and directories in the current directory, run the ls command:
ls
To create a new file, use the touch command followed by the file name and extension:
touch index.js
The command above will create a new JavaScript file named index.js on the current working directory.
To create a new directory, use the mkdir command followed by the directory name:
mkdir my_project
To run JavaScript using Node.js, specify node followed by the file name as follows:
node index.js
You'll see any output from the code in the same console.
There are lots of things you can do with the console, but these 7 commands would be enough because we only need it to run JavaScript code.
Next, let's run your first JavaScript program!
4 - Time to Say Hello World!
It's time to run your first JavaScript program using Node.
From the console, create a new JavaScript file named index.js using the touch command.
touch index.js
Next, open the file using VSCode and write the following line of code into the file:
console.log("Hello World!");
Back on the console, run this script with Node:
node index.js
The console should execute the index.js file and print "Hello World!".
You've just run your very first JavaScript program using Node.js. Excellent!
When you run the node index.js command, the Node.js program starts reading the script line by line from top to bottom.
The node program sees that you wrote the word console.log followed by parentheses (), so it knows that you're instructing it to print something. The program then reads what you put in the parentheses and prints it out on the console.
In your VSCode or other text editor program, you should see different parts of your code highlighted with different colors. This is a feature of the text editor called syntax highlighting, and it's really useful to help you distinguish different parts of the code.
The log keyword is a function, so it gets highlighted in one color, while the words in the parentheses have another color.
A function is simply a piece of code that's used to perform a certain task. The log() function is used to "print" whatever you put inside the parentheses.
On the other hand, the console keyword is an object, which is a standalone property that gives access to certain functionalities.
We'll learn more about functions and objects later. For now, just remember that the console.log() keyword is used to print things to the console.
Next, let's start with learning JavaScript code structure.
5 - JavaScript Code Structure
A computer program is a series of pieces of code written in a text file. These text files are then run through a software that's designed specially for running the code. The Node.js software you downloaded previously is the tool that processes JavaScript code.
Before we go further, let's understand the structure of code.
Statements
A statement is a single instruction for the computer to run. Think of it like a sentence, but for computers. We can end a statement by using a semicolon ; just like we can end a sentence using a dot .
You can write multiple statements in a single line, but the convention is to write one statement per line:
// This is hard to read
console.log("Hello World!"); console.log("I'm learning JavaScript");

// Now it's better
console.log("Hello World!");
console.log("I'm learning JavaScript");
Each statement is an expression of some action that needs to be carried out by the software that executes the code.
Comments
In programming, comments are text we use to communicate the context of the code written in the file.
To write a comment in JavaScript, you need to add two forward slashes // before the comment as shown below:
// This is a comment
// This is also a comment

// Below print two lines of statements
console.log("Hello World!");
console.log("I'm learning JavaScript");
Comments are ignored by the language processor, so you can use comments to disable some code without having to delete that code.
The code below shows how to disable the second print statement:
console.log("Hello World!");
// console.log("I'm learning JavaScript");
Execution Flow
A language processor such as Node.js executes statements in a top-down approach. The statement written in the first line will be executed before the second line, then continue down to the last line:
console.log("Hello World!");
console.log("I'm learning JavaScript");

// Printing numbers
console.log(1);
console.log(2);
console.log(3);
Output:
Hello World!
I'm learning JavaScript
1
2
3
If you want to print the numbers before the text, then you need to move the corresponding console.log() lines to the top.
Exercise #1
Try to print your name, age, and occupation on the console.
The output would look as follows:
John Doe
19
Student
Now that you understand the basic code structure of JavaScript, let's continue with learning variables next.
6 - JavaScript Variables
Before explaining what a variable is, I want you to change the code you've written in the index.js file.
Change the code in that file as follows:
let message = "Hello World!"
console.log(message)
Next, run the code using the node index.js command. You'll see the same output as when you write the 'Hello World!' message directly inside the console.log() function. How can this be?
This is because the message written in the code above is a variable.
In programming, a variable is simply a name that you give to a value so that you can access that value later. You can think of a variable as a label that can be tagged to a certain value, so you can refer to the value using the label.
To declare a variable, you need to type the keyword let followed by the variable name.
The first line in the code tells JavaScript to associate the message variable with the value Hello World!:
let message = "Hello World!"
In the second line, JavaScript is instructed to print the value of message, and that's exactly what it does.
You can change the value of your variable by re-assigning another value as follows:
message = "Hello World!"
console.log(message)
message = "Nice weather!"
console.log(message)
Run the file and you'll see two lines printed as the output:
Hello World!
Nice weather!
Variables are used to reference data so that you can use the same data multiple times in your program.
Next, let's see some rules for naming variables in JavaScript.
Variable naming
JavaScript has a few naming rules that you need to know to avoid naming errors.
Variable names can only contain alphabet letters, numbers, and underscores (_). This means you can name your variable message, message_1, message_2.
The first character of the variable name must not be a number. message_1 is okay. 1_message is not.
You can't use reserved keywords such as console because they are used by JavaScript to do certain things. There are many other keywords used by JavaScript that you'll learn in the following sections such as if, for, and while.
Variable names are case-sensitive, which means Message, MESSAGE, and message can be used to create three different variables. But of course, I don't recommend using similar names as it causes confusion.
Sometimes, you need more than one word to declare a variable name. JavaScript has two naming conventions that are used worldwide:
camelCasesnake_case
Camel case is a naming convention that uses an uppercase letter for the first character for subsequent words. Here's an example:
let myAwesomeVariable
The snake case naming convention uses an underscore to separate words. Here's an example:
let my_awesome_variable
Both are acceptable naming conventions, but you should stick to one of them in your code to avoid confusion.
Constant variable
There are times when you need to store a value that never changes in a variable.
A constant variable is a variable that doesn't change its value as long as the program is running. In other programming languages, changing the value of a constant will produce an error.
In JavaScript, a constant variable is declared using the const keyword.
The following shows how to declare 2 constants in JavaScript:
const FILE_SIZE_LIMIT = 2000
const MAX_SPEED = 300
The naming convention for a constant is to use all uppercase letters, although using lowercase letters also works. The uppercase is just a standard to make constants stand out more.
The var keyword
The var keyword is used to declare variables with a global scope. This keyword was the only keyword you can use to declare variables before JavaScript released the new let and const keyword in 2015.
As of today, you should avoid using var if you can, since var can introduce bugs that you can avoid by using the let keyword.
To show you what I mean, consider the following example:
if(true) {
    var name = "Nathan";
}

console.log(name)
The code above will print the name variable just fine, but it really should not because the variable name is declared inside the if block.
This is because any variable declared using the var keyword is accessible from everywhere. The scope of that variable is global.
On the other hand, the let keyword has a block scope, which means the variable is only accessible from the block and all its child blocks.
But why bother with scoping the variable? This is because when you have hundreds or thousands of code lines, it can become frustrating to trace an error that occurs because of global variables.
There's a principle in software development called "principles of least exposure", which means you don't expose any part of your program that's unnecessary.
Block scoping a variable ensures that a variable is exposed and accessible only in parts of your codebase that require the variable.
A variable declared using the let keyword is identical to a variable declared using var except for the scope level.
if(true) {
    let name = "Nathan";
}

console.log(name)  // Error: name is not defined
This also means that you now have var, let, and const keywords to declare a variable. Which one to use?
In general, you can declare a variable with const first. When you code your application and realize that you need to change the variable assignment, you can change the declaration to let.
If you know from the start that the variable's value will change, then you can use let immediately. Just don't use var today or people might get mad at you.
Exercise #2
Write a program with three variables, each with the following value:
The first variable contains your name
The second variable contains your age
The third variable contains your occupation
Then print the variables using the console.log() method. Here's the example output:
John Doe
Student
19
Summary
How you use variables to make a program that does what you want it to do is one of the most important skills you can have as a programmer.
But before you learn more about how to make use of variables, let's learn about data types in JavaScript.
7 - JavaScript Basic Data Types
Data Types are simply definitions for different types of data known to a programming language.
A data type contains specifications about what you can and can't do with that data.
To show you a brain-friendly example, I'm sure you agree that 2 + 2 = 4?
Well, JavaScript also agrees with that:
console.log(2 + 2);

// Output: 4
But what if you try to add a number with letters as shown below?
console.log(2 + "ABC");
Output:
2ABC
Adding a number and letters together will cause JavaScript to concatenate or join the values together.
In this section, you're going to learn basic data types that JavaScript knows:
Strings
Numbers
Booleans
Null
Undefined
You will also see how these different types react to operators such as + shown in the above example.
First, let's start with strings.
Strings in JavaScript
Strings are simply data defined as a series of characters.
You've seen an example of string data previously when you call the console.log() function to print a message:
let message = "Hello, Sunshine!";
console.log(message); // Hello, Sunshine!
A string needs to be enclosed in quotations. You can use double quotes or single quotes, but they have to match.
You'll get an error when you use different quotation marks like this:
// Invalid or unexpected token
let message = "Hello';
You can join two or more strings as one with the plus + symbol. Don't forget to add a space before the next string or you'll get a string without spaces!
let message = "Hello " + "and " + "Goodbye!";
console.log(message);

// Output: Hello and Goodbye!
When printing a variable's value, you can also add strings in the console.log() function directly as follows:
let message = "Hello, Dave!";

console.log("The message is: " + message);

// Output: The message is: Hello, Dave!
This is particularly useful when you have multiple strings to console.log in one sentence as follows:
let name = "John";
let topic = "JavaScript";

console.log(name + " is learning " + topic + " today");

// Output: John is learning JavaScript today
Or you can also use the template strings format, which allows you to embed a variable directly inside the string as follows:
let name = "John";
let topic = "JavaScript";

console.log(`${name} is learning ${topic} today`);

// Output: John is learning JavaScript today
To use the template strings format, you need to use the backtick (`) character to wrap the string instead of quotations.
The variable is embedded in the string using the dollar symbol and curly brackets as in ${variable}.
This way, JavaScript knows that you're referencing a variable inside the string.
When you have multiple strings to print in a single line, then the template strings format is more convenient because you didn't have to break the string with quotations and concatenations.
Next, strings can also represent numbers. You surround the numbers in quotations as follows:
let score = "10" + "30";
console.log(score);

// Output: 1030
When you join two string numbers with a + symbol, JavaScript will join the two numbers instead of performing arithmetic addition.
This is how strings work in JavaScript. Let's look at numbers next.
Numbers (integers and floats) in JavaScript
Number data types represent different kinds of numbers. There are two types of numbers in JavaScript:
Integers
Floats
An integer is a whole number without decimals and fractions. Below, you see examples of two integers x and y:
let x = 1;
let y = 2;

console.log(x + y);

// Output: 3
On the other hand, floats refer to numbers with decimal points like this:
let f = 1.2;
let z = 2.35;

console.log(f + z);

// Output: 3.55
To create a float, you need to write a number and use . to define the decimal values.
With number types, you can perform arithmetic operations such as addition +, subtraction -, division /, and multiplication * just like how you use a calculator.
Booleans in JavaScript
Boolean is a type that represents true and false values.
You can think of Booleans as a light switch that can only be in one of two positions: on or off.
So it is with Boolean values in programming languages. They are used when JavaScript needs to make a decision: Go left or go right? Right or wrong?
Here's how you create Boolean values in JavaScript:
let on = true;
let off = false;
This data type is frequently used when you need to make a decision using a control flow. You'll see why Boolean values are very useful in developing a program later in Section 9.
Undefined in JavaScript
Undefined is a data type in JavaScript used to represent a variable that hasn't been assigned any value yet.
Anytime you declared a variable without assigning any value, the undefined value will be assigned to that variable. For example:
let first_name;

console.log(first_name); // undefined
You can also assign undefined to a variable explicitly as follows:
let last_name = undefined;
But this is usually not recommended, because JavaScript has another value called null which is used to mark a variable as empty.
Null in JavaScript
The null value is a special data type that represents an empty or unknown value. Here's how you assign a variable as null:
let first_name = null;
The code above means that the value of first_name is empty or unknown.
At this point, you may be thinking what's the difference between undefined and null? They seem to serve a similar purpose.
And you are correct. Both undefined and null are values that represent nothing, and other programming languages usually only have one, and that is null.
In JavaScript, the undefined value is reserved as the default value when a variable is declared, while null means you intentionally assign an "empty" value for the variable.
This slight difference will come to play later when you learn about functions in Chapter 13.
For now, just keep in mind that JavaScript treats undefined as the "default" empty value and null as the "intentional" empty value.
8 - Type Conversion and Coercion
At times, you might want to convert one data type into another so that the program runs as expected.
For example, suppose you need to convert a string into an integer so you can perform an addition between numbers.
If you have one of the numbers as a string, JavaScript joins them together instead of adding:
let x = "7";
let y = 5;

console.log(x + y); // 75
To add the two numbers properly, you need to convert the x variable into an integer.
Changing the data from one type to another is also known as type conversion or type casting. There are 3 functions frequently used to do type conversion:
Number()String()Boolean()
As their name implies, these type conversion functions will attempt to convert any value you specified inside the parentheses to the type of the same name.
To convert a string into an integer, you can use the int() function:
let x = "7";
let y = 5;

// Convert x to integer
x = Number(x);

console.log(x + y); // 12
On the other hand, the String() function converts a value of another type to a string. If you type String(true), then you'll get 'true' back.
Passing a value of the same type as the function has no effect. It will just return the same value back.
Type coercion
In JavaScript, type coercion is a process where a value of one type is implicitly converted into another type.
This is automatically done by JavaScript so that your code won't cause an error. But as you'll see in this section, type coercion can actually cause undesired behavior in the program.
Let's consider what happens when you perform an addition between a number and a string in JavaScript:
console.log(1 + "1");
As you've seen in the previous section, JavaScript will consider the number as a string and join the two letters as 11 instead of adding them (1 + 1 = 2)
But you need to know that other programming languages don't respond the same way.
Programming languages like Ruby or Python will respond by stopping your program and giving an error as feedback. It will respond with something along the lines of "Cannot perform addition between a number and a string".
But JavaScript will see this and said: "I cannot do the operation you requested as it is, but I can do it if the number 1 is converted to a string, so I'll do just that."
And that's exactly what type coercion is. JavaScript notices that it doesn't know how to execute your code, but it doesn't stop the program and respond with an error.
Instead, it will change the data type of one of the values without telling you.
While type coercion doesn't cause any errors, the output is actually something you don't want either.
Type coercion rules
Type coercion rules are never stated clearly anywhere, but I did find some rules by trying various silly code myself.
It seems that JavaScript will first convert data types to string when it finds different data types:
1 + "1" // "11"
[1 ,2] + "1" // "1,21"
true + "1" // "true1"
But the order of the values matters when you have an object. Writing objects first always returns numeric 1:
{ a: 1 } + "1" // 1
"1" + { a: 1 } // "1[object Object]"
true + { a: 1 } // "true[object Object]"
{ a: 1 } + 1 // 1
JavaScript can calculate between boolean and numeric types, because boolean values true and false implicitly has the numeric value of 1 and 0:
true + 1 // 1+1 = 2
false + 1 // 0+1 = 1
[1,2] + 1 // "1,21"
Type coercion is always performed implicitly. When you assign the value as a variable, the variable type will never change outside of the operation:
let myNumber = 1;
console.log(myNumber + "1"); // prints 11
console.log(myNumber); // still prints number 1 and not string
You can try to find some more on your own, but you hopefully understand what type coercion is and how it works by now.
Why you should avoid type coercion
JavaScript developers are generally divided into two camps when talking about type coercion:
Those who think it's a feature
Those who think it's a bug
If you ask me, I would recommend that you avoid using type coercion in your code all the time.
The reason is that I've never found a problem where type coercion is required for the solution, and when I need to convert one type into another, it's always better to do so explicitly:
let price = "50";
let tax = 5;

let totalPrice = Number(price) + Number(tax);

console.log(totalPrice);
Using explicit type conversion functions such as Number() and String() will make your code clear and transparent. You don't need to guess the correct data type required in your program.
Type coercion is one of the unique features in JavaScript that may confuse beginners, so it's good to clear it up early.
Next, we'll learn about JavaScript operators.
9 - Operators in JavaScript
As the name implies, operators are symbols you can use to perform operations on your data.
You've seen some examples of using the plus + operator to join multiple strings and add two numbers together. Of course, JavaScript has more than one operator as you'll discover in this section.
Since you've learned about data types and conversion previously, learning operators should be relatively easy.
Arithmetic operators
The arithmetic operators are used to perform mathematical operations like additions and subtractions.
These operators are frequently used with number data types. Here's an example:
console.log(10 - 3); // 7
console.log(2 + 4); // 6
In total, there are 8 arithmetic operators in JavaScript:
| Name | Operation example | Meaning |
| Addition | x + y | Returns the sum between the two operands |
| Subtraction | x - y | Returns the difference between the two operands |
| Multiplication | x * y | Returns the multiplication between the two operands |
| Exponentiation | x ** y | Returns the value of the left operand raised to the power of the right operand |
| Division | x / y | Returns the value of the left operand divided by the right operand |
| Remainder | x % y | Returns the remainder of the left operand after being divided by the right operand |
| Increment | x++ | Returns the operand plus one |
| Decrement | x-- | Returns the operand minus one |
These operators are pretty straightforward, so you can try them on your own.
As you've seen in the previous section, the + operator can also be used on strings data to merge multiple strings as one:
let message = "Hello " + "human!";
console.log(message); // Hello human!
When you add a number and a string, JavaScript will perform a type coercion and treats the number value as a string value:
let sum = "Hi " + 89;
console.log(sum); // Hi 89
Using any other arithmetic operator with strings will cause JavaScript to return a NaN value.
The assignment operator
The next operator to learn is the assignment operator, which is represented by the equals = sign.
In JavaScript, the assignment operator is used to assign data or a value to a variable.
You've seen some examples of using the assignment operator before, so here's a reminder:
// Assign the string value 'Hello' to the 'message' variable
let message = "Hello";

// Assign the Boolean value true to the 'on' variable
let on = true;
You may've noticed that the equals sign has a slightly different meaning in programming than in math, and you're correct!
The assignment operator isn't used to compare if a number equals another number in programming.
If you want to do that kind of comparison, then you need to use the equal to == operator.
Assignment operators can also be combined with arithmetic operators, so that you can add or subtract values from the left operand.
See the table below for the types of assignment operators:
| Name | Operation example | Meaning |
| Assignment | x = y | x = y |
| Addition assignment | x += y | x = x + y |
| Subtraction assignment | x -= y | x = x - y |
| Multiplication assignment | x *= y | x = x * y |
| Division assignment | x /= y | x = x / y |
| Remainder assignment | x %= y | x = x % y |
Next, let's look at comparison operators.
The comparison operators
Comparison operators are used to compare two values. The operators in this category will return Boolean values: either true or false.
The following table shows all comparison operators available in JavaScript:
| Name | Operation example | Meaning |
| Equal | x == y | Returns true if the operands are equal |
| Not equal | x != y | Returns true if the operands are not equal |
| Strict equal | x === y | Returns true if the operands are equal and have the same type |
| Strict not equal | x !== y | Returns true if the operands are not equal, or have different types |
| Greater than | x > y | Returns true if the left operand is greater than the right operand |
| Greater than or equal | x >= y | Returns true if the left operand is greater than or equal to the right operand |
| Less than | x < y | Returns true if the left operand is less than the right operand |
| Less than or equal | x <= y | Returns true if the left operand is less than or equal to the right operand |
Here are some examples of using these operators:
console.log(9 == 9); // true

console.log(9 != 20); // true

console.log(2 > 10); // false

console.log(2 < 10); // true

console.log(5 >= 10); // false

console.log(10 <= 10); // true
The comparison operators can also be used to compare strings like this:
console.log("ABC" == "ABC"); // true

console.log("ABC" == "abc"); // false

console.log("Z" == "A"); // false
String comparisons are case-sensitive, as shown in the example above.
JavaScript also has two versions of each comparison operator: loose and strict.
In strict mode, JavaScript will compare the types without performing a type coercion.
You need to add one more equal = symbol to the operator as follows
console.log("9" == 9); // true
console.log("9" === 9); // false

console.log(true == 1); // true
console.log(true === 1); // false
You should use the strict comparison operators unless you have a specific reason not to.
Logical operators
The logical operators are used to check whether one or more expressions result in either True or False.
There are three logical operators that JavaScript has:
| Name | Operation example | Meaning | | ----------- | ----------------- | --------------------------------------------------------------- | --- | ---------------------------------------------------------------------- | | Logical AND | x && y | Returns true if all operands are true, else returns false | | Logical OR | x || y | Returns true if one of the operands is true, else returns false | | Logical NOT | !x | Reverse the result: returns true if false and vice versa |
These operators can only return Boolean values. For example, you can determine whether '7 is greater than 2' and '5 is greater than 4':
console.log(7 > 2 && 5 > 4); // true
These logical operators follow the laws of mathematical logic:
&&AND operator - if any expression returnsfalse, the result isfalse||OR operator - if any expression returnstrue, the result istrue!NOT operator - negates the expression, returning the opposite.
Let's have a little exercise. Try to run these statements on your computer. Can you guess the results?
console.log(true && false);

console.log(false || false);

console.log(!true);
These logical operators will come in handy when you need to assert that a specific requirement is fulfilled in your code.
The typeof operator
JavaScript allows you to check the data type by using the typeof operator. To use the operator, you need to call it before specifying the data:
let x = 5;
console.log(typeof x) //  'number'

console.log(typeof "Nathan") // 'string'

console.log(typeof true) // 'boolean'
The typeof operator returns the type of the data as a string. The 'number' type represents both integer and float types, the string and boolean represent their respective types.
Exercise #3
Guess the result of these operators in action:
console.log(19 % 3);
console.log(10 == 3);
console.log(10 !== "10");
console.log(2 < "10");
console.log("5" > 2);
console.log((false && true) || false);
10 - JavaScript Arrays
An array is an object data type that can be used to hold more than one value. An array can be a list of strings, numbers, booleans, objects, or a mix of them all.
To create an array, you need to use the square brackets [] and separate the items using a comma.
Here's how to create a list of strings:
let birds = ['Owl', 'Eagle', 'Parrot', 'Falcon'];
You can think of an array as a list of items, each stored in a locker compartment:

You can also declare an empty array without any value:
let birds = [];
An array can also have a mix of values like this:
let mixedArray = ['Bird', true, 10, 5.17]
The array above contains a string, a boolean, an integer, and a float.
Array index position
JavaScript remembers the position of the elements within an array. The position of an element is also called an index number.
Going back to the locker example, you can think of index numbers as the locker numbers. The index number starts from 0 as follows:
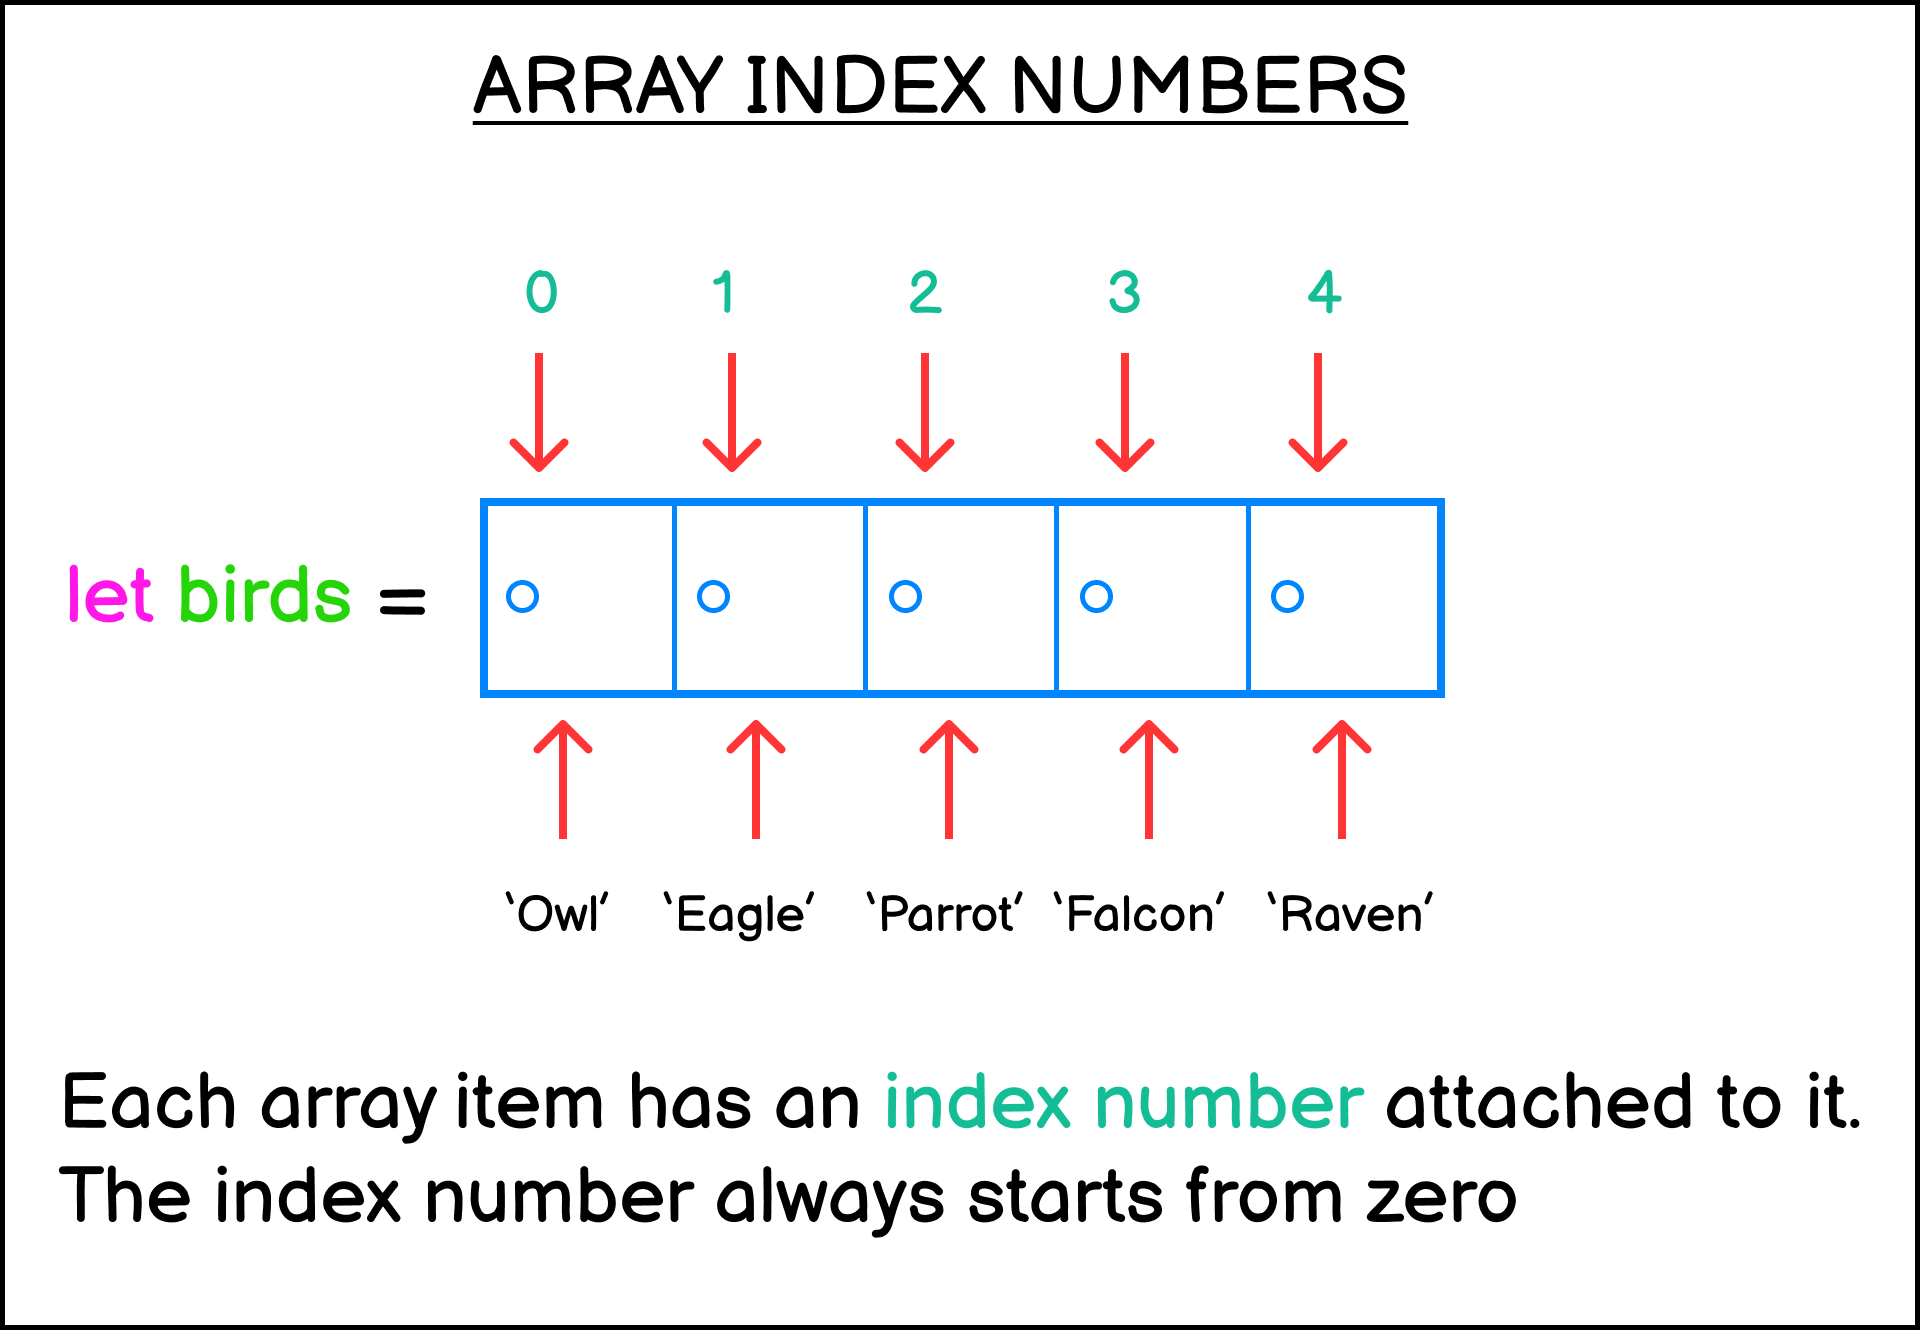
To access or change the value of an array, you need to add the square brackets notation [x] next to the array name, where x is the index number of that element. Here's an example:
// Access the first element in the array
myArray[0];

// Access the second element in the array
myArray[1];
Suppose you want to print the string 'Owl' from the birds array. Here's how you can do it.
let birds = ['Owl', 'Eagle', 'Parrot', 'Falcon'];

console.log(birds[0]); // Owl
console.log(birds[1]); // Eagle
There you go. You need to type the name of the array, followed by the index number wrapped in square brackets.
You can also assign a new value to a specific index using the assignment operator.
Let's replace 'Parrot' with 'Vulture':
let birds = ['Owl', 'Eagle', 'Parrot', 'Falcon'];
birds[2] = 'Vulture';

console.log(birds);
// ['Owl', 'Eagle', 'Vulture', 'Falcon']
Because the array index starts from zero, the value 'Parrot' is stored at index 2 and not 3.
Special methods for array manipulation
Since array is an object, you can call methods that are provided by JavaScript to manipulate the array values.
For example, you can use the push() method to add an item to the end of the array:
let birds = ['Owl', 'Eagle'];

birds.push('Sparrow');

console.log(birds);
// ['Owl', 'Eagle', 'Sparrow']
Another method called pop() can be used to remove an item from the end of an array:
let birds = ['Owl', 'Eagle', 'Sparrow'];

birds.pop();

console.log(birds);
// ['Owl', 'Eagle']
The unshift() method can be used to add an item from the front at index 0:
let fishes = ['Salmon', 'Goldfish', 'Tuna'];

fishes.unshift('Sardine');

console.log(fishes);
// ['Sardine', 'Salmon', 'Goldfish', 'Tuna']
On the other hand, the shift() method can be used to remove an item from index 0:
let fishes = ['Salmon', 'Goldfish', 'Tuna'];

fishes.shift();

console.log(fishes);
// ['Goldfish', 'Tuna']
The indexOf() method can be used to find and return the index of an item in the array.
The method will return -1 when the item isn't found inside the array:
let fishes = ['Salmon', 'Goldfish', 'Tuna'];

let pos = fishes.indexOf('Tuna');

console.log(pos); // 2
To get the size of an array, you can access the length property:
let fishes = ['Salmon', 'Goldfish', 'Tuna'];

console.log(fishes.length); // 3
Note that we don't add parentheses next to the length keyword above. This is because length is a property of the array object and not a method.
We'll learn more about objects in the coming tutorials.
Exercise #4
Create an array named colors that include the 'red', 'green, and 'blue' colors.
First, add a 'black' color after the last index of the array. Then print the array.
Next, remove the value 'red' and swap the position of 'green' and 'blue'. Print the array.
Finally, add the color 'yellow' on the first index of the array, then print the array.
The result output is as follows:
[ 'red', 'green', 'blue', 'black' ]
[ 'blue', 'green', 'black' ]
[ 'yellow', 'blue', 'green', 'black' ]
You need to modify the original array using the methods explained in this section.
11 - Control Flows (Conditionals) in JavaScript
Up until now, the JavaScript code you've written is executed line by line from top to bottom. But what if you want to run some lines of code only when a certain condition is met?
A computer program usually needs to take into account many different conditions that can arise during the program's execution.
This is similar to how a human makes decisions in their life. For example, do you have money to cover the vacation to Japan? If yes, go. If not, then save more money!
This is where control flow comes in. Control flow is a feature in a programming language that allows you to selectively run specific code based on the different conditions that may arise.
Using control flows allows you to define multiple paths a program can take based on the conditions present in your program.
There are two types of control flows commonly used in JavaScript: conditionals and loops.
This section will focus on the conditional statements such as:
if...elsestatementswitch...casestatement
You'll learn about loop statements in the next section.
The if...else statement
The if statement allows you to create a program that runs only if a specific condition is met.
The syntax for the if statement is as follows:
if (condition) {
  // code to execute if condition is true
}
Let's see an example. Suppose you want to go on a vacation that requires 5000 dollars.
Using the if statement, here's how you check if you have enough balance:
let balance = 7000;

if (balance > 5000) {
  console.log("You have the money for this trip. Let's go!");
}
Run the code above once, and you'll see the string printed on the terminal.
Now change the value of balance to 3000 and you'll get no response.
This happens because the code inside the if statement is only executed when the condition is true.
After the if statement, you can write another line of code below it as follows:
let balance = 7000;

if (balance > 5000) {
  console.log("You have the money for this trip. Let's go!");
}
console.log("The end!");
The second console.log() call above will be executed no matter what value you assign to the balance variable.
If you want it to execute only when the if condition is met, then put the line inside the curly brackets as well:
let balance = 7000;

if (balance > 5000) {
  console.log("You have the money for this trip. Let's go!");
  console.log("The end!");
}
Next, suppose you need to run some code only when the if statement condition is not fulfilled.
This is where the else statement comes in. The else statement is used to run code only when the if statement is not fulfilled.
Here's an example:
let balance = 7000;

if (balance > 5000) {
  console.log("You have the money for this trip. Let's go!");
} else {
  console.log("Sorry, not enough money. Save more!");
}
console.log("The end!");
Now change the value of balance to be less than 5000, and you'll trigger the else block in the example.
JavaScript also has the else if statement which allows you to write another condition to check should the if statement condition isn't met.
Consider the example below:
let balance = 7000;

if (balance > 5000) {
  console.log("You have the money for this trip. Let's go!");
} else if (balance > 3000) {
  console.log("You only have enough money for a staycation");
} else {
  console.log("Sorry, not enough money. Save more!");
}
console.log("The end!");
When the balance amount is less than 5000, the else if statement will check if the balance is more than 3000. If it does, then the program will proceed to recommend you do a staycation.
You can write as many else if statements as you need, and each one will be executed only if the previous statement isn't met.
Together, the if..else..else if statements allow you to execute different blocks of code depending on the condition the program faced.
The switch...case statement
The switch statement is a part of core JavaScript syntax that allows you to control the execution flow of your code.
It's often thought of as an alternative to the if..else statement that gives you more readable code, especially when you have many different conditions to assess.
Here's an example of a working switch statement. I will explain the code below:
let age = 15;
switch (age) {
  case 10:
    console.log("Age is 10");
    break;
  case 20:
    console.log("Age is 20");
    break;
  default:
    console.log("Age is neither 10 or 20");
}
First, you need to pass an expression to be evaluated by the switch statement into the parentheses. In the example, the age variable is passed as an argument for evaluation.
Then, you need to write the case values that the switch statement will try to match with your expression. The case value is immediately followed by a colon (:) to mark the start of the case block:
case "apple":
Keep in mind the data type of the case value that you want to match with the expression. If you want to match a string, then you need to put a string. switch statements won't perform type coercion when you have a number as the argument but put a string for the case:
switch (1) {
  case "1":
    console.log("Hello World!");
    break;
}
The number expression doesn't match the string case value, so JavaScript won't log anything to the console.
The same also happens for boolean values. The number 1 won't be coerced as true and the number 0 won't be coerced as false:
switch (0) {
  case true:
    console.log("Hello True!");
    break;
  case false:
    console.log("Bonjour False!");
    break;
  default:
    console.log("No matching case");
}
The switch statement body
The switch statement body is composed of three keywords:
casekeyword for starting a case blockbreakkeyword for stopping theswitchstatement from running the nextcasedefaultkeyword for running a piece of code when no matchingcaseis found.
When your expression finds a matching case, JavaScript will execute the code following the case statement until it finds the break keyword. If you omit the break keyword, then the code execution will continue to the next block.
Take a look at the following example:
switch (0) {
  case 1:
    console.log("Value is one");
  case 0:
    console.log("Value is zero");
  default:
    console.log("No matching case");
}
When you execute the code above, JavaScript will print the following log:
> "Value is zero"
> "No matching case"
This is because without the break keyword, switch will continue to evaluate the expression against the remaining cases even when a matching case is already found.
Your switch evaluation may match more than one case, so the break keyword is commonly used to exit the process once a match is found.
Finally, you can also put expressions as case values:
switch (20) {
  case 10 + 10:
    console.log("value is twenty");
    break;
}
But you need to keep in mind that the value for a case block must exactly match the switch argument.
One of the most common mistakes when using the switch statement is that people think case value gets evaluated as true or false.
The following case blocks won't work in switch statements:
let age = 5;

switch (age) {
  case age < 10:
    console.log("Value is less than ten");
    break;
  case age < 20:
    console.log("Value is less than twenty");
    break;
  default:
    console.log("Value is twenty or more");
}
You need to remember the differences between the if and case evaluations:
ifblock will be executed when the test condition evaluates totruecaseblock will be executed when the test condition exactly matches the givenswitchargument
Switch statement use cases
The rule of thumb when you consider between if and switch is this:
You only use
switchwhen the code is cumbersome to write usingif
For example, let's say you want to write a weekday name based on the weekday number
Here's how you can write it:
let weekdayNumber = 1;

if (weekdayNumber === 0) {
  console.log("Sunday");
} else if (weekdayNumber === 1) {
  console.log("Monday");
} else if (weekdayNumber === 2) {
  console.log("Tuesday");
} else if (weekdayNumber === 3) {
  console.log("Wednesday");
} else if (weekdayNumber === 4) {
  console.log("Thursday");
} else if (weekdayNumber === 5) {
  console.log("Friday");
} else if (weekdayNumber === 6) {
  console.log("Saturday");
} else {
  console.log("The weekday number is invalid");
}
I don't know about you, but the code above sure looks cumbersome to me! Although there's nothing wrong with the code above, you can make it prettier with switch:
let weekdayNumber = 1;

switch (weekdayNumber) {
  case 0:
    console.log("Sunday");
    break;
  case 1:
    console.log("Monday");
    break;
  case 2:
    console.log("Tuesday");
    break;
  case 3:
    console.log("Wednesday");
    break;
  case 4:
    console.log("Thursday");
    break;
  case 5:
    console.log("Friday");
    break;
  case 6:
    console.log("Saturday");
    break;
  default:
    console.log("The weekday number is invalid");
}
When you have lots of condition to evaluate for the same block, you'd probably combine multiple if conditions using the logical operator AND (&&) or OR(||):
let myFood = "Banana";

if (myFood === "Banana" || myFood === "Apple") {
  console.log("Eat fruits everyday to keep you healthy.");
}

if (myFood === "Chocolate Cake") {
  console.log("Enjoy the sweet treat.");
}
You can replace the code above using the switch statement. The key is you need to stack multiple cases as one just like this:
let myFood = "Banana";

switch (myFood) {
  case "Banana":
  case "Apple":
    console.log("Eat fruits everyday to keep you healthy.");
    break;
  case "Chocolate Cake":
    console.log("Enjoy the sweet treat.");
    break;
}
Unfortunately, switch can't replace multiple if conditions that use the && operator because of the way the case evaluation works. You need to use the if statement for that.
Exercise #5
A primary school is giving different rewards based on the student's grade:
Students that got an A will get a Chocolate
Students that got a B will get a Cookie
Students that got a C will get a Candy
For any other value, print "No reward to give."
Create a variable named grade that will store the student's grade.
Example output:
You got an A, so here's a Chocolate for you!
You got a B, here's a Cookie for you!
You got a C, there's room for improvement and here's your Candy!
You can use either the if...else or the switch...case statement.
12 - Control Flows (Loops) in JavaScript
As you program an application in JavaScript, you'll often need to write a piece of code that needs to be executed repeatedly.
Let's say you want to write a program that prints the numbers 1 to 10 in the console. You can do it by calling console.log 10 times like this:
console.log(1);
console.log(2);
console.log(3);
console.log(4);
console.log(5);

// and so on..
This works, but there's a better way to write this kind of repetitive task.
A Loop statement is another category of control flow statement used to execute a block of code multiple times until a certain condition is met.
There are two loop statements used in JavaScript:
The
forstatementThe
whilestatement
Let's learn how to use these statements in practice.
The for statement
Instead of repeating yourself 10 times to print the numbers 1 to 10, you can use the for statement and write just a single line of code as follows:
for (let x = 0; x < 10; x++) {
  console.log(x);
}
There you go! The for statement is followed by parentheses (()) which contain 3 expressions:
The
initializationexpression, where you declare a variable to be used as the source of the loop condition. Represented asx = 1in the example.The
conditionexpression, where the variable in initialization will be evaluated for a specific condition. Represented asx < 11in the example.The
arithmeticexpression, where the variable value is either incremented or decremented by the end of each loop.
These expressions are separated by a semicolon (;)
After the expressions, the curly brackets ({}) will be used to create a code block that will be executed by JavaScript as long as the condition expression returns true.
You can identify which expression is which by paying attention to the semicolon (;) which ends the statement.
for ( [initialization]; [condition]; [arithmetic expression]) {
  // As long as condition returns true,
  // This block will be executed repeatedly
}
The arithmetic expression can be an increment (++) or a decrement (--) expression. It is run once each time the execution of the code inside the curly brackets end:
for (let x = 10; x >= 1; x--) {
  console.log(x);
}
Or you can also use shorthand arithmetic operators like += and -= as shown below:
// for statement with shorthand arithmetic expression
for (let x = 1; x < 20; x += 3) {
  console.log(x);
}
Here, the x will be incremented by 3 each time the loop is executed.
Once the loop is over, JavaScript will continue to execute any code you write below the for body:
for (let x = 1; x < 2; x++) {
  console.log(x);
}
console.log("The for loop has ended");
console.log("Continue code execution");
When to use a for loop
The for loop is useful when you know how many times you need to execute a repetitive task.
For example, let's say you're writing a program to flip a coin. You need to find how many times the coin lands on heads when tossed 10 times. You can do it by using the Math.random method:
When the number is lower than
0.5you need to increment thetailscounterWhen the number is
0.5and up you must increment theheadscounter
let heads = 0;
let tails = 0;
for (x = 1; x <= 10; x++) {
  if (Math.random() < 0.5) {
    tails++;
  } else {
    heads++;
  }
}

console.log("Tossed the coin ten times");
console.log(`Number of heads: ${heads}`);
console.log(`Number of tails: ${tails}`);
The example above shows where the for loop offers the most effective approach.
Now let's see an alternative exercise about coin flips where the for loop is not effective:
Find out how many times you need to flip a coin until it lands on heads.
This time, you don't know how many times you need to flip the coin. This is where you need to use the while loop statement, which you're going to learn next.
The while statement
The while statement or while loop is used to run a block of code as long as the condition evaluates to true.
You can define the condition and the statement for the loop as follows:
while (condition) {
  statement;
}
Just like the for loop, the while loop is used to execute a piece of code over and over again until it reaches the desired condition.
In the example below, we will keep executing the statement block until the condition expression returns false:
let i = 0;

while (i < 6) {
  console.log(`The value of i = ${i}`);
  i++;
}
Here, the while loop will repeatedly print the value of i as long as i is less than 6. In each iteration, the value of i is incremented by 1 until it reaches 6 and the loop terminates.
Keep in mind that you need to include a piece of code that eventually turns the evaluating condition to false or the while loop will be executed forever. The example below will cause an infinite loop:
let i = 0;

while (i < 6) {
  console.log(`The value of i = ${i}`);
}
Because the value of i never changes, the while loop will go on forever!
When to use a while loop
Seeing that both while and for can be used for executing a piece of code repeatedly, when should you use a while loop instead of for?
An easy way to know when you should use while is when you don't know how many times you need to execute the code.
Back to the coin toss example, there's one case that's perfect for a while loop:
Find out how many times you need to flip a coin until it lands on heads.
You also need to show how many times you flip the coin until it lands on heads:
let flips = 0;
let isHeads = false;

while (!isHeads) {
  flips++;
  isHeads = Math.random() < 0.5;
}

console.log(`It took ${flips} flips to land on heads.`);
Here, the condition isHead = Math.random() < 0.5 simulates the flipping of a fair coin. When the result is true, it means the coin landed on heads and the loop will exit.
Because you can't know how many times you need to loop until you get heads, you need to use a while loop instead of a for loop.
Exercise #6
Write a program that prints a half pyramid using asterisks * as shown below:
*
**
***
****
*****
Next, print a reverse half pyramid as follows:
*****
****
***
**
*
13 - Functions in JavaScript
A function is simply a section (or a block) of code that's written to perform a specific task.
For example, the type casting function String() is used to convert data of another type to a string.
The console.log() and various array methods we've learned in previous chapters are also functions. But because these functions are called from an object, they are called methods.
You'll learn more about methods later in Chapter 14. For now, just know that a function and a method are essentially the same, except that a method is called from an object.
Besides the built-in functions provided by JavaScript, you can also create your own function.
How to create your own function
Creating a function starts with typing the function keyword followed by the function name, a pair of round brackets, and then a pair of curly brackets.
Here's an example:
function greet() {
  // function body here
  console.log("Hello!");
}
To call a function, you need to specify the function name followed by parentheses:
greet(); // Hello!
The code inside the function is executed when you call that function.
Function parameters and arguments
Parameters are variables used to accept inputs given when the function is called.
You can specify parameters in the function header, inside the parentheses.
The following example shows a function that has one parameter called name:
function greet(name) {
  // function body
}
How you use that name parameter inside the function is up to you.
You can use the parameter inside the print() function as follows:
function greet(name) {
  console.log(`Hello, ${name}!`);
  console.log("Nice weather today, right?");
}
Now whenever you need to call the greet() function, you need to pass an input to fill for the name parameter.
The input you passed to fill a parameter is called an argument, and here's how to do it:
greet("Peter");
The 'Peter' string inside the parentheses when calling the greet() function will be passed as the name parameter.
Run the code to receive this output:
Hello, Peter!
Nice weather today, right?
You can have more than one parameter when defining the function, but you need to split each parameter with a comma as follows:
function greet(name, weather) {
  console.log(`Hello, ${name}!`);
  console.log(`It's ${weather} today, right?`);
}

greet("Nathan", "rainy");
Output:
Hello, Nathan!
It's rainy today, right?
When you specify two parameters in the function header, you need to pass two arguments. If you call the function without passing the arguments then the value will be undefined.
In the next section, you'll learn how to create parameters with default values, which allows you to call the function without having to pass an argument to it.
But for now, I hope you see the convenience of having parameters. They make your functions more adaptable and reusable by taking different input values to cover a variety of scenarios the function might have.
As shown in the example, the name and weather parameters allow you to greet many different people in different weathers.
Whether sunny, rainy, or cloudy, just change the name and weather arguments when you want to greet another person.
Default parameters
When defining a function, you can set a default value for any parameter in that function.
For example, the name parameter in the function below is a default parameter:
function greet(name = "Nathan") {
  console.log(`Hello, ${name}!`);
  console.log("Nice weather today, right?");
}
Here, the default value 'Nathan' will be used when no value or undefined is passed for the name parameter.
You can test this by calling the greet() function without an argument as follows:
greet();
greet("Jack");
Output:
Hello, Nathan!
Nice weather today, right?

Hello, Jack!
Nice weather today, right?
Any function you define can have a mix of default and non-default parameters.
Here's another example of a function that has one default parameter called name and one non-default parameter called weather:
function greet(weather, name = "Nathan") {
  console.log(`Hello, ${name}!`);
  console.log(`It's ${weather} today, right?`);
}

greet("sunny");
Output:
Hello, Nathan!
It's sunny today, right?
Notice that the weather parameter was placed in front of the name parameter. This is for convenience so that you don't need to specify the default parameter.
If you place the non-default parameter after the default parameter, then you need to pass a value to the name parameter to get to the weather parameter.
Consider the example below:
function greet(name = "Nathan", weather) {
  console.log(`Hello, ${name}!`);
  console.log(`It's ${weather} today, right?`);
}

greet(undefined, "sunny");
To pass an argument to the weather parameter, we need to pass undefined or any value for the name parameter first.
This is why it's better to specify non-default parameters in front of default parameters.
Default parameters and null
Back in Chapter 7, recall that we briefly explored the difference between undefined as the "default" empty value and null as the "intentional" empty value.
When you pass undefined to a function that has a default parameter, the default parameter will be used:
function greet(name = "John"){
  console.log(name);
}

greet(undefined); // John
As you can see, JavaScript prints the default parameter value John when you pass undefined to the function.
But when you pass null to the function, the default parameter will be ignored:
function greet(name = "John"){
  console.log(name);
}

greet(null); // null
This is one of the common mistakes that beginners make when learning JavaScript. When you use the value null, JavaScript will think you want that value to be empty, so it doesn't replace the value with the default parameter.
When you use undefined, then JavaScript will replace it with the default parameter. You might encounter this issue as you work with JavaScript code in your career, so just keep this in mind.
The return statement
A function can also have a return statement inside the code block. A return statement is used to return a value back to the caller.
For example, the following function returns the sum of two values:
function sum(a, b) {
  return a + b;
}

let result = sum(3, 2);
console.log(result); // 5
The value returned by a function can be assigned to a variable for further operation. You can add the return statement anywhere inside the function.
When JavaScript reaches the return statement, it skips further code written inside the function block and goes back to where you call the function.
The following function has two return statements:
function checkAge(age) {
  if (age > 18) {
    return "You may get a car license";
  }
  return "You may not get a car license yet";
}

console.log(checkAge(20));
console.log(checkAge(15));
Output:
You may get a car license
You may not get a car license yet
When we call the checkAge() function the first time, the value of age argument is greater than 18, so JavaScript executes the return statement inside the if block.
The second time we called the function, the if condition isn't met, so JavaScript executes the return statement under the if block instead.
You can also stop a function execution and return to the caller by specifying the return statement without any value:
function greet() {
  console.log("Hello!");
  return;
  console.log("Good bye!");
}

greet()
Output:
Hello!
Here, the return statement is called between the console.log() calls.
JavaScript executes the first console.log() call, then skips the rest of the code. The 'Good bye!' string isn't printed.
Variable scope
Now that you're learning about functions, it's a good time to talk about variable scope.
A variable declared inside a function can only be accessed from that function. This is because that variable has a local scope.
On the other hand, a variable declared outside of any block is known as a global variable because of its global scope.
These two scopes are important because when you try to access a local variable outside of its scope, you'll get an error. For example:
function greet() {
  let myString = "Hello World!";
}

greet();
console.log(myString);
When you run the code above, JavaScript responds with an error:
ReferenceError: myString is not defined
This is because the myString variable is declared inside the greet() function, so you can't access that variable outside of it. It doesn't matter even if you called that function before accessing the variable.
Meanwhile, a global variable can be accessed from anywhere, even inside a function:
let myString = "Hello World!";

function greet() {
  console.log(myString);
}

greet(); // Hello World!
Here, the greet() function is able to access the myString variable declared outside of it.
Keep in mind that this applies only to variables declared using let and const.
Next, you can also define a local variable with the same name as the global variable without overwriting it.
Here's an example:
let myString = "Hello World!";

function greet() {
  let myString = "Morning!";
  console.log(myString);
}

greet();  // Morning!
console.log(myString); // Hello World!
When you call the greet() function, a local variable called myString was assigned the string 'Morning!'.
Outside of the function, the global variable that's also called myString still exists, and the value isn't changed.
JavaScript considers the local scope variable to be a different variable. When you declare the same variable inside a function, any code inside the function will always refer to the local variable.
In practice, you rarely need to declare the same variable in different scopes:
Any variable declared outside a function shouldn't be used inside a function without passing them as parameters.
A variable declared inside a function should never be referred to outside of that function
Keep this in mind when you write JavaScript functions.
The rest parameter
The rest parameter is a parameter that can accept any number of data as its arguments. The arguments will be stored as an array.
You can define a rest parameter in the function header by adding triple dots ... before the parameter name.
Here's an example of creating a function that has a variable length argument:
function printArguments(...args){
    console.log(args);
}
When calling the printArguments() function above, you can specify as many arguments as you want:
function printArguments(...args){
    console.log(args);
}

printArguments("A", "B", "C");
// [ 'A', 'B', 'C' ]
printArguments(1, 2, 3, 4, 5);
// [ 1, 2, 3, 4, 5 ]
Keep in mind that a function can only have one rest parameter, and the rest parameter must be the last parameter in the function.
You can use a rest parameter when your function needs to work with an indefinite number of arguments.
Arrow function
The JavaScript arrow function syntax allows you to write a JavaScript function with a shorter, more concise syntax.
When you need to create a function in JavaScript, the primary method is to use the function keyword followed by the function name as shown below:
function greetings(name) {
  console.log(`Hello, ${name}!`);
}

greetings("John"); // Hello, John!
The arrow function syntax allows you to create a function expression that produces the same result as the code above.
Here's the greetings() function using the arrow syntax:
const greetings = (name) => {
  console.log(`Hello, ${name}!`);
};

greetings("John"); // Hello, John!
When you create a function using the arrow function syntax, you need to assign the expression to a variable so that the function has a name.
Basically, the arrow function syntax looks as follows:
const fun = (param1, param2, ...) => {
  // function body
}
In the code above,
funis the variable that holds the function. You can call the function asfun()later in your code.(param1, param2, ...)are the function parameters. You can define as many parameters as required by the function.Then you have the arrow
=>to indicate the beginning of the function.
The code above is equal to the following:
const fun = function(param1, param2, ...) {
  // function body
}
The arrow function syntax doesn't add any new ability to the JavaScript language.
Instead, it offers improvements to the way you write a function in JavaScript.
At first, it may seem weird as you are used to the function keyword.
But as you start using the arrow syntax, you will see that it's very convenient and easier to write.
Single and multiline arrow functions
The arrow function provides you a way to write a single line function where the left side of the arrow => is returned to the right side.
When you use the function keyword, you need to use the curly brackets {} and the return keyword as follows:
function plusTwo(num) {
  return num + 2;
}
Using the arrow function, you can omit both the curly brackets and the return keyword, creating a single line function as shown below:
const plusTwo = (num) => num + 2;
Without the curly brackets, JavaScript will evaluate the expression on the right side of the arrow syntax and return it to the caller.
The arrow function syntax also works for a function that doesn't return a value as shown below:
const greetings = () => console.log("Hello World!");
When using the arrow function syntax, the curly brackets are required only when you have a multiline function body:
const greetings = () => {
  console.log("Hello World!");
  console.log("How are you?");
};
Arrow function without round brackets
The round brackets () are used in JavaScript functions to indicate the parameters that the function can receive.
When you use the function keyword, the round brackets are always required:
function plusThree(num) {
  return num + 3;
}
On the other hand, the arrow function allows you to omit the round brackets when you have exactly one parameter for the function:
The following code example is a valid arrow function expression:
const plusThree = num => num + 3;
As you can see, you can remove the round and curly brackets as well as the return keyword.
But you still need the round brackets for two conditions:
When the function has no parameter
When the function has more than one parameter
When you have no parameter, then you need round brackets before the arrow as shown below:
const greetings = () => console.log("Hello World!");
The same applies when you have more than one parameter.
The function below has two parameters: name and age.
const greetings = (name, age) => console.log("Hello World!");
The arrow syntax makes the round brackets optional when you have a single parameter function.
Arrow function doesn't have arguments binding
When using the function keyword to define a function, you can access the arguments you pass to the function using the arguments keyword like this:
const printArgs = function () {
  console.log(arguments);
};

printArgs(1, 2, 3);
// [Arguments] { '0': 1, '1': 2, '2': 3 }
The arguments keyword in the code above refers to the object that stores all the arguments you passed into the function.
By contrast, the arrow function doesn't have the arguments object and will throw an error when you try to access it:
const printArgs = () => console.log(arguments);

printArgs(1, 2, 3);
//Uncaught ReferenceError: arguments is not defined
You can use the JavaScript spread syntax to imitate the arguments binding as follows:
const printArgs = (...arguments) => console.log(arguments);

printArgs(1, 2, 3);
// [1, 2, 3]
By using the spread syntax, the arguments you passed to the arrow function will be stored in an array.
Note that you need the round brackets even though you are passing just one argument to the function.
You can access the given arguments with the array index notation as arguments[0], arguments[1], and so on.
How to convert a normal function to an arrow function easily
You can follow the three easy steps below to convert a normal function to an arrow function:
Replace the
functionkeyword with the variable keywordletorconstAdd
=symbol after the function name and before the round bracketsAdd
=>symbol after the round brackets
The code below will help you to visualize the steps:
function plusTwo(num) {
  return num + 2;
}

// step 1: replace function with let / const
const plusTwo(num) {
  return num + 2;
}

// step 2: add = after the function name
const plusTwo = (num) {
  return num + 2;
}

// step 3: add => after the round brackets
const plusTwo = (num) => {
  return num + 2;
}
The three steps above are enough to convert any old JavaScript function syntax to the new arrow function syntax.
When you have a single line function, there's a fourth optional step to remove the curly brackets and the return keyword as follows:
// from this
const plusTwo = num => {
  return num + 2;
};

// to this
const plusTwo = num => num + 2;
When you have exactly one parameter, you can also remove the round brackets:
// from this
const plusTwo = (num) => num + 2;

// to this
const plusTwo = num => num + 2;
But the last two steps are optional. Only the first three steps are required to convert any JavaScript function and use the arrow function syntax.
Exercise #7
Write a function named calculateSquare() that's used to calculate the area and perimeter of a square shape.
The function accepts one parameter: the side of the square.
The formula to calculate the area is side * side, and the formula to calculate the perimeter is 4 * side.
The output shows the size of the size, the area, and the perimeter as follows:
The square side is 8
The area of the square is 64
The perimeter of the square is 32
14 - Objects in JavaScript
An object is a special data type that allows you to store more than one value, just like an array.
The difference between an object and an array is that an array stores data as a list of items, while an object stores data in a key:value pair format.
Let's see an example illustrating this difference. Suppose you want to store information about a book in your program.
When you use regular variables, it would look like this:
let bookTitle = "JavaScript Introduction";
let bookAuthor = "Nathan Sebhastian";
While it works fine, it certainly isn't the best way to store related values.
Another way to store the value would be to use an array:
let myBook = ["JavaScript Introduction", "Nathan Sebhastian"];
This is certainly better as you can group related data about the book together, but you have no way to add context to the value.
This is where an object is useful. You can declare a single book object and store the data in key:value format:
let myBook = {
  title: "JavaScript Introduction",
  author: "Nathan Sebhastian",
};
An object is declared using the curly brackets {}, and each item inside the brackets is written in the key:value format.
An object item is also known as a property, with the key as property name and value as property value.
Like an array, you need to separate each item inside an object using a comma.
You can assign a string or numbers as the key of an item, and you can assign any type of data as the value, including a function:
let myBook = {
  title: "JavaScript Introduction",
  author: "Nathan Sebhastian",
  describe: function () {
    console.log(`Book title: ${this.title}`);
    console.log(`Book author: ${this.author}`);
  },
};
Here, the describe key or property is a function that prints the title and author value from the object.
The this keyword refers to the context of the code, which is the myBook object in this case.
Usually, an object key is something that gives more context to the value it holds. A key must also be unique, so you can't use the same key twice in the same object.
For example, if you have data about a book, you can use object keys such as title, author, and price to help you understand the context of the value stored in each key.
How to access object values
To access the value of an object, you can use either the dot notation . or the square brackets [] notation.
Here's an example of using the dot notation to access the object properties:
let myBook = {
  title: "JavaScript Introduction",
  author: "Nathan Sebhastian",
};

console.log(myBook.title);
console.log(myBook.author);
And here's how you use the square brackets to access the same properties:
let myBook = {
  title: "JavaScript Introduction",
  author: "Nathan Sebhastian",
};

console.log(myBook["title"]);
console.log(myBook["author"]);
Keep in mind that you need to wrap the property name in quotes like a string, or JavaScript will think you're passing a variable inside the square brackets.
How to add a new property to the object
You can assign a new property to the object using either the dot notation or the square brackets like this:
let myBook = {
  title: "JavaScript Introduction",
  author: "Nathan Sebhastian",
};

// add release year property
myBook.year = 2023;

// add publisher property
myBook["publisher"] = "CodeWithNathan";

console.log(myBook);
When you print the object, here's the result:
{
  title: 'JavaScript Introduction',
  author: 'Nathan Sebhastian',
  year: 2023,
  publisher: 'CodeWithNathan'
}
You can add as many properties as you need to the same object.
How to modify object properties
To modify an existing property, you need to specify an existing object property using either the dot or square brackets notation followed by the assignment operator as follows:
let myBook = {
  title: "JavaScript Introduction",
  author: "Nathan Sebhastian",
};

// change the author property
myBook.author = "John Doe";

console.log(myBook);
Output:
{
  title: 'JavaScript Introduction',
  author: 'John Doe'
}
As you can see, the author property value has been changed.
How to delete object properties
To delete a property from your object, you need to use the delete operator as follows:
let myBook = {
  title: "JavaScript Introduction",
  author: "Nathan Sebhastian",
};

delete myBook.author;

console.log(myBook);
Output:
{ title: 'JavaScript Introduction' }
When you try to access the deleted property, you will get the undefined value.
How to check if a property exists in an object
To check if a certain property exists in your object, you can use the in operator like this:
propertyName in myObject
The in operator returns true if the propertyName exists in your object.
See the example below:
let person = {
  firstName: "Nathan",
  lastName: "Sebhastian"
}

// check if firstName exists
console.log('firstName' in person); // true

// check if age exists
console.log('age' in person); // false
Now you know how to manipulate a JavaScript object.
Exercise #8
Create a person object with the following properties:
name- the person's nameage- the person's agegreet()- a function to greet another person
Inside the greet() function, introduce the person, specifying the name and the age.
Here's an example output:
person.greet();

Hello! My name is Alex and I'm 22 years old.
Final Exercise: Build a Cash Register Machine
Let's build a cash register machine that can add items to a shopping cart, calculate total price, calculate discounts, and accept payment by cash.
The currency is assumed in USD, so you don't need to add it to the program.
The cash register has 3 items for sale:
Phone for 300
Smart TV for 220
Gaming Console for 150
There's a 10% discount when the total price is higher than 400.
The cash register should have a shopping cart that starts empty.
The cash register should provide a method called addItem that takes the name of an item as a parameter. When called, it should check if the item is available for sale. If it is, the item should be added to the shopping cart. If it is not available, show a message saying we don't sell that item.
The cash register should provide a method called calculateTotalPrice that calculates the total price of all the items in the shopping cart. It should iterate over the items in the shopping cart and sum up their prices.
The cash register should provide a method called pay that takes the payment amount as a parameter.
It should calculate the total price of the items in the shopping cart using the calculateTotalPrice method. If the total price is higher than 400, a 10% discount should be applied.
The method should then compare the payment amount with the total price (after applying the discount) and display an appropriate message:
If the payment amount is equal to or greater than the total price, it should display a message thanking the customer for the purchase. If there is any change, it should also display the amount of change to be given.
If the payment amount is less than the total price, it should display a message indicating that the customer does not have enough money to purchase the items.
The program should include appropriate
console.log()statements to display messages for adding items to the shopping cart, displaying the total price, and processing the payment.
The program should handle scenarios where the customer's payment amount is exactly equal to the total price, as well as cases where the payment amount is greater or less than the total price.
To build the program, you need to use what you've learned about objects, arrays, conditionals, and loops.
I recommend that you try building the program yourself first. If you get stuck, then see the provided solution below. Good luck!
Conclusion
Congratulations on finishing this handbook! We have gone through quite a lot of concepts together to learn how to code using JavaScript.
I hope you enjoyed the process as much as I enjoy writing it. I would love to get your feedback, learning what you liked and didn't so I can improve the tutorial.
If you want to learn more about JavaScript, I'm creating a course that helps you use JavaScript to build web applications. It's currently in a pre-order period so you can get the course at a lower price and support my work in creating more tutorials. You can check it out here.
Solutions
Exercise #1
console.log("Your name here");
console.log("Your age here");
console.log("Your occupation here");
Exercise #2
let name = "Your name here";
let age = "Your age here";
let occupation = "Your occupation here";

console.log(name);
console.log(age);
console.log(occupation);
Exercise #3
1
false
true
true
true
false
Exercise #4
let colors = ["red", "green", "blue"];

colors.push("black");
console.log(colors);

colors.shift();
colors[0] = "blue";
colors[1] = "green";
console.log(colors);

colors.unshift("yellow");
console.log(colors);
Exercise #5
Using if...else statement:
let grade = "A";

if (grade === "A") {
  console.log("You got an A, so here's a Chocolate for you!");
} else if (grade === "B") {
  console.log("You got a B, here's a Cookie for you!");
} else if (grade === "C") {
  console.log(
    "You got a C, there's room for improvement and here's your Candy!"
  );
} else {
  console.log("No reward to give.");
}
let grade = "A";
switch (grade) {
  case "A":
    console.log("You got an A, so here's a Chocolate for you!");
    break;
  case "B":
    console.log("You got a B, here's a Cookie for you!");
    break;
  case "C":
    console.log(
      "You got a C, there's room for improvement and here's your Candy!"
    );
    break;
  default:
    console.log("No reward to give.");
}
Using switch...case statement:
Exercise #6
Half pyramid pattern:
let pattern;

for (let i = 1; i <= 5; i++) {
  pattern = "";
  for (let j = 1; j <= i; j++) {
    pattern += "*";
  }
  console.log(pattern);
}
Inverse half pyramid pattern:
for (let i = 4; i >= 0; i--) {
  pattern = "";
  for (let j = 0; j <= i; j++) {
    pattern += "*";
  }
  console.log(pattern);
}
Exercise #7
function calculateSquare(side) {
  console.log(`The square side is ${side}`);
  console.log(`The area of the square is ${side * side}`);
  console.log(`The perimeter of the square is ${4 * side}`);
}

calculateSquare(7);
Exercise #8
const person = {
  name: "Alex",
  age: 22,
  greet: function () {
    console.log(
      `Hello! My name is ${this.name} and I'm ${this.age} years old.`
    );
  },
};

person.greet();
Final Exercise
const cashRegister = {
  itemsForSale: [
    { name: "Phone", price: 300 },
    { name: "Smart TV", price: 220 },
    { name: "Gaming Console", price: 150 },
  ],
  shoppingCart: [],
  addItem: function (name) {
    let foundItem = this.itemsForSale.find(function (item) {
      return item.name === name;
    });
    if (foundItem) {
      this.shoppingCart.push(foundItem);
      console.log(`Adding ${name} to your shopping cart`);
    } else {
      console.log(`Sorry, we don't sell ${name} here!`);
    }
  },
  calculateTotalPrice: function () {
    let totalPriceAmount = 0;
    this.shoppingCart.forEach(function (purchasedItem) {
      totalPriceAmount += purchasedItem.price;
    });
    return totalPriceAmount;
  },
  pay: function (amount) {
    let totalPriceAmount = this.calculateTotalPrice();
    if (totalPriceAmount > 500) {
      totalPriceAmount -= totalPriceAmount * 0.1;
      console.log(
        `You get a 10% discount and your total price is ${totalPriceAmount}`
      );
    }
    if (amount >= totalPriceAmount) {
      if (amount - totalPriceAmount > 0) {
        console.log(`Here's your ${amount - totalPriceAmount} change`);
      }
      console.log(`Thanks for your purchase! Hope you come again`);
    } else {
      console.log(
        "Sorry, but you don't have enough money to purchase your items"
      );
    }
  },
};
To test the object, run the code below:
cashRegister.addItem("Phone");
cashRegister.addItem("Smart TV");
console.log(cashRegister.calculateTotalPrice());
cashRegister.pay(700);
Output:
Adding Phone to your shopping cart
Adding Smart TV to your shopping cart
520
You get a 10% discount and your total price is 468
Here's your 232 change
Thanks for your purchase! Hope you come again
Thanks for reading!
If you enjoyed this handbook and want to take your JavaScript skills to the next level, I recommend you check out my new book Beginning Modern JavaScript here.
The book is designed to be easy to understand and accessible to anyone looking to learn JavaScript. It provides a step-by-step gentle guide that will help you understand how to use JavaScript to create a dynamic application.
Here's my promise: You will actually feel like you understand what you're doing with JavaScript.
Until next time!