
By Ibrahima Ndaw
TypeScript is a superset that needs to compile to plain JavaScript. It offers more control over your code since it uses type annotations, interfaces, classes, and static type checking to throw errors at compile-time.
TypeScript helps to enhance code quality and understandability, especially with a large codebase.
In this guide, I will lead you through TypeScript by first learning all the basics needed to start with this great language. Then we'll finish up by building an app from scratch using HTML, CSS, and TypeScript.
Let's dive in
- What is TypeScript?
- Setting up TypeScript
- Configuring TypeScript with tsconfig
- TypeScript Types
- Basic TypeScript Types
- Interfaces and Type aliases
- Build a Pokedex app using TypeScript
- Markup
- Fetch and display data using TypeScript
- Compile TypeScript to JavaScript
- Resources
What is TypeScript?
TypeScript is an object-oriented programming language developed and maintained by Microsoft. It's a superset of JavaScript, meaning that any valid JavaScript code will also run as expected in TypeScript.
TypeScript has all of the functionality of JavaScript as well as some additional features. It needs to be compiled to plain JavaScript during runtime, therefore you need a compiler to get back the JS Code.
TypeScript uses static typing, meaning that you can give a type to a variable during declaration. And it's something that can't be done with JavaScript because it's a dynamically typed language – it does not know the data type of a variable until it assigns a value to that variable at runtime.
Static type checking makes TypeScript great because it helps to throw an error at compile-time if the variable is unused or reassigned with a different type annotation. However, the error does not block the code from executing (and the JavaScript code will still be generated).
Static typing is optional in TypeScript. If no type is defined but the variable has a value, TypeScript will infer the value as type. And if the variable has no value, the type will be set to any by default.
Now, let's start using TypeScript in the next section to see it in action.
Setting up TypeScript
As I said earlier, TypeScript needs to compile to plain JavaScript. So we need to use a tool to do the compilation. And to have access to that tool, you need to install TypeScript by running this command on the terminal.
yarn add -g typescript
Or if you are using npm:
npm install -g typescript
Note that here I use the -g flag to install TypeScript globally so that I can access it from anywhere.
By installing TypeScript, we have now access to the compiler, and we can compile our code to JavaScript.
Later we will dive into it and what it does, but for now let's add a configuration file to our project. It's not mandatory to add a config file - but for many cases, it's useful to have it since it allows us to define rulesets for the compiler.
Configuring TypeScript with tsconfig
tsconfig is a JSON file that helps configure TypeScript. Having a config file is better since it helps control the behavior of the compiler.
To create the config file, you first need to create a new directory named Pokedex and browse into the root of the folder. Then, open it on the terminal or an IDE and run this command to generate a new TypeScript configuration file.
tsc --init
Once the file is generated, we can now explore it on an IDE.
tsconfig.json
{
    "compilerOptions": {
        "target": "es5",
        "module": "commonjs",
        "outDir": "public/js"
        "rootDir": "src",
        "strict": true,
        "esModuleInterop": true
        "forceConsistentCasingInFileNames": true
    },
    "include": ["src"]
}
This config file is much more verbose than what you see above – I removed the comments and unused values to make it easier to read. That said, we can now break down these values, explain each one, and see what it does.
target: it specifies the ECMAScript target version when compiling the TypeScript code. Here, we target es5 to support all browsers, you can change it to ES6, ES3(it's the default if no target is specified), ES2020, etc.
module: it defines the module of the compiled code. The module can be Common JS, ES2015, ES2020, etc.
outDir: it specifies the output directory for the code compiled to JavaScript.
rootDir: it defines the location where the TypeScript files that need to be compiled are located.
include: it helps define which directory needs to be compiled. If you don't have that value, the compiler will take every .ts file and compile it to JavaScript even if an output directory is defined.
With that in place, we can now dive into one of the most important parts of TypeScript: the Types.
TypeScript Types
Types provide a way to enhance code quality, and they also make the code easier to understand since it defines the variable types. They are optional, and help define what a given variable should have as its value. They also allow the compiler to catch errors before runtime.
TypeScript has several types such as number, string, boolean, enum, void, null, undefined, any, never, array, and tuple. We won't see all types in this guide, but keep in mind that they exist.
Now, let's see some examples of basic Types.
Basic TypeScript Types
let foo: string = "test"
let bar: number = 1
let baz: string[] = ["This", "is", "a", "Test"]
As you can see here, we have three variables with different types. foo expects a string, bar, a number, and baz, an array of a string. If they receive anything else besides the type declared, an error will be thrown by TypeScript.
You can also declare baz like this: let baz: Array<string> = ["This", "is", "a", "Test"].
Now, let's try to reassign one of these variables and see how TypeScript behaves.
let foo: string = "test"
foo = 1
Type '1' is not assignable to type 'string'
TypeScript will throw an error because we have already declared foo to expect a string as value. And this error is caught at compile-time which makes TypeScript great and useful.
With TypeScript, types can be explicit like above, but they can be also implicit. It's better to explicitly define the type of a given value because it helps the compiler and the next developer who inherits the code. But you can also declare variables with an implicit type annotation.
let foo = "test"
let bar = 1
let baz = ["This", "is", "a", "Test"]
TypeScript will try here to infer as much as it can to give you type safety with less code. It will take the value and define it as a type for the variable. And nothing will change regarding errors.
Let's try to reassign these variables to see what will happen.
foo = 7
bar = "updated"
baz = [2, true, "a", 10]
TypeScript will catch the errors like before, even if variable types are declared implicitly.
Type '7' is not assignable to type 'string'.
Type '"updated"' is not assignable to type 'number'.
Type 'true' is not assignable to type 'string'.
When dealing with an object of several properties, it can be tricky and annoying to define the types. But luckily, TypeScript has something to help you along with that use-case. So, let's dive into TypeScript Interfaces and Type aliases in the next section.
Interfaces and Type aliases
Interfaces and Type aliases help us define the shape of an object-like data structures. They seem like the same thing regarding their structure, but keep in mind that they are different.
However, the consensus amongst developers is to use interface whenever you can since it's in the default tslint ruleset.
Now, let's create an interface and a type alias in the next section to see them in action.
interface ITest {
  id: number;
  name?: string;
}

type TestType = {
  id: number,
  name?: string,
}

function myTest(args: ITest): string {
  if (args.name) {
    return `Hello ${args.name}`
  }
  return "Hello Word"
}

myTest({ id: 1 })
As you can see, the structure of an interface and a type alias looks like a JavaScript object. They have to define the form of given data with TypeScript.
Notice that here, I use an optional field name by adding a question mark (?). It lets us make the property name optional. That means if no value is passed to the property name, it will return undefined as its value.
Next, we use the interface ITest as a type for the argument received by the function myTest. And as with variables, functions can also be defined to return a specific type. And here, the return value must be a string otherwise an error will be thrown by TypeScript.
So far, we have covered all the basic knowledge needed to get started with TypeScript. Now, let's use it to build a Pokedex with HTML and CSS.
Let's dive in.

Build a Pokedex app using TypeScript
The project we are going to build will fetch remote data from the Pokemon API and display each pokemon with TypeScript.
So, let's start by creating three new files in the root of the folder Pokedex: index.html, style.css, and src/app.ts. And for the configuration of TypeScript, we will use the same tsconfig.json file created earlier.
Now, let's move to the markup part and add some content to the HTML file.
Markup
index.html
<!DOCTYPE html>
<html lang="en">
  <head>
    <meta charset="UTF-8" />
    <meta name="viewport" content="width=device-width, initial-scale=1.0" />
    <link rel="stylesheet" href="style.css" />
    <title>TypeScript Pokedex</title>
  </head>
  <body>
    <main>
      <h1>Typed Pokedex</h1>
      <div id="app"></div>
    </main>
    <script src="public/js/app.js"></script>
  </body>
</html>
As you can see we have a relatively simple markup. There are two important things to retain though:
- the id
appof thedivtag that will be used to append the content using TypeScript, and - the
scripttag that points to thepublicfolder and to be precise the JavaScript file that TypeScript will create for us during compile time.
Besides, the CSS file is a bit long, so I won't cover it – I don't want to waste your time and do want to stay focused on TypeScript. That said, we can now dive into it and start fetching data from the API.
Fetch and display data using TypeScript
We start the TS part by selecting the id app which is the id of the div tag.
src/app.ts
const container: HTMLElement | any = document.getElementById("app")
const pokemons: number = 100

interface IPokemon {
  id: number;
  name: string;
  image: string;
  type: string;
}
Here, we have a type annotation that has not to be covered yet. This is a Union Type which allows having alternative types for a given variable. That means if container is not of type HTMLElement, TypeScript will check again if the value is equal to the type after the pipe (|) symbol and so forth because you can have multiple types.
Next, we have an interface IPokemon that defines the shape of a pokemon object which will be used next in the function responsible for displaying the content.
src/app.ts
const fetchData = (): void => {
  for (let i = 1; i <= pokemons; i++) {
    getPokemon(i)
  }
}

const getPokemon = async (id: number): Promise<void> => {
  const data: Response = await fetch(`https://pokeapi.co/api/v2/pokemon/${id}`)
  const pokemon: any = await data.json()
  const pokemonType: string = pokemon.types
    .map((poke: any) => poke.type.name)
    .join(", ")

  const transformedPokemon = {
    id: pokemon.id,
    name: pokemon.name,
    image: `${pokemon.sprites.front_default}`,
    type: pokemonType,
  }

  showPokemon(transformedPokemon)
}
The function fetchData allows us to loop through the number of pokemon to retrieve and for each object call getPokemon with the pokemon number.
It may take time to fetch data, so we'll use an asynchronous function that returns a Promise of type void. This last means that the function won't return a value.
And once the data fetched, we can now create a new object transformedPokemon that mirrors the interface IPokemon, and then pass it as an argument to showPokemon().
src/app.ts
const showPokemon = (pokemon: IPokemon): void => {
  let output: string = `
        <div class="card">
            <span class="card--id">#${pokemon.id}</span>
            <img class="card--image" src=${pokemon.image} alt=${pokemon.name} />
            <h1 class="card--name">${pokemon.name}</h1>
            <span class="card--details">${pokemon.type}</span>
        </div>
    `
  container.innerHTML += output
}

fetchData()
As you can see, the function showPokemon receives as a parameter the pokemon object of type IPokemon and returns void or no value to be precise. It will just append the content to the HTML file with the help of the id container (remember, it's the div tag).
Great! We have now done a lot, but something is still missing because the index.html file will display nothing if you try to launch it in the browser. This is because TypeScript needs to be compiled to plain JavaScript. So, let's do that in the next section.
Compile TypeScript to JavaScript
Earlier in this tutorial, we installed the TypeScript compiler which allows compiling our TS code to JavaScript. And to do so, you need to browse into the root of the project and run the following command.
tsc
This command will compile every file with a .ts extension to JavaScript. And since we have a tsconfig file, the compiler will follow the defined rules and compile only the TS files located in the src folder and put the JS code into the public directory.
The compiler also allows compiling only a single file.
tsc myFile.ts
And if you do not specify a name after the TS file (myFile.ts), the compiled JS file will take the same name as the TS file.
If you want to not execute the command on every change, just add a -w flag to let the compiler keep watching for a change and recompile the code when needed.
tsc -w
And now if you launch the index.html file, you will see your Pokedex successfully rendered in the browser.
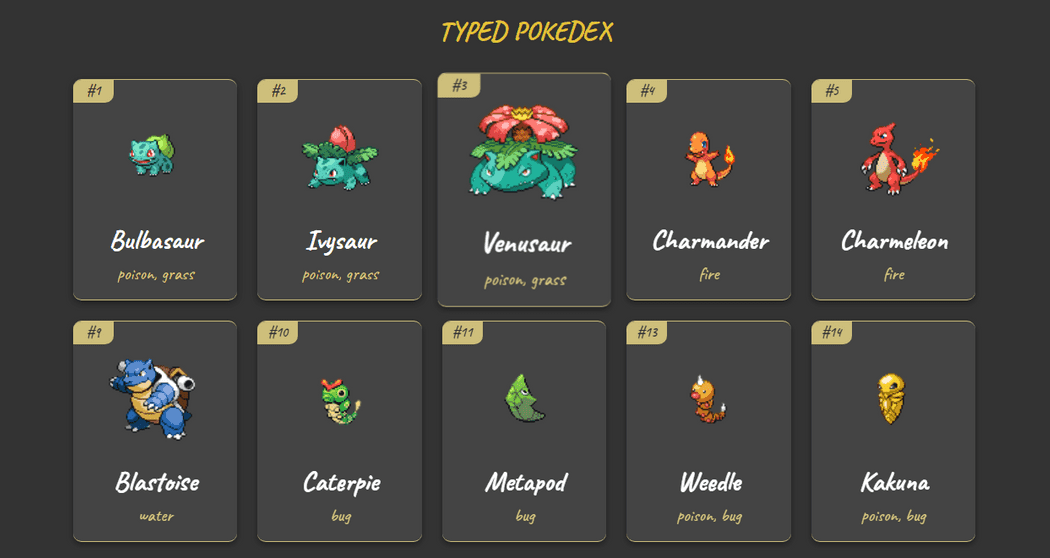
Great! We have now learned the basics of TypeScript by building a Pokedex app with HTML and CSS.
Preview the finished project here or find the Source Code here.
You can also find other great content like this on my blog or follow me on Twitter to get notified when I write something new.
Thanks for reading.
Resources
Here are some useful resources to dive deeper into TypeScript.