By Berrak Nil
A-Frame is a web framework for building virtual reality experiences. Ever since its introduction in late 2015, it quickly became a favorite among artists and creators of all backgrounds who want to experiment with WebXR.
I am a creative coder with a background in audio. Diving into the sonic possibilities of this new platform was a very exciting and rewarding journey. Most of my A-Frame experience was confined to standard desktop and smartphone environments and not VR. I am sharing my findings. I want to create a sort of an unofficial manual on how to implement, use and create audio in A-Frame. In this first part, we will take a look at how to use A-Frame’s out of the box audio capabilities.
Prerequisites
This write-up assumes you have some experience with A-Frame. You don’t have to be an expert on it but knowing how the basics work will make following this tutorial easier. If you haven’t had a chance to check it out yet, you can start here.
A-Frame Sound Component
A-Frame is a framework based on Three.js. The sound component it provides is a wrapper around the Three.js positional audio component (or non-positional depending on what we choose, but more on that later), which uses the Web Audio API.
This means we get things like positional audio, volume control and audio playback out of the box, as soon as we use an A-Frame sound component.
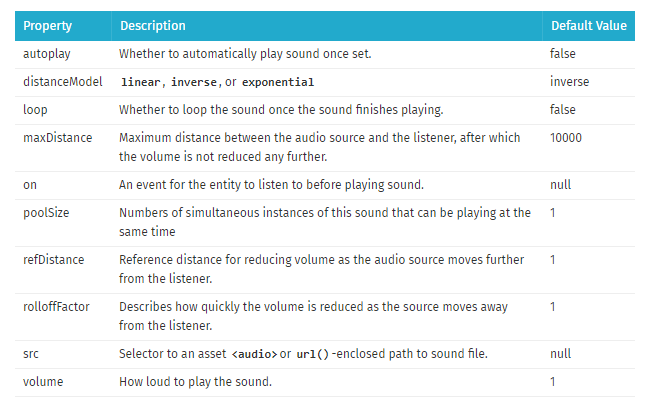 _A-Frame sound component properties, screenshot taken from [A-Frame Docs](https://aframe.io/docs/0.8.0/components/sound.html" rel="noopener" target="blank" title=")
But how do we add this component to our scenes and provide audio feedback to user interactions and/or create a soundscape?
To demonstrate this I created an A-Frame project from scratch. It is based on user interactions with a desktop computer. (i.e. to use with a mouse and a keyboard). The principles should transfer to other types of controls for the most part.
You have the option to either start with a fresh copy of the project [Glitch][GitHub] — with no sounds attached to it — and follow along while implementing the provided sounds yourself. Or you can check out the finished version [Glitch][GitHub] and follow along by reading the code.
The Kitchen
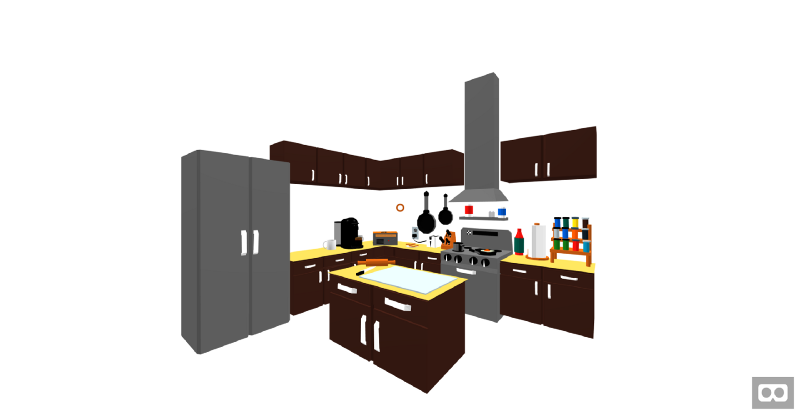
Before we start the audio implementation process, let’s take a look at our scene. We have several 3D models here (courtesy of Google Poly). Our kitchen is a complete model by itself. Items like the espresso machine, radio, the frying pan and the egg on top of it are separate models that are added to the scene on top of the kitchen.
Now let’s see the methods we can use to add sounds to this scene.
User Interaction Sounds
User interaction sounds are usually one-shot sounds. This means they are short samples that play once when triggered. They are not continuous or looped like environment audio or music. Which means we need to find a way to put an audio file on our scene and then trigger it when our user interacts with that object. (e.g. clicks the mouse button, hovers over it etc.).
To trigger a sound on user interaction, we can:
- Put a sound on a model
- Put a sound on a primitive, like a box geometry
- Put a primitive on an component
So let’s go through our options one by one and see the use cases for each one.
Putting a Sound on a Model
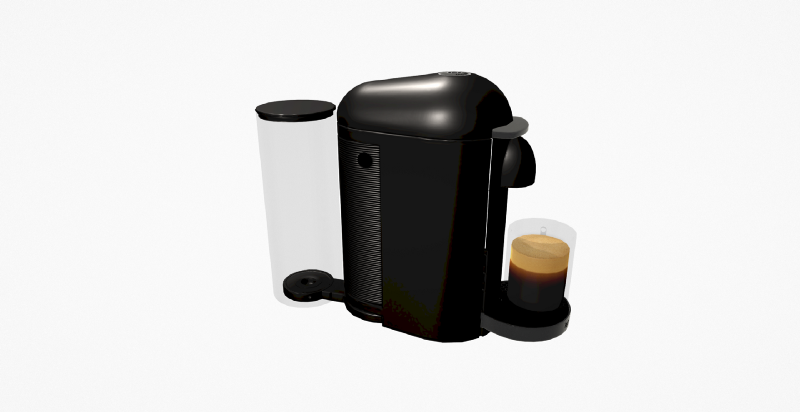
Who doesn’t want to start the day with a fresh cup of espresso? (If that’s not you, feel free to grab a tea model from here and go with that instead.)
I would say half of the satisfaction of having that caffeine boost is the sound our beloved espresso machine makes. To make sure our scene provides that aural feedback, we implement a sound that will respond to user interaction.
First let’s take a look at how our espresso machine works under the hood
We start by loading our model with the A-Frame loader. Then we set the position, rotation and scale of the model within the scene, by using the named properties.
Our model is referenced by the id “#coffeeMaker”, instead of the relative path of the file. All the models for this project is registered in the Asset Management System beforehand.
Easiest way to add a sound to our espresso machine is by adding the sound component to it by using it as an HTML attribute on the object.
We reference our sound by using the asset management system again, and setting the volume of it to 1. This means it will be heard at 100%. Now for the most important part, we set the “on” property of the sound to the “click” value. This means when a user clicks on this object, the sound will be triggered.
We don’t use the autoplay or loop properties here as this is a one-shot that depends on user interaction. We leave the positional property as “on” by default. Otherwise we would hear the sound at the same volume level at all times, no matter how distant we are from the object. Sound wouldn’t have any panning and would always play exactly where we are, instead of to the left, right or behind us depending on our position relative to the object.
NOTE: Positional sounds like these should be rendered mono to make the spatial cognition of the sound easier, while background music or audio ambiances that are not positional preferably should be rendered stereo.
Time to Crack a Few Eggs
Now it’s your turn, go ahead and implement the provided frying egg sound to the egg model, which is placed on top of the frying pan. For a challenge, you can also try to use a few additional sound properties of your choosing. Go around the scene after putting the egg sound in place and test your implementation to see if it sounds realistic (or unrealistic if that’s what you are going for!)
Did you do it?
Great!
Your code for the egg model now should look approximately like this (with your desired properties and values)
Putting a Sound on a Geometry
So we can add our sounds to the models by simply adding them as an HTML attribute. What if we want to put a sound to an object that is already part of a bigger model and not a separate entity by itself?
Let’s say we want to add a sound to the red bottle on the right, which should make it sound like we are picking it up when we click on it.
If we put the sound on the kitchen model like we did with the smaller models, it would mean that the sound would trigger no matter where we clicked on the model itself, instead of only on the bottle like we want.
We can solve this problem by using a geometry which we can click on, aligning it to where the bottle is, and adding the sound property to it.
A-Frame Inspector to the Rescue
For the next steps I highly recommend that you start creating and positioning objects inside your scene right in the browser by using the A-Frame Inspector. You can then copy and use this code instead of guesswork as to where your object should be positioned.
 Open the A-Frame Inspector by using the
 <ctrl> + <alt> + i shortcut.
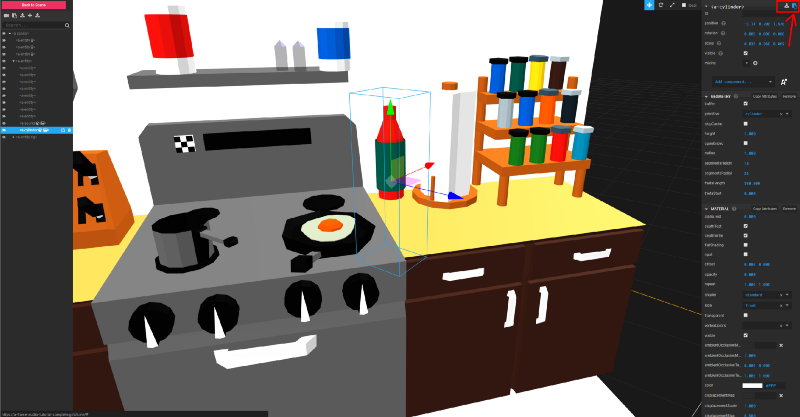
Let’s start by creating a geometry primitive on our scene, a cylinder should work well given our bottle’s shape.
Now scale and position this cylinder by using the A-Frame inspector. It can cover our bottle and respond to user interaction on the correct spot.
NOTE: If you add this geometry inside the model, it would enable you to move or rotate the parent model and preserve the correct position of everything inside.
 Scale and position the cylinder inside the scene by using the controls top right
You can paste the code you copied from the inspector and just move the scale, position and rotation values inside the .
 Copy the entity and its properties by using the button on the top right
Make sure to bring down the opacity of the material to 0, so our bottle can stay visible inside the cylinder geometry. As a final step, add the provided bottle sound to the object, like you did before with the espresso machine and the egg.
Now your cylinder code should look like this…
…and respond to user interaction correctly.
Using an Component
<a-sound> is a primitive wrapper around the A-Frame sound component and allows us to use audio without attaching it to anything else on the scene. However if we want to trigger this sound on interaction, we still need a type of geometry which will allow us to interact with this object.
We can put this geometry on anywhere else on the scene. (think of a user interface menu button which will trigger a non-positional sound). Or we can put it directly on to and then position it on top of the object we want to hear audio feedback from.
Which means to add a sound to our toaster, we can do the reverse of what we just did and create an component and attach a clickable geometry to it.
Environment Audio
We saw a couple of the ways we can use to implement sounds that respond to user interactions. But what about sounds that don’t require the user to do anything to play? These are sounds that go through the scene from beginning to end, to create atmosphere, mood, a sense of place?
If we take a look at our kitchen, we can see that there is a big fridge to the left, which is dead silent right now. Not to mention, whether we are consciously aware of it or not, almost all the environments we occupy (unless they are an anechoic chamber) have something called a presence or a room tone.
Electric hums, machinery, air conditioning units and alike create the room tone with or without us adding on top of it acoustically. So, to reflect that, our choice should be an ongoing. In this case a looping sound which is present throughout our scene.
NOTE: .mp3 format by its nature does not loop seamlessly in most platforms, there’s always a very short gap between loops which breaks the audio consistency, and therefore for looping sounds other formats like .wav or .ogg should be used.
Adding Room Tone
Now let’s add the provided room tone to our scene. We have several options depending on what type of A-Frame project we are working on. If we have only one room-as is the case here-we can put our room tone directly to our . Or if we have several rooms in our scene with different characteristics, we can put the room tone in to a plane geometry which could act as the ground. Or in an object which we can put in the center of the room. In all cases we have to make sure our room tone is not positional, as opposed to all the other sounds we used previously on this project.
Given that we are only working with a single room/environment in here, we can put our room tone directly into the scene itself. We set the positional property to false, to make sure sound is heard equally throughout the room.
We also set the autoplay property to true since we don’t need user interaction to hear the room tone.
NOTE: Audio autoplay in most browsers either already require or will require user interaction to start. Which means to automatically play sounds like background music or ambient audio you need to use a menu screen or a mute/unmute button or something alike to enable audio autoplay.
Music
For the final piece of our audio puzzle, let’s add some music to our scene. We can either choose to add this as diegetic music that’s coming from the radio in our scene, or as extra-diegetic music which is non-existent in the virtual world we created, but specifically for the user/viewer/player who is experiencing and controlling this virtual world.
To do the latter, we would need to put our music either onto our camera () or to our first-person character (if that is an option) and make sure the audio is non-positional. In this scene I chose to go with the former and put the music to the radio model as a source inside the virtual world.
We can add the provided music track (composed by yours truly) to our radio model just like we added all the sounds up to this point.
Playback Control
Our music plays whenever we click on the radio, but what if we want to pause it and then play it again?
To have this functionality we need to write a custom A-Frame component. Then add that component as an HTML attribute to any object we want to add that functionality to, just like we added the “sound” component to our models before.
You can either write your A-Frame components inline, or write it in an external JavaScript file and then link to it from the html, like I did for this project.
Now we have an audio-toggle component that enables us to play and pause the sound we are hearing. It also allows us to change the autoplay ability via the “playing” property.
And that’s it! We have an A-Frame scene with music, environment sounds and interactive audio.
In the next part we will take a look at how to integrate Tone.js to an A-Frame project and writing more custom components with advanced audio functionality.
Thanks for reading!