

Designing an application tends to be cumbersome and more often than not, there is a whiteboard with arrows pointing from various points to others.
What you initially thought would be an application with one or two activities, suddenly appears to have multiple flows, fragments and a wide range of user interaction. Wouldn’t it be nice then, if we could take whatever it is that is on that whiteboard and replicate it easily in code?
Say hello to the Navigation Component.
To the unfamiliar, the Navigation Component is not another UI class that you place instead of a layout for your activity/fragment. Think of it like a map, where instead of continents, you have your fragments, and you will need directions to get from continent to continent. It presents your fragments and the connections between them in a top down manner. In this article, we will go over the main aspects of this component and learn how we can integrate it into our applications.
Ready to set sail? ⛵️
Learning The Ropes
The Navigation component is available from Android Studio 3.3 and afterwards. To use it you, add the following dependencies to your project:
android {
    ...
}

dependencies {
    implementation 'androidx.navigation:navigation-fragment-ktx:2.0.0'
    implementation 'androidx.navigation:navigation-ui-ktx:2.0.0'
}
In order to have something to work with, let’s imagine we designed an application with the following structure:
- Start Fragment
- Fragment A
- Fragment B
The user can either go to Fragment A or Fragment B from the Start fragment.
 Our application
If we want to do all of this without the Navigation Component, we would have to add the all too familiar code of opening a fragment when one of the buttons is clicked.
val myFragment : MyFragment = MyFragment()
supportFragmentManager.beginTransaction().add(R.id.container, myFragment).commit()
In our small example, this amounts to several short lines and is rather uncomplicated, but I think we can all agree that this will not scale appropriately if our application was larger and had more complex user flows.
All Aboard
To begin using the Navigation Component, we need to create a navigation graph. This graph will act as our map, outlining the user flow in our application. To create one, right click on the res folder and create a new resource file. We will name ours: _user_flowgraph.xml. Make sure to mark the type of the file as Navigation.
 Creating a new resource file
Every voyage starts from a home base and ours is no different. Our home is called a NavHost. This will act as a placeholder for destinations to be swapped when a user interacts with our UI. We need to add the NavHost to our activity’s main layout:
<?xml version="1.0" encoding="utf-8"?>
<androidx.constraintlayout.widget.ConstraintLayout xmlns:android="http://schemas.android.com/apk/res/android"
    xmlns:tools="http://schemas.android.com/tools"
    android:layout_width="match_parent"
    android:layout_height="match_parent"
    xmlns:app="http://schemas.android.com/apk/res-auto"
    tools:context=".MainActivity">

    <fragment
        android:id="@+id/nav_host_fragment"
        android:name="androidx.navigation.fragment.NavHostFragment"
        android:layout_width="0dp"
        android:layout_height="0dp"
        app:layout_constraintLeft_toLeftOf="parent"
        app:layout_constraintRight_toRightOf="parent"
        app:layout_constraintTop_toTopOf="parent"
        app:layout_constraintBottom_toBottomOf="parent"
        app:defaultNavHost="true"
        app:navGraph="@navigation/user_flow_graph" />

</androidx.constraintlayout.widget.ConstraintLayout>
We have added a fragment element that will house where our fragments will be displayed and swapped. Pay attention to the navGraph attribute, which we linked to our previously created XML file.
Now we need to add a starting destination, as our application will not compile if we won’t.
With the user_flow_graph.xml open, we need to click on the small plus icon in the Navigation Editor:
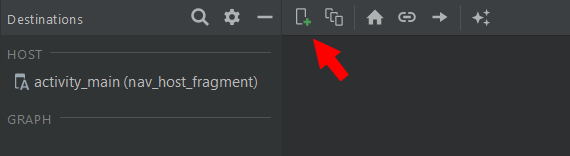 Add A Destination
You can see in the menu that pops up, that we can either create a placeholder which will need to be filled in later or we can choose from any fragment that we have:
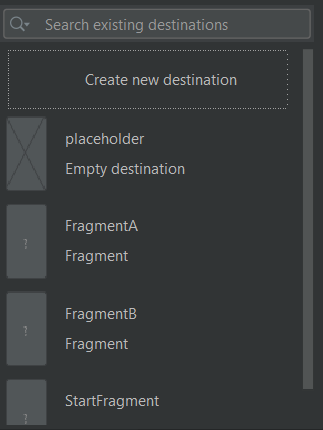 Our Destination Choices
Our user flow starts from out Start Fragment, so let’s choose it first.
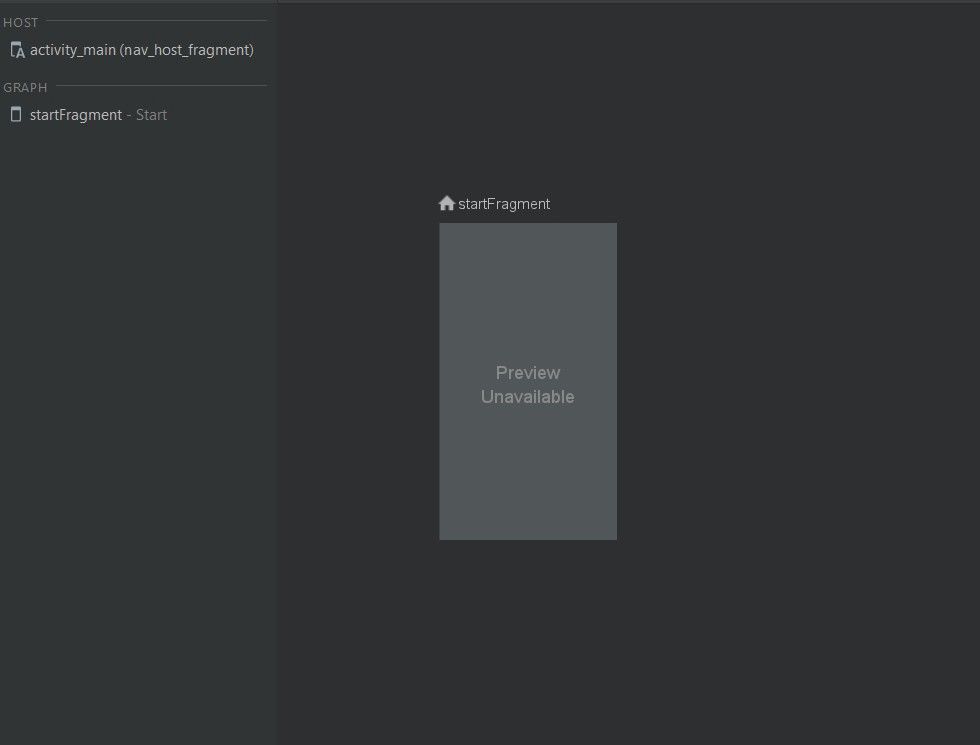 Our home base (notice the little ? icon)
Let’s add our other two fragments, fragment A and fragment B.
 All our destinations
We connect two destinations by clicking on the dot that appears when we hover over a destination and dragging it to another.
 Pretty neat. huh?
What we have just created between the Start fragment and fragments A and B, are actions.
Shiver me Timbers
You might have asked yourself, if by just connecting the destinations our work here is done and in some magical way, everything will work.
Well, it won’t.
We need to tell our code to navigate to a destination. So, how can we do that? Some magic is involved in the process.
First thing we are going to do, is add a gradle plugin called Safe Args. It will ensure type safety when we navigate between our destinations.
buildscript {
   /...
    }
    dependencies {
        ...
        classpath "androidx.navigation:navigation-safe-args-gradle-plugin:2.0.0"

    }
}
We will also need to add the following plugin to our application’s build.gradle:
apply plugin: "androidx.navigation.safeargs.kotlin"
Also, make sure that android.useAndroidX=true in your gradle.properties file.
Before we move forward, let’s understand why we needed to add all these configurations. Basically, when we created actions earlier, behind the scenes, Android Studio generates code that we will use to activate actions. This code consists of methods and classes that represent each action. Let’s take our Start fragment as an example. The code generated for the actions we have declared will have a class called StartFragmentDirections. The methods for this class represent the actions we created earlier. So for both of our fragments, we will get:
- StartFragmentDirections.actionStartFragmentToFragmentA()
- StartFragmentDirections.actionStartFragmentToFragmentB()
Now that our actions have been translated into code, let’s use them:
val action = StartFragmentDirections.actionStartFragmentToFragmentA()
The last step in this process requires us to use the NavController. This object is in charge of managing the navigation within our NavHost. You can access it using one of these three methods:
- Fragment.findNavController()
- View.findNavController()
- Activity.findNavController(viewId: Int)
So, put together we will have:
fragmentABtn.setOnClickListener { button ->
    val action = StartFragmentDirections.actionStartFragmentToFragmentA()
    button.findNavController().navigate(action)
}
Trim Your Sails
What if we wanted to pass data between our destinations? Imagine a scenario where if the user clicks on a certain item, we want to do something with that item in our next destination. For that, we have destination arguments. Open our user_flow_graph.xml and click on Fragment A. You will notice on the right hand side, a menu detailing the various attributes of Fragment A. One of those attributes will be Arguments.
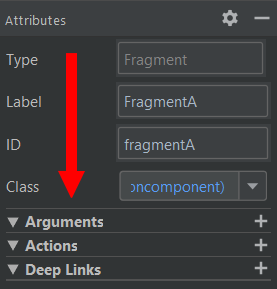
To add an argument, simply click on the ➕ icon. A popup window opens and in it we can configure our argument. You can give it a name, choose it’s type and add a default value. Let’s add an argument of String type to Fragment A, that will be the message passed from Start fragment.

In our Start fragment, where we defined our action and are calling the generated method, we will pass in our argument.
fragmentABtn.setOnClickListener { button ->
    val action = StartFragmentDirections.actionStartFragmentToFragmentA("Hello From Start Fragment")
    button.findNavController().navigate(action)
}
To access it in Fragment A, we will need to either:
- access the bundle and get our message value
class FragmentA: Fragment() {

    override fun onCreateView(
        inflater: LayoutInflater,
        container: ViewGroup?,
        savedInstanceState: Bundle?
    ): View? {
        val bundle = arguments
        val root = inflater.inflate(R.layout.fragment_a, container, false)
        val textView : TextView = root.findViewById(R.id.textView)
        textView.text = bundle?.getString("message")
        return root
    }
}
- use navArgs if we are using the -ktx dependencies
class FragmentA: Fragment() {

    override fun onCreateView(
        inflater: LayoutInflater,
        container: ViewGroup?,
        savedInstanceState: Bundle?
    ): View? {
        val args : FragmentAArgs by navArgs()
        val root = inflater.inflate(R.layout.fragment_a, container, false)
        val textView : TextView = root.findViewById(R.id.textView)
        textView.text = args.message
        return root
    }
}
✋ when using navArgs, you will need to add support for Java8 in your build.gradle file.
You can find all the code shown here in this GitHub repository.