

When you go about building an application, there are a ton of things to consider. And those are all mainly concerned with the client part of the project.
When you start to think about the server for your application, things can get pretty complicated. One way to alleviate some of that pressure is to use Firebase – and two features in particular:
- Authenticating users using Firebase Auth
- Storing data using a Realtime Database
In this article, you'll learn:
- How to build an Android application in Kotlin which authenticates users with Firebase Auth
- How to use Retrofit2 to make requests to your server
- How to build a server in Node.js with Express that will receive requests from your application and fetch data from a Realtime Database in Firebase
All of this might seem like a simple task, but it isn’t. There is a lot of setting up to do and we have to handle various configurations as well. But I'll also outline some pitfalls that will help save you time and frustration.
Trust me - you want to learn from my mistakes.
If you want to skip over all of the explanation, you can head to the bottom of the article and see the entire source code there through the links.
Ok, let's get started.
Setting up your project
Our application will consist of both a front end and a back end. From the frontend perspective, there will be a login/signup page and another page that will fetch/send random data to our database.
We will be using Firebase Authentication here to validate registered users. There are several ways to authenticate users:
- Email & Password
- Google/Facebook/Twitter/Github account (what is called Federated Identity Provider Identification)
- Phone number
- Custom authorization
- Anonymous authorization
In our application we will use the Email & Password option, as it is the more straightforward approach (and in most cases, the more common solution).
This authentication will happen in our client and there will be no need for any communication to our back end for this task.
To make requests to the our server, we will be using Retrofit2 by making GET requests. In these GET requests, we will be sending the data that needs to be updated alongside a token (more about the token in the Server section).
From the backend side, our server is in charge of accepting requests from users using our application to either fetch/save/delete data (or CRUD).
To be able to let authenticated users access the database, we will need to use Firebase’s Admin SDK. This framework will give us access to an API to verify authenticated users and pass requests to our database.
We will be saving users' data using Firebase’s Realtime Database. After all is done on the backend side, we will be deploying it via Heroku.
 _Photo by dylan nolte on Unsplash_
How to Build out the Client Side/ UI
After opening a new Kotlin project, we need to import some dependencies. First and foremost, you need to add Firebase to your project.
Follow the steps outlined here to do so.
Once that’s done, add the following dependency to your application level build.gradle file:
implementation 'com.google.firebase:firebase-auth:19.4.0'
When users open the application, they can either login or signup (if it is their first time).
Since we have agreed that users will be validated based on a combination of their email and password, we’ll create a simple activity that has two EditTexts for doing exactly that. We’ll also have two buttons to signify the choice to either signup or login.
<?xml version="1.0" encoding="utf-8"?>
<androidx.constraintlayout.widget.ConstraintLayout xmlns:android="http://schemas.android.com/apk/res/android"
    xmlns:app="http://schemas.android.com/apk/res-auto"
    xmlns:tools="http://schemas.android.com/tools"
    android:orientation="vertical" android:layout_width="match_parent"
    android:layout_height="match_parent">

    <EditText
        android:id="@+id/email_edit_text"
        android:layout_width="wrap_content"
        android:layout_height="wrap_content"
        android:ems="10"
        android:hint="Enter your email"
        android:inputType="textEmailAddress"
        app:layout_constraintBottom_toBottomOf="parent"
        app:layout_constraintEnd_toEndOf="parent"
        app:layout_constraintStart_toStartOf="parent"
        app:layout_constraintTop_toTopOf="parent"
        app:layout_constraintVertical_bias="0.153" />

    <EditText
        android:id="@+id/password_edit_text"
        android:layout_width="wrap_content"
        android:layout_height="wrap_content"
        android:ems="10"
        android:hint="Enter your password"
        android:inputType="textPassword"
        app:layout_constraintBottom_toBottomOf="parent"
        app:layout_constraintEnd_toEndOf="parent"
        app:layout_constraintStart_toStartOf="parent"
        app:layout_constraintTop_toBottomOf="@+id/email_edit_text"
        app:layout_constraintVertical_bias="0.046" />

    <Button
        android:id="@+id/Login"
        android:layout_width="wrap_content"
        android:layout_height="wrap_content"
        android:text="Login"
        android:background="#39e600"
        android:onClick="loginUser"
        app:layout_constraintBottom_toBottomOf="parent"
        app:layout_constraintEnd_toEndOf="parent"
        app:layout_constraintHorizontal_bias="0.139"
        app:layout_constraintStart_toStartOf="parent"
        app:layout_constraintTop_toBottomOf="@+id/password_edit_text"
        app:layout_constraintVertical_bias="0.146" />

    <Button
        android:id="@+id/Signup"
        android:layout_width="wrap_content"
        android:layout_height="wrap_content"
        android:text="Signup"
        android:background="#4d94ff"
        android:onClick="signupUser"
        app:layout_constraintBottom_toBottomOf="parent"
        app:layout_constraintEnd_toEndOf="parent"
        app:layout_constraintHorizontal_bias="0.647"
        app:layout_constraintStart_toEndOf="@+id/Login"
        app:layout_constraintTop_toBottomOf="@+id/password_edit_text"
        app:layout_constraintVertical_bias="0.146" />
</androidx.constraintlayout.widget.ConstraintLayout>
package com.tomerpacific.todo.activities

import android.content.Intent
import android.os.Bundle
import android.view.KeyEvent
import android.view.View
import android.view.inputmethod.EditorInfo
import android.widget.EditText
import android.widget.Toast
import androidx.appcompat.app.AppCompatActivity
import com.google.android.gms.tasks.OnCompleteListener
import com.google.firebase.auth.FirebaseAuth
import com.google.firebase.auth.UserProfileChangeRequest
import com.tomerpacific.todo.R

class LoginActivity : AppCompatActivity() {

    private var userEmail : String = ""
    private var userPassword: String = ""

    override fun onCreate(savedInstanceState: Bundle?) {
        super.onCreate(savedInstanceState)
        setContentView(R.layout.activity_login)

      // START 1 ---------------------- //

        findViewById<EditText>(R.id.email_edit_text).apply {
            setOnEditorActionListener {_, actionId, keyEvent ->
                if (actionId == EditorInfo.IME_ACTION_SEARCH || actionId == EditorInfo.IME_ACTION_DONE ||
                    keyEvent == null ||
                    keyEvent.keyCode == KeyEvent.KEYCODE_ENTER) {
                    userEmail = text.toString()
                }
                false
            }

            setOnFocusChangeListener {view, gainedFoucs ->
                userEmail = text.toString()
            }
        }

        findViewById<EditText>(R.id.password_edit_text).apply {
            setOnEditorActionListener {_, actionId, keyEvent ->
                if (actionId == EditorInfo.IME_ACTION_SEARCH || actionId == EditorInfo.IME_ACTION_DONE ||
                    keyEvent == null ||
                    keyEvent.keyCode == KeyEvent.KEYCODE_ENTER) {
                    userPassword = text.toString()
                }
                false
            }

            setOnFocusChangeListener {view, gainedFoucs ->
                userPassword = text.toString()
            }
        }

      // END 1 ---------------------------------------- //
    }

    override fun onStart() {
        super.onStart()
        FirebaseAuth.getInstance().currentUser?.let {
            Intent(this@LoginActivity, MainActivity::class.java).apply {
                startActivity(this)
            }
        }
    }

  // START 2 ----------------------- //
    fun loginUser(view : View) {

        if (userEmail.isEmpty() || userPassword.isEmpty()) {
            Toast.makeText(this, "Please make sure to fill in your email and password", Toast.LENGTH_SHORT).show()
            return
        }

        FirebaseAuth.getInstance().signInWithEmailAndPassword(userEmail, userPassword)
            .addOnCompleteListener(this) { task ->
                if (task.isSuccessful) {
                    updateFirebaseUserDisplayName()
                } else {
                    Toast.makeText(this, "An error has occurred during login. Please try again later.", Toast.LENGTH_SHORT).show()
                }
            }
    }

  // END 2 ----------------------------- //

  // START 3 --------------------------- //
    fun signupUser(view: View) {

        if (userEmail.isEmpty() || userPassword.isEmpty()) {
            Toast.makeText(this, "Please make sure to fill in your email and password", Toast.LENGTH_SHORT).show()
            return
        }

        FirebaseAuth.getInstance().createUserWithEmailAndPassword(userEmail, userPassword)
            .addOnCompleteListener(this) { task ->
                if (task.isSuccessful) {
                    updateFirebaseUserDisplayName()
                } else {
                    Toast.makeText(this, "An error has occurred during signup. Please try again later.", Toast.LENGTH_SHORT).show()
                }
            }
    }

    private fun updateFirebaseUserDisplayName() {

        FirebaseAuth.getInstance().currentUser?.apply {
            val profileUpdates : UserProfileChangeRequest = UserProfileChangeRequest.Builder().setDisplayName(userEmail).build()
            updateProfile(profileUpdates)?.addOnCompleteListener(OnCompleteListener {
                when(it.isSuccessful) {
                    true -> apply {
                        Intent(this@LoginActivity, MainActivity::class.java).apply {
                            startActivity(this)
                            finish()
                        }
                    }
                    false -> Toast.makeText(this@LoginActivity, "Login has failed", Toast.LENGTH_SHORT).show()
                }
            })
        }
    }
  // END 3 ------------------------------------- //

}
Let's see what's going on in the above code.
- We are attaching listeners to our edit texts to identify when they have either lost focus or the user has pressed the done button.
- The loginUser method is in charge of, well, authenticating the user based on their prior credentials (using the signInWithEmailAndPassword API).
- The signupUser method uses the createUserWithEmailAndPassword API.
- You can see that we have overridden the onStart lifecycle method to identify when the user returns to the application and to update the UI appropriately if the user is already logged in.
When running our application, we will see this:
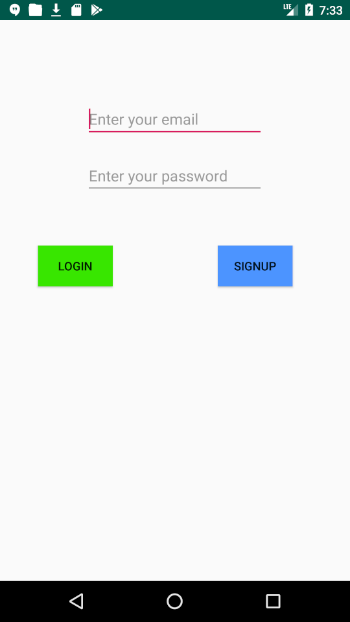 Nothing too fancy
That was the easy part. Before we move on to writing the logic to communicate with the back end, let’s first build the back end.
 _Photo by Roger Starnes Sr on Unsplash_
How to Set Up the Server
We will be using Express when building our server. Below is a template for such a server which also adds headers to bypass any CORS issues we might encounter:
const express = require('express')
var bodyParser = require('body-parser')
const app = express()
var port = process.env.PORT || 3000

app.use(bodyParser.urlencoded())

app.use(function(req, res, next) {
  res.setHeader('Access-Control-Allow-Origin', '*')
  res.header('Access-Control-Allow-Methods', 'GET, OPTIONS')
  res.header('Access-Control-Allow-Headers', 'Content-Type, Authorization')
  res.header('Access-Control-Allow-Credentials', true)
  return next()
});

app.listen(port, () => console.log(`Example app listening at http://localhost:${port}`))
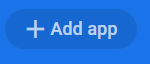
Similar to what we did in the client, we also need to add Firebase to our Node.js server. If you recall the steps you took to create a project in Firebase and chose an Android project, you need to add to that project another application which will represent our server. By clicking on Add App in the main screen of Firebase console,
You will be presented with a platform to choose from:
 You need to choose the Web option (the one with the </> icon)
After doing the initial configuration inside the Firebase console, you will need to add the configuration object to your project:
var firebaseConfig = {
  apiKey: "API_KEY",
  authDomain: "PROJECT_ID.firebaseapp.com",
  databaseURL: "https://PROJECT_ID.firebaseio.com",
  projectId: "PROJECT_ID",
  storageBucket: "PROJECT_ID.appspot.com",
  messagingSenderId: "SENDER_ID",
  appId: "APP_ID",
  measurementId: "G-MEASUREMENT_ID",
};
We will place these configurations in our main file (app.js):
const express = require('express')
var bodyParser = require('body-parser')
const app = express()
var port = process.env.PORT || 3000

<--- FIREBASE CONFIG --->
var firebaseConfig = {
  apiKey: "API_KEY",
  authDomain: "PROJECT_ID.firebaseapp.com",
  databaseURL: "https://PROJECT_ID.firebaseio.com",
  projectId: "PROJECT_ID",
  storageBucket: "PROJECT_ID.appspot.com",
  messagingSenderId: "SENDER_ID",
  appId: "APP_ID",
  measurementId: "G-MEASUREMENT_ID",
};

  // Initialize Firebase
firebase.initializeApp(firebaseConfig);
<---- END FIREBASE CONFIG --->

app.use(bodyParser.urlencoded())

app.use(function(req, res, next) {
  res.setHeader('Access-Control-Allow-Origin', '*')
  res.header('Access-Control-Allow-Methods', 'GET, OPTIONS')
  res.header('Access-Control-Allow-Headers', 'Content-Type, Authorization')
  res.header('Access-Control-Allow-Credentials', true)
  return next()
});

app.listen(port, () => console.log(`Example app listening at http://localhost:${port}`))
You might be thinking: “I am saving all this secret information in the client. It will be visible to everyone!”. This is completely true, but in the case of Firebase, it is ok.
How to Configure the Database
We're getting there, but we still have some more configuration to do. This time it has to do with our Realtime database.
Head over to your Firebase console and choose the project you created earlier in this article. On the left menu, you will see a Realtime Database option. Click it.
Next, on the right side, a window will load with the following tabs:
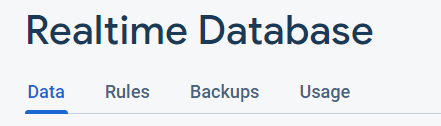
Under the Data tab, there will be your database’s URL. Remember it as we will need to use it later on.
The other important tab to look at is the Rules tab. These rules specify who has access to your database and what they can do there.
Initially (and for testing purposes), the rules there are pretty lax and let anyone read and write from your database. Before you make your application live, make sure to update these rules with something more restrictive. Don’t worry, you will get to see an example.
How to Set UP Firebase Admin SDK
Next up, we need to set up Firebase Admin SDK. Since we already set up the necessary things in the Firebase console, we need to install the firebase admin package.
npm install firebase-admin --save
Now we need to generate a private key since our project is a service account. Inside the Firebase Console, follow these steps:
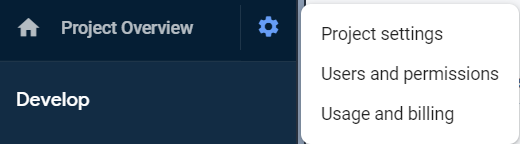
First, next to Project Overview, there is a gear icon. Click it and choose Project Settings:
Then click on the Service Accounts tab, and click the Create Service Account button.
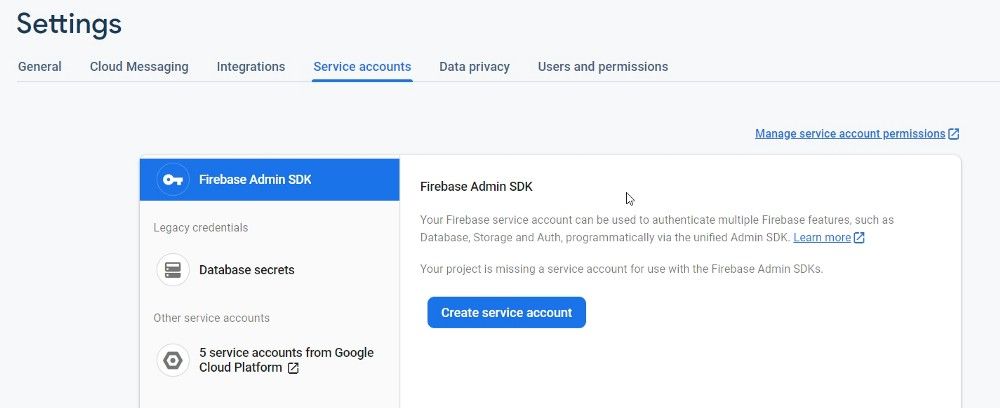
Choose Node.js as the configuration snippet, and click on Generate new private key.
Place this file inside your project and change the path to it in the code snippet provided by Firebase.
⚠️ Make sure to exclude this file in your .gitignore file and to never upload it to any public repository.
Putting it all together, our app.js file will look like this:
const express = require('express')
var bodyParser = require('body-parser')
const app = express()
var port = process.env.PORT || 3000

<--- FIREBASE CONFIG --->
var firebaseConfig = {
  apiKey: "API_KEY",
  authDomain: "PROJECT_ID.firebaseapp.com",
  databaseURL: "https://PROJECT_ID.firebaseio.com",
  projectId: "PROJECT_ID",
  storageBucket: "PROJECT_ID.appspot.com",
  messagingSenderId: "SENDER_ID",
  appId: "APP_ID",
  measurementId: "G-MEASUREMENT_ID",
};

  // Initialize Firebase
firebase.initializeApp(firebaseConfig);
<---- END FIREBASE CONFIG --->

const serviceAccount = require("PATH_TO_YOUR_SERVICE_ACCOUNT_FILE.json");

admin.initializeApp({
  credential: admin.credential.cert(serviceAccount),
  databaseURL: "URL_TO_DATABASE"
});

app.use(bodyParser.urlencoded())

app.use(function(req, res, next) {
  res.setHeader('Access-Control-Allow-Origin', '*')
  res.header('Access-Control-Allow-Methods', 'GET, OPTIONS')
  res.header('Access-Control-Allow-Headers', 'Content-Type, Authorization')
  res.header('Access-Control-Allow-Credentials', true)
  return next()
});

app.listen(port, () => console.log(`app listening at http://localhost:${port}`))
Remember the database URL I mentioned earlier? You will need to insert it inside the object you pass to Firebase’s admin initializeApp method.
How to Create An Endpoint & Deploy
Phew, that was a lot of setting up. Right now, our server is able to run, but it won’t do anything since there is no endpoint configured.
To fix that situation, let’s define one of our endpoints:
app.get('/getData', function (req, res) {
  if (req.headers.authtoken) {
    admin.auth().verifyIdToken(req.headers.authtoken)
    .then(() => {
      var database = admin.database()
      var uid = req.query.uid
      database.ref('/users/' + uid).once('value')
      .then(function(snapshot) {
        var data = snapshot.val() ? snapshot.val() : []
        res.status(200).send({ our_data: data})
      }).catch(function(error) {
        res.status(500).json({ error: error})
      })
    }).catch(() => {
      res.status(403).send('Unauthorized')
    })
  } else {
    res.status(403).send('Unauthorized')
  }
})
Our endpoint is called getData and you can see that before doing any other logic, we are extracting the authtoken sent and verifying it using Firebase admin.
If everything works correctly, we proceed with getting the user’s ID and using that to fetch the user’s data from the database.
How to Make the Requests on the Client
As I mentioned earlier, we will be using Retrofit2 to make our requests to the server.
I won’t go into detail about how to use Retrofit2 here (there are plenty of articles that do just that), so below you can find the standard implementation of making network requests using Retrofit2.
fun fetchDataFromDB() {
        val user = FirebaseAuth.getInstance().currentUser

        if (user != null) {
            user.getIdToken(false).addOnCompleteListener{
                if (it.isSuccessful) {
                    val token = it.result?.token

                    val retrofit = Retrofit.Builder()
                        .baseUrl(TodoConstants.BASE_URL_FOR_REQUEST)
                        .addConverterFactory(GsonConverterFactory.create())
                        .build()
                    val service = retrofit.create(DataService::class.java)
                    val call = service.getData(token, getUserUUID())

                    call.enqueue(object: Callback<Result> {
                        override fun onResponse(call: Call<Result>, response: Response<Result>) {
                            if (response.isSuccessful) {
                                val body = response.body() as Result
                               //Here we have the data sent back from the server
                            }
                        }

                        override fun onFailure(call: Call<Result>, t: Throwable) {

                        }
                    })
                }
            }
        }
    }
Notice that after getting the FirebaseUser object, we use the getIdToken method to extract the token which will be sent to the server.
In the same manner, we can create another GET request to set data in our database.
And that's it! Thanks for following along.
This article is based on what I went through when building my own application. You can check it out below (the source code is also available):