
Tied up in a AWS announcement about a new EC2 high-end instance type (the C5) is a strong suggestion that Amazon’s cloud computing giant has begun to shift its hundreds of thousands of physical servers away from the open source Xen hypervisor that’s run them until now, to the open source alternative, KVM.
Whether you’ve got your career and/or home mortgage deeply invested in the future of Xen or whether you never knew it existed, you might be interested in learning more about KVM. So here’s a general introduction adapted from my book, Teach Yourself Linux Virtualization and High Availability: prepare for the LPIC-3 304 certification exam.
_Need some more basic background on either Linux servers or AWS? My Linux in Action and Learn Amazon Web Services in a Month of Lunches books from Manning might help, along with my Linux server administration courses at Pluralsight. There’s also a hybrid course called Linux in Motion that’s made up of more than two hours of video and around 40% of the text of Linux in Action._
KVM
Like Xen, KVM (Kernel-based Virtual Machine) is an open source hypervisor technology for virtualizing compute infrastructure running on x86 compatible hardware. Also like Xen, KVM has both an active user community and significant enterprise deployments.
A KVM host actually runs on the Linux kernel along with two KVM kernel modules (the kvm.ko module and either kvm-intel.ko or kvm-amd.ko). Through its tight kernel integration — including the I/O connectivity with kernel block and network drivers provided by Virtio — KVM can offer its guests more seamless access to all the complex hardware and networking profiles that they might encounter.
Hardware virtualization extensions built into modern CPU designs and required for KVM deployments mean that, right out of the box, KVM guests can safely access only those hardware resources they need without the need to worry about leakage to the larger system.
Where exactly does QEMU fit in with all this? Besides being able to act as a hypervisor, QEMU’s strength is as an emulator. KVM, in its hypervisor virtualization role, can tap on to QEMU’s emulation powers to compliment its own hardware acceleration features, presenting its guests with an emulated chipset and PCI bus. The whole, as they say, can be greater than the sum of its parts.
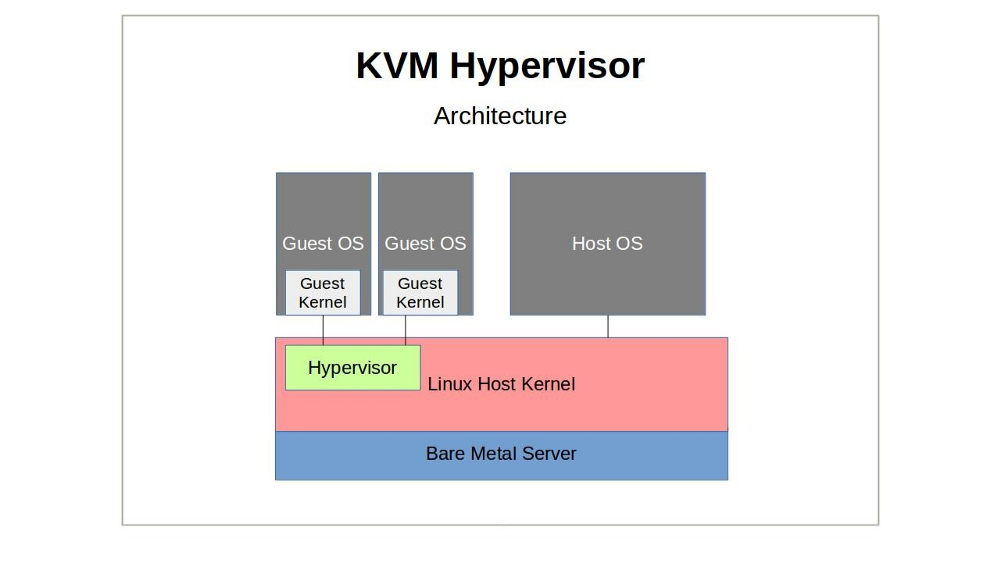
 A KVM hypervisor sitting between the Linux host OS and its guest VMs
A great deal of management functionality for KVM is often actually provided by Libvirt. Therefore, you might sometimes want to refer to the detailed information about KVM-related features like networking, storage, and file system layouts that’s found in the fifth chapter of the Teach Yourself Linux Virtualization and High Availability book (“Libvirt and Related Tools”).
Installation
Before anything else, you’ll need to make sure that the physical machine you’re planning to use as a KVM host supports hardware virtualization. Besides the BIOS setting and the contents of /proc/cpuinfo (which we discussed in Chapter One), you can also quickly check this from a running Linux system using kvm-ok:$ kvm-ok
It’s also a good idea to be sure which hardware architecture — 64 or 32-bit — you’re working with:$ uname -m
But even if your hardware profile is up to the task, you’ll have to let the Linux kernel in on your plans. If they’re not already there, you should add the kvm and either kvm-intel or kvm-amd kernel modules.# modprobe kvm-intel
If those modules fail to load (and there’s no /dev/kvm device in the file system), then there’s a good chance your CPU just isn’t up to the job you’d like it to to. However, if all that worked out, you’re ready to install the qemu-kvm package (and, if necessary, libvirt, virt-install, and bridge-utils as well).
Working with KVM Management Tools
It’s no secret that virtualization platforms have a well-deserved reputation for being complicated. But there are two things that can make getting started with KVM just a bit more challenging than some of the others:
- There are quite a few management toolkits available, each offering similar — but not identical — functionality.
- They have a nasty habit of changing the names used for the key binaries depending on which distribution and release you’re using.
I’ll introduce you to Libvirt Tools and vmbuilder in Chapter Five, but here, we’ll discuss the KVM tool kit.
Building new guests using what we’ll call the “KVM” way is a two step process. First, you’ll use qemu-img to create a new image — or modify or convert an old one. Then you’ll use qemu-kvm to set up a virtual machine that will start up the installation.
_Did I just say “you’ll use qemu-kvm…”? Silly me. qemu-kvm was merged into qemu a long time ago and has been replaced by qemu-system-x86_64. In the meantime, some systems offer you kvm as a wrapper that executes qemu-system-x8664 -enable-kvm — although you shouldn’t confuse the kvm wrapper with the old kvm binary that used a somewhat different syntax.
So let’s see how these two steps work. You create a disk image with qemu-img (which, by the way, can be used very effectively for other hypervisors as well), where “my-disk” is the name of the image you’d like to create, the maximum size of the image will be 6 GB, and qcow2 is the file format. qcow, by the way, stands for “QEMU Copy On Write”.
qemu-img create -f qcow2 /home/username/myimages/my-disk.img 6G \
 Formatting ‘/home/username/myimages/my-disk.img’, \
 fmt=qcow2 size=6442450944 \
 encryption=off \
 cluster_size=65536 \
 lazy_refcounts=off \
 refcount_bits=16
Choosing a file format will depend on your specific needs. If you need greater compatibility and flexibility — including the ability to generate sophisticated snapshots — then qcow2 is probably going to be your best choice.
The qcow disk image format permits disk space allocation to grow only as needed, meaning the use of space is always as efficient as possible. Changes to a qcow read-only image can be saved to a separate file, which refers internally to the original image. qcow2 added the ability to create multiple image snapshots.
We’re now ready for step two. Here’s how we’ll build our VM:
kvm -name my-VM \
 -hda /home/username/myimages/my-disk.img \
 -cdrom /home/username/Downloads/ubuntu-16.04-server-amd64.iso \
 -boot d -m 1024
A new SDL window will often (although not necessarily for all distributions) pop up where you can complete the operating system installation process. Regaining control of your mouse from the Qemu terminal requires pressing CTRL+ALT.
To explain: using “kvm” (although the precise command you’ll need for your version may differ), we’ll call our new guest “my-VM”, designate the my-disk.img file as hda (“hard drive a”), point to the location of the operating system ISO (Ubuntu 16.04 server, in this case), and set 1024 MB as the maximum memory alloted to the VM.
By default, KVM will configure your guest for user-level networking (as though the parameters -netdev user,id=user.0 -device e1000,netdev=user.0 were specified). This will provide the guest with an IP address through KVM’s own DHCP service and access to your host, the Internet, and to LAN-based recourses. While the default configuration is simple, it may be overly restrictive for some scenarios, as there are often some performance and feature limitations.
Besides these, you can use command line flags to control various VM configuration parameters, including:
- -smp 2 provides two processors (“smp” = symmetric multiprocessing).
- The -net argument (example: -net nic,model=virtio,macaddr =52:54:00:05:11:11) establishes a network connection for your guest.
- You can provision a network bridge using something like -net bridge,vlan=0,br=br0 — although this will require a matching -net definition on the host. The two are connected through a special “vlan” parameter.
- -balloon virtio will allow me to expand or reduce a guest’s memory size without having to reboot it.
- You can also use the -drive file= flag to define additional block storage devices. Adding a value for format= (qcow2, for instance).
The -M flag will assign a specific machine type hardware emulation. pc. For example, will provide a standard PC profile. For a complete list of available machine types, you can run kvm -M ?:
kvm -M ?
Supported machines are:
ubuntu Ubuntu 15.04 PC (i440FX + PIIX, 1996) (alias of pc-i440fx-wily)
pc-i440fx-wily Ubuntu 15.04 PC (i440FX + PIIX, 1996) (default)
ubuntu Ubuntu 15.04 PC (i440FX + PIIX, 1996) (alias of pc-i440fx-vivid)
pc-i440fx-vivid Ubuntu 15.04 PC (i440FX + PIIX, 1996) (default)
pc-i440fx-utopic Ubuntu 14.10 PC (i440FX + PIIX, 1996)
pc-i440fx-trusty Ubuntu 14.04 PC (i440FX + PIIX, 1996)
pc Standard PC (i440FX + PIIX, 1996) (alias of pc-i440fx-2.5)
pc-i440fx-2.5 Standard PC (i440FX + PIIX, 1996)
pc-i440fx-2.4 Standard PC (i440FX + PIIX, 1996)
pc-i440fx-2.3 Standard PC (i440FX + PIIX, 1996)
pc-i440fx-2.2 Standard PC (i440FX + PIIX, 1996)
pc-i440fx-2.1 Standard PC (i440FX + PIIX, 1996)
pc-i440fx-2.0 Standard PC (i440FX + PIIX, 1996)
pc-i440fx-1.7 Standard PC (i440FX + PIIX, 1996)
pc-i440fx-1.6 Standard PC (i440FX + PIIX, 1996)
pc-i440fx-1.5 Standard PC (i440FX + PIIX, 1996)
pc-i440fx-1.4 Standard PC (i440FX + PIIX, 1996)
pc-1.3 Standard PC (i440FX + PIIX, 1996)
pc-1.2 Standard PC (i440FX + PIIX, 1996)
pc-1.1 Standard PC (i440FX + PIIX, 1996)
pc-1.0 Standard PC (i440FX + PIIX, 1996)
pc-0.15 Standard PC (i440FX + PIIX, 1996)
pc-0.14 Standard PC (i440FX + PIIX, 1996)
pc-0.13 Standard PC (i440FX + PIIX, 1996)
pc-0.12 Standard PC (i440FX + PIIX, 1996)
pc-0.11 Standard PC (i440FX + PIIX, 1996)
pc-0.10 Standard PC (i440FX + PIIX, 1996)
q35 Standard PC (Q35 + ICH9, 2009) (alias of pc-q35–2.5)
pc-q35–2.5 Standard PC (Q35 + ICH9, 2009)
pc-q35–2.4 Standard PC (Q35 + ICH9, 2009)
pc-q35–2.3 Standard PC (Q35 + ICH9, 2009)
pc-q35–2.2 Standard PC (Q35 + ICH9, 2009)
pc-q35–2.1 Standard PC (Q35 + ICH9, 2009)
pc-q35–2.0 Standard PC (Q35 + ICH9, 2009)
pc-q35–1.7 Standard PC (Q35 + ICH9, 2009)
pc-q35–1.6 Standard PC (Q35 + ICH9, 2009)
pc-q35–1.5 Standard PC (Q35 + ICH9, 2009)
pc-q35–1.4 Standard PC (Q35 + ICH9, 2009)
isapc ISA-only PC
none empty machine
xenfv Xen Fully-virtualized PC
xenpv Xen Para-virtualized PC
KVM Monitor
While working with QEMU, you can open a monitor console and interact with your clients in ways that might be difficult or even impossible using a regular headless server. You can launch the KVM Monitor by pressing CTRL+ALT, and then SHIFT+2, and a new console will open on your desktop. SHIFT+1 will close the console. You can also access the console from the command line using something like:
kvm -monitor stdio
You will probably NOT be able to launch the monitor as root (i.e., via sudo). Naturally, your version may require “qemu-system-x86_64” rather than kvm. This approach allows you to add command line arguments (like that -monitor which specified a console target). Consult man qemu-system-x86_64 for details on the kinds of operations the monitor allows.
This example (borrowed from en.wikibooks.org/wiki/QEMU/Monitor) will list all the block devices currently available to your system, and then point one of them to an ISO file you want to use:
(qemu) info block
ide0-hd0: type=hd removable=0 file=/path/to/winxp.img
ide0-hd1: type=hd removable=0 file=/path/to/pagefile.raw
ide1-hd1: type=hd removable=0 file=/path/to/testing_data.img
ide1-cd0: type=cdrom removable=1 locked=0 file=/dev/sr0 ro=1 drv=host_device
floppy0: type=floppy removable=1 locked=0 [not inserted]
sd0: type=floppy removable=1 locked=0 [not inserted]
(qemu) change ide1-cd0 /home/images/my.iso
Networking
By default, a KVM guest will receive an IP address within the 10.0.2.0/24 subnet, and have outgoing access (including SSH access) both to its host, and to the wider network beyond. By that same default however, it won’t be able to host services for network clients. If you need to open up incoming network connectivity, you’ll probably want to create a network bridge on your host that’s similar to the one we used for Xen in the previous chapter. As before, you will install bridge-utils on the host and, assuming you’re running a Debian-based system and you want your host to receive its IP from a network DHCP server, edit the /etc/network/interfaces to look something like this (on CentOS machines, edit files in the /etc/sysconfig/network-scripts/ directory):
auto lo
iface lo inet loopback
auto eth0
iface eth0 inet manual
auto br0
iface br0 inet dhcp
 bridge_ports eth0
 bridge_stp off
 bridge_fd 0
 bridge_maxwait 0
On CentOS, you’ll need to create an ifcfg-br0 file in the /etc/sysconfig/network-scripts/ directory to look something like this:
DEVICE=br0
TYPE=Bridge
BOOTPROTO=static
DNS1=192.168.0.1
GATEWAY=192.168.0.1
IPADDR=192.168.0.100
NETMASK=255.255.255.0
ONBOOT=yes
SEARCH=”example.com”
…And then add a line reading BRIDGE=br0 line to your primary network interface file (which will often be: /etc/sysconfig/network-scripts/ifcfg-eth0).
You will then stop and restart your network services (or reboot).
Looking for a solid introduction to Linux or AWS administration? Check out my Linux in Action and Learn Amazon Web Services in a Month of Lunches books and the Linux in Motion text-video hybrid course from Manning. Prefer your tech learning in video? I’ve got Linux administration courses at Pluralsight just waiting to be watched.