
By Cam Barts
For someone who is trying to break into software development, it doesn’t matter where you look — LinkedIn, career advice boards, youtube tutorials — the advice is always the same: you need a portfolio. freeCodeCamp knows this advise, and they make it compulsory to create one to finish their “Responsive Web Design” Certification.
The portfolio is supposed to be a living document. You finish a project, you throw that bad boy onto your portfolio to show it off to the world. You constantly add to it, displaying your personal growth trajectory. You give it to potential recruiters and hiring managers to add some dimension to your resume.
Out of the five projects to get that certification, I put hands-down the most work into my portfolio. If it was going to be my digital first impression, I wanted to ensure that it was the best one I could make.
The de facto method for completing the projects on freeCodeCamp is to use codepen.io. The free version lets you code in an HTML, CSS, and JavaScript pane, and see your changes as you type them in a window. You can open the page in a full view, which eliminates the HTML, CSS, and JavaScript panes, but leaves a black banner at the top. The url is a hash, something like https://codepen.io/cam-barts/full/ZPWpqo, which is not memorable, doesn’t give any indication about the site’s content, and in my opinion doesn’t make any waves on a resume. Furthermore, unless you pay for a membership with codepen, you can’t change it.
Around the time I was finishing my project, the stars aligned and I discovered two technologies that would help my portfolio stand out: Github Pages and Google Lighthouse.
Github Pages allows you to host a website directly from a GitHub repository. It offers a pretty slick github.io url, which tickled my fancy for something to put on a resume. It would allow me full control of what my users would see when they navigated to the site (so long, black banner), and I wouldn’t have to deal with self hosting or paying for some other hosting service.
I heard about Google Lighthouse in the CodeNewbie Podcast featuring Frances Coronel. It audits your website straight from Chrome Dev Tools for five areas: Performance, Progressive Web App, Accessibility, Best Practices, and SEO. SEO, or Search Engine Optimization, is what helps your site float to the top of search engines like Google, which helps you get found. Also, now that I was going to host my site on Pages, I wanted to take responsibility for my site’s performance, and to effectively do that I had to at least have a benchmark.
My goal in writing this article is to help you create a blazing fast, professional looking portfolio site at no cost to you. I want it to be something you’re proud to post about on LinkedIn and plaster on the top of your resume, and I want to leverage GitHub Pages and Google Lighthouse to do it.
To go any further, I’ve made a few assumptions. The first is that you have a Github account. If you don’t already have one, creating one is easy. The second is that you have a basic understanding of git. If you’re brand new, there are plenty of excellent articles on getting started. This article assumes you’ve completed your portfolio on codepen. Finally, you should have Google Chrome installed.
This article follows my personal portfolio. You can find the pen here, the code here, and the final product is at cam-barts.github.io.
Getting started
Setting up your Github Pages site is pretty straightforward. The TL;DR version is:
- Create Repository following name convention [GitHub Username].github.io
- Clone Locally
- Create index.html, style.css, script.js files within repository
- Add code to those files
- Commit and push to GitHub
- Profit!
You create a repository with a title that follows the convention [Your Github Username].github.io. Here is mine: cam-barts.github.io. Whatever code gets pushed to that repository gets displayed when you navigate to that site.
So, when you’ve cloned the repository locally, what exactly do you put into it?
You should start with three files, an index.html file, a style.css file, and a script.js file. In whatever editor you like (I use Atom), you should start with the following code snippet in your index.html:
There is a lot going on here that might be unfamiliar if you have only been working with codepen.io.
The dir attribute in the html tag indicates that the document should be read Left To Right. That just ensures that when your page shows up, all of the elements are left justified, which is how English speakers read.
The meta tags in the head indicate metadata about the page, which helps search engines like Google index your site.
At this point, you should go ahead fill out the meta tags and the title tag. Note that the keywords meta tag’s content should be comma separated, and should include terms that you would want people to use in Google to find your portfolio. Here’s what mine looks like:
The next step is to copy the HTML section of your portfolio pen into the body section of your snippet. Once that’s completed, if you linked to any outside CSS or JS in your pen settings, such as to Bootstrap or Font Awesome, you need to link those in your index.html.
Create more link tags for css and script tags for JavaScript and add the links that are in the settings to the href and src attributes, respectively. To ensure that your styles and scripts show up, be sure to put them before the existing link and script tags in the snippet. For example, linking to Bootstrap and JQuery would look like:
Next, you need to add your own CSS into your style.css, and if you have any JavaScript, add that to your script.js.
After you’ve done that, you’re good to commit all your work and push it to Github. Immediately after you do that, you can navigate to [Your Github Username].github.io and check out your website!
Optimizing your portfolio site
Congratulations on publishing your portfolio!
The next steps involve optimizing your site. For this, we will use Google Lighthouse. It is better to do this in an In Private Browser window so that any cache or Chrome extensions you may have will not affect the results. When you navigate to your site, open Chrome Developer Tools (Ctrl + Shift+ i) and click on the Audits tab.
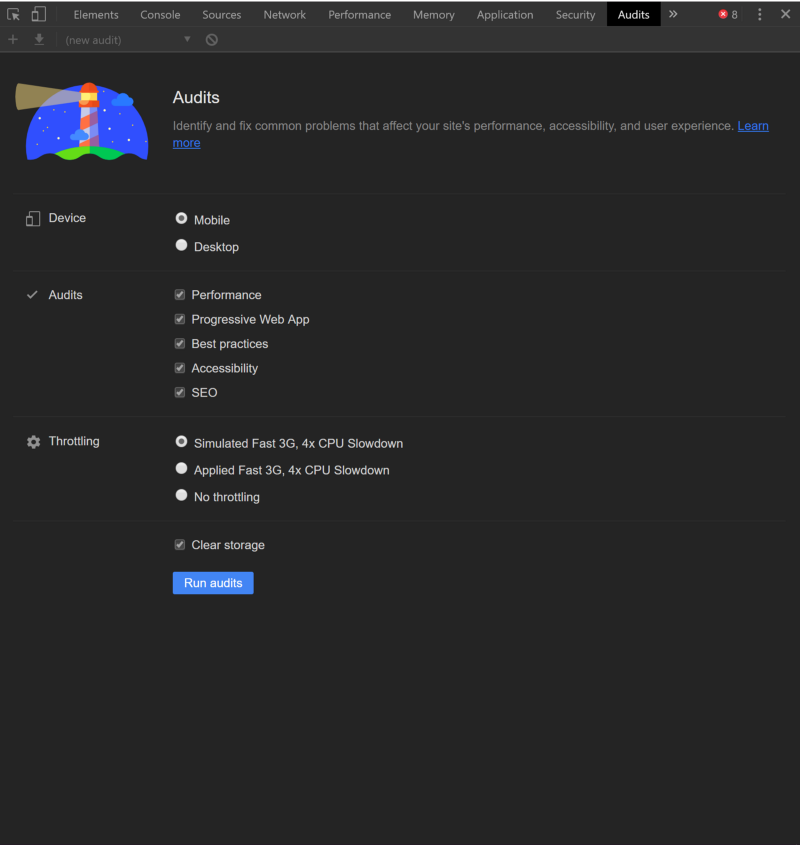 Google Lighthouse Pane
Progressive Web Apps are outside of the scope of this tutorial, but there is no harm in running all of the audits. When you run them, you should get a page that looks like this:
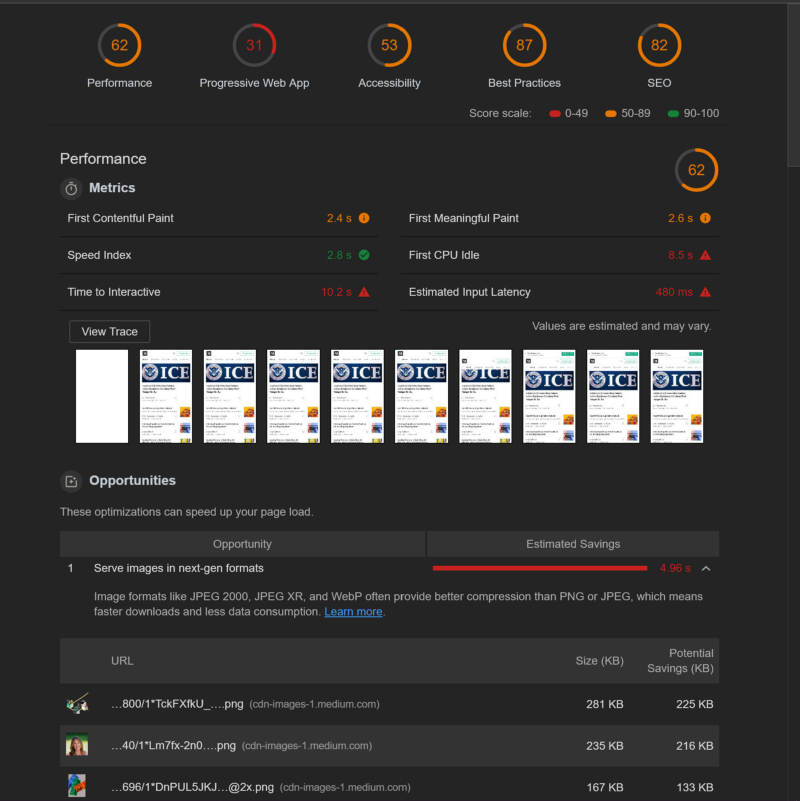
The best thing about these reports is that it gives you “Opportunities” to improve your scores.
In the performance section, it tells you to serve next gen file formats such as WebP versus traditional .PNG images, and suggests lazy loading the images.
In the SEO section, it suggests SEO improvements such as adding a description meta tag and using legible font sizes. Not only does it make these suggestions, it links to articles with practical examples with things to change in your code to optimize for those areas.
For me, it only took an hour to get the scores for my site in the high 90s for Performance, Accessibility, Best Practices, and SEO. You can see all to the changes I made here.
Going further
Next steps for your site are up to you. You could link it to Google Analytics to see how many visitors your Portfolio is getting. You could add sections for your awards to show your freeCodeCamp certifications as you get them. The evolution of your site is completely in your hands! Comment links to your portfolio below.