By Ondrej Svestka
In this tutorial, I will show you how to easily and quickly add a captcha to your Bootstrap form to prevent spam. We will be using Google’s ReCaptcha, the most popular Captcha solution today.
As a base, I will be using an HTML contact form with the PHP backend from one my previous tutorials. You can use it with any other Bootstrap form that you have.
Our form will be using HTML5 syntax sprinkled with some Bootstrap scaffolding and a JavaScript validator.
We will submit it via AJAX (the page will not reload), and then process the form values with PHP.
And finally, we will send an email with PHP and return a response to the original page that will be shown in a status message above the form.
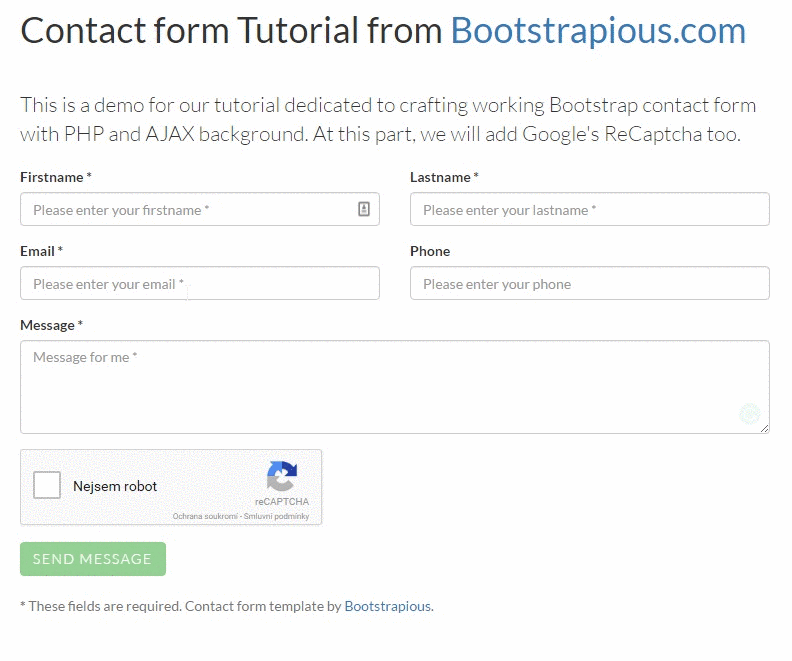 _This will be the result. See it also live [in the demo](https://bootstrapious.com/tutorial/recaptcha/" rel="noopener" target="blank" title=").
As I mentioned before, I will mostly focus on working with ReCaptcha today and not on the Bootstrap form itself too much. So, in case you have missed it, have at least a quick look at my Bootstrap form tutorial.
Demo & Links
- See the demo
- or download the files for the tutorial
Ok, let’s do it!
1. Register your site
To be able to use ReCaptcha, you will need to register your website on ReCaptcha’s website first.
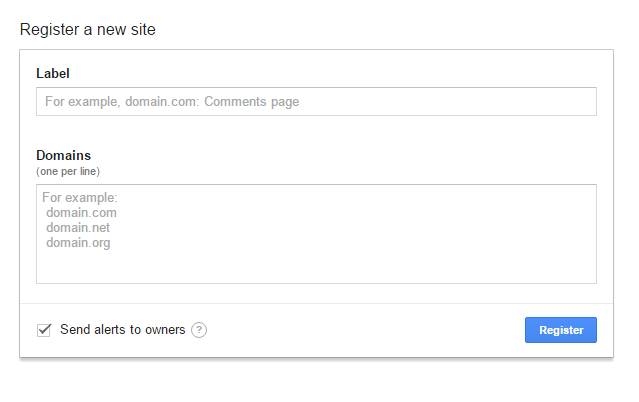
After successful registration, you will get a pair of keys to use with your ReCaptcha. Leave the page open or copy the keys to a text file, we will need them soon.

2. HTML
We will use the contact form’s template from the previous tutorial + we will add a reCAPTCHA element and a hidden input next to it to help us with the JavaScript validation.
Let’s explain the HTML code a bit:
- we have an HTML contact form ready written with the Bootstrap markup
- the main 3rd party scripts & stylesheets that will be used are: jQuery, Bootstrap 4, CSS, and JavaScript
To add a ReCaptcha to your form, you just need:
- to include
<div class="g-recaptcha" data-sitekey="6LfKURIUAAAAAO50vlwWZkyK_G2ywqE52NU7YO0S">on a place you need it in your form (replace the site key with your own key from the first step) - Include the ReCaptcha JS to initialize ReCaptcha on the page —
<script src='https://www.google.com/recaptcha/api.js'><;/script> - I also use
data-callbackanddata-expired-callbackattributes on theg-recaptchadiv — these are optional and I will use them to make ReCaptcha cooperate with the validator
Here’s the full code of the form
3. PHP
In the PHP, we will be using Google’s client library that will take care of the verification.
You can use Composer to install it in your project, download it from GitHub or simply use the version I included in the Download package.
The major part of the code is also from my previous tutorial, so I will try to recap it just briefly.
Let’s name the file contact.php and see what we’ll do in it:
- in the beginning, we need to require the ReCaptcha PHP library —
require('recaptcha-master/src/autoload.php'); - and do some configuration stuff, for example entering your Secret Key —
$recaptchaSecret = 'YOUR_SECRET_KEY'; - We also set the additional variables as the emails to send the email to, subject and the success/error messages
- then, you’ll need to initialize the class with your Secret Key -
$recaptcha = new \ReCaptcha\ReCaptcha($recaptchaSecret); - send a call to validate the ReCaptcha —
$response = $recaptcha->verify($_POST['g-recaptcha-response'], $_SERVER['REMOTE_ADDR']); - throw an exception if the validation fails —
if (!$response->isSuccess()) {...} - the script then composes the email message, sends it, and returns a JSON response. (The form is submitted by AJAX in default.)
4. JavaScript
Our JavaScript file contact.js will take care of:
- validating the inputs with Bootstrap validator
- handling the JS callbacks from ReCaptcha (we will fill in the hidden
input[data-recaptcha]based on the ReCaptcha’s response. If successful, we fill this input in = the validator will consider the form being valid.) - AJAX sending the form
- and lastly, displaying the success or error message and also emptying the form.
Here’s the code:
5. Result
This is it!
You should have a working contact Bootstrap contact form with ReCaptcha and PHP background now.
Thanks for the 50 clap ? if you enjoyed this article! Also, check out my other Bootstrap tutorials or my Bootstrap templates.
Originally published on Bootstrapious blog.
About The Author
Ondrej Svestka is a Bootstrap and front-end enthusiast and founder of Boostrapious.