
By Catalin Pit
This article will teach you how to build a voting application that displays the poll results in real-time. Each time someone votes, the application updates automatically and shows the new results.
Even though you will build a full-stack application, you will not write any backend code thanks to Hasura!
The application will use:
- Hasura GraphQL Engine for the backend
- React and Apollo for the frontend
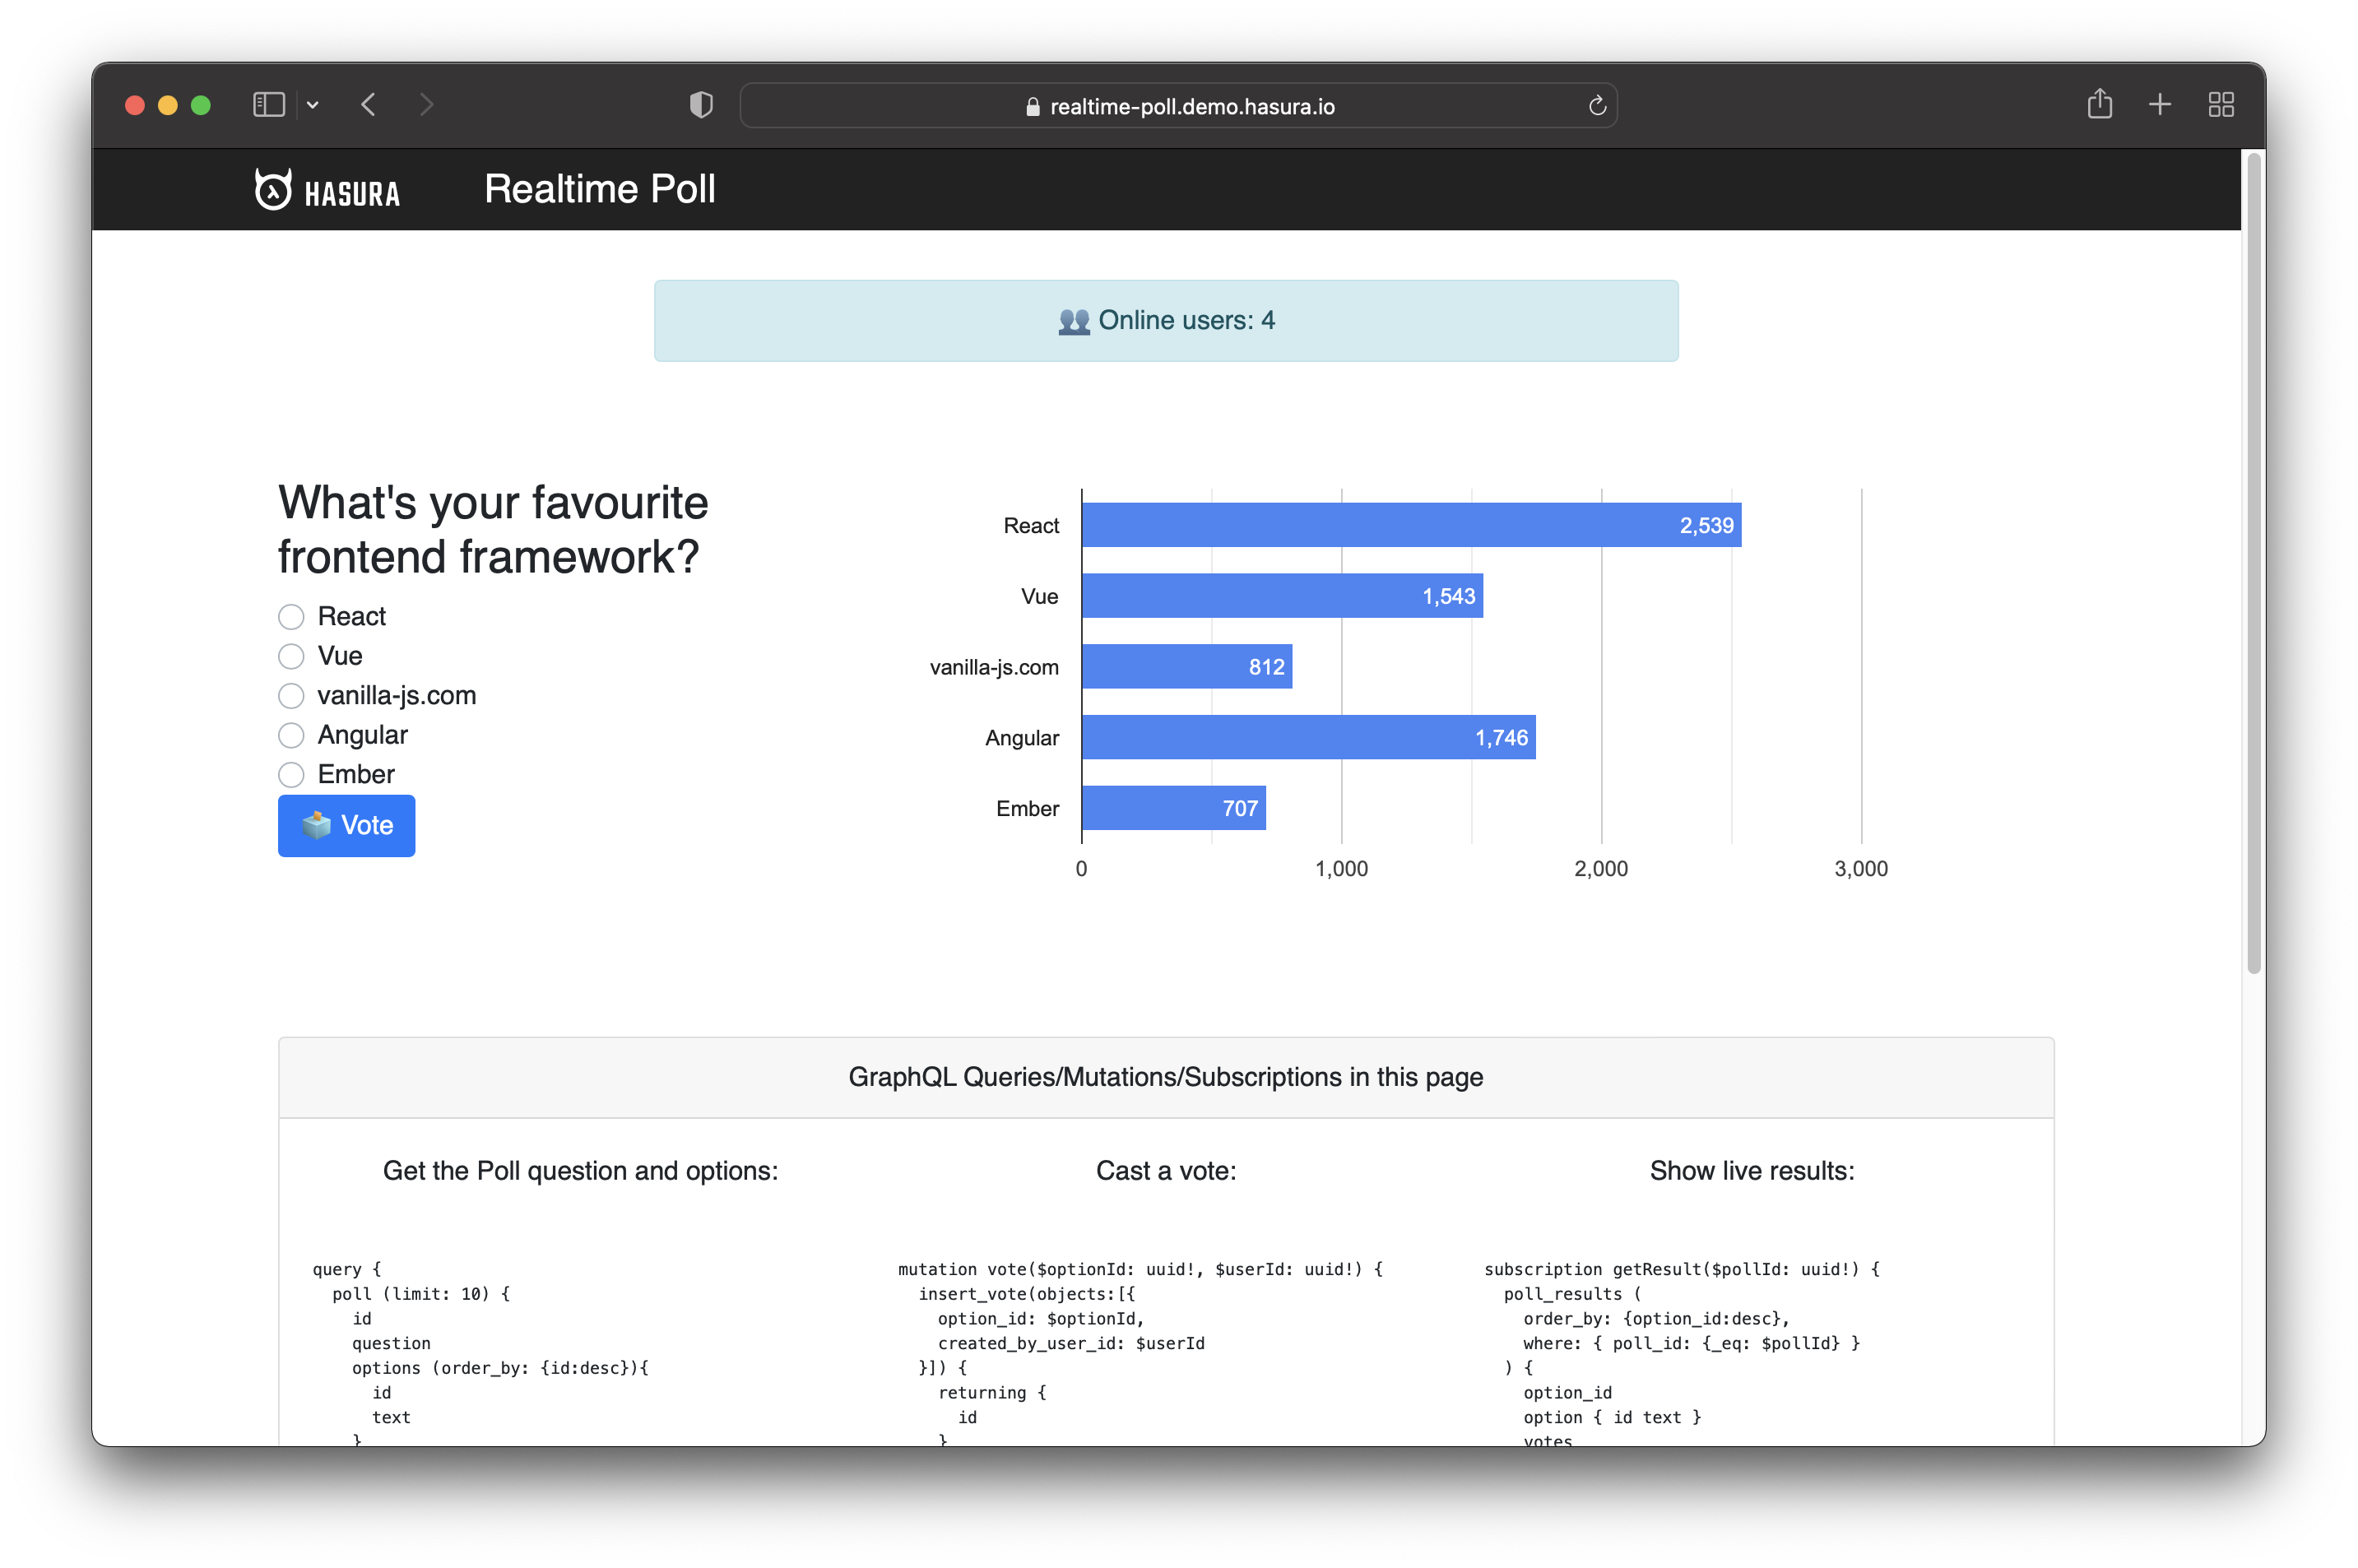
Live Demo | Backend Explorer | GitHub Repository
Why These Technologies?
Before going further, let's talk about the technologies we'll use for the application stack.
Hasura GraphQL Engine
Hasura is an open source GraphQL Engine that enables you to create an instant, real-time GraphQL API without writing backend code at all.
You might wonder how that works. Hasura connects to your database and it automatically generates the API based on your database tables and views. You get things like the GraphQL Schema and Resolvers out of the box.
Therefore, the reason for choosing Hasura is to speed up the process of building the real-time GraphQL API. Hasura does all the heavy lifting, so we can focus on other things.
React and Apollo Client
React is one of the most popular JavaScript frameworks with a great community. It's also versatile, allowing you to build both web and mobile applications.
Apollo Client is a fully-featured GraphQL client that allows you to build user interface components and fetch data via GraphQL seamlessly. The Apollo Client is also one of the most popular GraphQL clients.
Together, React and Apollo Client form a powerful combination that fits the requirements for the real-time voting application.
Data Modeling
The first step is to determine the structure of the database. The database will contain the following tables:
- user – a user is a person who votes in the poll
- poll – the poll represents the question (e.g. what is your favorite framework?)
- option – an option is a poll option that people can pick
- vote – a vote is the link between a user and a poll option. It represents the user’s vote.
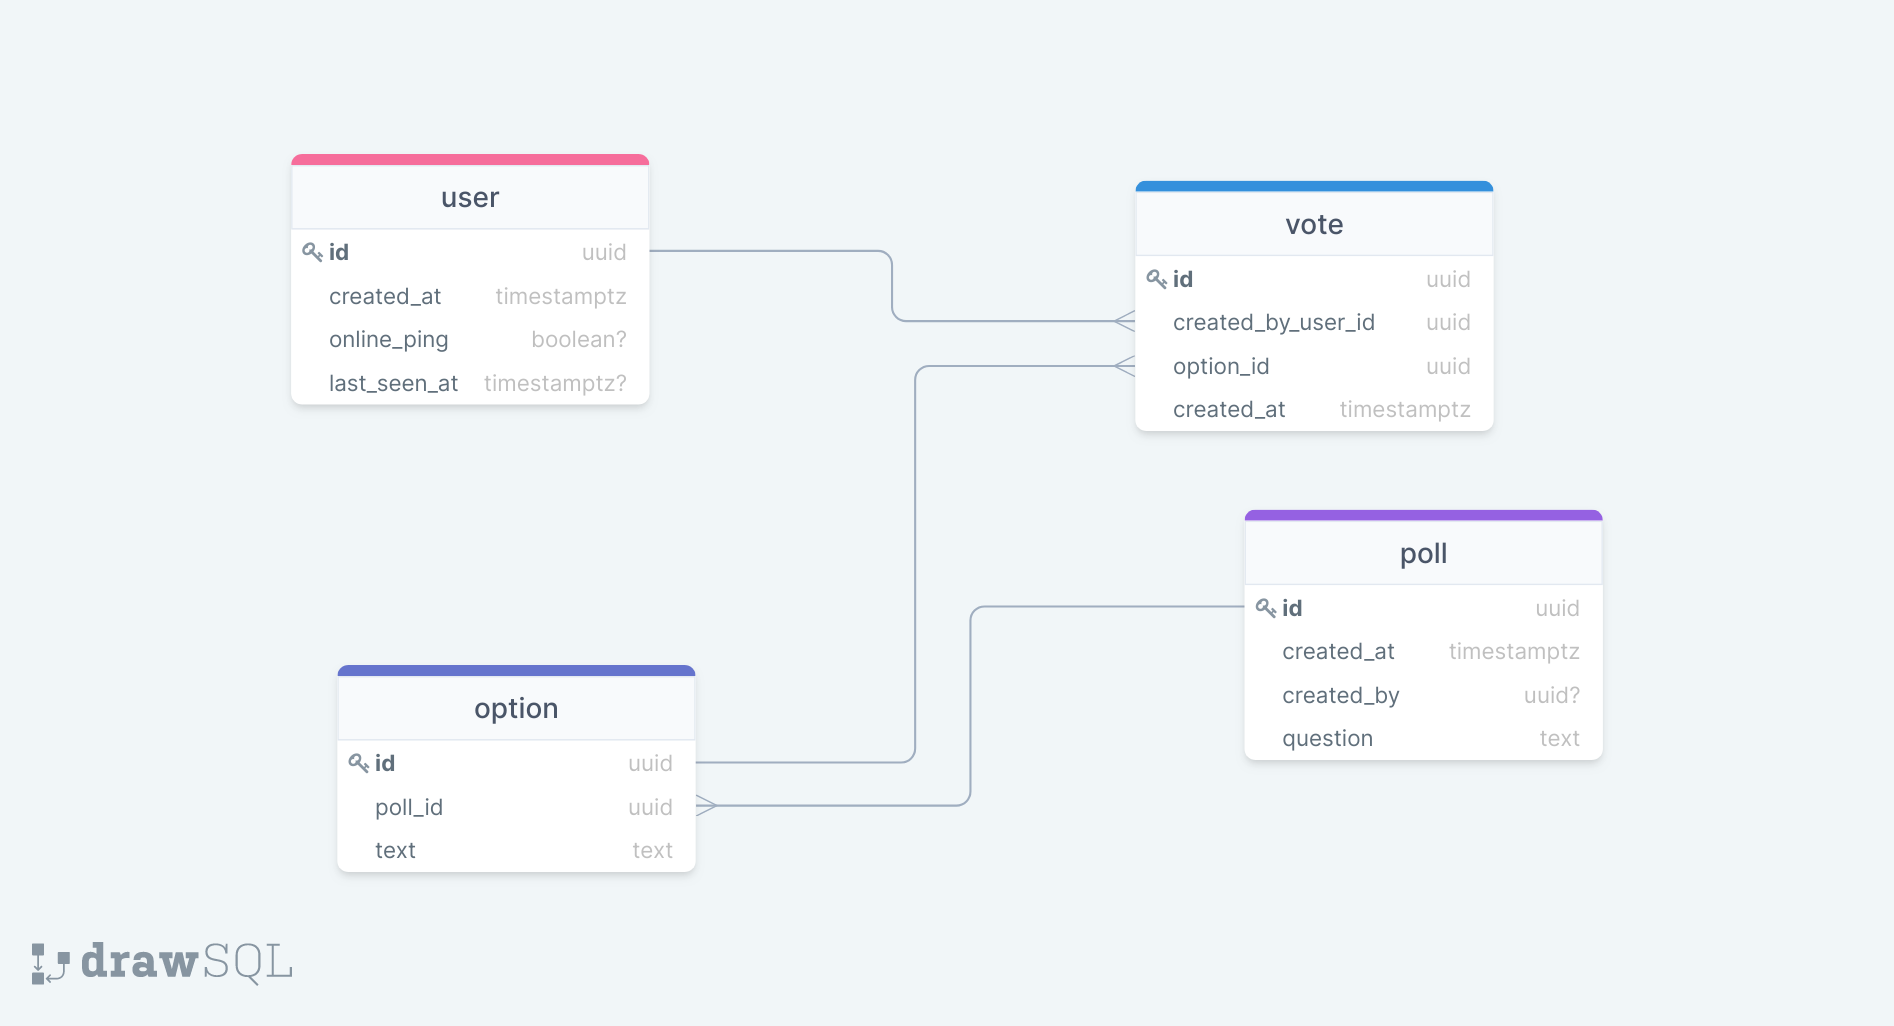
The figure above illustrates the database tables and relationships.
There is a one-to-many relationship between the user and vote. A user can vote multiple times, but one vote can belong to only one user.
The poll and option have a one-to-many relationship meaning that a poll can have multiple options, but an option belongs to only one poll.
Lastly, there is a one-to-many relationship between the option and vote tables. What that means is that you can only pick one option. One vote represents one option.
The database also has two views – online_users and poll_results. They show the number of online users and the results from the poll.
Backend Implementation with Hasura
You can use Hasura in two ways:
It's worth mentioning that Hasura Cloud also offers advanced performance, security, and monitoring features. Some of the things it offers are as follows:
- automatically scaling your application up or down
- monitoring and tracing
- rate limiting
These are just three benefits, but there are more. If you want to check them out, you can do it here.
This tutorial uses the cloud version, but you can follow the tutorial even if you use Hasura locally. With that out of the way, let's start building the backend.
Database Setup
After setting up the account, go to the project’s dashboard and click on the "DATA" tab.
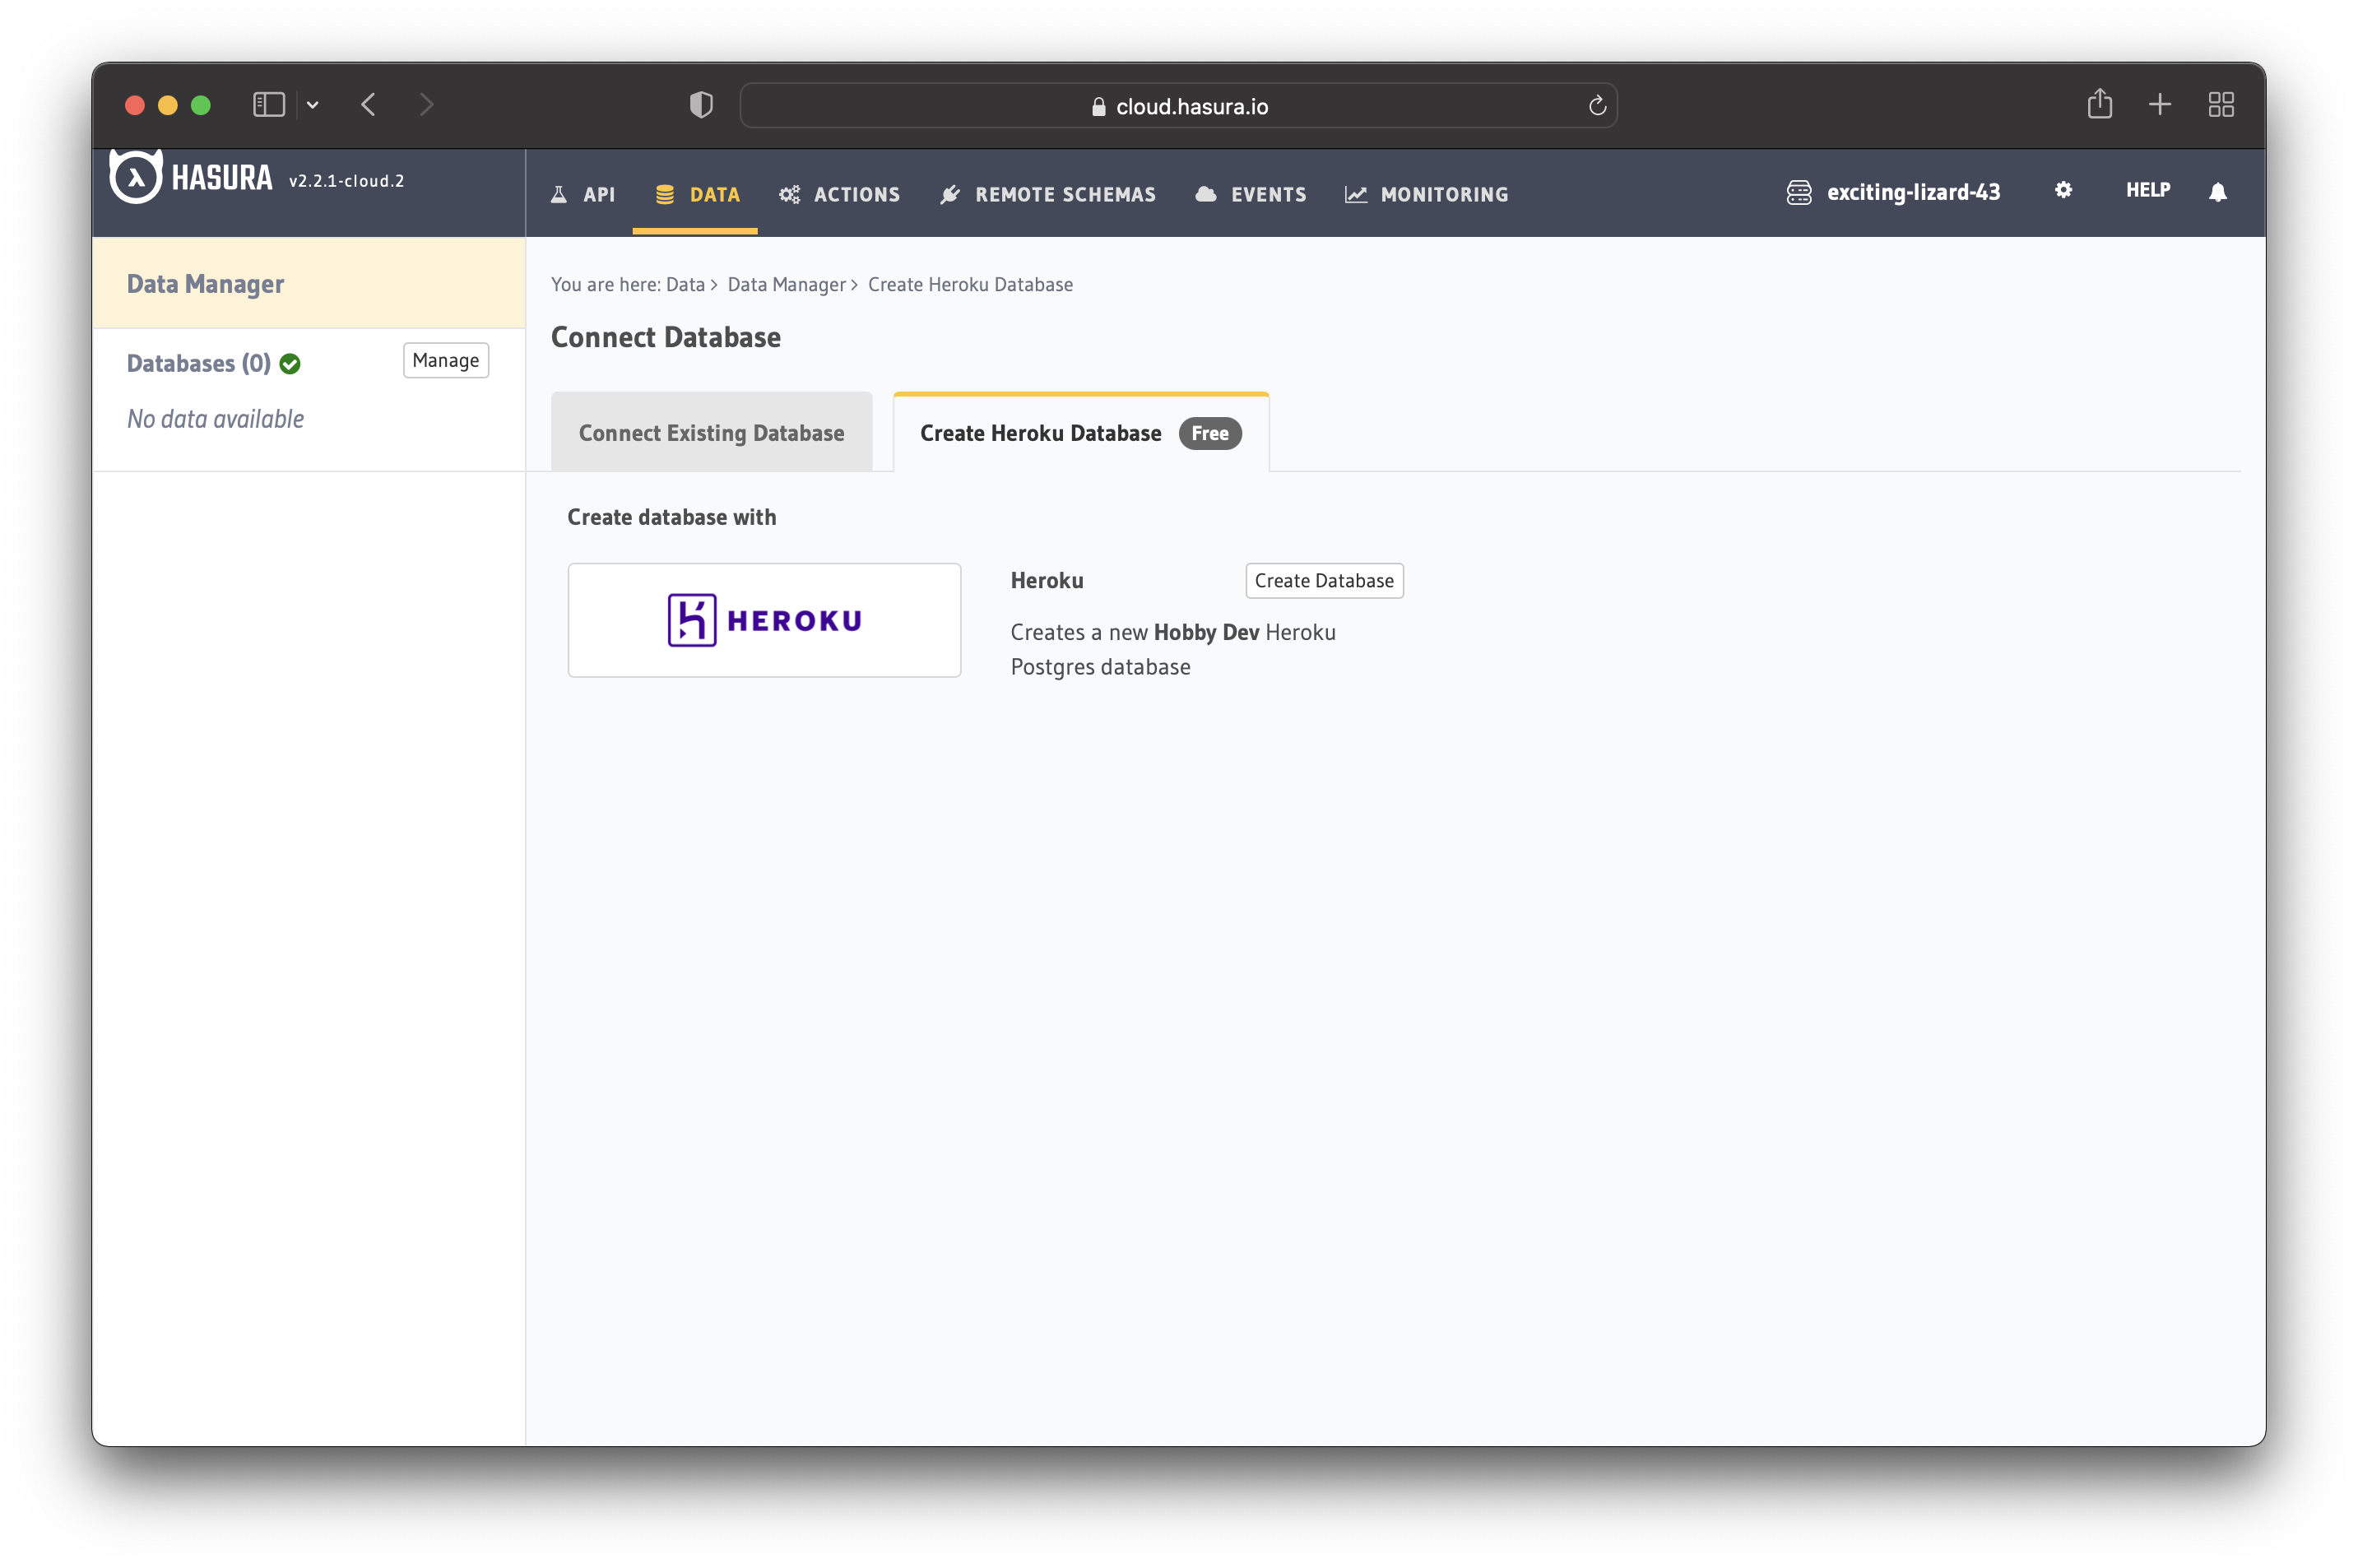
In the "DATA" tab, you can connect to an existing database or create a new one on Heroku. We will create a new database so click on the "Create Heroku Database" option.
After that, click on "Create Database" and you should have a PostgreSQL database up and running within seconds.
Database Tables
The next step involves creating the database tables. Go to your newly created database and click on the "Create Table" button.
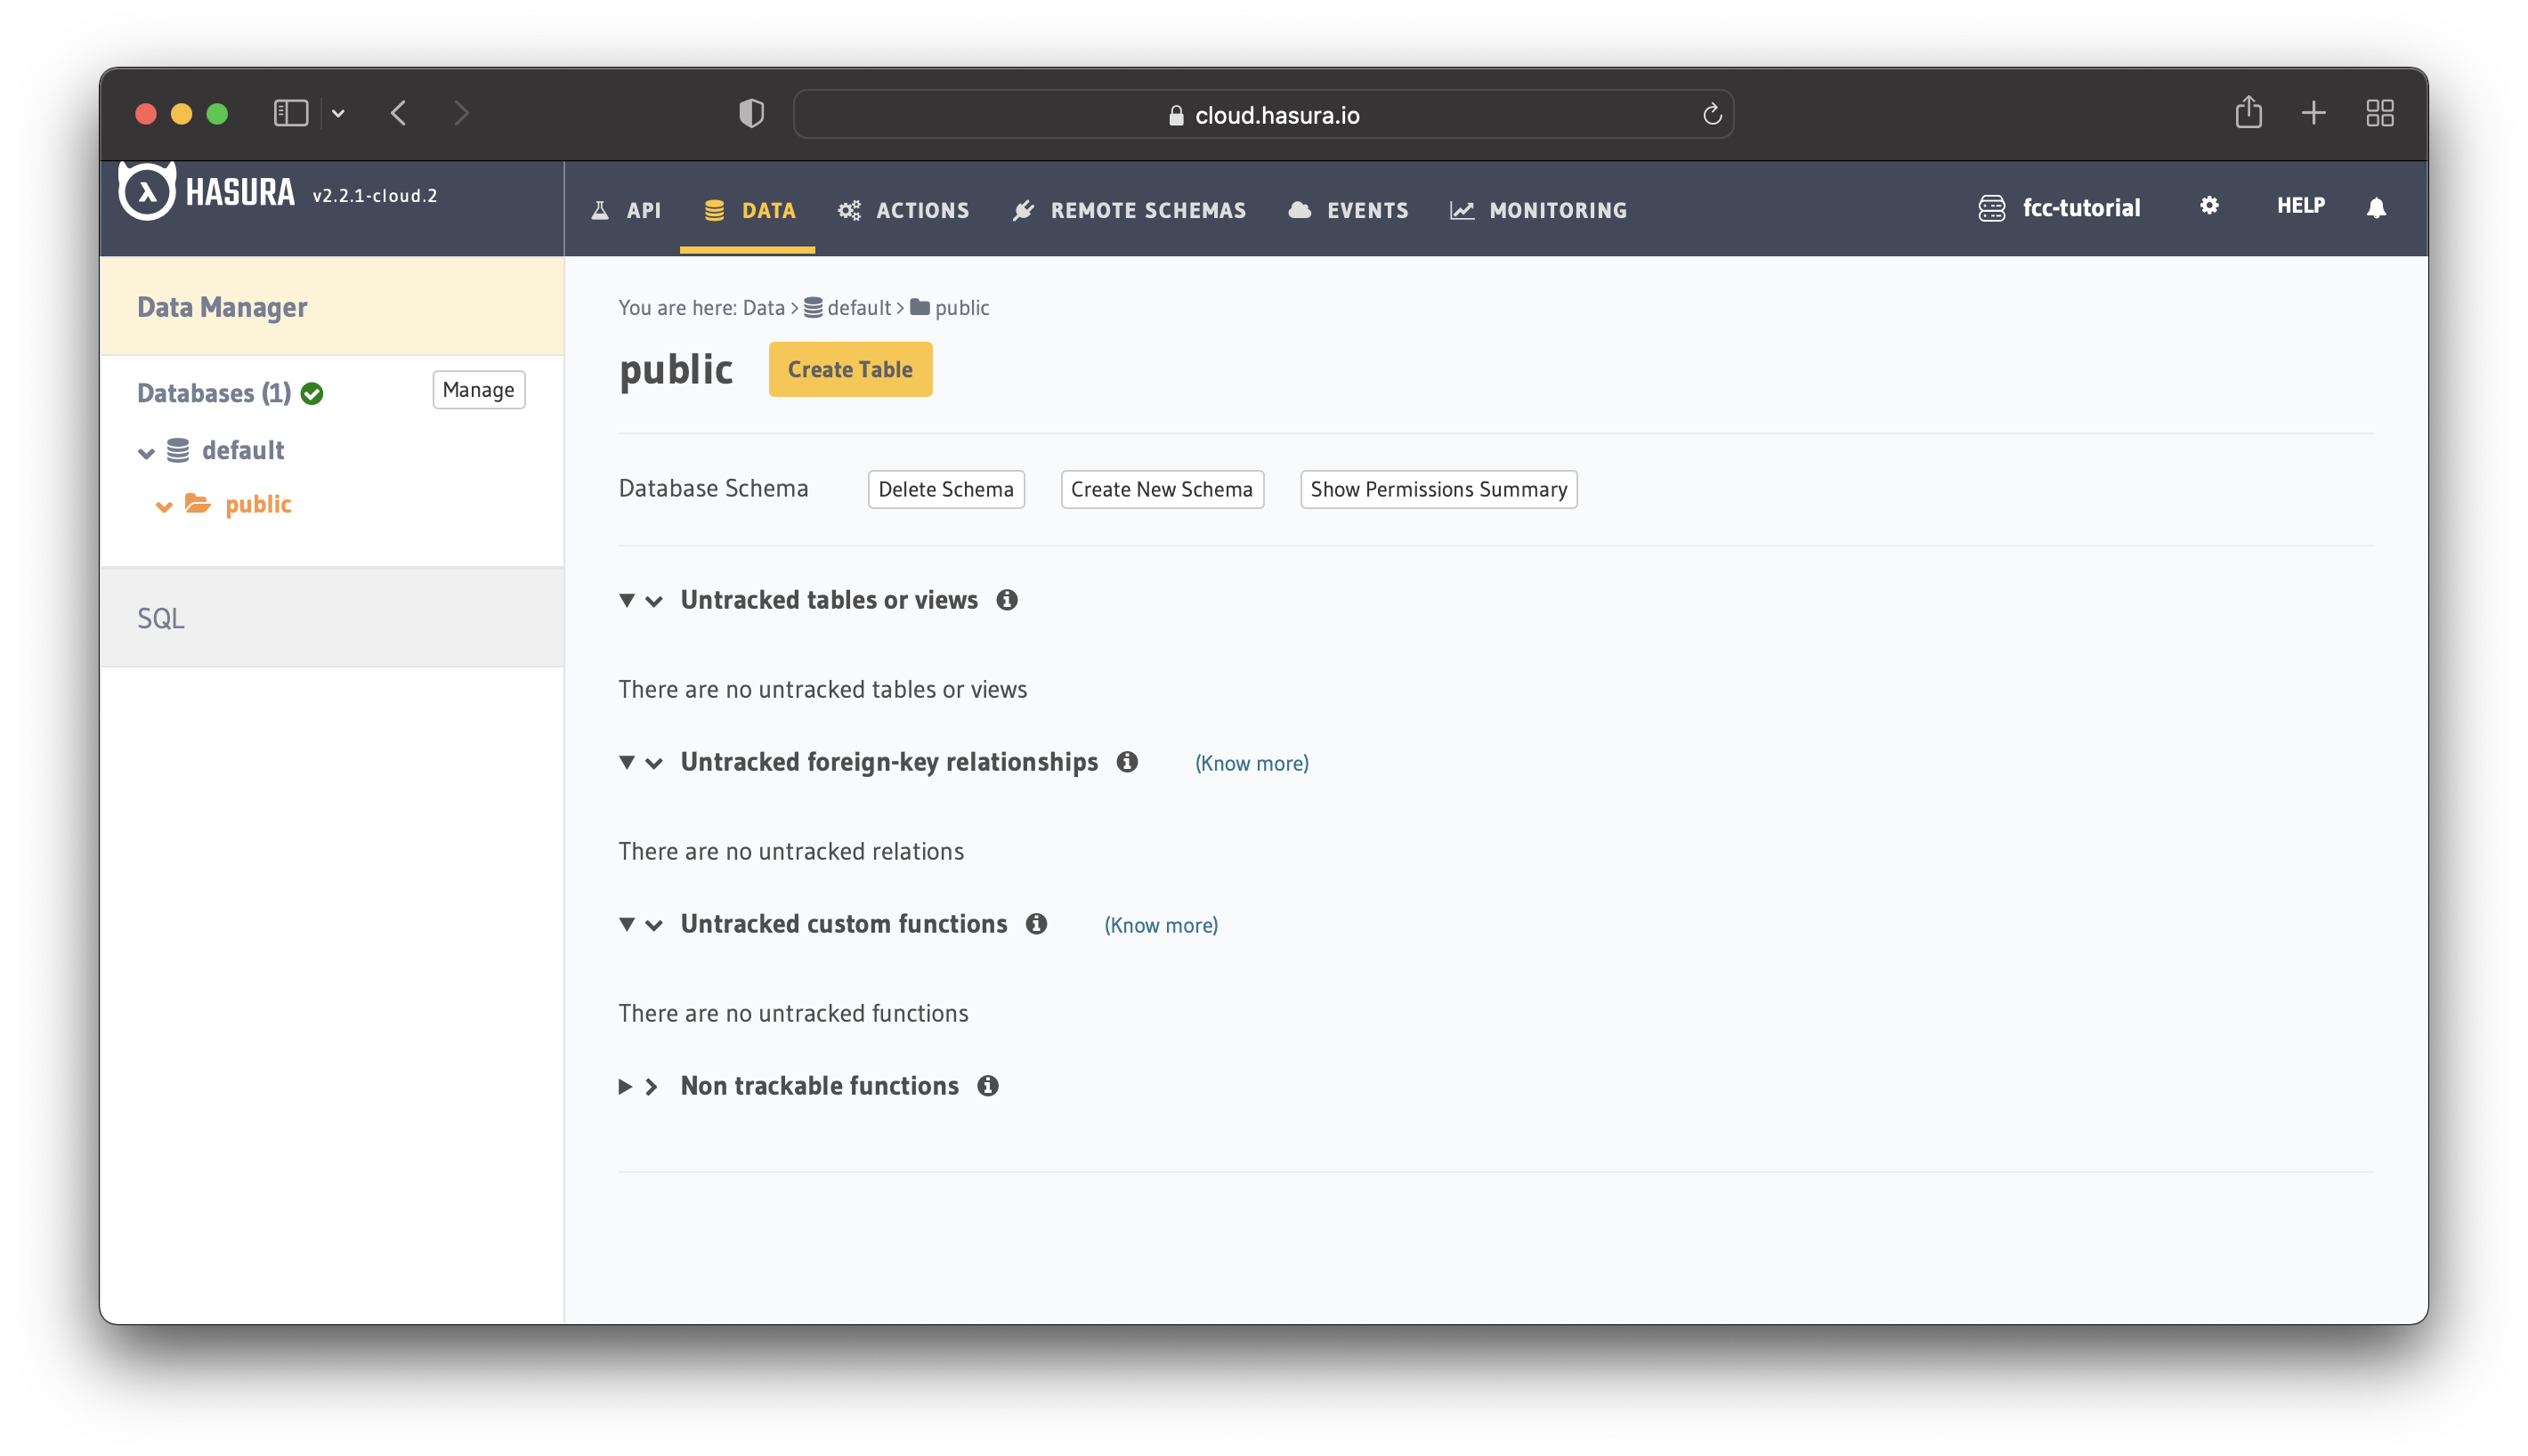
Clicking the button opens a new page where you can create a new table.
User Table
The "user" table has the following columns:
- id (primary key) – UUID,
gen_random_uuid(), Unique - created_at – Timestamp,
now() - online_ping – Boolean, Nullable
- last_seen_at -–Timestamp, Nullable
The figure illustrates the table columns, types, and other configurations.
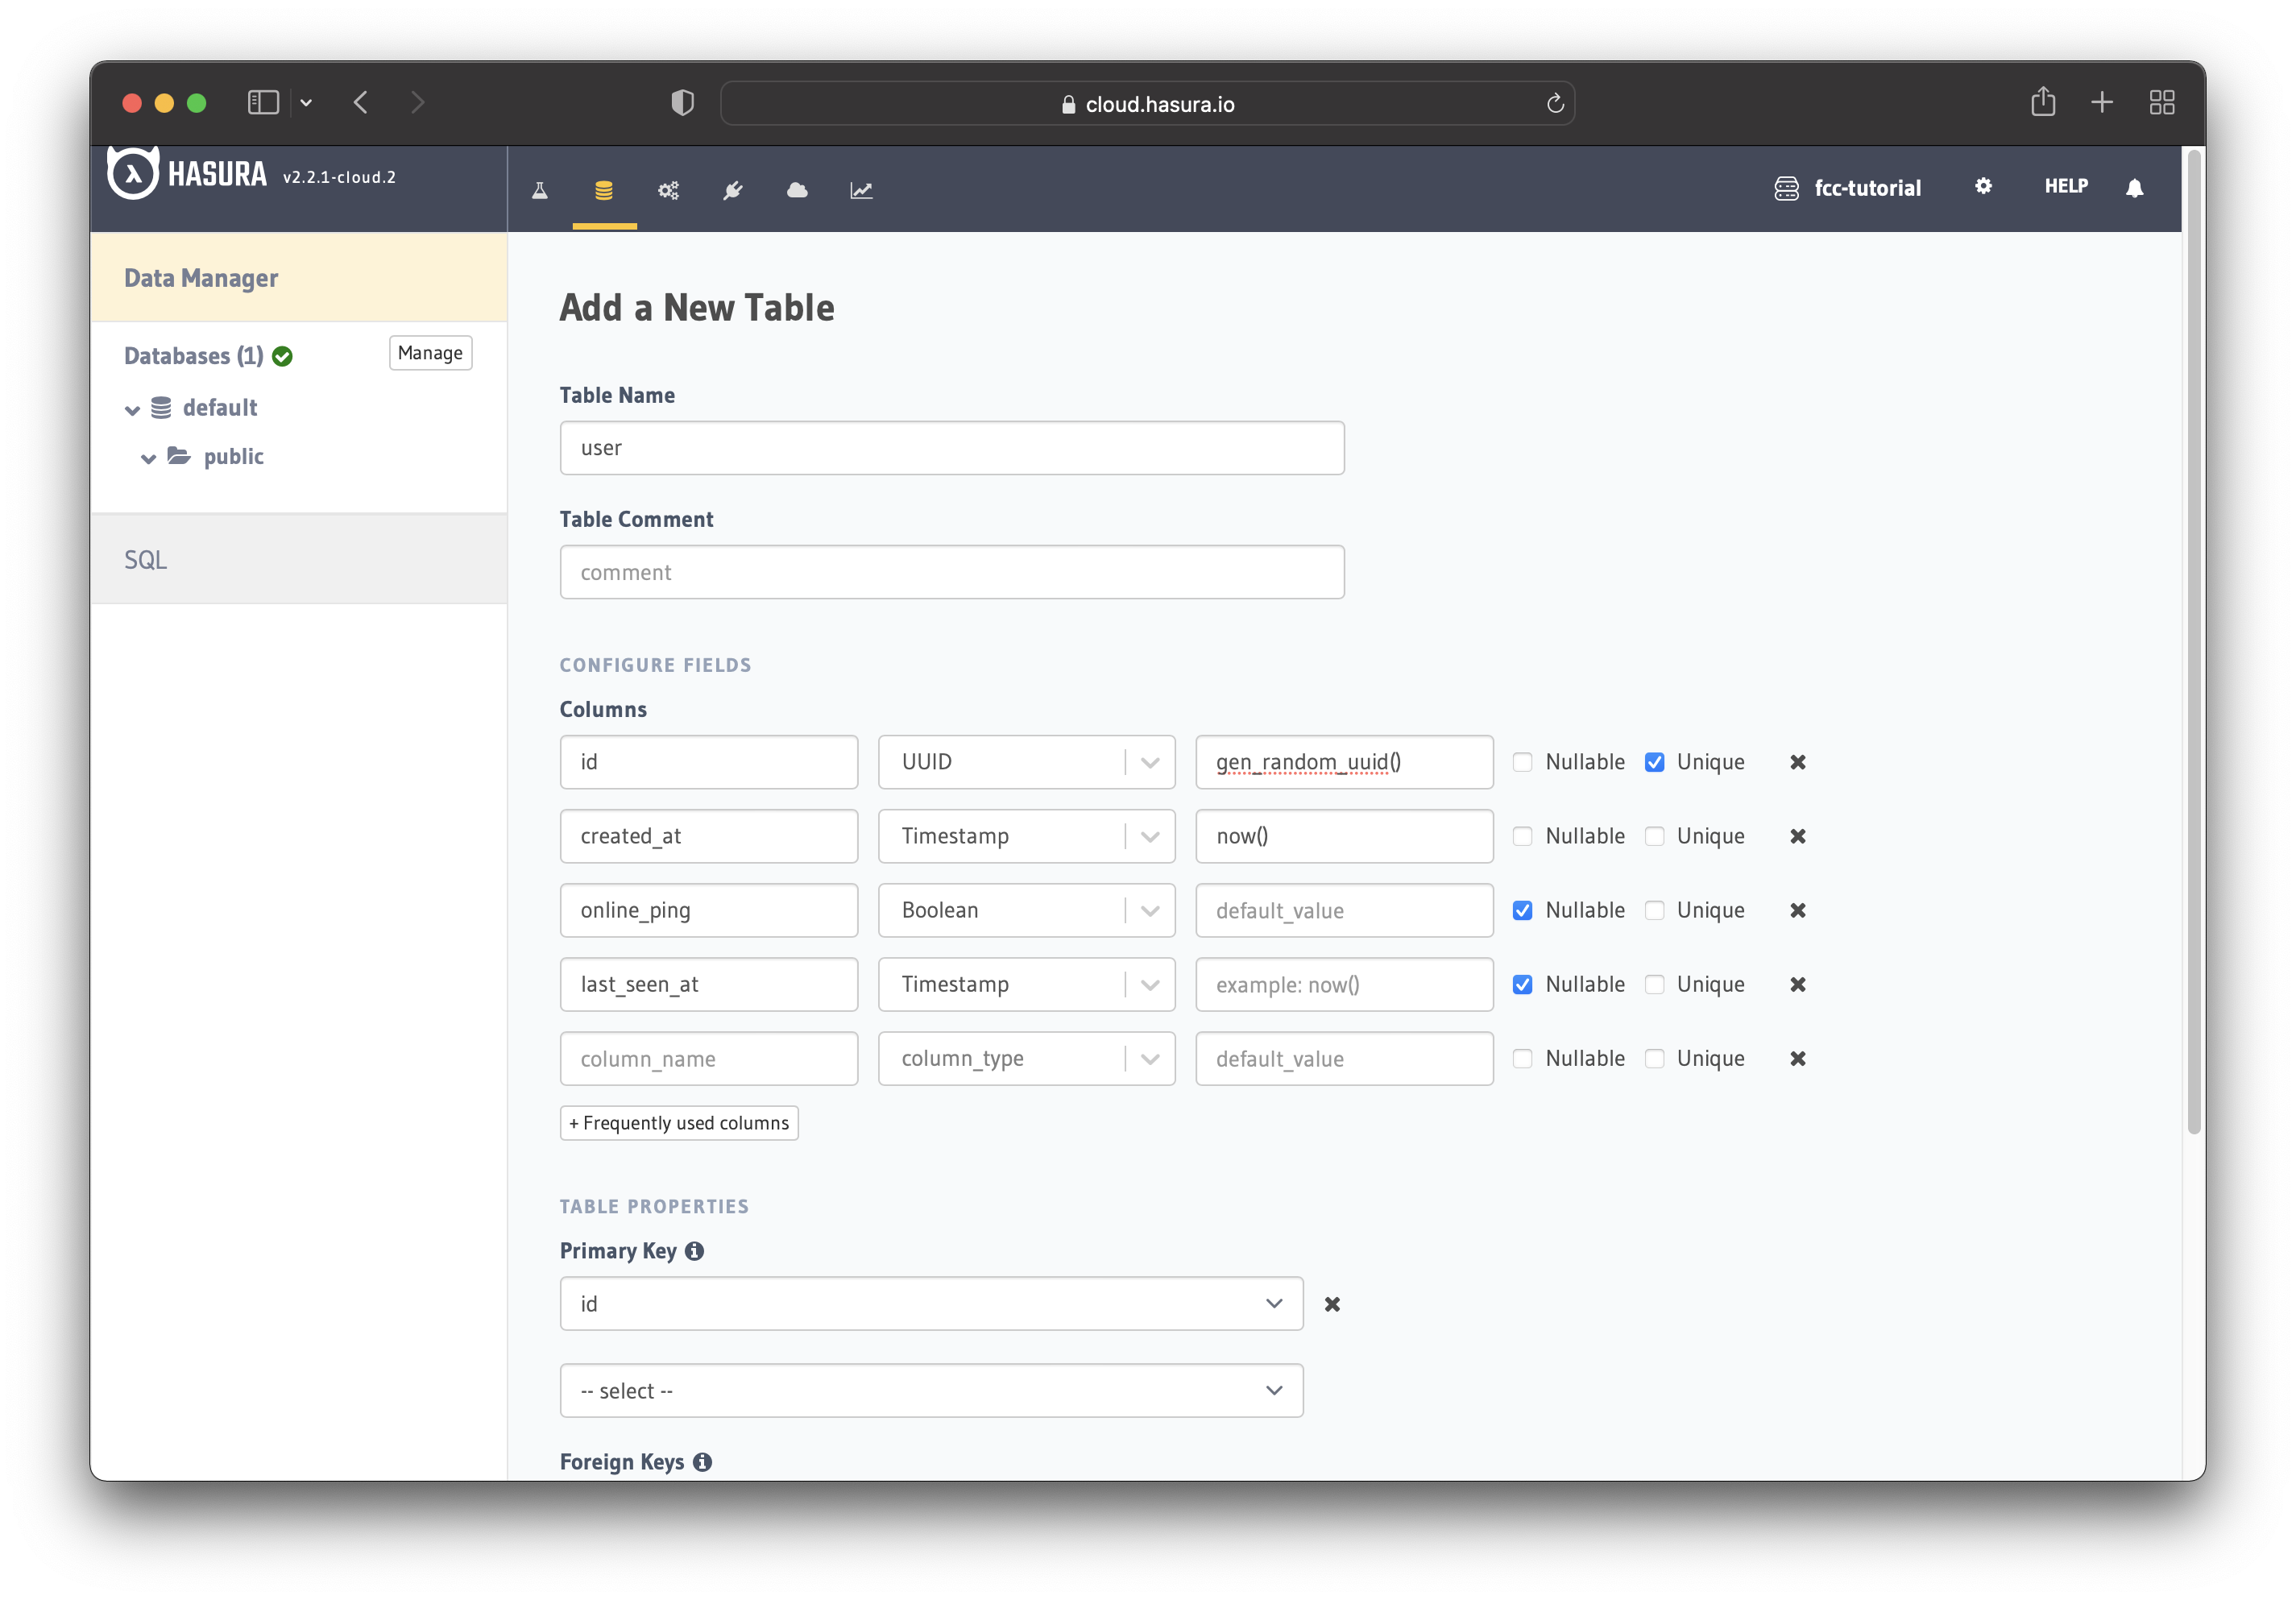
Before saving the table, set the id column as the Primary Key, as shown in the above figure.
After that, scroll down and press the "Add Table" button to save it. You can follow the same process to create the other tables.
Poll Table
The "poll" table has the following columns:
- id (primary key) – UUID,
gen_random_uuid(), Unique - created_at – Timestamp,
now() - created_by – UUID, nullable
- question – text
Option Table
The "option" table has the following columns:
- id (primary key) – UUID,
gen_random_uuid(), Unique - poll_id – UUID
- text – text
Vote Table
The "vote" table has the following columns:
- id (primary key) – UUID,
gen_random_uuid(), Unique - created_by_user_id – UUID
- option_id – UUID
- created_at – Timestamp,
now()
Database Views
We will use views for the poll results and online users because they allow us to re-use complex queries. A view is the result of querying one or more tables.
You can think of a view as saving a complex query and giving it a name so you can re-use it. A view is called a "virtual table" and you can query it as you would query a regular table.
Poll Results
Displaying the poll results requires us to perform database joins on the poll, option and vote tables.
The first database join returns all the records from the vote table and the matching records from the option table. That is, it returns each vote and its associated poll option.
The second join returns all the records from the option table and the matching records from the poll table. That is, it returns all options and the poll they belong to.
After that, the view counts all the records returned and returns them as "votes".
CREATE
OR REPLACE VIEW "public"."poll_results" AS
SELECT
  poll.id AS poll_id,
  o.option_id,
  count(*) AS votes
FROM
  (
    (
      SELECT
        vote.option_id,
        option.poll_id,
        option.text
      FROM
        (
          vote
          LEFT JOIN option ON ((option.id = vote.option_id))
        )
    ) o
    LEFT JOIN poll ON ((poll.id = o.poll_id))
  )
GROUP BY
  poll.question,
  o.option_id,
  poll.id;
Where do you add these database views?
To add the database views, go to the "DATA" tab and click on the "SQL" option. The "SQL" page allows you to run SQL statements directly on the database.
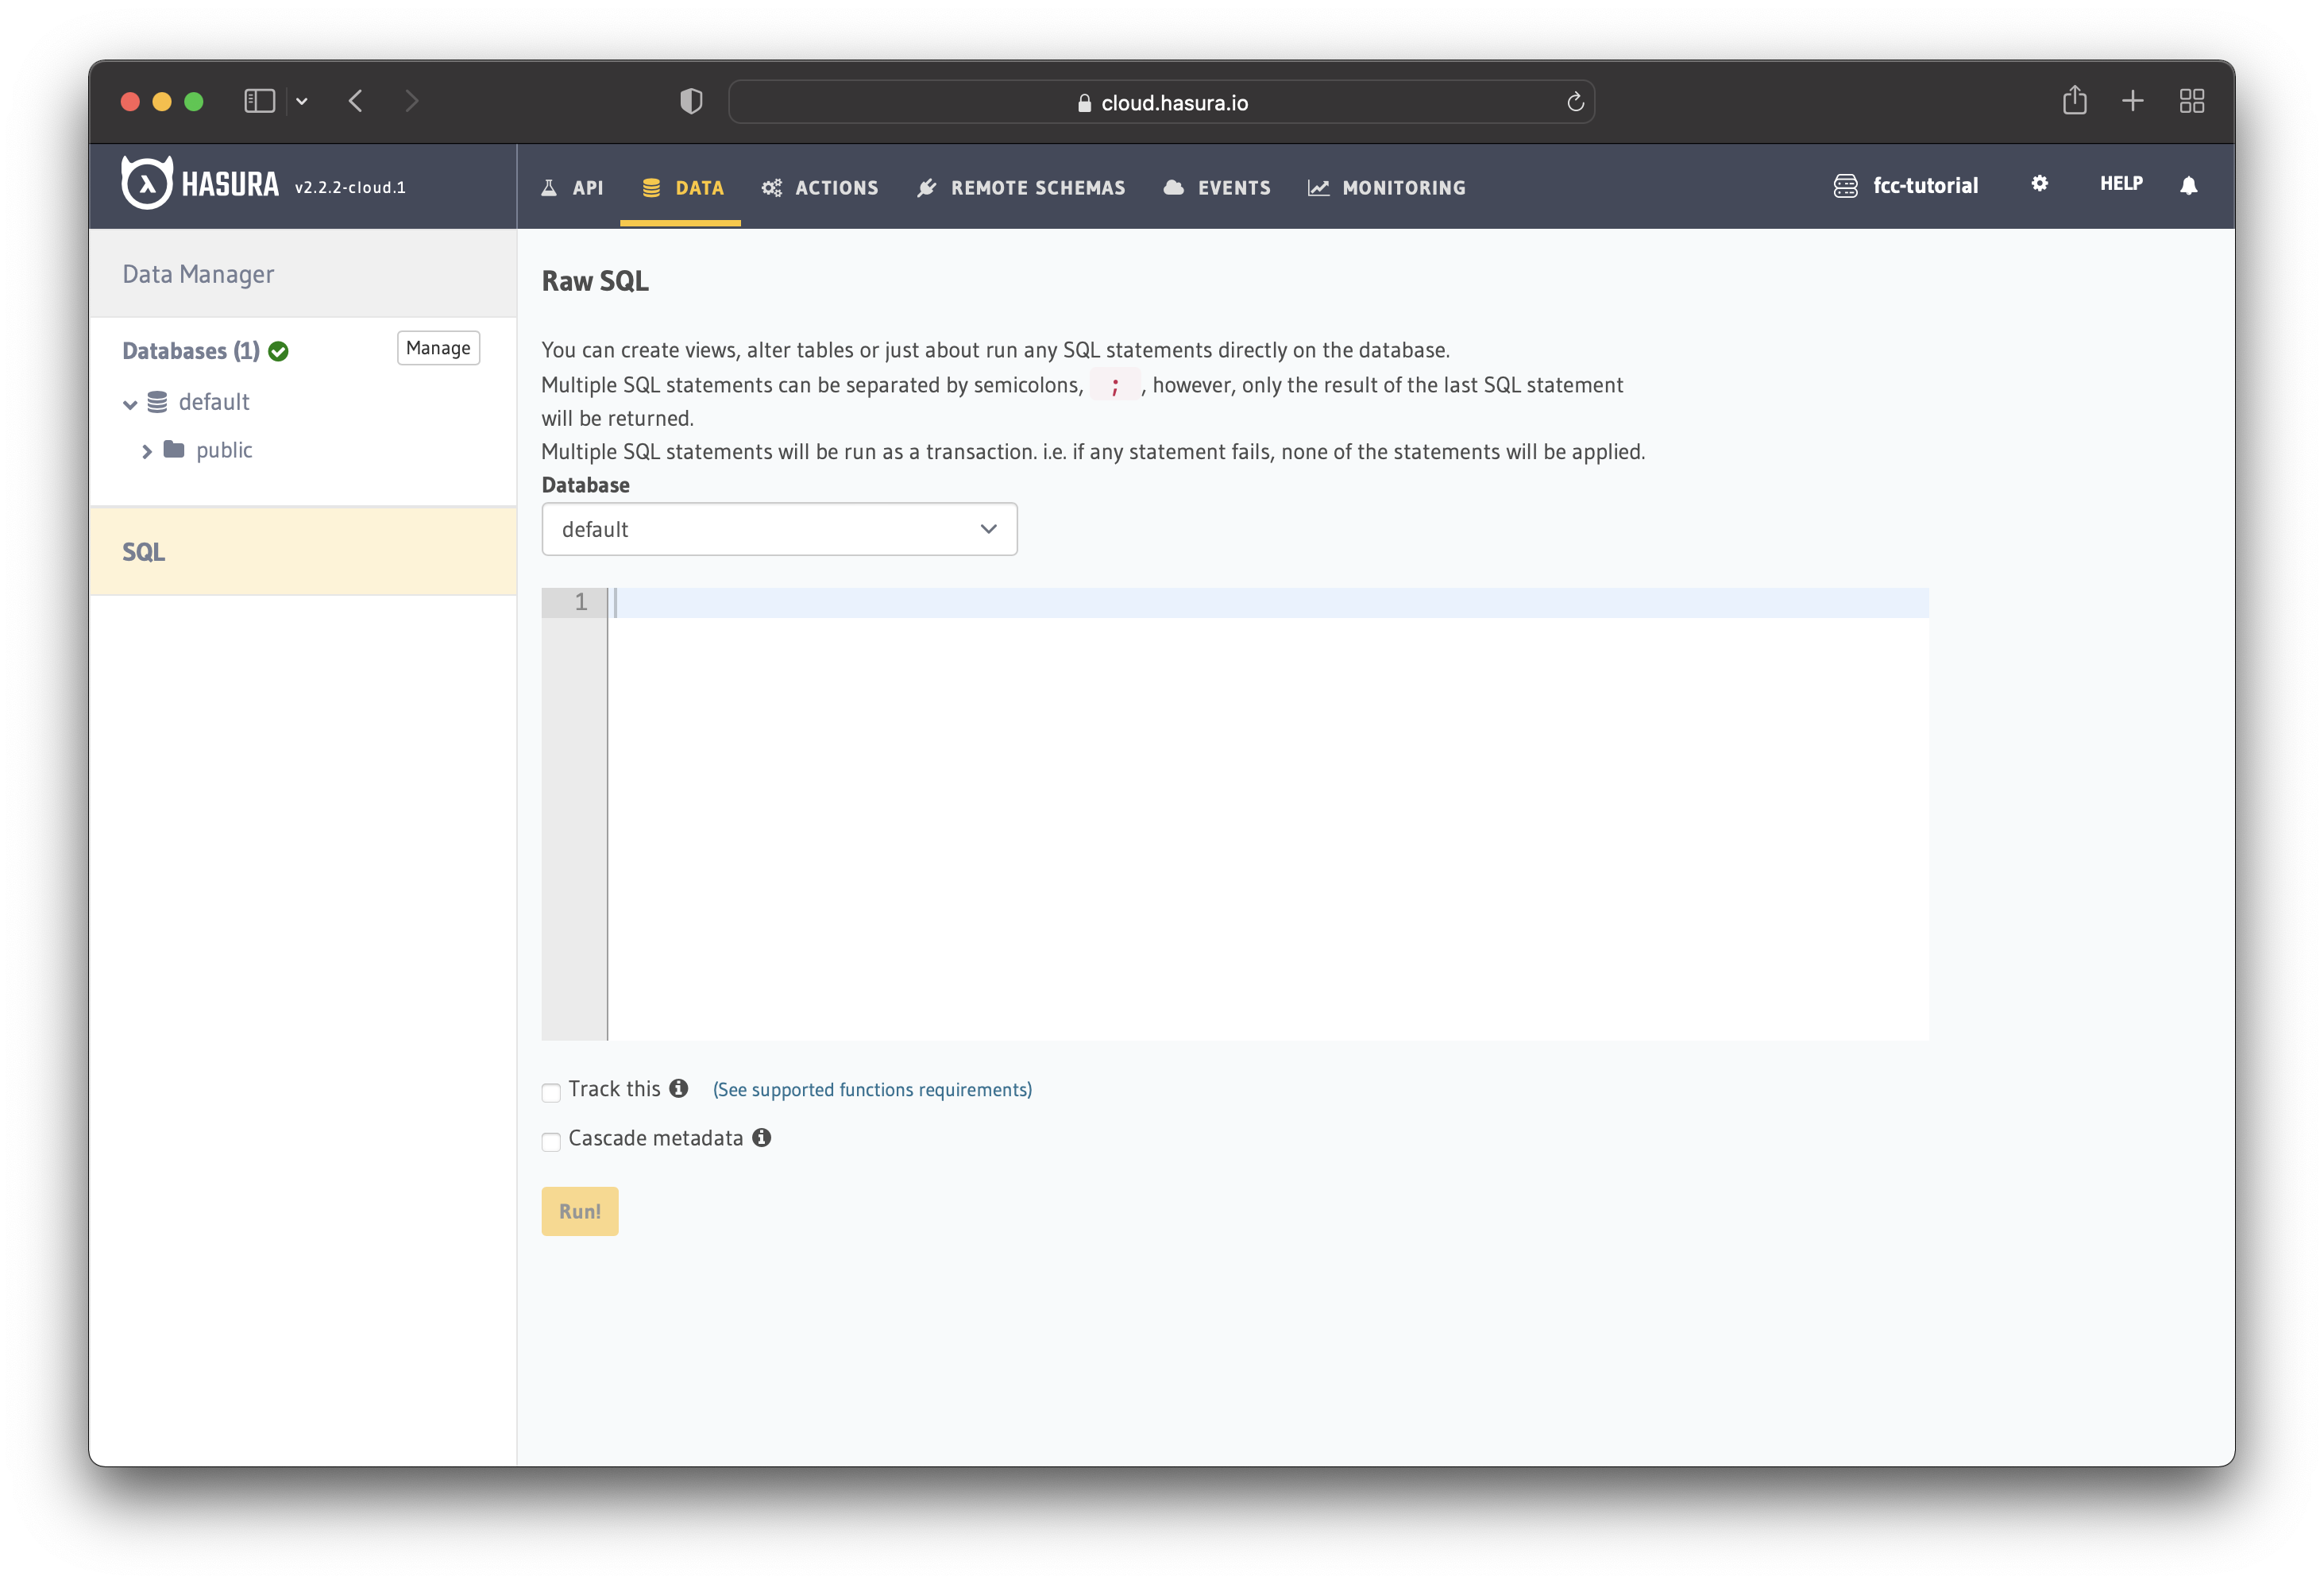
After that, add the SQL code and click on the "Run!" button. If there are no errors, you should be able to access and use the newly created view.
Online Users
For the number of online users, we can also use a view.
The users table has a property last_seen_at that keeps track of the users’ last login. We can use this property to determine the number of logged-in users (online).
CREATE
OR REPLACE VIEW "public"."online_users" AS
SELECT
  count(*) AS count
FROM
  "user"
WHERE
  (
    "user".last_seen_at > (now() - '00:00:15' :: interval)
  );
The above view counts the number of users seen in the last 15 seconds. If they logged in during the last 15 seconds, we count them as online users.
Relationships
The last step in implementing the backend is configuring the relationships between tables. With Hasura, you can create relationships between tables in two ways:
- using foreign key constrains
- manually (when it's not possible to use foreign key constraints)
Going further, we will create relationships by adding foreign key constraints. If you want to read more about relationships, the documentation has a comprehensive section on table relationships.
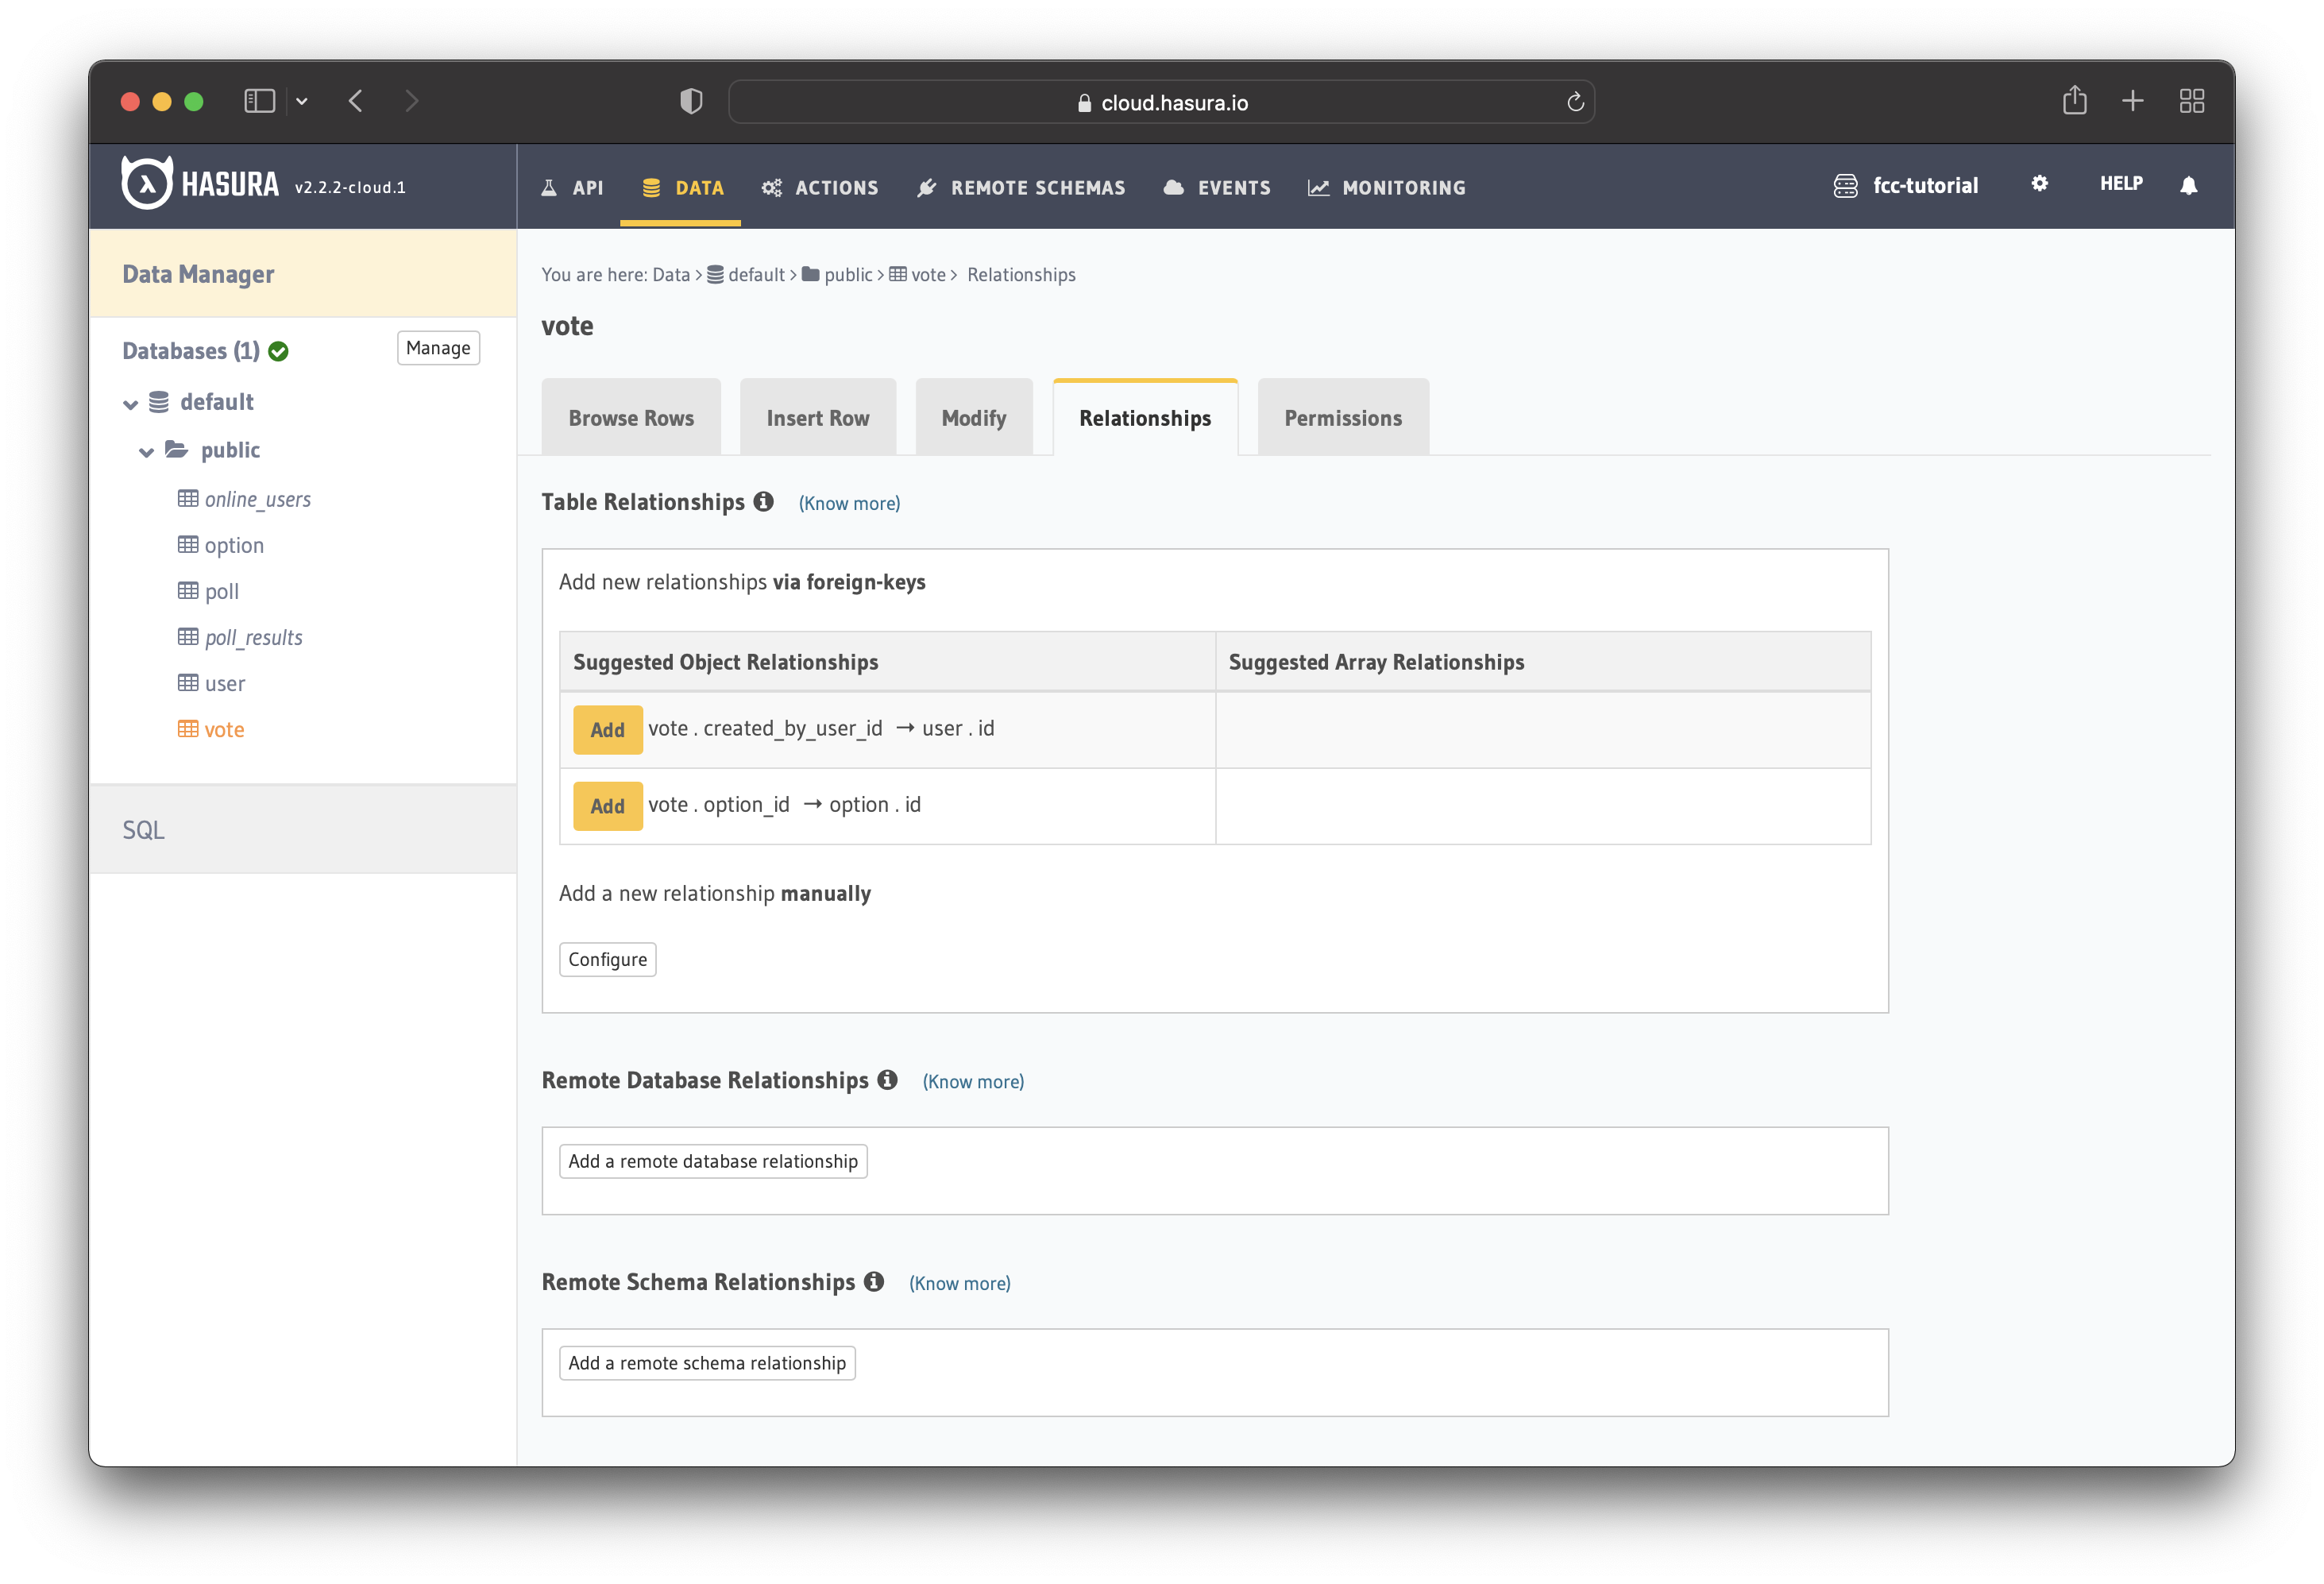
User – Vote
Navigate to "Modify" in the vote table and click on the button saying "Add a foreign key".
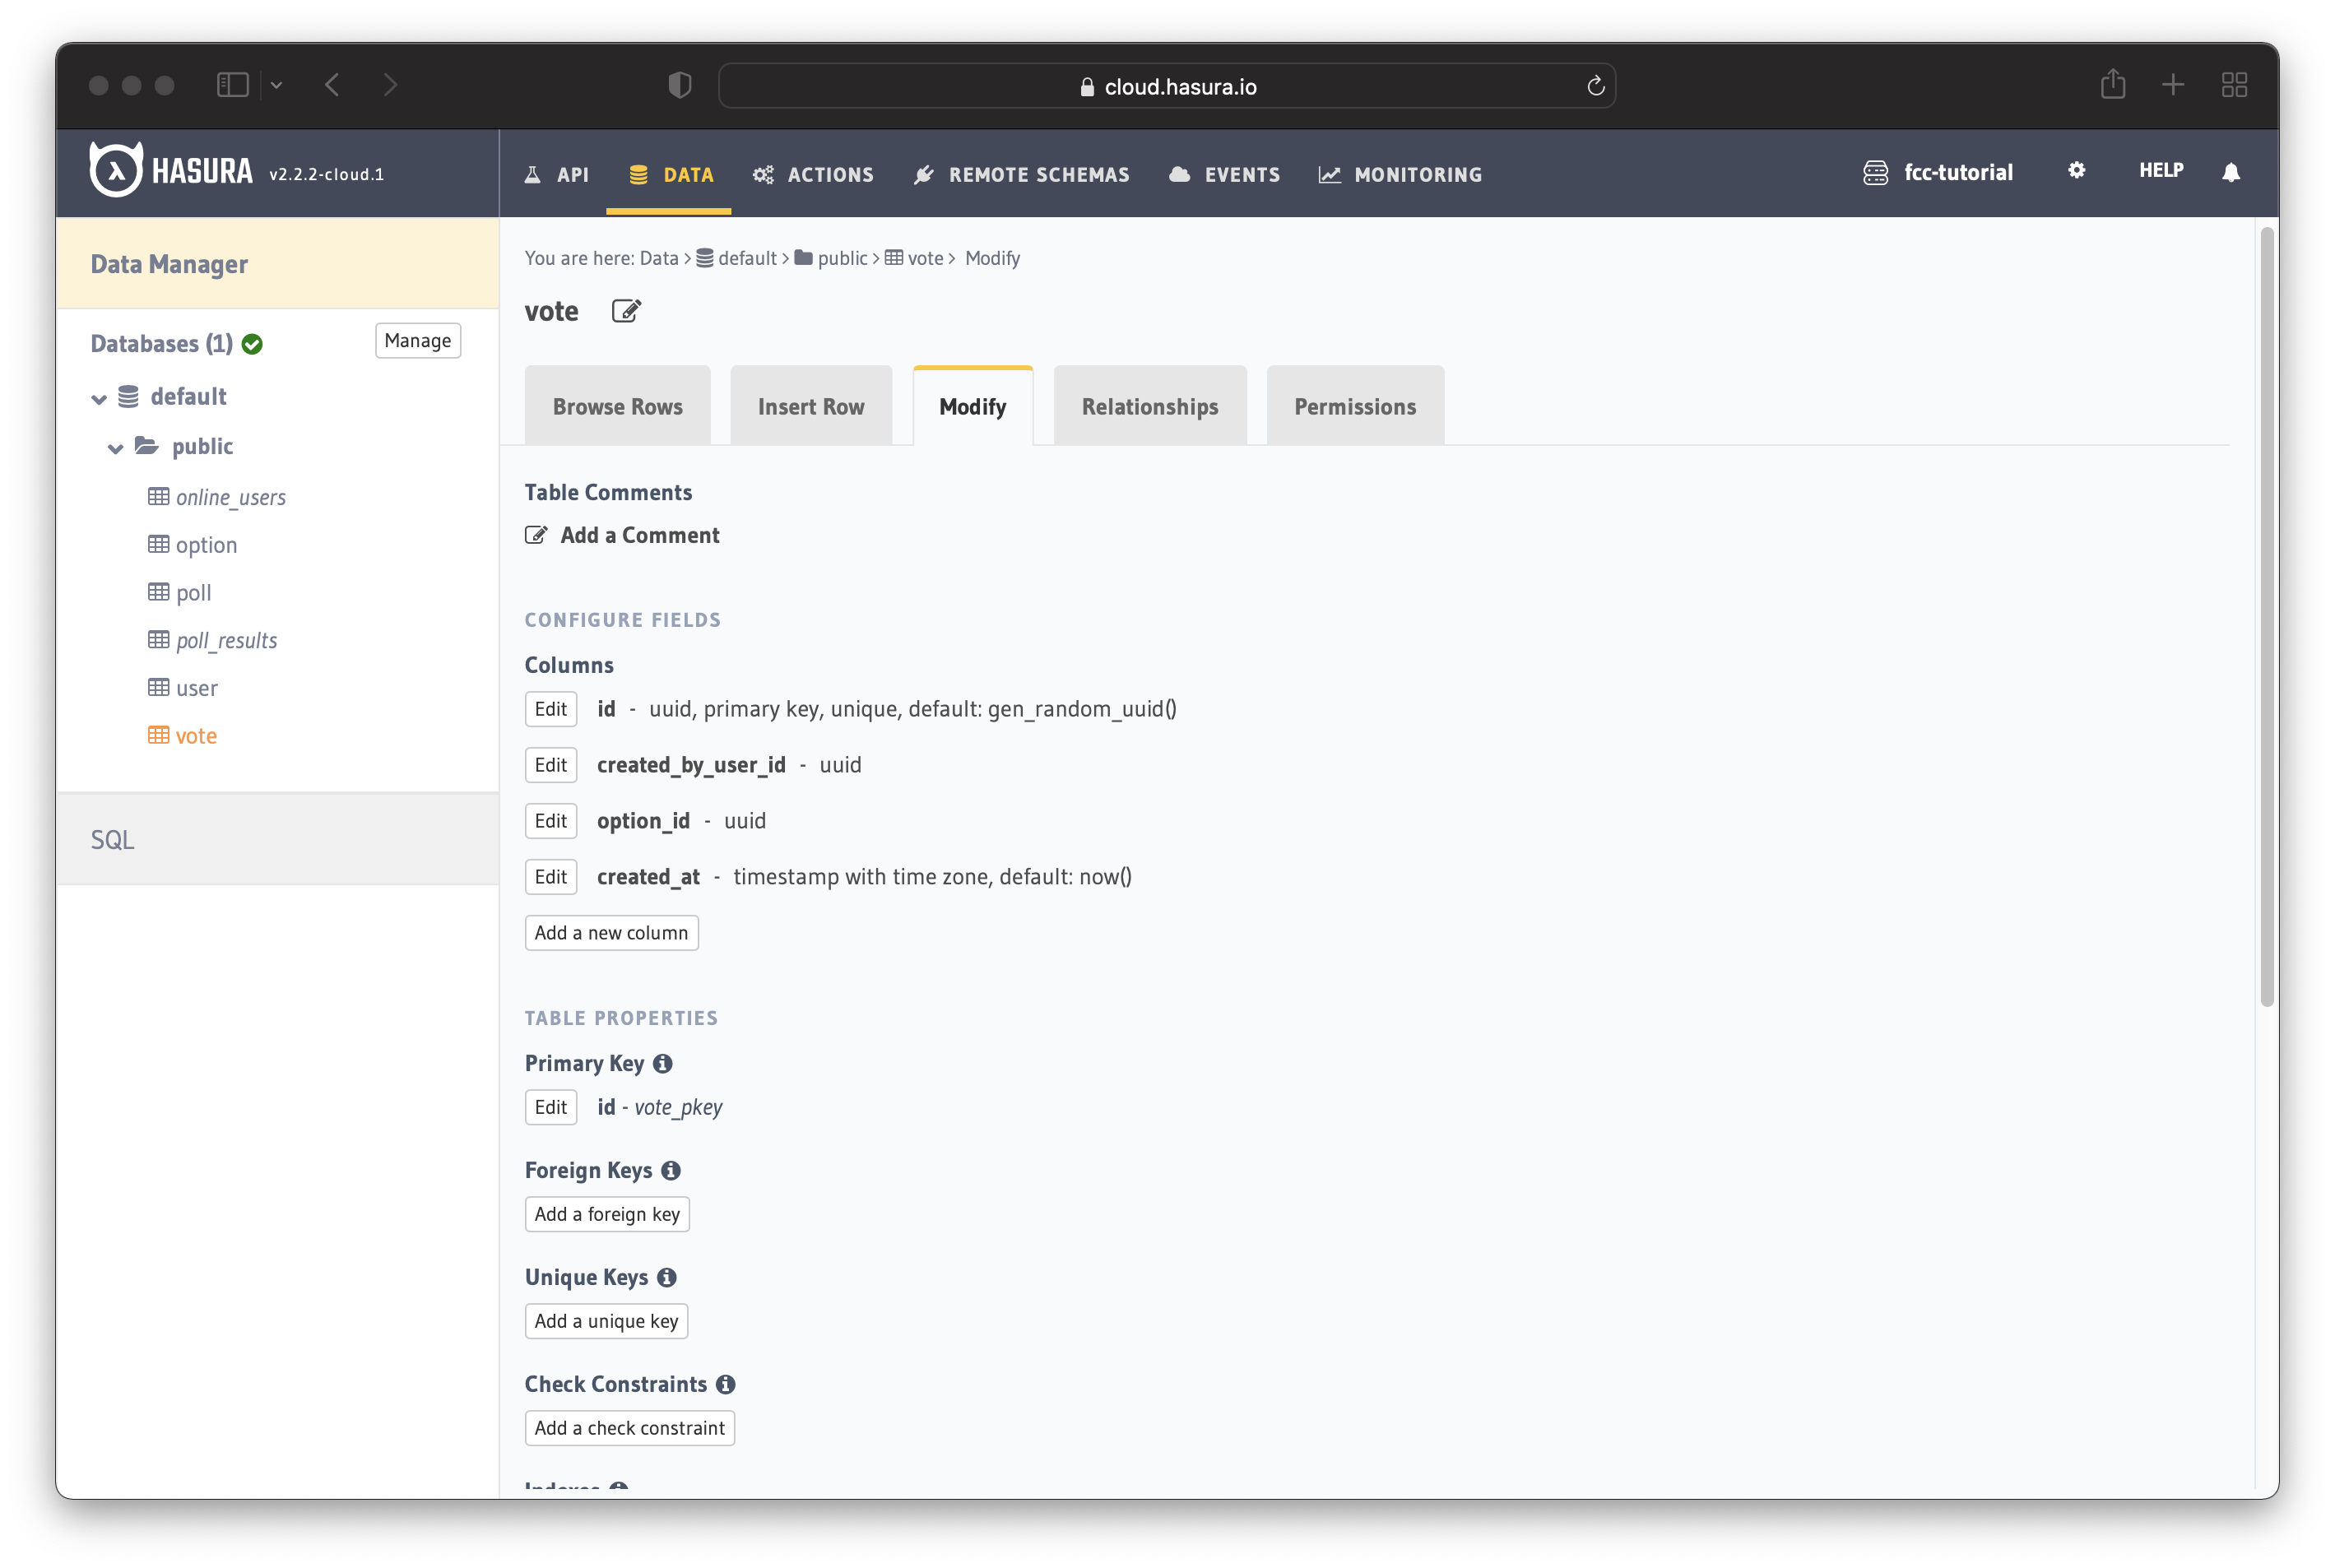
Let's configure the created_by_user_id column as a foreign key for the id column in the users table.
The image illustrates the process of adding foreign keys.
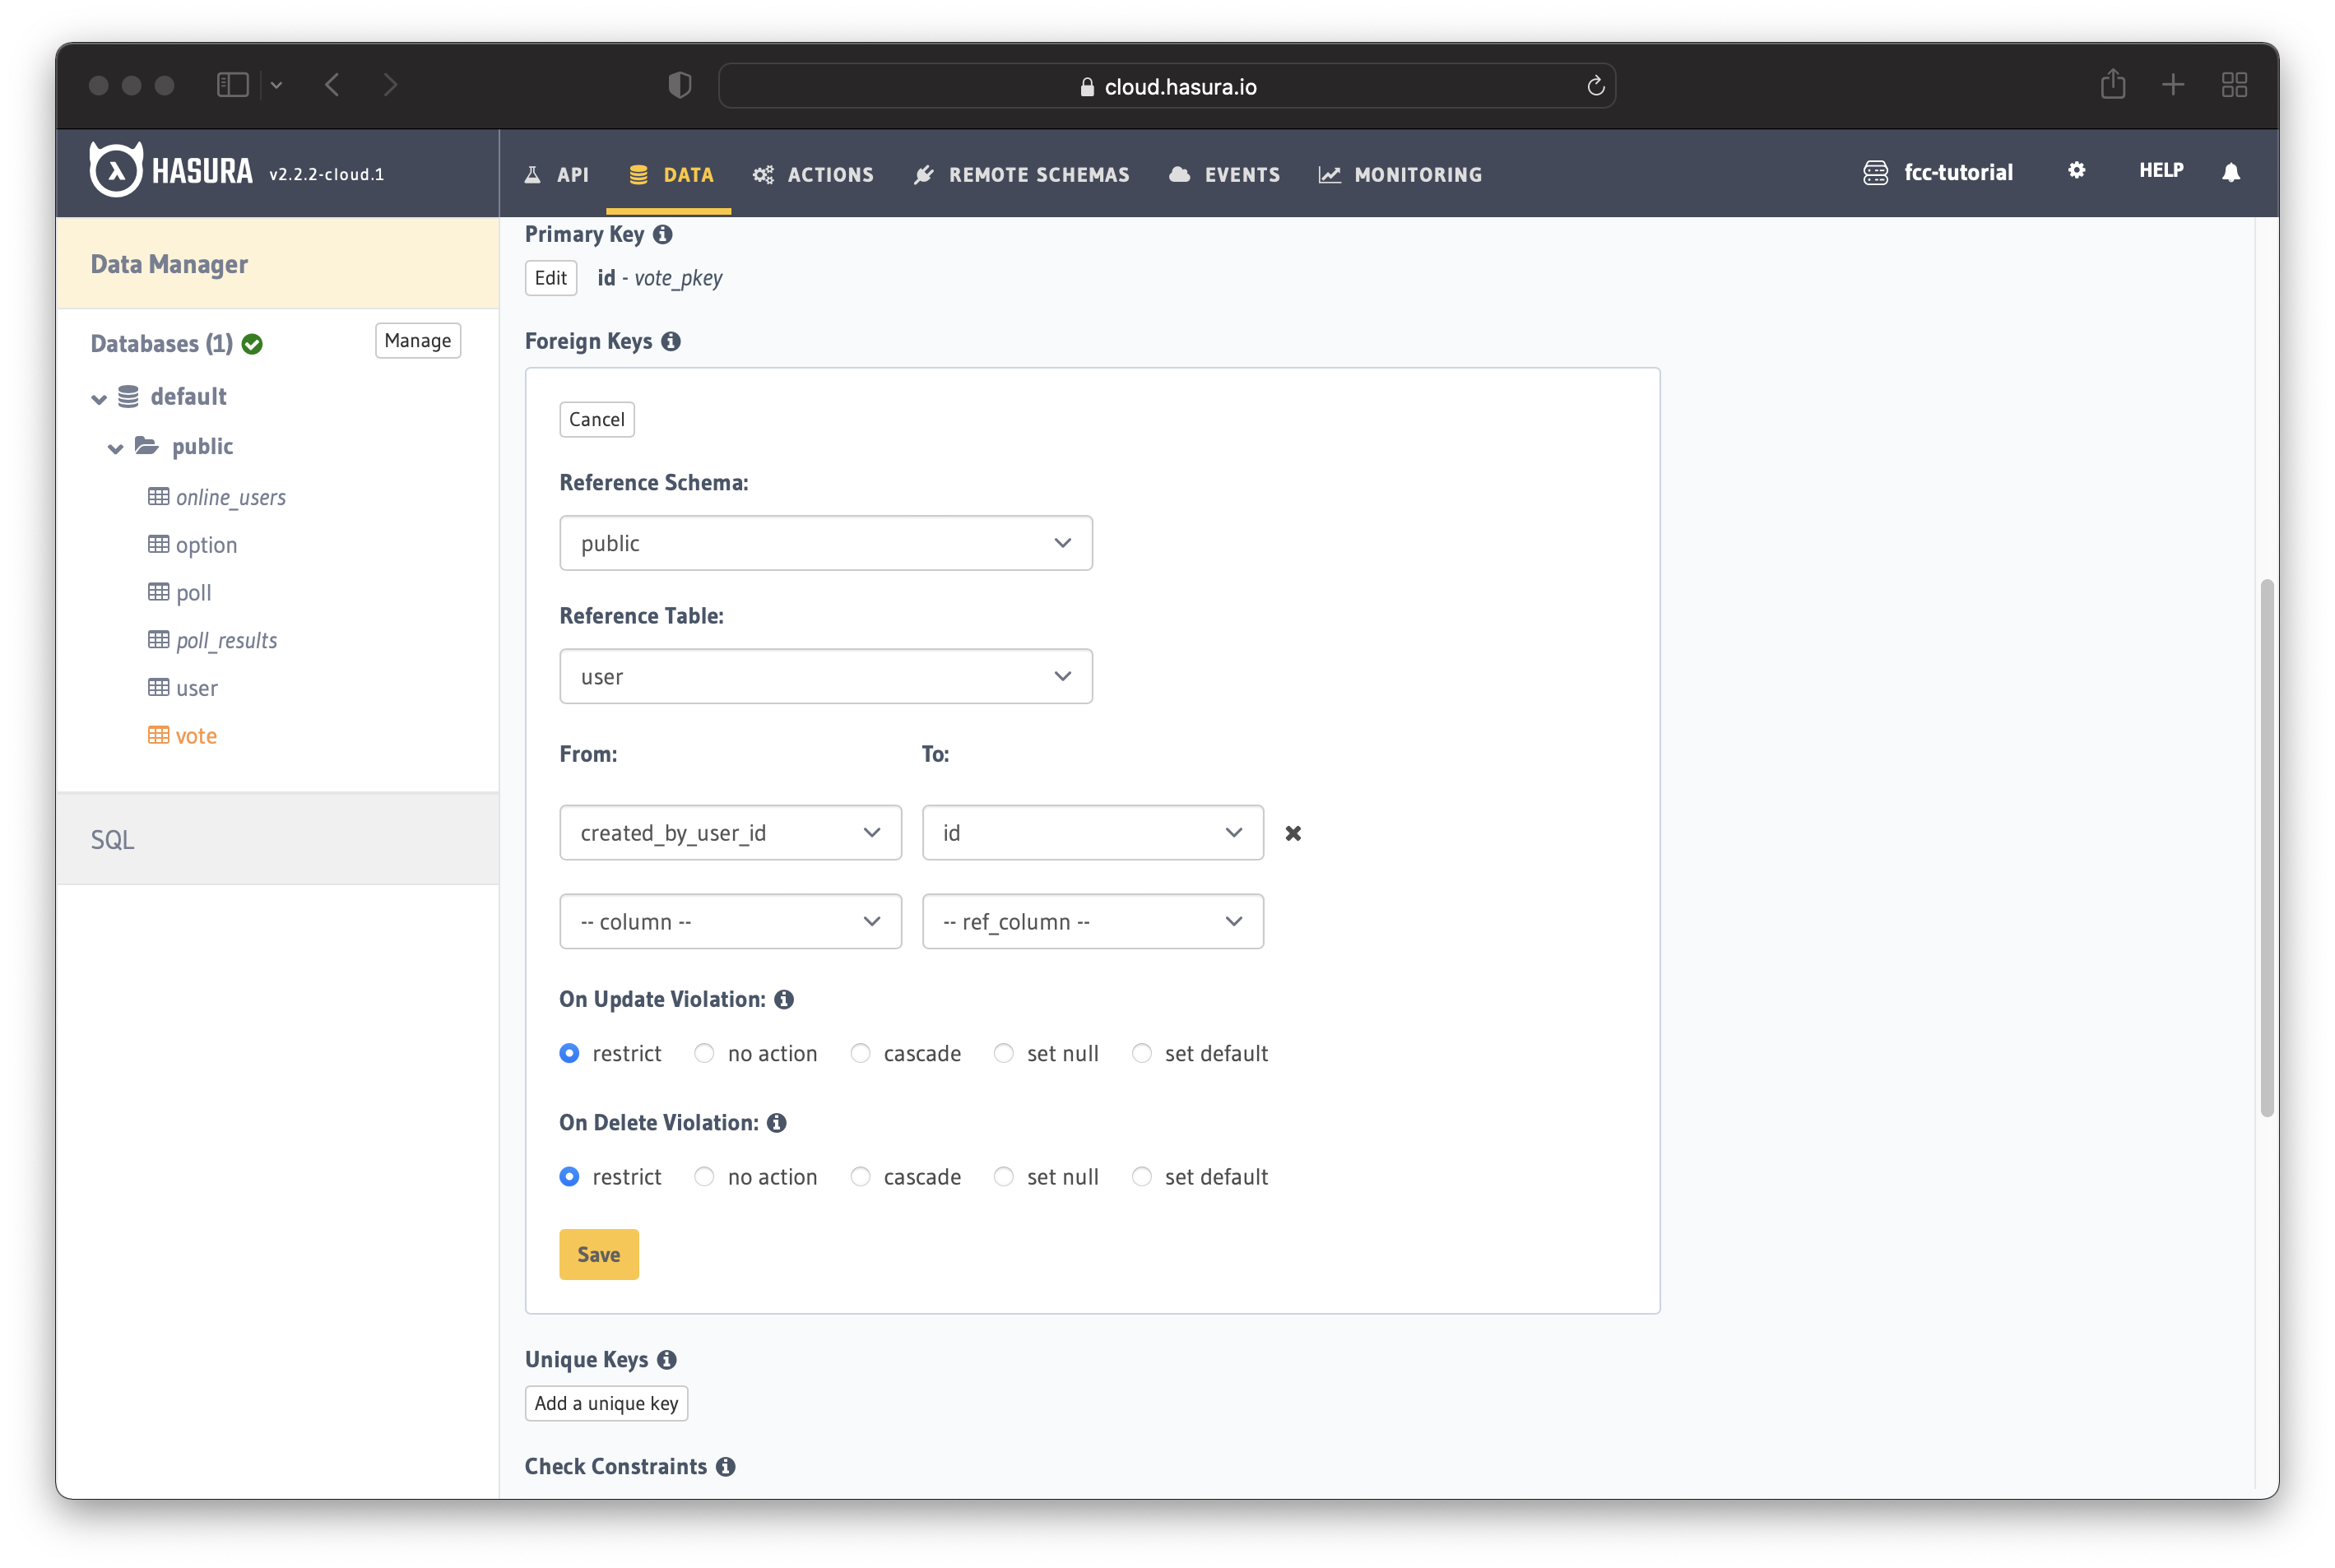
Following the same process, add the option_id column as a foreign key for the id column in the option table.
The "Reference Table" field value should be option. The value for "From" should be option_id, whereas the value for "To" should be id.
Since you added the foreign keys, Hasura suggests potential relationships automatically. If you go to the "Relationships" tab, you should see the suggested relationships.
When you click on the "Add" button, you get the chance to name your relationship. You can either leave the default name or use a custom one.
Save the relationships by pressing the "Add" button and you are done!
Poll – Option
Go to the option table and add the poll_id as the foreign key for the id column in the poll table.
- Reference Table – poll
- From – poll_id
- To – id
After saving it, go to the "Relationships" tab and accept only the suggested "Object Relationship".
Option – Vote
When you configured the foreign keys for the "User – Vote" relationship earlier, you added the option_id column as a foreign key for the id column in the option table.
That means the only thing left to do is to go to the "Relationships" tab in the poll table and accept the suggested "Array Relationship".
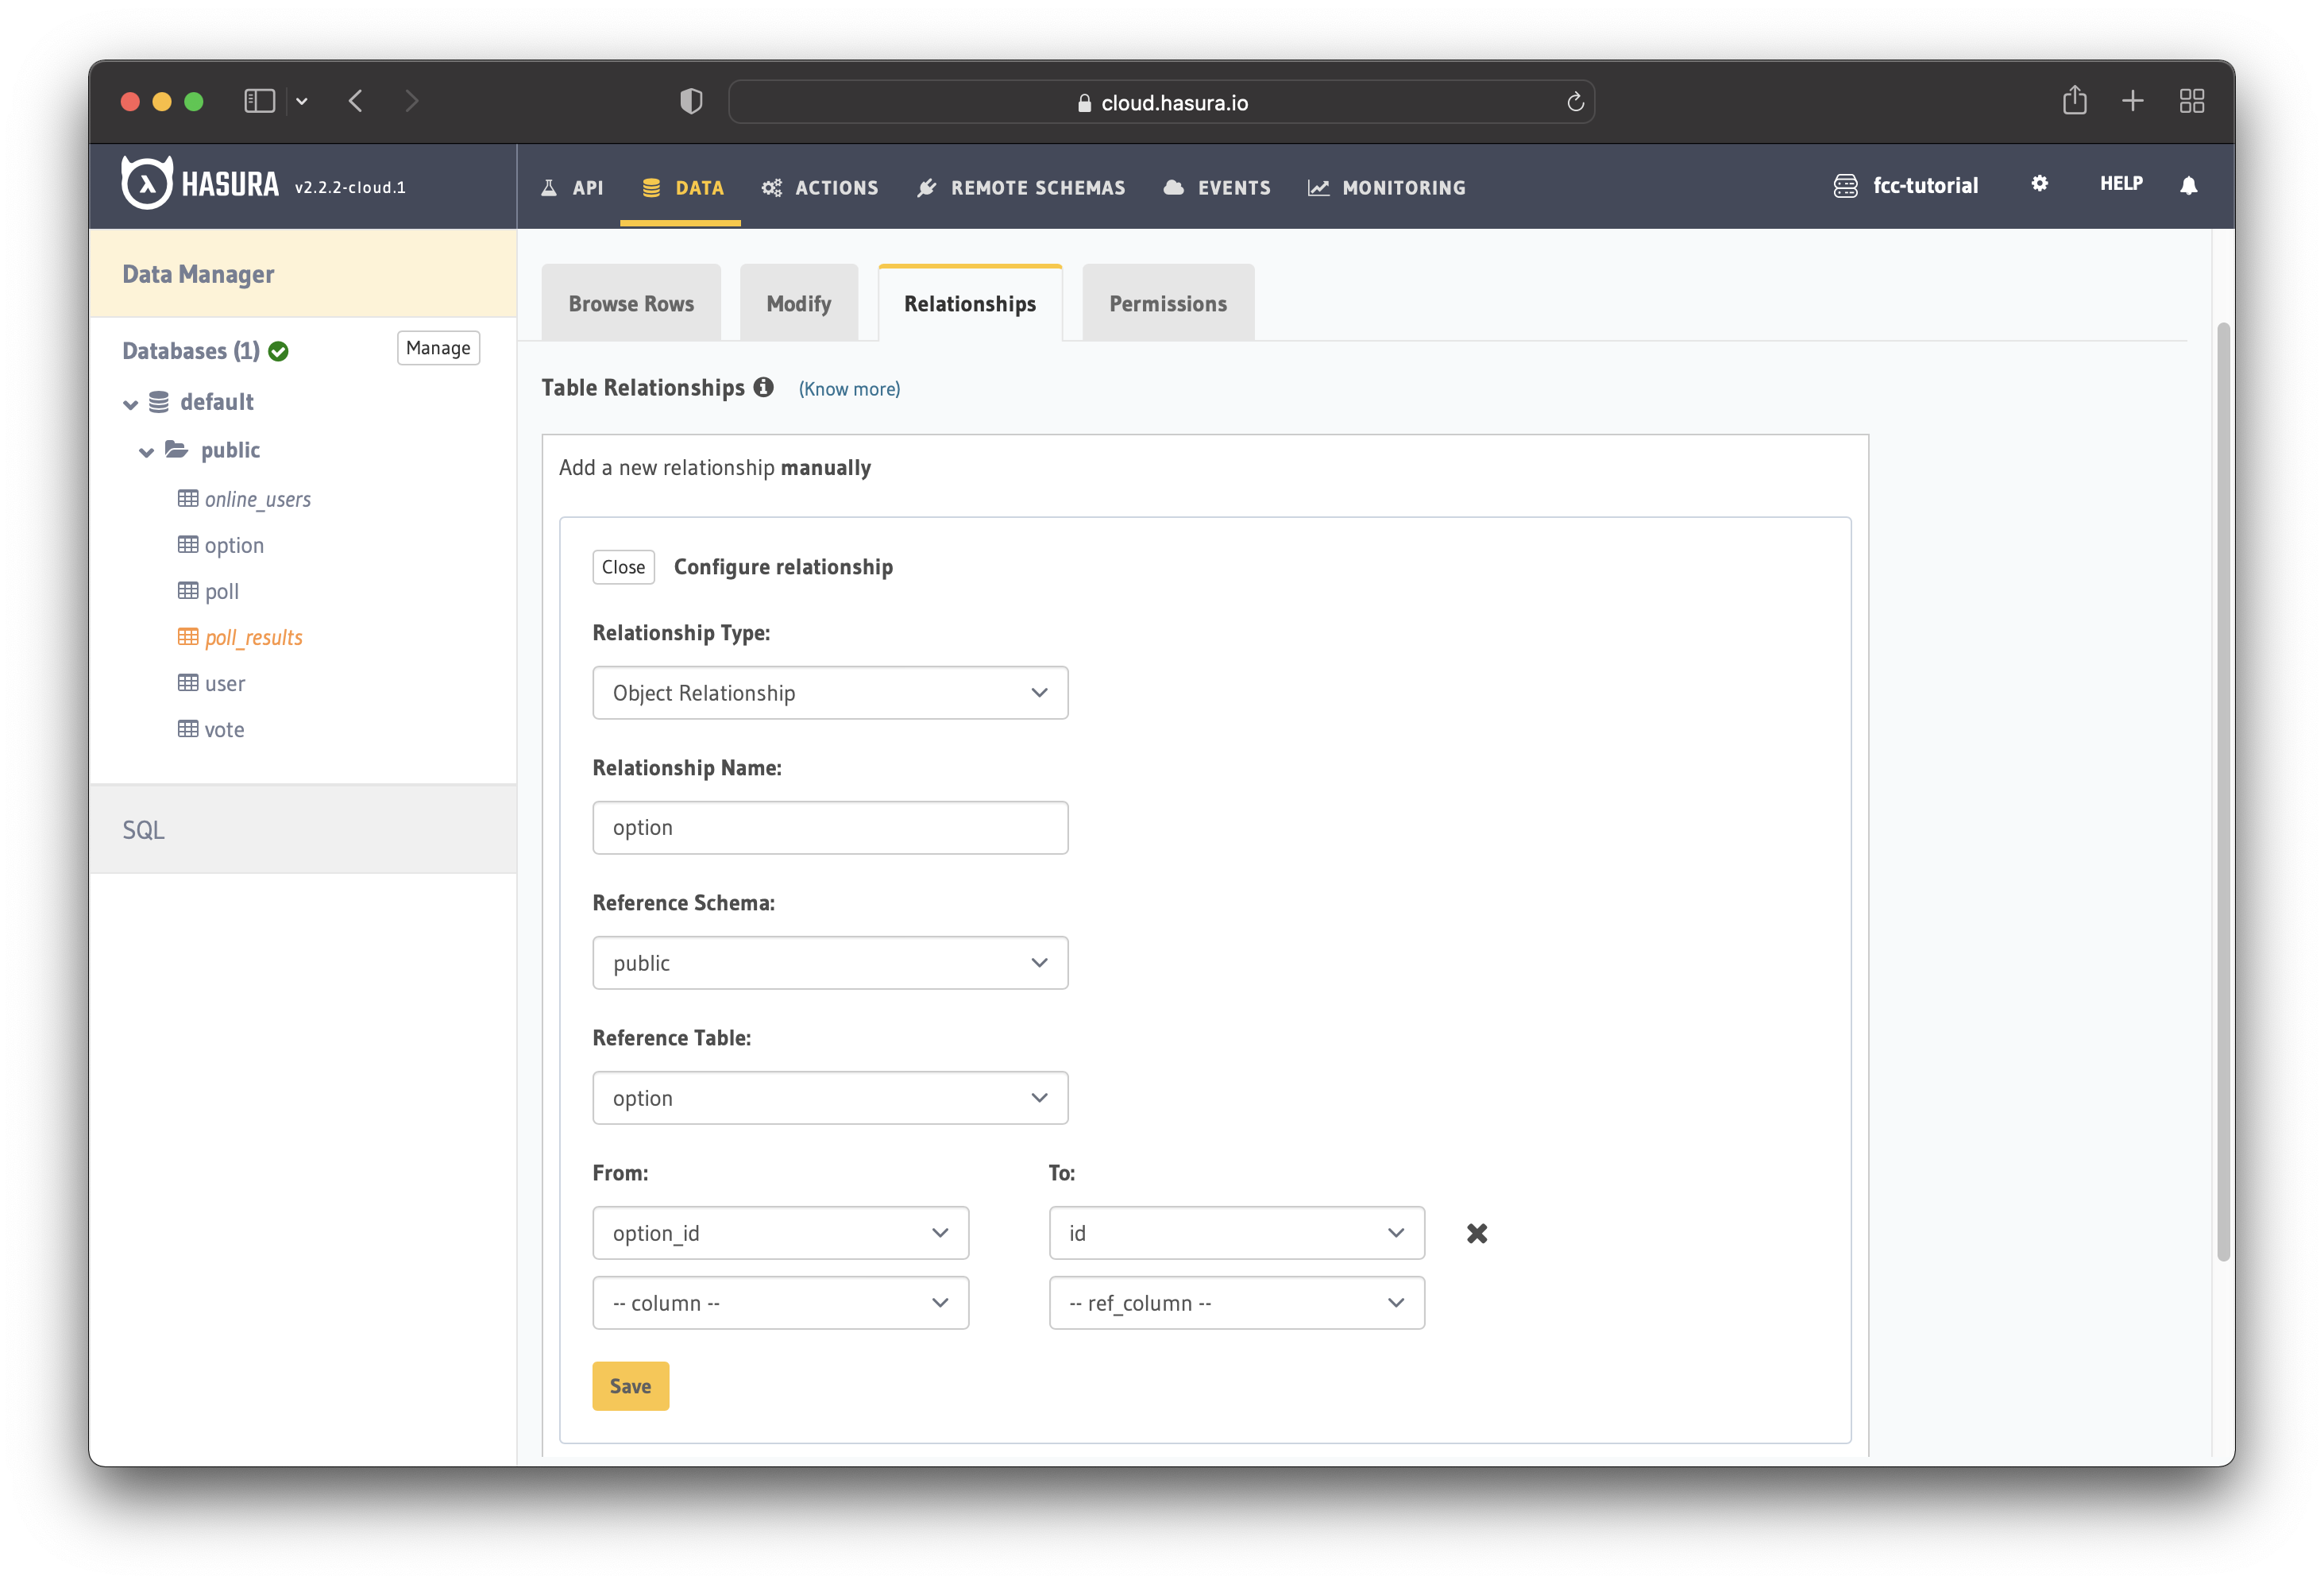
Poll Results View
For the poll_results View, we need to manually set the relationships with the option and poll tables. Looking at the view, you can see we have the foreign keys poll_id and option_id.
Go to the "Relationships" tab in poll_results to add the relationships manually. Once you are there, click on the button saying "Configure".
The relationships between poll_results and the option and poll tables are object relationships.
Configure the relationship between poll_results and option as shown in the figure below.
The relationship between poll_results and poll is configured in a similar way. Add the following information:
- Relationship Type – Object Relationship
- Relationship Name – poll
- Reference Schema – public
- Reference Table – poll
- From – poll_id
- To – id
Save them and you are done with the relationships!
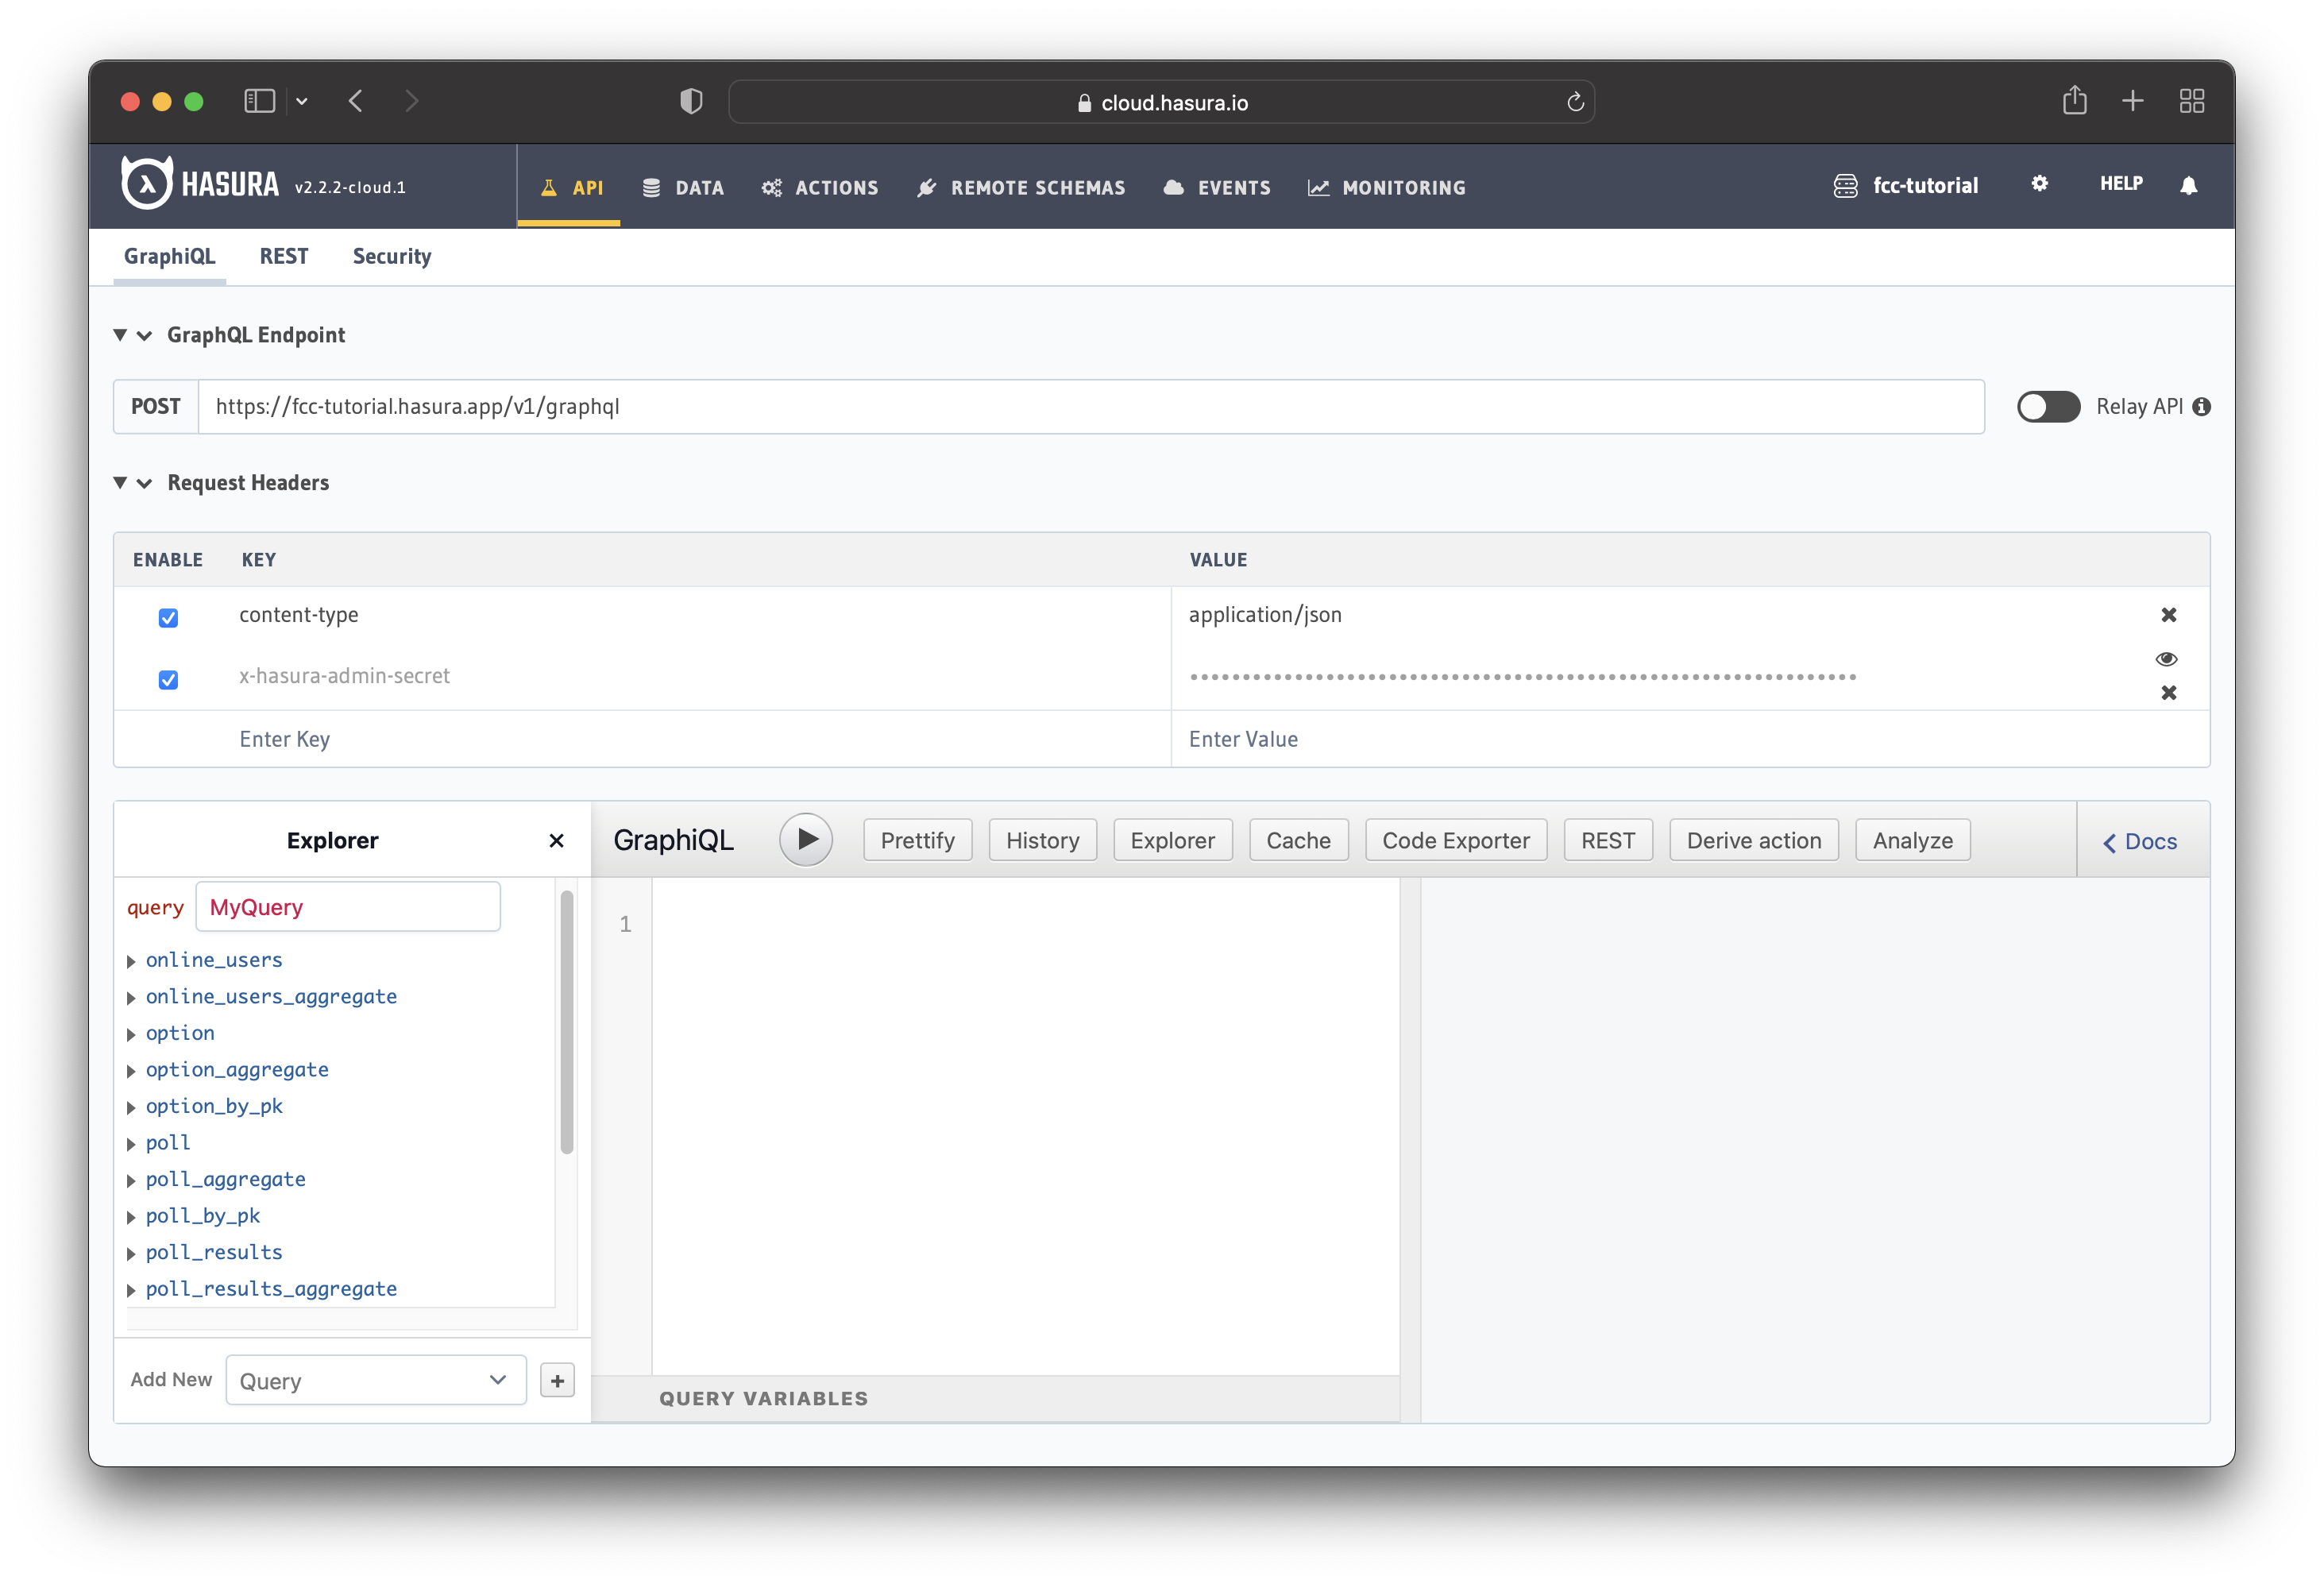
GraphQL API is Ready
You now have a fully functioning GraphQL API without writing any line of code. If you go to the API Explorer in Hasura Console, you can insert, modify and delete data.
Imagine building the same application manually – it would be quite tedious and time-consuming.
The next step is to implement the frontend part.
Frontend Implementation
The first step of the frontend implementation is to create and initialize the project. Go to your preferred folder and run:
npx create-react-app realtime-poll
Once the installation finishes, go to the realtime-poll folder and install the required dependencies:
npm i react-bootstrap react-google-charts @apollo/client graphql graphql-ws
The react-bootstrap package will allow us to build the application interface with Bootstrap, whereas react-google-charts will help us display the poll results as a chart. The other packages will enable us to use the GraphQL API we built previously.
Before going further, delete setupTests.js, reportWebVitals.js and logo.svg from the src folder. After that, remove all the references to those files from index.js and App.js.
Setup GraphQL Client with Apollo
The voting application uses GraphQL Subscriptions to show the poll results in real-time. When people vote, the results of the poll update automatically, so we need to display them without forcing people to refresh the page.
A GraphQL Subscription is an operation that allows us to do that by subscribing to server events. When the data (poll results) gets updated (someone votes), we receive the updates in real-time.
Since the data is pushed to the client each time there is an update, we need a special connection. GraphQL Subscriptions use WebSockets, which allows us to keep an open connection between the server and client.
Note: This article briefly touches on Subscriptions. For more information, check the documentation to learn about GraphQL Subscription.
Let's start implementing the GraphQL Client with Apollo. The first step is to create a new file in the src folder:
📂 realtime-poll
 └ 📁 node_modules
   📁 package-lock.json
   📁 package.json
   📁 public
   📁 README.md
   📂 src
    └ apollo.js
Open the newly created file, apollo.js, and import the following packages:
import { ApolloClient, HttpLink, InMemoryCache, split } from "@apollo/client";
import { GraphQLWsLink } from '@apollo/client/link/subscriptions';
import { createClient } from "graphql-ws";
import { getMainDefinition } from "@apollo/client/utilities";
After that, store your application endpoint in a separate variable. Replace the value "realtime-poll-example.hasura.app" with the URL of your application.
As we mentioned earlier, GraphQL Subscriptions use the WebSocket protocol, so we need two links. We will use one link, httpURL, for queries and mutations and the other, wsURI, for subscriptions.
const GRAPHQL_ENDPOINT = "realtime-poll-example.hasura.app";

const scheme = (proto) =>
  window.location.protocol === "https:" ? `${proto}s` : proto;

const wsURI = `${scheme("ws")}://${GRAPHQL_ENDPOINT}/v1/graphql`;
const httpURL = `${scheme("https")}://${GRAPHQL_ENDPOINT}/v1/graphql`;
We also have a function (splitter) that determines which link to use. If the operation is a query or mutation, it uses the HTTP link. Otherwise, it uses the WebSocket link.
const splitter = ({ query }) => {
  const { kind, operation } = getMainDefinition(query) || {};
  const isSubscription =
    kind === "OperationDefinition" && operation === "subscription";
  return isSubscription;
};
GraphQLWsLink enables us to execute the subscriptions. The createClient constructor receives the WebSocket link and additional connection options as parameters. Then, we pass the value returned by createClient to the GraphQLWsLink constructor.
const cache = new InMemoryCache();
const options = { reconnect: true };

const wsLink = new GraphQLWsLink(createClient({ url: wsURI, connectionParams: { options } }));
We are left with:
- setting up the HTTP link for queries and mutation
- using the splitter function
- creating the ApolloClient
The split function takes the splitter function we wrote earlier and the two links as arguments. We pass the link returned by the "split" function as an argument to the ApolloClient constructor.
const httpLink = new HttpLink({ uri: httpURL });
const link = split(splitter, wsLink, httpLink);
const client = new ApolloClient({ link, cache });
Lastly, we export the client so we can use it for queries, mutations and subscriptions.
export default client;
You can see the complete code in this gist.
GraphQL Operations
We will use a couple of GraphQL queries, mutations and subscriptions in the application. They will also be displayed on the homepage of the application.
As a result, we will store them in a separate file and import them where necessary.
Go to the src folder and create a new file named GraphQL.jsx.
📂 realtime-poll
 └ 📁 node_modules
   📁 package-lock.json
   📁 package.json
   📁 public
   📁 README.md
   📂 src
    └ GraphQL.jsx
Open GraphQL.jsx and add the following imports:
import gql from "graphql-tag";
import React from "react";
import { Card } from "react-bootstrap";
We need gql so the GraphQL queries, mutations, and subscriptions can be parsed into the standard GraphQL AST. We also need React and the Card component because we will render the GraphQL query, mutation, and subscription strings on the page.
Get Polls
The application needs a query to fetch all the polls from the database.
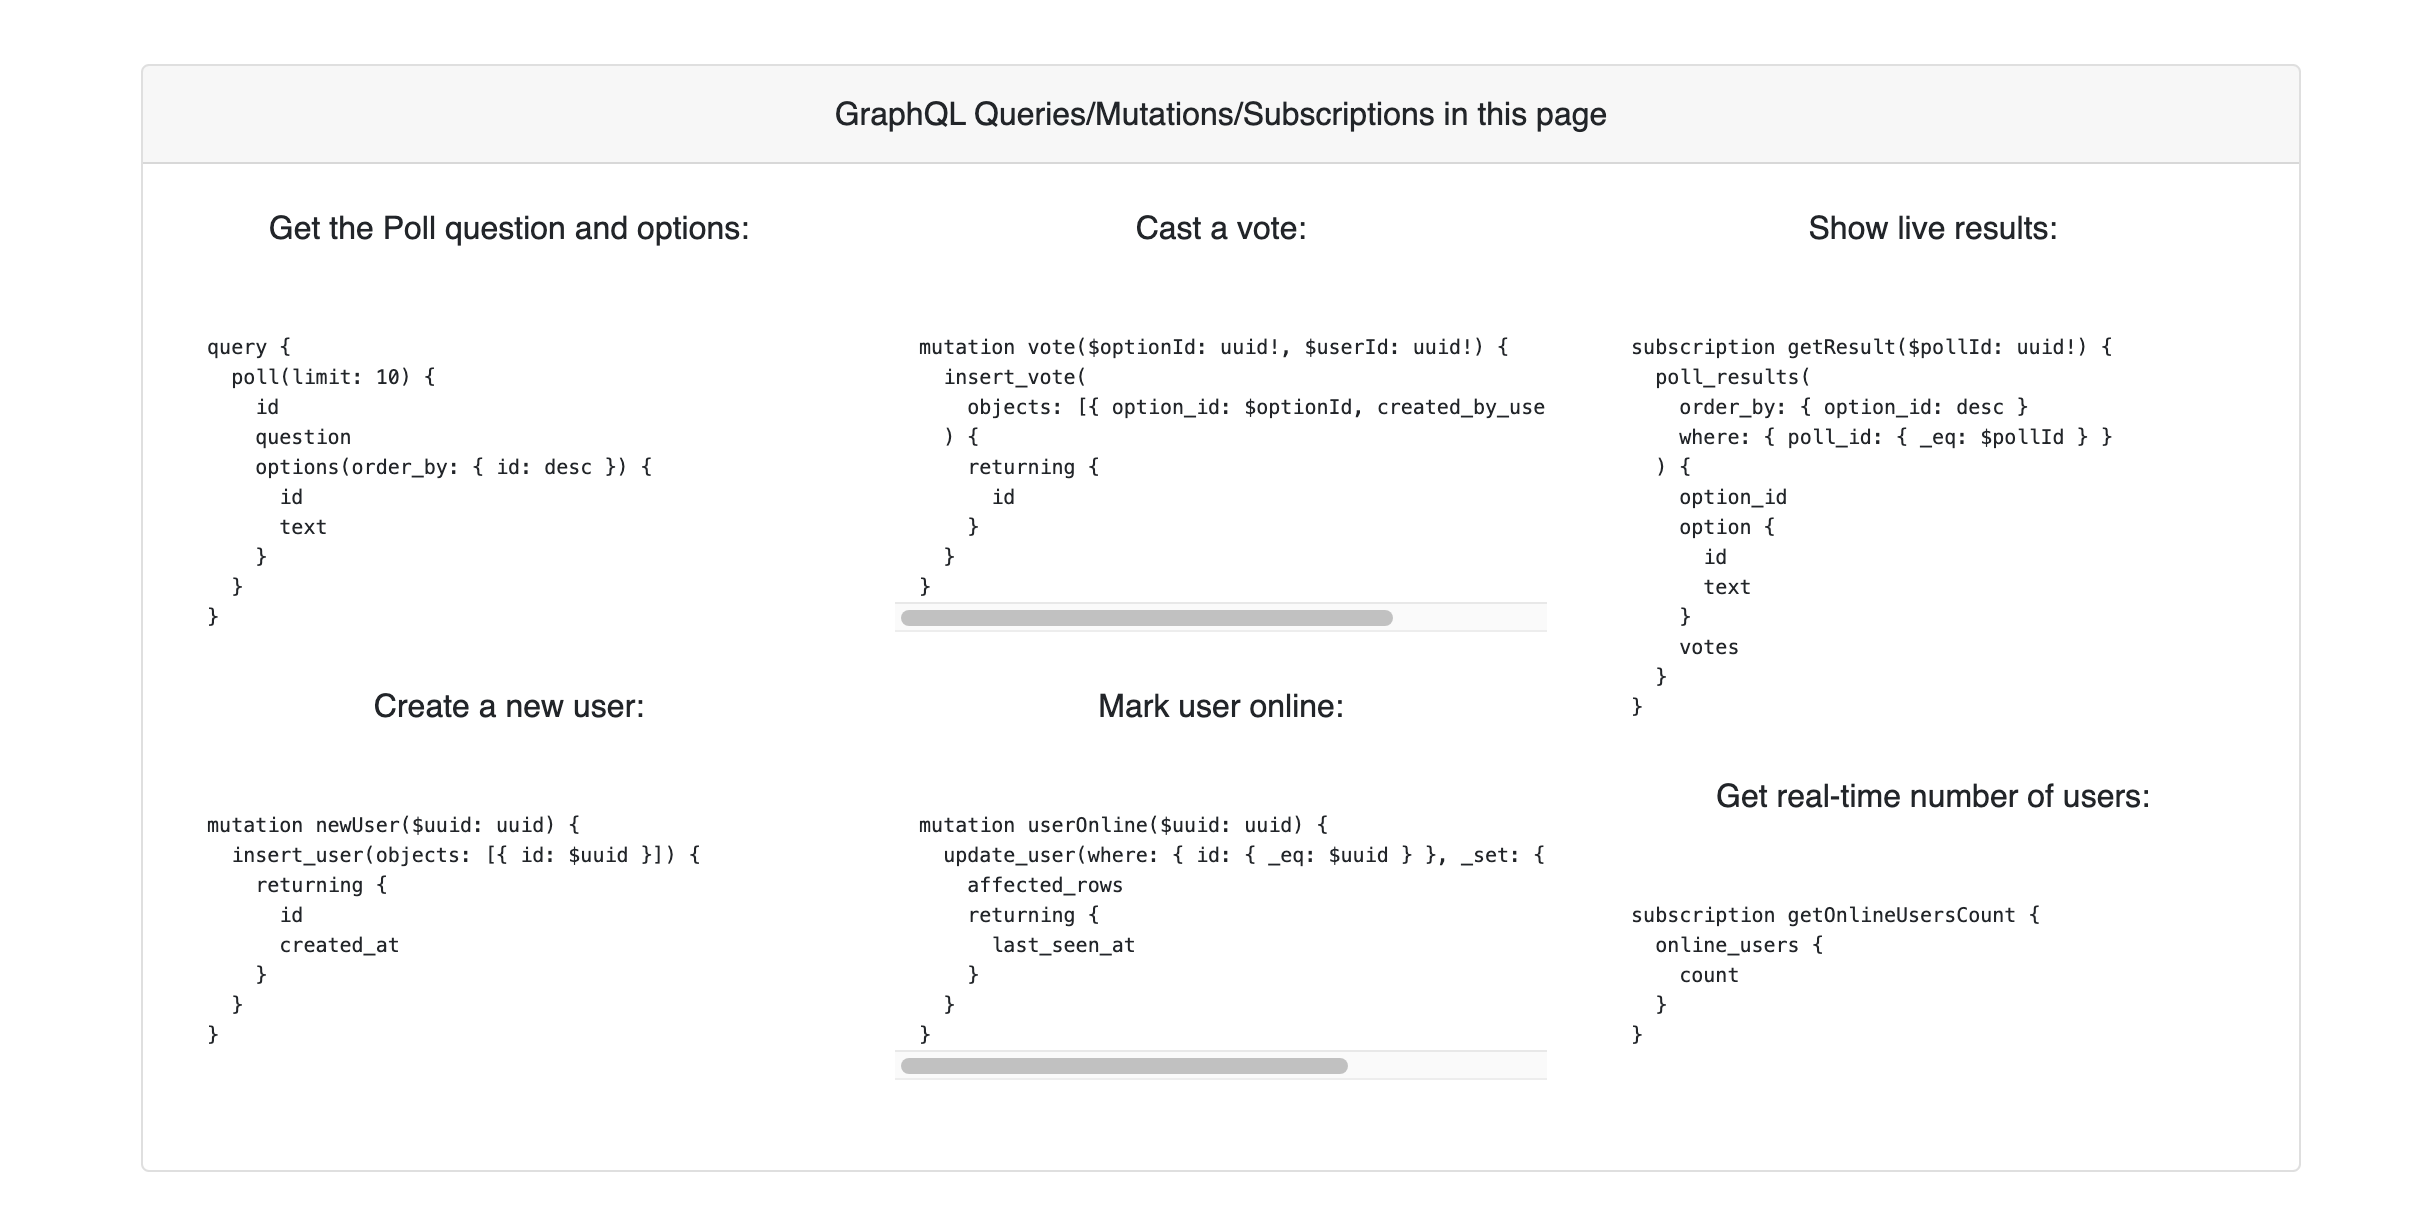
const QUERY_GET_POLL = gql`
  query {
    poll(limit: 10) {
      id
      question
      options(order_by: { id: desc }) {
        id
        text
      }
    }
  }
`;
The above query returns 10 polls along with their id, question and options (answers). The options are ordered in descending order by the id.
Vote
Since it's a poll, there should be a way to pick an answer and vote.
const MUTATION_VOTE = gql`
  mutation vote($optionId: uuid!, $userId: uuid!) {
    insert_vote(
      objects: [{ option_id: $optionId, created_by_user_id: $userId }]
    ) {
      returning {
        id
      }
    }
  }
`;
The above mutation inserts a new vote into the database.
Real-time Poll Results
The voting application displays the results in real-time with the help of this subscription:
const SUBSCRIPTION_RESULT = gql`
  subscription getResult($pollId: uuid!) {
    poll_results(
      order_by: { option_id: desc }
      where: { poll_id: { _eq: $pollId } }
    ) {
      option_id
      option {
        id
        text
      }
      votes
    }
  }
`;
These are the GraphQL operations used by the application to display the polls, allow the users to vote and show the results in real-time.
The file also contains:
- two mutations to create a new user and mark the user online
- one subscription to display the number of online users in real-time
You can find the complete code for GraphQL.jsx in this gist.
Poll Implementation
The next step is to implement the Poll. Create a new file Poll.jsx in the src folder.
📂 realtime-poll
 └ 📁 node_modules
   📁 package-lock.json
   📁 package.json
   📁 public
   📁 README.md
   📂 src
    └ Poll.jsx
The Poll.jsx file will contain two components:
PollQuestionwhich represents the poll itself and it handles the votingPollwhich renders the poll question and answers
Open the newly created file and add the following imports:
import { useMutation, useQuery } from "@apollo/client";
import React, { useEffect, useState } from "react";
import { Button, Form } from "react-bootstrap";
import { Error, Loading } from "./Components";
import { MUTATION_VOTE, QUERY_GET_POLL } from "./GraphQL";
import { Result } from "./Result";
The first line imports the two hooks from the Apollo Client that allow you to execute queries and mutations. We import React and its two default hooks on the second line, whereas on the third line, we import two Bootstrap components.
The last three lines import custom React components, GraphQL Queries, and Mutations. They do not exist yet, but we will implement them later.
Poll Question Component
The next step is to implement the component for the poll question. The "PollQuestion" component handles the voting process. After your imports, write the following code:
const PollQuestion = ({ poll, userId }) => {
    const defaultState = {
      optionId: "",
      pollId: poll.id,
      voteBtnText: "🗳 Vote",
      voteBtnStyle: "primary",
    };
    const [state, setState] = useState(defaultState);
    const [vote, { data, loading, error }] = useMutation(MUTATION_VOTE);
};
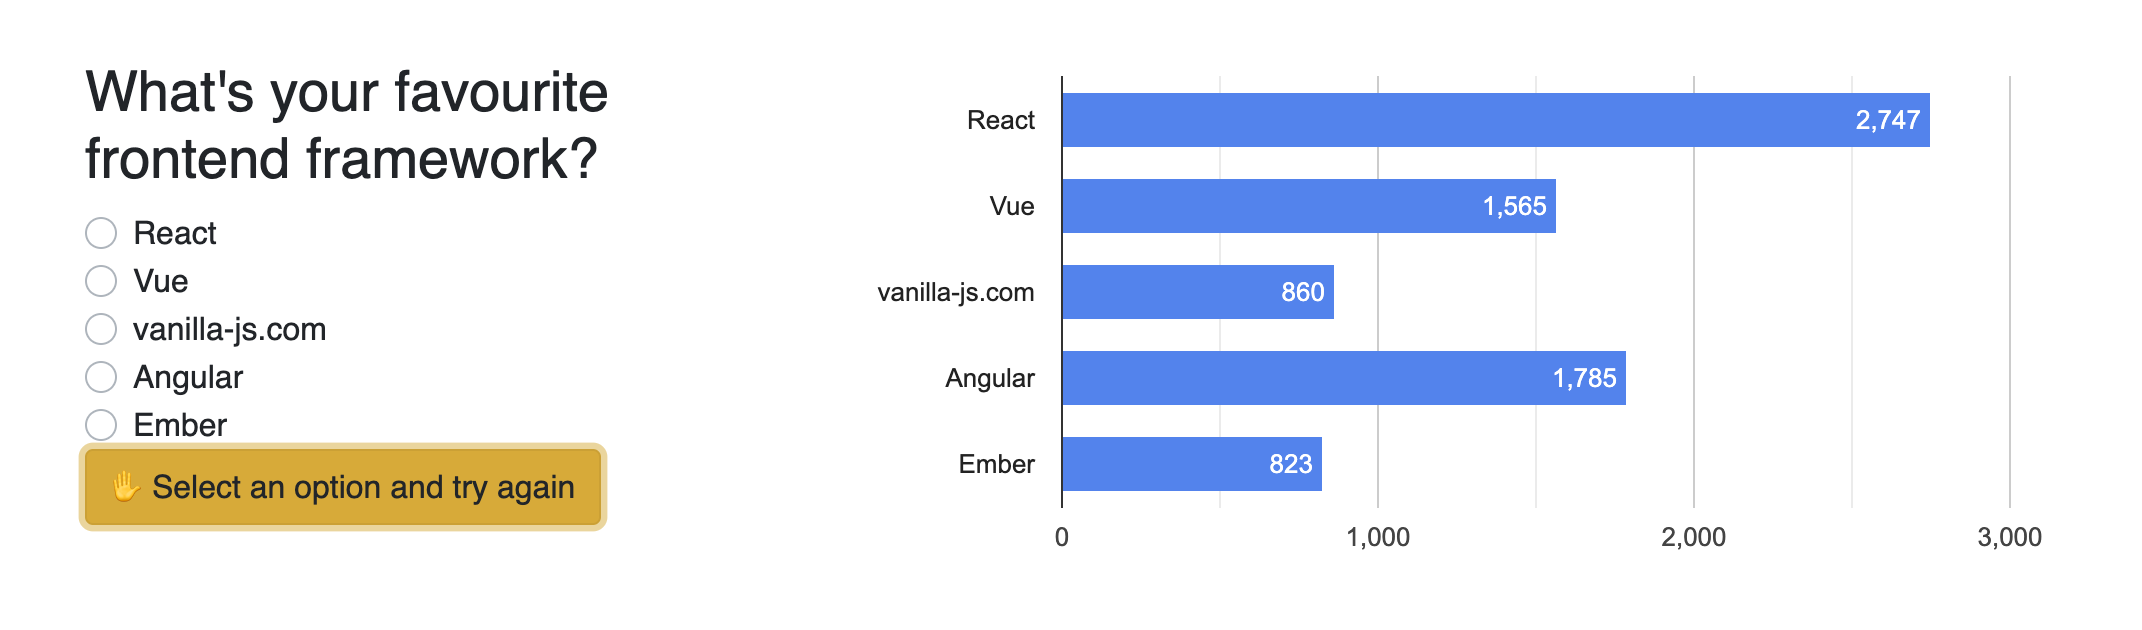
In the above code, we set the default state for the poll. When someone visits the poll for the first time, there should not be any answer selected. Also, the button should display "🗳 Vote".
The image illustrates what the poll looks like with the default state.

We also use the useMutation hook so people can vote. The hook returns an array that contains two elements. The first element (vote) is a function that we can call to run the mutation. The second one is an object which we can destructure further.
We need to update the optionId each time a user selects an answer. For example, if the user selects "Vue" in this poll, we set the optionId to the id of that option.
const handleOptionChange = (e) => {
    const optionId = e.currentTarget.value;
    setState((prev) => ({ ...prev, optionId }));
};
Let's move on to writing the logic for handling a vote submission. First, we need to ensure the users cannot submit an empty form. If the user did not select an answer, the button becomes yellow and prompts the user to choose an answer and try again.
If an answer is selected, we call the vote function returned by the useMutation hook. We pass the id of the selected answer and the id of the user that voted.
const handlesubmitVote = (e) => {
    e.preventDefault();

    if (!state.optionId) {
      setState({
        voteBtnText: "✋ Select an option and try again",
        voteBtnStyle: "warning",
      });
      return;
    }

    setState({
      voteBtnText: "🗳️ Submitting",
      voteBtnStyle: "info",
    });

    vote({
      variables: {
        optionId: state.optionId,
        userId,
      },
    });
};
If the vote is successful, we update the button state accordingly. After 5 seconds, we reset the state of the button so the users can vote again. If there is an error, the button will highlight that.
The useEffect hook runs each time the value of data or error changes.
useEffect(() => {
    if (data) {
      setState({
        voteBtnText: "👍 Done",
        voteBtnStyle: "success",
      });

      //  Re-authorize to vote after 5 seconds
      let timer = setTimeout(() => {
        setState({
          voteBtnText: "🗳️ Vote",
          voteBtnStyle: "primary",
        });
      }, 5000);

      return () => clearTimeout(timer);
    }

    if (error) {
      setState({
        voteBtnText: "Error 😞 Try again",
        voteBtnStyle: "danger",
      });
    }
}, [data, error]);
Lastly, we render the form, poll options, and the voting button.
return (
    <div className="textLeft">
      <h3>{poll.question}</h3>
      <Form
        className="pollForm textLeft"
        onSubmit={(e) => {
          handlesubmitVote(e);
        }}
      >
        {poll.options.map(({ id, text }) => (
          <Form.Check
            custom
            type="radio"
            name="voteCandidate"
            id={id}
            key={id}
            value={id}
            label={text}
            onChange={handleOptionChange}
          />
        ))}
        <Button
          className="voteBtn info"
          variant={state.voteBtnStyle}
          type="submit"
        >
          {state.voteBtnText}
        </Button>
      </Form>
    </div>
);
We are done with the PollQuestion component. You can find the complete code for PollQuestion in this gist.
Poll Component
The Poll component renders the poll question and the results. Let's start by calling the useQuery hook with the GraphQL Query string that returns all the polls.
export const Poll = ({ userId }) => {
    const { data, loading, error } = useQuery(QUERY_GET_POLL);

    if (loading) return <Loading />;
    if (error) return <Error message={error.message} />;
};
The data property will contain an array with polls if the query is successful. Once we have the array, we map through it and render the polls and their corresponding answers.
return (
    <div className="container">
      {data?.poll.map((poll) => (
        <div key={poll.id} className="pollWrapper wd100">
          <div className="displayFlex">
            <div className="col-md-4 pollSlider">
              <PollQuestion poll={poll} userId={userId} />
            </div>
            <div className="col-md-8 pollresult">
              <Result pollId={poll.id} />
            </div>
          </div>
        </div>
      ))}
    </div>
);
If you look at the above code, you can observe that we use the Result component, which does not exist yet. In the next step, we will do just that!
You can find the complete code for the Poll file in this gist.
Result Component
Let's start by creating the Result.jsx in the src folder.
📂 realtime-poll
 └ 📁 node_modules
   📁 package-lock.json
   📁 package.json
   📁 public
   📁 README.md
   📂 src
    └ Result.jsx
Open the file and add the following imports:
import { useSubscription } from "@apollo/client";
import React from "react";
import { Chart } from "react-google-charts";
import { Error, Loading } from "./Components";
import { SUBSCRIPTION_RESULT } from "./GraphQL";
The first line imports the useSubscription hook, which we will use to display the poll results in real-time. On the second line, we import React and on the third line we import the Chart component. The last two lines import two custom components and the GraphQL Subscription string.
Write the following code after the imports:
export const Result = ({ pollId }) => {
    const { data, loading, error } = useSubscription(SUBSCRIPTION_RESULT, {
      variables: { pollId },
    });

    const hasResults = data?.poll_results.length > 0;

    if (loading) return <Loading />;
    if (error) return <Error message={error.message} />;

    return (
      <div>
        {hasResults ? <PollChart data={data?.poll_results} /> : <p>No result</p>}
      </div>
    );
};
The "Result" component takes a poll ID as a prop so it can display the results for that specific poll.
In the first line, we call the useSubscription hook with the poll ID. If the call is successful, the data property will contain an array with the poll results. Also, all the new votes will be reflected in the data property. The array with the poll results updates each time a new vote is submitted.
Before displaying the poll results, we check if there are any results. If there are, we display the results. If not, we show a "No result" string.
If you look at the code, you can see that we use a PollChart component. You can find the code for PollChart and the complete code for Result.jsx in this gist.
The article focuses on the essential parts of the frontend implementation. It highlights how to implement the trickier bits. You can browse the complete application code in this GitHub Repository.
Conclusion
At this point, you have a full-stack application without writing any backend code. Hasura provides a helpful user interface that you can use to build your API. As a result, it simplifies and shortens the process of building a GraphQL API.
You can:
- see see a live demo of the application
- explore the backend
- browse the complete code in this GitHub Repository
If you are interested, I also wrote about building an e-commerce backend with minimal code.
Thanks for reading! If you want to keep in touch, let's connect on Twitter @catalinmpit. I also publish articles regularly on my blog catalins.tech if you want to read more content from me.