
By Jonathan Puc
Hello, all! It’s been a while since I built something out of personal enjoyment or curiosity, so I surfed the internet exploring cool API’s.
Since it’s NBA Playoff time (sadly, I’m a Knicks fan), I decided to see if there was an existing API that contained the data of every player currently in the NBA — and heck yeah, there was.
Also, a project I’m working on at my job has introduced me to two awesome libraries called redux-saga and styled components. They are pretty darn exciting, and are two things I definitely plan to try and use in all my future projects.
So let’s build a React application with these libraries!
Before we dive in, let’s just talk a bit about redux-saga and styled components and why they are handy.
Redux-Saga
In Redux, actions and reducers are pure, meaning they don’t have any side effects.
An example of a side-effect could be something like a service request. When you are making a request, it can fail or return a different kind of result even though you always send the same request.
So if your reducers and actions are pure, where can you handle / put side effects? Well redux-saga is a solution. It allows you to listen to actions, perform a side effect, and then dispatch another action.
I know, talk is cheap. Show me the code.
Are you ready to see an example of this beast at work?
In a nutshell, we have a function that listens for whenever an action of type ‘IMAGE_FETCH_REQUESTED’ is dispatched. When it identifies one, it’ll call the fetchImage function.
Inside the fetchImage function, we simply make a special call to a method on our service object, passing along the userId of the profile image we want to grab. The result gets saved inside our profileImage variable.
Shortly after, we let our store know that we have successfully grabbed an image and would like to pass the image on to be stored. So we’ll just dispatch an action with put with the type of 'IMAGE_FETCH_SUCCEEDED' and pass the image as payload. Our reducer will handle the rest.
But if there is some kind of error, we simply dispatch an action with the type'IMAGE_FETCH_FAIL' and pass the error as payload.
The beauty of it lies in how nicely it reads and sits within a simple try catch block.
Feel free to read more about redux-saga.
Styled Components
Discovering styled components kind of blew my mind.
I always had trouble structuring and writing CSS inside React apps. Something didn’t sit right and it felt messy to me. In particular, class names were tough.
The whole idea of React is about being modular: you write a component once and are able to use it everywhere. But when styling such components, we still give them a class name to target them with CSS.
Max Stoiber, co-creator of styled components, put it perfectly when he said:
If you only ever use every class name once, why do you have a class name at all?
Having heard those words, I knew styled components was for me.
So let’s see this one at work now too:
Here we have a basic functional component: a button that pretty much does nothing, even though it’s daring you to make your move.
This may look weird to newcomers, but really it’s quite simple and I’m sure you’ll fall in love with it in no time.
We import styled from the library. Think of this as a factory that allows you to create the HTML nodes you all know and love.
We create the node of our liking. In this case, a button and span, with its styles. We then assign it to a variable of our choice.
Now we refer to those variables and pop them within our functional component to be rendered.
It’s as easy as that.
What I really like is that you can still write the CSS you are familiar with in a JS file. Furthermore, it keeps everything nice and modular — everything sits within a single file, easy to read and digest!
You can learn more about styled-components here.
How this all links together
We’ll be building an application where users can search for a player using their first and last name. Our saga (redux-saga) will fetch the data of the player, including statistics and a headshot of them, and save it into our redux store. And using styled components, we’ll make all this information look a little more presentable.
Part 1 — Setting up our app and react-redux.
We’ll be using create-react-app in this project, so if you haven’t yet got it installed, just run npm install -g create-react-app .
When that’s done, we’ll run create-react-app nba-players .
Now after all the installing and scaffolding is done, we’ll cd nba-players and then install the modules we’ll need with npm install --save redux react-redux redux-saga styled-components axios .
Setting up our redux store
This will be a quick walkthrough of getting our store set up, since this guide is about redux-saga and styled components and not about react-redux/redux.
Inside your src folder, we’ll create a folder called store and create our index.js file.
store/index.js
We’ll be using Redux DevTools to see what’s going on under the hood in our store. You can download the Chrome extension here.
Let’s create our reducers.
Make a folder called reducers within the root of your store folder, and create the two following files:
reducers/index.js
reducers/player.js
Lets create our actions
Make a folder called actions within the root of your store folder, and create the two following files:
actions/actionTypes.js
actions/player.js
With all those pieces created, let’s connect the store to our React application!
Navigate your way to src/index.js and add the following:
Sweet, let’s test and make sure everything is working as expected.
Back in our terminal, we’ll run npm run start to fire up our React app, open the developer tools, and navigate to the ‘Redux’ tab. Click on the State tab within the Redux DevTools.
You should see something like this :)

Awesome, we’ve got everything we need to get started.
Part 2— Redux Saga
We’re ready to utilise the NBA player API to fetch data and load it into our store!
Let’s write our first saga.
Inside our src/store folder, we’ll create a folder called sagas and create a file called index.js .
This basically serves as our watcher / gatekeeper.
Line 8 sits there and listens for certain action types we give it. When an action passes through that matches, it’ll call a function, in this case retrievePlayer. We’ll create that now.
Within the same folder, we’ll create a file called player.js and it’ll contain the following:
The retrievePlayer generator function is where the magic happens, so let’s walk through it.
The function has access to the action that’s passed through. If you can recall from our action creator in actions/player.js , we pass a name.
We’ll use ES6 destructuring to get the name and surname from the name object attached to the action payload.
Using redux-saga, we call our fetchPlayerData function and pass in the name details.
fetchPlayerData will make a GET call to the NBA players API and return the response. The response will be saved inside the stats variable.
Access to the players image is as easy as appending the name and surname to the API endpoint, so we do just that.
We save our two new pieces of data into an object called playerProfile.
We then use redux-saga’s put which will dispatch an action. Here we give it the type of GET_PLAYER_SUCCESS with the our new playerProfile as the payload.
If something goes wrong, we simply dispatch an action with the type GET_PLAYER_FAIL and pass the error as the payload.
That’s it!
Our players reducer that we made previously at reducers/player.js will handle the rest after receiving the actions we dispatched.
There is one last thing we need to do before our sagas work, however.
Inside store/index.js we’ll have to make some modifications.
It should now look like the following
Woohoo, we’re now ready to build some components that’ll allow us to search for a player and see their image and stats :)
Part 3 — Styled Components
components/Search.js
components/StatBox.js
components/PlayerPhoto.js
components/Player.js
With all our components built, it’s time to import them into our App.js
Everything’s hooked up and ready to go. Simply type in the full name of a player to your liking, such as Lebron James or Stephen Curry, and you should see something like this.
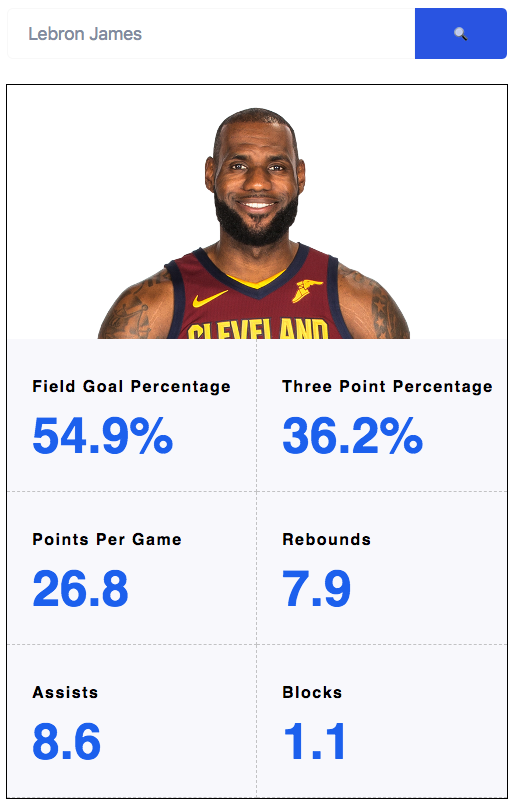
Not the prettiest thing to look at, but this is an opportunity for you to apply styling as you see fit. Go crazy with the styled-components library.
Also remember that we added a loading property in our redux store state.player.loading ? Why not make the UX a little bit nicer by showing a loading message of some kind when loading is set to true?
We’ve created the foundation of the application together — now go on and give it your own personal touch :)
If needed, you can find the source code here.
As always, my inbox is open to anybody in need of further advice or if you have questions.
Feel free to connect with me on any of the platforms below!