
By Aaron Katz
Recently, I really wanted to find a way to build an API that would take in a URL and save a screenshot.
My initial use case was simple: if I was analyzing phishing emails, I wanted an easy way to get a screenshot of the URL that the email was trying to direct their targets to.
To build this, I used Terraform to create all of the infrastructure necessary to set it up in AWS, using Selenium, chromedriver, and headless Chrome to obtain the screenshots.
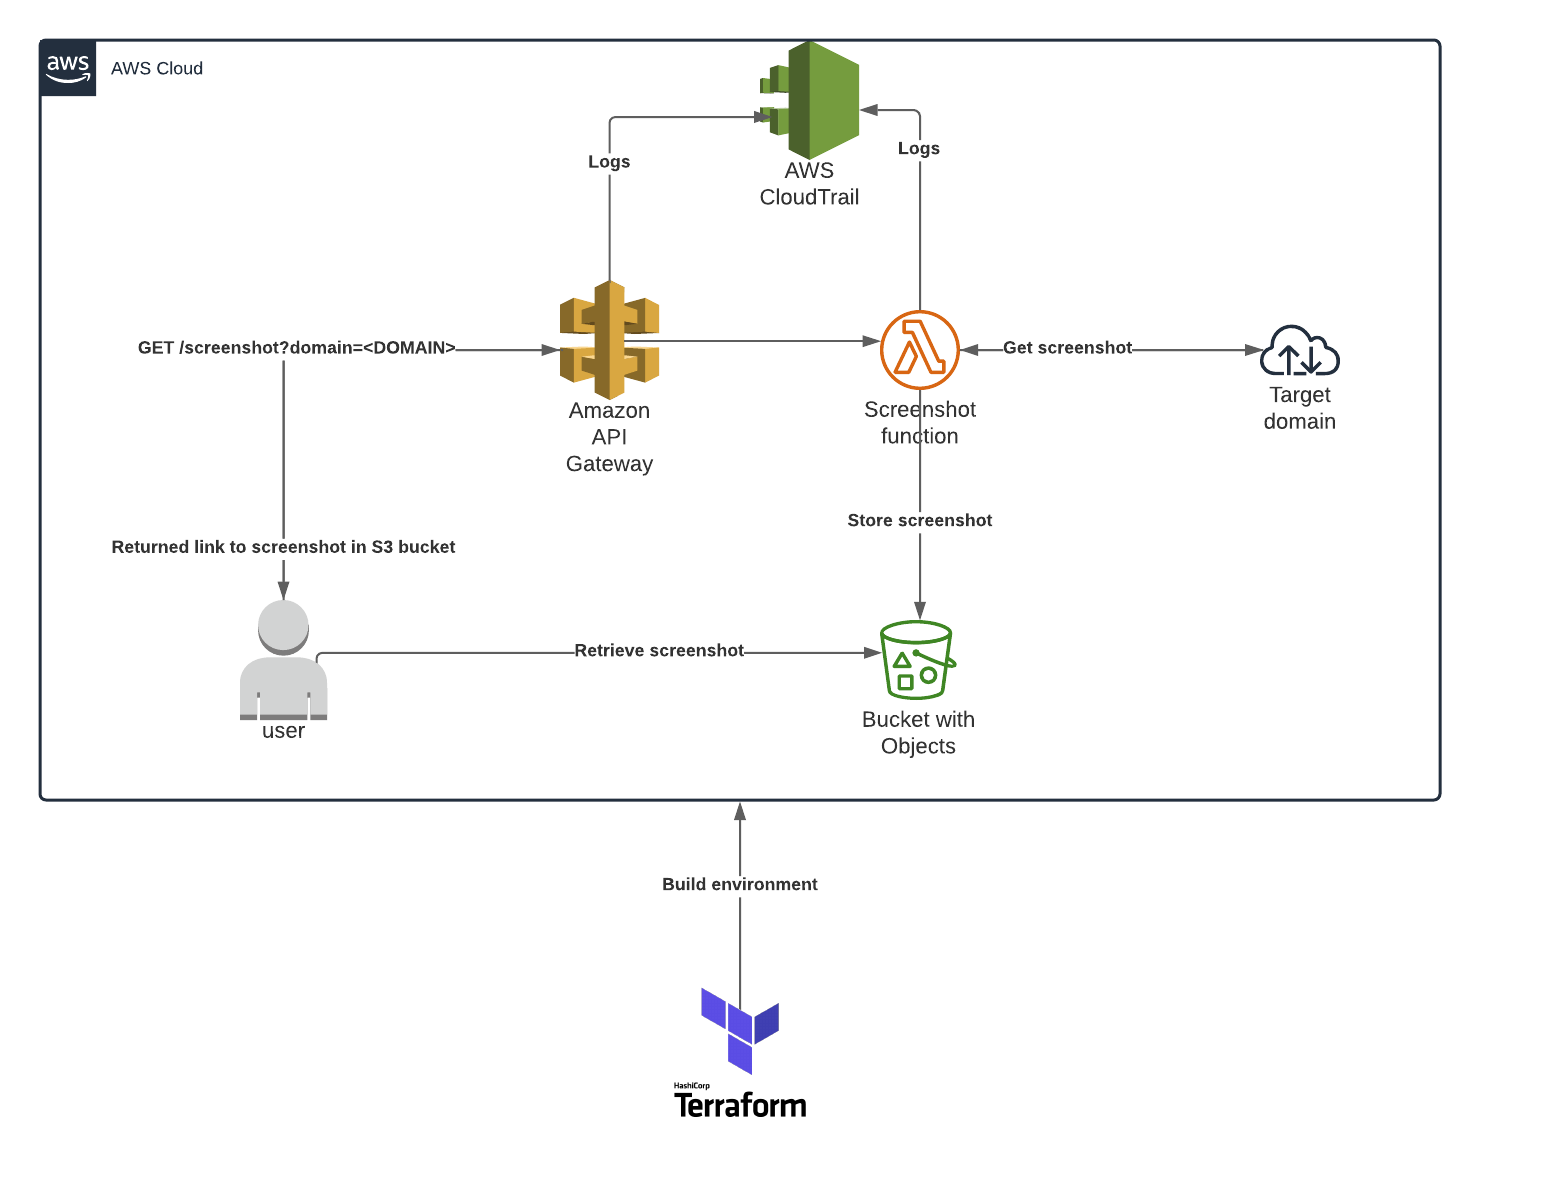 High level diagram illustrating what will be built in AWS by Terraform
Note: All code samples are from PowerShell, so please excuse the ".\" notation.
Requirements
- An AWS account
- Terraform binary
- Existing S3 bucket to store Terraform state (https://www.terraform.io/docs/backends/types/s3.html)
- AWS IAM user and access key created with appropriate permissions (programmatic access, administrative group) for Terraform usage
How to Set Up the Project
Create your new directory and initialize Terraform like this:
mkdir .\screenshot-service
cd .\screenshot-service
.\terraform init
Configure the AWS Provider
Create a file called provider.tf in the root of your project directory. Then configure with appropriate values for the AWS access key and secret key, as well as the name of an existing S3 bucket that will be used to store the Terraform state file.
provider "aws" {
  region = "us-east-1"

  access_key = "ACCESSKEY"
  secret_key = "SECRETKEY"
}

terraform {
  backend "s3" {
    bucket = "EXISTING_BUCKET"
    region = "us-east-1"
    key = "KEYFORSTATE"
    access_key = "ACCESSKEY"
    secret_key = "SECRETKEY"
    encrypt = "true"
  }
}
Configure the S3 Bucket
We will be using an S3 bucket to store all of our screenshots. To configure the S3 service, create a new file in the root of your project called s3.tf and add the following:
resource "aws_s3_bucket" "screenshot_bucket" {
  bucket        = "STORAGE_BUCKET_NAME"
  force_destroy = true
  acl = "public-read"

  versioning {
    enabled = false
  }
}
Create the Lambda Layer
Let's start by creating the lambda layer which will contain the necessary binaries. First, from the root of the project, create a folder called chromedriver_layer: mkdir .\chromedriver_layer.
Next, download the chromedriver and chromium binaries:
cd .\chromedriver_layer
wget https://chromedriver.storage.googleapis.com/2.41/chromedriver_linux64.zip -OutFile .\chromedriver.zip
wget https://github.com/adieuadieu/serverless-chrome/releases/download/v1.0.0-54/stable-headless-chromium-amazonlinux-2017-03.zip -OutFile .\headless-chromium.zip
Expand-Archive .\headless-chromium.zip
rm *.zip
Last, we need to zip this up nicely for Terraform:
cd ..\
Compress-Archive .\chromedriver_layer -DestinationPath \chromedriver_layer.zip
How to Configure Lambda
Lambda Infrastructure
Create a file called lambda.tf in the root of your project directory. First, we will create the execution role required for our function:
resource "aws_iam_role" "lambda_exec_role" {
  name        = "lambda_exec_role"
  description = "Execution role for Lambda functions"

  assume_role_policy = <<EOF
{
        "Version"  : "2012-10-17",
        "Statement": [
            {
                "Action"   : "sts:AssumeRole",
                "Principal": {
                    "Service": "lambda.amazonaws.com"
                },
                "Effect": "Allow",
                "Sid"   : ""
            }
        ]
}
EOF
}
Next, we will add a few policies to the execution role we have created that will enable our function to access required services:
resource "aws_iam_role_policy" "lambda_logging" {
  name = "lambda_logging"

  role = aws_iam_role.lambda_exec_role.id

  policy = <<EOF
{
    "Version"  : "2012-10-17",
    "Statement": [
        {
            "Effect"  : "Allow",
            "Resource": "*",
            "Action"  : [
                "logs:CreateLogStream",
                "logs:PutLogEvents",
                "logs:CreateLogGroup"
            ]
        }
    ]
}
EOF
}

resource "aws_iam_role_policy" "lambda_s3_access" {
  name = "lambda_s3_access"

  role = aws_iam_role.lambda_exec_role.id

  # TODO: Change resource to be more restrictive
  policy = <<EOF
{
  "Version"  : "2012-10-17",
  "Statement": [
    {
      "Effect": "Allow",
      "Action": [
        "s3:ListBuckets",
        "s3:PutObject",
        "s3:PutObjectAcl",
        "s3:GetObjectAcl"
      ],
      "Resource": ["*"]
    }
  ]
}
EOF
}
There, now our function will be able to access S3 and log to CloudWatch. Let's define our function:
resource "aws_lambda_function" "take_screenshot" {
  filename      = "./screenshot-service.zip"
  function_name = "take_screenshot"
  role          = aws_iam_role.lambda_exec_role.arn
  handler       = "screenshot-service.handler"
  runtime       = "python3.7"

  source_code_hash = filebase64sha256("./screenshot-service.zip")
  timeout          = 600
  memory_size      = 512
  layers = ["${aws_lambda_layer_version.chromedriver_layer.arn}"]

  environment {
    variables = {
      s3_bucket = "${aws_s3_bucket.screenshot_bucket.bucket}"
    }
  }
}
The above code specifies that we are uploading a lambda function package using a Python 3.7 runtime, and that the function that will be called is named "handler".
I have set the timeout to 600 seconds, but feel free to change that as you will. Also, feel free to play with the memory_size – for me, this has led to super quick screenshots.
We also set an environment variable called s3_bucket which will be passed to the function, containing the name of the bucket used to store the screenshot.
The Lambda function itself
Create a folder called lambda in the root of the project directory and create a file called screenshot-service.py in that folder.
Add the following imports and logging configuration to the file:
#!/usr/bin/env python
# -*- coding utf-8 -*-

import json
import logging
from urllib.parse import urlparse, unquote # TODO: Can I use urllib3?
from selenium import webdriver
from datetime import datetime
import os
from shutil import copyfile
import boto3
import stat
import urllib.request
import tldextract

# Configure logging
logger = logging.getLogger()
logger.setLevel(logging.DEBUG)
Next, we will create a function that will copy the binaries from our lambda layer and make them executable:
def configure_binaries():
    """Copy the binary files from the lambda layer to /tmp and make them executable"""
    copyfile("/opt/chromedriver", "/tmp/chromedriver")
    copyfile("/opt/headless-chromium", "/tmp/headless-chromium")

    os.chmod("/tmp/chromedriver", 755)
    os.chmod("/tmp/headless-chromium", 755)
Next, we will create the function that will take the screenshot of the provided domain. We will be passing in the URL and the S3 bucket name.
We will add an optional parameter allowing for the title of the image to be set by the user. The screenshot is taken by Selenium automating the headless Chrome browser we downloaded.
def get_screenshot(url, s3_bucket, screenshot_title = None):
    configure_binaries()

    chrome_options = webdriver.ChromeOptions()
    chrome_options.add_argument('--headless')
    chrome_options.add_argument("disable-infobars")
    chrome_options.add_argument("enable-automation")

    chrome_options.add_argument('--no-sandbox')
    chrome_options.add_argument('--disable-gpu')
    chrome_options.add_argument('--window-size=1280x1696')
    chrome_options.add_argument('--user-data-dir=/tmp/user-data')
    chrome_options.add_argument('--hide-scrollbars')
    chrome_options.add_argument('--enable-logging')
    chrome_options.add_argument('--log-level=0')
    chrome_options.add_argument('--disable-dev-shm-usage')
    chrome_options.add_argument('--v=99')
    chrome_options.add_argument('--single-process')
    chrome_options.add_argument('--data-path=/tmp/data-path')
    chrome_options.add_argument('--ignore-certificate-errors')
    chrome_options.add_argument('--homedir=/tmp')
    chrome_options.add_argument('--disk-cache-dir=/tmp/cache-dir')
    chrome_options.add_argument(
        'user-agent=Mozilla/5.0 (X11; Linux x86_64) AppleWebKit/537.36 (KHTML, like Gecko) Chrome/61.0.3163.100 Safari/537.36')
    chrome_options.binary_location = "/tmp/headless-chromium"

    if screenshot_title is None:
        ext = tldextract.extract(url)
        domain = f"{''.join(ext[:2])}:{urlparse(url).port}.{ext[2]}"
        screenshot_title = f"{domain}_{datetime.utcnow().strftime('%Y%m%d_%H%M%S')}"
    logger.debug(f"Screenshot title: {screenshot_title}")

    with webdriver.Chrome(chrome_options=chrome_options, executable_path="/tmp/chromedriver", service_log_path="/tmp/selenium.log") as driver:
        driver.set_window_size(1024, 768)

        logger.info(f"Obtaining screenshot for {url}")
        driver.get(url)

        driver.save_screenshot(f"/tmp/{screenshot_title}.png") # TODO: Delete the screenshot after
        logger.info(f"Uploading /tmp/{screenshot_title}.png to S3 bucket {s3_bucket}/{screenshot_title}.png")
        s3 = boto3.client("s3")
        s3.upload_file(f"/tmp/{screenshot_title}.png", s3_bucket, f"{screenshot_title}.png", ExtraArgs={'ContentType': 'image/png', 'ACL': 'public-read'})
    return f"https://{s3_bucket}.s3.amazonaws.com/{screenshot_title}.png"
Last, let's create our handler, which will be invoked when the API Gateway receives a legitimate request:
def handler(event, context):
    logger.debug("## ENVIRONMENT VARIABLES ##")
    logger.debug(os.environ)
    logger.debug("## EVENT ##")
    logger.debug(event)

    bucket_name = os.environ["s3_bucket"]
    logger.debug(f"bucket_name: {bucket_name}")

    logger.info("Validating url")

    if event["httpMethod"] == "GET":
        if event["queryStringParameters"]:
            try:
                url = event["queryStringParameters"]["url"]
            except Exception as e:
                logger.error(e)
                raise e
        else:
            return {
                "statusCode": 400,
                "body": json.dumps("No URL provided...")
            }
    elif event["httpMethod"] == "POST":
        if event["body"]:
            try:
                body = json.loads(event["body"])
                url = body["url"]
            except Exception as e:
                logger.error(e)
                raise e
        else:
            return {
                "statusCode": 400,
                "body": json.dumps("No URL provided...")
            }
    else:
        return {
            "statusCode": 405,
            "body": json.dumps(f"Invalid HTTP Method {event['httpMethod']} supplied")
        }

    logger.info(f"Decoding {url}")
    url = unquote(url)

    logger.info(f"Parsing {url}")
    try:
        parsed_url = urlparse(url)
        if parsed_url.scheme != "http" and parsed_url.scheme != "https":
            logger.info("No valid scheme found, defaulting to http://")
            parsed_url = urlparse(f"http://{url}")
        if parsed_url.port is None:
            if parsed_url.scheme == "http":
                parsed_url = urlparse(f"{parsed_url.geturl()}:80")
            elif parsed_url.scheme == "https":
                parsed_url = urlparse(f"{parsed_url.geturl()}:443")

    except Exception as e:
        logger.error(e)
        raise e

    logger.info("Getting screenshot")
    try:
        screenshot_url = get_screenshot(parsed_url.geturl(), bucket_name) # TODO: Variable!
    except Exception as e:
        logger.error(e)
        raise e

    response_body = {
        "message": f"Successfully captured screenshot of {parsed_url.geturl()}",
        "screenshot_url": screenshot_url
    }

    return {
        "statusCode": 200,
        "body"      : json.dumps(response_body)
    }
Next, we need to install all packages that the lambda function uses into the lambda directory since these packages are not installed by default in AWS.
Then we need to create the zip archive (once created, Terraform will continue to update it if you make changes to your code):
cd .\lambda
pip install selenium tldextract -t .\
cd ..\
Compress-Archive .\lambda -DestinationPath .\screenshot-service.zip
How to Configure API Gateway
Create a file called apigw.tf in the root of your project directory. First, we will configure the REST API:
resource "aws_api_gateway_rest_api" "screenshot_api" {
  name        = "screenshot_api"
  description = "Lambda-powered screenshot API"
  depends_on = [
    aws_lambda_function.take_screenshot
  ]
}
This API will be used to direct all requests that are made for the screenshot service. We use the depends_on feature to ensure that the gateway and its related components are only created after the lambda function is created.
Next, let's create the API Gateway resource for the lambda function:
resource "aws_api_gateway_resource" "screenshot_api_gateway" {
  path_part   = "screenshot"
  parent_id   = aws_api_gateway_rest_api.screenshot_api.root_resource_id
  rest_api_id = aws_api_gateway_rest_api.screenshot_api.id
}
We have now defined a resource that will respond at the /screenshot endpoint for the API service.
Next up we will create a stage for the API. A stage is a fancy way of naming our deployment of the API. You can configure caching, logging, request throttling, and more using a stage.
resource "aws_api_gateway_stage" "prod_stage" {
  stage_name = "prod"
  rest_api_id = aws_api_gateway_rest_api.screenshot_api.id
  deployment_id = aws_api_gateway_deployment.api_gateway_deployment_get.id
}
Next we will create an API key and usage plan tied to our stage, so that only users with knowledge of the key can use this service. (Note: If you want this publicly accessible, skip this step.)
resource "aws_api_gateway_usage_plan" "apigw_usage_plan" {
  name = "apigw_usage_plan"

  api_stages {
    api_id = aws_api_gateway_rest_api.screenshot_api.id
    stage = aws_api_gateway_stage.prod_stage.stage_name
  }
}

resource "aws_api_gateway_usage_plan_key" "apigw_usage_plan_key" {
  key_id = aws_api_gateway_api_key.apigw_prod_key.id
  key_type = "API_KEY"
  usage_plan_id = aws_api_gateway_usage_plan.apigw_usage_plan.id
}

resource "aws_api_gateway_api_key" "apigw_prod_key" {
  name = "prod_key"
}
Let's now configure the API to respond to either a GET or POST request if a valid API Gateway Key is provided (set the value to false if you want the method open to the public):
resource "aws_api_gateway_method" "take_screenshot_get" {
  rest_api_id   = aws_api_gateway_rest_api.screenshot_api.id
  resource_id   = aws_api_gateway_resource.screenshot_api_gateway.id
  http_method   = "GET"
  authorization = "NONE"
  api_key_required = true
}

resource "aws_api_gateway_method" "take_screenshot_post" {
  rest_api_id   = aws_api_gateway_rest_api.screenshot_api.id
  resource_id   = aws_api_gateway_resource.screenshot_api_gateway.id
  http_method   = "POST"
  authorization = "NONE"
  api_key_required = true
}
We now need to give the API Gateway permission to invoke the lambda function we created:
resource "aws_lambda_permission" "apigw" {
  statement_id  = "AllowAPIGatewayInvoke"
  action        = "lambda:InvokeFunction"
  function_name = aws_lambda_function.take_screenshot.arn
  principal     = "apigateway.amazonaws.com"

  source_arn = "${aws_api_gateway_rest_api.screenshot_api.execution_arn}/*/*/*"
}
Great, we now have the appropriate permissions. Let's set up our integration with the lambda function:
resource "aws_api_gateway_integration" "lambda_integration_get" {
  depends_on = [
    aws_lambda_permission.apigw
  ]
  rest_api_id = aws_api_gateway_rest_api.screenshot_api.id
  resource_id = aws_api_gateway_method.take_screenshot_get.resource_id
  http_method = aws_api_gateway_method.take_screenshot_get.http_method

  integration_http_method = "POST" # https://github.com/hashicorp/terraform/issues/9271 Lambda requires POST as the integration type
  type                    = "AWS_PROXY"
  uri                     = aws_lambda_function.take_screenshot.invoke_arn
}

resource "aws_api_gateway_integration" "lambda_integration_post" {
  depends_on = [
    aws_lambda_permission.apigw
  ]
  rest_api_id = aws_api_gateway_rest_api.screenshot_api.id
  resource_id = aws_api_gateway_method.take_screenshot_post.resource_id
  http_method = aws_api_gateway_method.take_screenshot_post.http_method

  integration_http_method = "POST" # https://github.com/hashicorp/terraform/issues/9271 Lambda requires POST as the integration type
  type                    = "AWS_PROXY"
  uri                     = aws_lambda_function.take_screenshot.invoke_arn
}
This integration tells the API Gateway what lambda function to invoke when it receives a request at the specified endpoint and HTTP method.
Almost done with the gateway, I promise. As a last step, let's make sure that our API can send logs to CloudWatch:
resource "aws_api_gateway_account" "apigw_account" {
  cloudwatch_role_arn = aws_iam_role.apigw_cloudwatch.arn
}

resource "aws_iam_role" "apigw_cloudwatch" {
  # https://gist.github.com/edonosotti/6e826a70c2712d024b730f61d8b8edfc
  name = "api_gateway_cloudwatch_global"

  assume_role_policy = <<EOF
{
  "Version": "2012-10-17",
  "Statement": [
    {
      "Sid": "",
      "Effect": "Allow",
      "Principal": {
        "Service": "apigateway.amazonaws.com"
      },
      "Action": "sts:AssumeRole"
    }
  ]
}
EOF
}

resource "aws_iam_role_policy" "apigw_cloudwatch" {
  name = "default"
  role = aws_iam_role.apigw_cloudwatch.id

  policy = <<EOF
{
    "Version": "2012-10-17",
    "Statement": [
        {
            "Effect": "Allow",
            "Action": [
                "logs:CreateLogGroup",
                "logs:CreateLogStream",
                "logs:DescribeLogGroups",
                "logs:DescribeLogStreams",
                "logs:PutLogEvents",
                "logs:GetLogEvents",
                "logs:FilterLogEvents"
            ],
            "Resource": "*"
        }
    ]
}
EOF
}
We have now given API Gateway the requisite permissions in order to write logs to CloudWatch.
Last but not least, we deploy our API. We use depends_on to ensure that the deployment occurs after all dependencies are created.
resource "aws_api_gateway_deployment" "api_gateway_deployment_get" {
  depends_on = [aws_api_gateway_integration.lambda_integration_get,  aws_api_gateway_method.take_screenshot_get, aws_api_gateway_integration.lambda_integration_post, aws_api_gateway_method.take_screenshot_post]

  rest_api_id = aws_api_gateway_rest_api.screenshot_api.id
}
Lambda packaging
In main.tf, add the following:
data "archive_file" "screenshot_service_zip" {
  type        = "zip"
  source_dir  = "./lambda"
  output_path = "./screenshot-service.zip"
}

data "archive_file" "screenshot_service_layer_zip" {
  type = "zip"
  source_dir = "./chromedriver_layer"
  output_path = "./chromedriver_lambda_layer.zip"
}
Outputs
Create a file called output.tf in the root of your project directory and add the following:
output "api_gateway_url" {
  value = "${aws_api_gateway_stage.prod_stage.invoke_url}/${aws_api_gateway_resource.screenshot_api_gateway.path_part}"
}

output "api_key" {
  value = aws_api_gateway_api_key.apigw_prod_key.value
}
Now once you run .\terraform apply you will get output with the URL of the API and the associated API key.
Congrats! You now have a working screenshot service. To view the code I've used, feel free to check out my Github repository.