In this article, we will explore the react-hook-form library.
You will learn how to use and integrate this library with React. We'll also see why it's becoming a popular choice for building both simple and complex forms with added support for handling complex validations.
Let's get started
Working with forms in React is a complex task. And it just gets more complex when the number of input fields increases along with the validations.
Take a look at the below code:
import React, { useState } from "react";
import "./styles.css";

export default function App() {
  const [state, setState] = useState({
    email: "",
    password: ""
  });

  const handleInputChange = (event) => {
    setState((prevProps) => ({
      ...prevProps,
      [event.target.name]: event.target.value
    }));
  };

  const handleSubmit = (event) => {
    event.preventDefault();
    console.log(state);
  };

  return (
    <div className="App">
      <form onSubmit={handleSubmit}>
        <div className="form-control">
          <label>Email</label>
          <input
            type="text"
            name="email"
            value={state.email}
            onChange={handleInputChange}
          />
        </div>
        <div className="form-control">
          <label>Password</label>
          <input
            type="password"
            name="password"
            value={state.password}
            onChange={handleInputChange}
          />
        </div>
        <div className="form-control">
          <label></label>
          <button type="submit">Login</button>
        </div>
      </form>
    </div>
  );
}
Here's a Code Sandbox demo: https://codesandbox.io/s/login-form-zjxs9.
In the above code, we have only 2 input fields, namely email and password, and a submit button.
Each input field has a value and onChange handler added so we can update the state based on the user's input.
Also, we have added a handleSubmit method which displays the data entered in the form to the console.
This looks fine. But what if we need to add validations like required field validation, minimum length validation, password validation, email field validation and also display the corresponding error messages?
The code will become more complex and lengthy as the number of input fields and their validations increase.
This is a very common requirement in any application. So to easily work with Forms, there are various libraries available like Formik, redux-form, react-final-form, react-hook-form and so on.
But the one which is gaining lot of popularity is the react-hook-form library.
So let’s now learn why and how to use it. For that, we'll create a new React application.
Create a new React project by running the following command from the terminal:
npx create-react-app react-hook-form-demo
Once the project is created, delete all files from the src folder and create new index.js and styles.css files inside the src folder.
To install the form library, execute the following command from the terminal:
yarn add react-hook-form
How to Create Initial Pages
Open the src/index.js file and add the following content inside it:
import React from 'react';
import ReactDOM from 'react-dom';
import App from './App';

ReactDOM.render(<App />, document.getElementById('root'));
Open the src/styles.css file and add the content from here inside it.
Now, create a new file App.js inside the src folder with the following content:
import React from "react";
import "./styles.css";

export default function App() {
  return (
    <div className="App">
      <form>
        <div className="form-control">
          <label>Email</label>
          <input type="text" name="email" />
        </div>
        <div className="form-control">
          <label>Password</label>
          <input type="password" name="password" />
        </div>
        <div className="form-control">
          <label></label>
          <button type="submit">Login</button>
        </div>
      </form>
    </div>
  );
}
Here, we have just added the email and password fields to the form.
Basic Form Creation Using react-hook-form
The react-hook-form library provides a useForm hook which we can use to work with forms.
Import the useForm hook like this:
import { useForm } from 'react-hook-form';
Use the useForm hook like this:
const { register, handleSubmit, errors } = useForm();
Here,
- register is a function to be used as a ref provided by the
useFormhook. We can assign it to each input field so that thereact-hook-formcan track the changes for the input field value. - handleSubmit is the function we can call when the form is submitted
- errors will contain the validation errors, if any
Now, replace the contents of the App.js file with the following content:
import React from "react";
import { useForm } from "react-hook-form";
import "./styles.css";

export default function App() {
  const { register, handleSubmit, errors } = useForm();

  const onSubmit = (data) => {
    console.log(data);
  };

  return (
    <div className="App">
      <form onSubmit={handleSubmit(onSubmit)}>
        <div className="form-control">
          <label>Email</label>
          <input type="text" name="email" ref={register} />
        </div>
        <div className="form-control">
          <label>Password</label>
          <input type="password" name="password" ref={register} />
        </div>
        <div className="form-control">
          <label></label>
          <button type="submit">Login</button>
        </div>
      </form>
    </div>
  );
}
In the above code, we have given a ref to each input field that we got from the useForm hook.
ref={register}
Also, we added the onSubmit function which is passed to the handleSubmit function.
<form onSubmit={handleSubmit(onSubmit)}>
Note that for each input field, we have given a unique name which is mandatory so react-hook-form can track the changing data.
When we submit the form, the handleSubmit function will handle the form submission. It will send the user entered data to the onSubmit function which we’re logging to the console.
const onSubmit = (data) => {
 console.log(data);
};
Now, start the application by running the yarn start command.

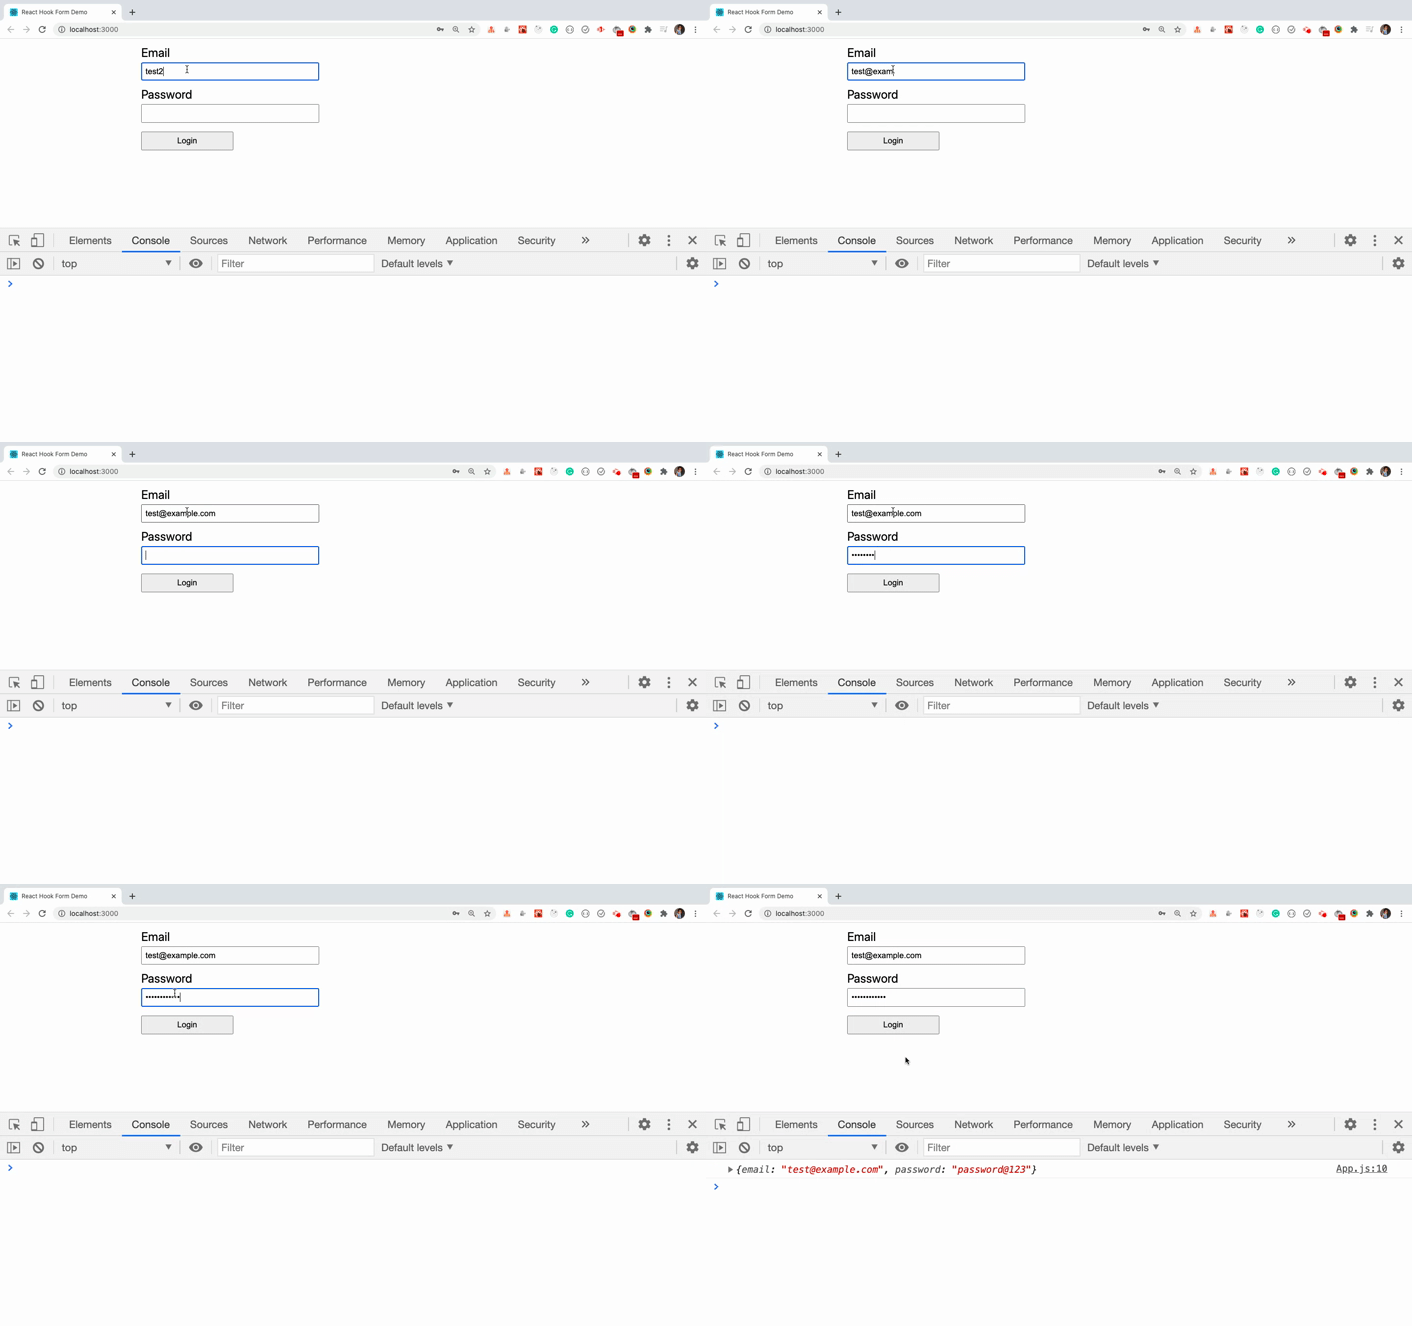
As you can see, when we submit the form, the details entered by the user are displayed in the console.
Also, as compared to the code without react-hook-form (which we saw at the start of this article), this code is much simpler. This is because we don’t have to add the value and onChange handler for each input field and there is no need to manage the application state ourselves.
How to Add Validations to the Form
Now, let’s add the required field and minimum length validation to the input fields.
To add validation we can pass it to the register function which is passed as a ref to each input field like this:
<input type="text" name="email" ref={register({ required: true})} />
<input
  type="password"
  name="password"
  ref={register({ required: true, minLength: 6 })}
/>
We also want to display the error message if the validation fails.
When the validation fails, the errors object coming from useForm will be populated with the fields for which the validation failed.
Open the App.js file and replace its contents with the following content:
import React from "react";
import { useForm } from "react-hook-form";
import "./styles.css";

export default function App() {
  const { register, handleSubmit, errors } = useForm();

  const onSubmit = (data) => {
    console.log(data);
  };

  return (
    <div className="App">
      <form onSubmit={handleSubmit(onSubmit)}>
        <div className="form-control ">
          <label>Email</label>
          <input
            type="text"
            name="email"
            ref={register({
              required: true,
              pattern: /^[^@ ]+@[^@ ]+\.[^@ .]{2,}$/
            })}
          />
          {errors.email && errors.email.type === "required" && (
            <p className="errorMsg">Email is required.</p>
          )}
          {errors.email && errors.email.type === "pattern" && (
            <p className="errorMsg">Email is not valid.</p>
          )}
        </div>
        <div className="form-control">
          <label>Password</label>
          <input
            type="password"
            name="password"
            ref={register({ required: true, minLength: 6 })}
          />
          {errors.password && errors.password.type === "required" && (
            <p className="errorMsg">Password is required.</p>
          )}
          {errors.password && errors.password.type === "minLength" && (
            <p className="errorMsg">
              Password should be at-least 6 characters.
            </p>
          )}
        </div>
        <div className="form-control">
          <label></label>
          <button type="submit">Login</button>
        </div>
      </form>
    </div>
  );
}

Here, for the email input field, we have provided the required and pattern matching validations.
<input
    type="text"
    name="email"
    ref={register({
      required: true,
      pattern: /^[^@ ]+@[^@ ]+\.[^@ .]{2,}$/
    })}
  />
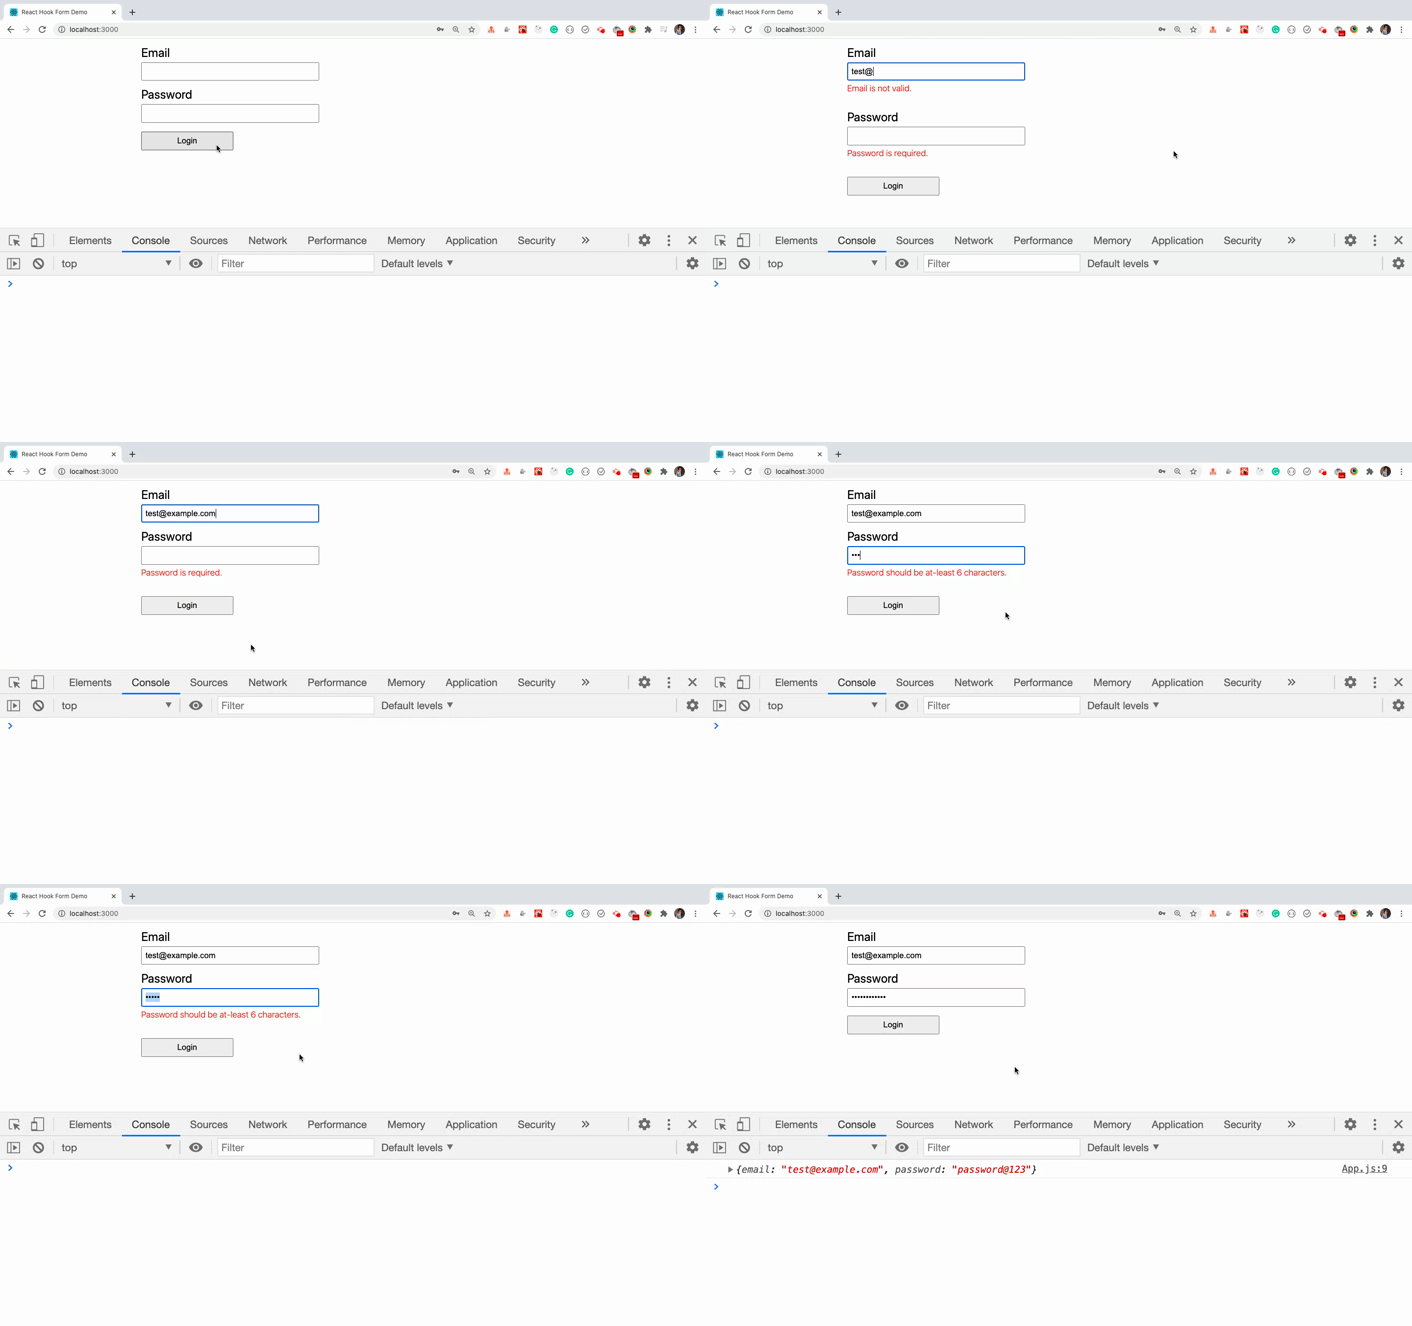
So as you type in the email input field, the validation will run once the form is submitted.
If the validation failed, then the errors.email field inside the errors object will be populated with the type field which we used to display the error message.
{errors.email && errors.email.type === "required" && (
  <p className="errorMsg">Email is required.</p>
)}
In the similar way, we have added the password field validation.
So as you can see, each input field is automatically focused if there is any validation error for the that input field when we submit the form.
Also, the form is not submitted as long as there is a validation error. You can see that the console.log statement is only printed if the form is valid.
So using react-hook-form reduced the amount of code that we have to write. The validation is also responsive, so once the field becomes valid, the error message goes away instantly.
But as the number of validations for each field increases, the conditional checks and error message code will still increase. So we can further refactor the code to make it even simpler.
Take a look at the below code:
import React from 'react';
import { useForm } from 'react-hook-form';
import './styles.css';

export default function App() {
  const { register, handleSubmit, errors } = useForm();

  const onSubmit = (data) => {
    console.log(data);
  };

  return (
    <div className="App">
      <form onSubmit={handleSubmit(onSubmit)}>
        <div className="form-control ">
          <label>Email</label>
          <input
            type="text"
            name="email"
            ref={register({
              required: 'Email is required.',
              pattern: {
                value: /^[^@ ]+@[^@ ]+\.[^@ .]{2,}$/,
                message: 'Email is not valid.'
              }
            })}
          />
          {errors.email && <p className="errorMsg">{errors.email.message}</p>}
        </div>
        <div className="form-control">
          <label>Password</label>
          <input
            type="password"
            name="password"
            ref={register({
              required: 'Password is required.',
              minLength: {
                value: 6,
                message: 'Password should be at-least 6 characters.'
              }
            })}
          />
          {errors.password && (
            <p className="errorMsg">{errors.password.message}</p>
          )}
        </div>
        <div className="form-control">
          <label></label>
          <button type="submit">Login</button>
        </div>
      </form>
    </div>
  );
}
In the code above, we have changed the email and password validation code.
For the email input field, we changed this previous code:
<input
  type="text"
  name="email"
  ref={register({
    required: true,
    pattern: /^[^@ ]+@[^@ ]+\.[^@ .]{2,}$/
  })}
/>
to the below new code:
<input
  type="text"
  name="email"
  ref={register({
    required: 'Email is required.',
    pattern: {
      value: /^[^@ ]+@[^@ ]+\.[^@ .]{2,}$/,
      message: 'Email is not valid.'
    }
  })}
/>
Here, we’ve directly provided the error message we want to display while adding the validation itself.
So we no longer need to add extra checks for each validation. We are displaying the error message using the message property available inside the errors object for each input field.
{errors.email && <p className="errorMsg">{errors.email.message}</p>}
So by doing it this way, the code is further simplified which makes it easy to add extra validations in future.
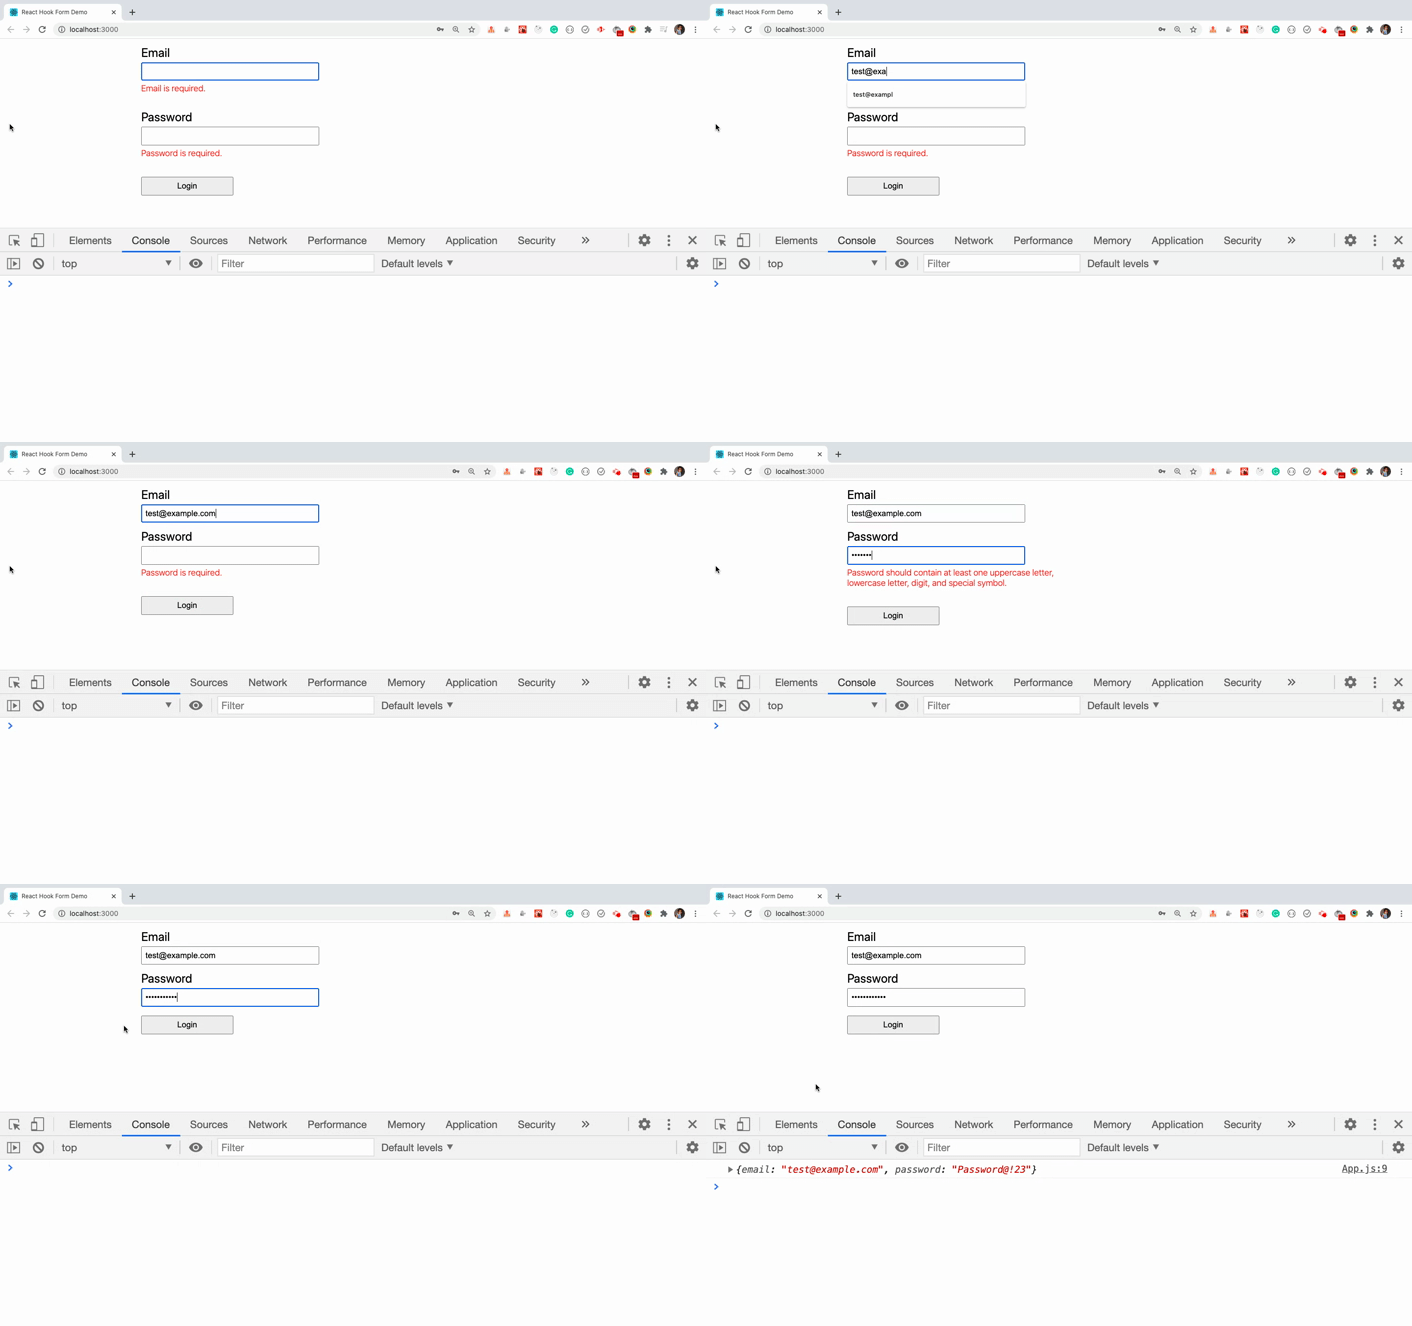
Note that if there are validation errors, the onSubmit handler will not be executed and the corresponding input field will automatically be focused (which is a good thing).
How to Add a Custom Validation Method
You can even provide a custom validation for the input field by adding a validate method. This is useful if you need to perform complex validations like this:
// validation function
const validatePassword = (value) => {
  if (value.length < 6) {
    return 'Password should be at-least 6 characters.';
  } else if (
    !/(?=.*\d)(?=.*[a-z])(?=.*[A-Z])(?!.*\s)(?=.*[!@#$*])/.test(value)
  ) {
    return 'Password should contain at least one uppercase letter, lowercase letter, digit, and special symbol.';
  }
  return true;
};

// JSX
<input
  type="password"
  name="password"
  ref={register({
    required: 'Password is required.',
    validate: validatePassword
  })}
/>

Now you know how to use react-hook-form to create forms in React along with complex validations.
Why react-hook-form is better than the alternatives
Let’s look at some additional reasons that react-hook-form should become your preferred choice for working with forms.
- Code complexity is less as compared to
formik,redux-formand other alternatives. react-hook-formintegrates well with theyuplibrary for schema validation so you can combine your own validation schemas.- The number of re-renders in the application is small compared to the alternatives.
- Mounting time is less as compared to the alternatives.
For the actual comparison metrics, read more here.
Conclusion
In this article, we have seen how to use react-hook-form and why it's many developers' preferred choice for building both simple and complex forms in React.
You can find the GitHub source code for this application here.
If you liked this article, then you'll also love my other articles.
Subscribe to my weekly newsletter to join other 1000+ subscribers to get amazing tips, tricks, and articles directly in your inbox.

