
Lately I've been seeing many tweets and articles about Prisma. It's a modern ORM (Object-Relational-Mapping tool) that works with Node.jsand TypeScript.
Yes, this library will help you build and manage your Node.js database – and it's compatible with TypeScript! It will generate all the types of your entities automatically.
The schema definition is easy to read by humans – no more headache there. You will see how that works in the coming sections.
Also, the ORM works well with Next.js, GraphQL, Nest.Js, Express.js, Apollo, and Hapi.
To summarize, Prisma is a modern ORM that plays nice with all the trending tech stacks.
That is why I decided to try it and to replace my previous database management library: TypeORM.
"Prisma helps app developers build faster and make fewer errors with an open source ORM for PostgreSQL, MySQL and SQLite." – Prisma homepage
Let's build a simple Twitter database using Node, Prisma, and SQLite
Time to practice. I will show you how to build your first Node.js database using Prisma. To keep this introduction accessible, we will use Node with SQLite.
SQLite is a self-contained database engine. This means that you don't need to configure a database on your computer. The project will run by itself if you follow the steps of this tutorial.
If, in the future, you want to use Prisma with a PostgreSQL database, here is a tutorial on creating a PostgreSQL database using Docker-Compose.
Prerequisites
- Node.js (12.2 or higher)
Before getting started, take the time to double-check if you have version 12.2 or higher of Node.js. If you don't, just update your Node before starting the next section.
Note: If you want to check your Node.js version, you can type:
node -vin a terminal. The output will be the version.
- Basic SQL knowledge
Even though I'm taking a simple approach to this new library, I recommend that you have basic SQL knowledge to fully understand the tutorial.
Note: You don't need to be an expert! Only the basics like creating a table and making some requests are essential here.
How to Set Up a Basic Twitter Project
First, you need to create a new folder for this project and move into it:
$ mkdir minimalistic-twitter
$ cd minimalistic-twitter
Then, we will install all the mandatory dependencies such as TypeScript and Prisma.
$ npm init -y
$ npm install prisma typescript ts-node @types/node --save-dev
$ npm install @prisma/client
From now, you should see a node_modules folder and a package.json file in your repository.
Before moving on to the Prisma initialization, the last configuration step is to create a configuration for TypeScript at the repository root.
To do so, you can create a tsconfig.json and paste the following configuration:
{
  "compilerOptions": {
    "sourceMap": true,
    "outDir": "dist",
    "strict": true,
    "lib": ["esnext"],
    "esModuleInterop": true
  }
}
There we go! It's time to use Prisma in our project. In the minimalistic-twitter folder, you can use the following command to prompt the Prisma help output.
$ npx prisma
Now, the last step before building our minimalistic Twitter app is to initialize the database configuration.
We will use the init command but with a --datasource-provider parameter to set the database type. Otherwise, by default, init will create a PostgreSQL database.
$ npx prisma init --datasource-provider sqlite
When the command finishes executing, you should find in your repository a .env file and a prisma folder with a schema.prisma file inside of it.
The schema.prisma file contains all the instructions to connect to your database. Later it will also include the instructions to generate your database tables.
The .env file contains all the environment variable that your project needs to run. For Prisma, the only variable is DATABASE_URL. Its value is set to ./dev.db .
The dev.db file will be the self-contained database file.
 Project tree after the project initialization
If you have the same output, congrats, it means that your project is ready! 🎉
How to Build Our First Model – User
Our basic Twitter database will consist of two main entities:
- A user entity with the user information and its tweets
- A tweet entity with the tweet content and its author
First, we'll focus on user entity creation. Each of them has:
- an id
- a unique email (two users can't have the same email)
- a username
- a list of tweets
With Prisma, if we want to define a new schema (model), we need to do it in the schema.prisma file.
To define an entity, we will use the model instruction as below. You can reproduce it after the database connection instruction in your schema.prisma file.
// After the database connection

model User {
  // We set an `id` variable
  // With an `Int` type (number)
  // Then, we set the Prisma decorators:
  // - @id (because it's an ID)
  // - @default(autoincrement()) (default value is auto-incremented)
  id Int @id @default(autoincrement())

  // We set an `email` variable
  // With a `String` type
  // Then, we set the Prisma decorator:
  // - @unique (because we want the user to be unique
  // based on the email - two users can't have the same)
  email String @unique

  // We set a `username` variable
  // With a `String` type
  username String

  // We set a `tweets` variable
  // With a `Tweet[]` type (one-to-many relationship)
  // Because each user can have between
  // 0 and an infinite number of tweets
  tweets Tweet[]
}
As you might notice, we don't have the Tweet model yet. It will be our next step.
How to Build Our Second Model – Tweet
Now that we have users, we need tweets. Let's follow the same process as before, but this time for the Tweet entity.
Each of them has:
- an id
- a creation date
- a text
- an userId (tweet's author)
Below, you will find the entity. You can reproduce it after the User model declaration in your schema.prisma file.
// After the database connection

// After the User model

model Tweet {
  // We set an `id` variable
  // With an `Int` type (number)
  // Then, we set the Prisma decorators:
  // - @id (because it's an ID)
  // - @default(autoincrement()) (default value is auto-incremented)
  id Int @id @default(autoincrement())

  // Save the tweet creation time
  createdAt DateTime @default(now())

  // We set a `text` variable
  // With a `String` type
  text String

  // We set a `userId` variable
  // With an `Int` type (number)
  // It will link the `id` of the `User` model
  userId Int

  // We set a `user` variable
  // With a `User` type (many-to-one relationship)
  // Because each tweet has an author
  // This author is a `User`
  // We link the `User` to a `Tweet` based on:
  // - the `userId` in the `Tweet` model
  // - the `id` in the `User` model
  user User @relation(fields: [userId], references: [id])
}
How to Generate our First Database Migration
The first thing we need to do before using our database is to generate it. To do so, we will use another command of the Prisma CLI. This command will allow us to create migrations.
If we have a look at the documentation about the migrate command, we'll see the following:
"Prisma Migrate is an imperative database schema migration tool that enables you to: Keep your database schema in sync with your Prisma schema as it evolves _and m_aintain existing data in your database." – Prisma migrate documentation
The idea here is to save our first database implementation. You can do it by typing the command below in your terminal:
npx prisma migrate dev --name initialize
Note: You can enter the name of your choice after the --name parameter. Keep in mind that the migration name is helpful to remember the changes you made.
If your migration command is successful, it means that all the instructions in schema.prisma are correct. ✅
Your project tree should now be similar to the image below (except for the migration hash).
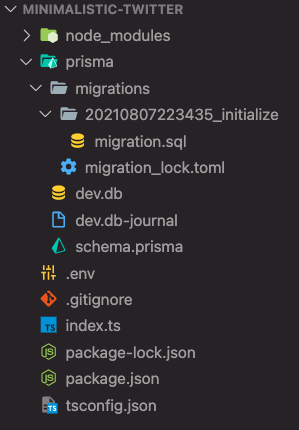 Project tree after the migration generation
Note: In the migration.sql file, you will find the SQL queries to generate your database.
Your database is ready! 🚀 It's time to try it, add some users, and let them tweet.
How to Test our Node JS SQLite Project
So, will the users now be able to tweet? Let's try to run some queries on our database. We'll create an index.ts file at the repository root, and we'll write some instructions into it.
First, we need to import and initialize the database connection. Based on the Prisma Quickstart documentation, we create a prisma variable to interact with the database and a function to write our test code:
import { PrismaClient } from "@prisma/client";

const prisma = new PrismaClient();

async function main() {}

main()
  .catch((e) => {
    throw e;
  })
  .finally(async () => {
    await prisma.$disconnect();
  });
We're ready to fill the main function with some instructions.
import { PrismaClient } from "@prisma/client";

const prisma = new PrismaClient();

async function main() {
  // We create a new user
  const newUser = await prisma.user.create({
    data: {
      email: "hello@herewecode.io",
      username: "gaelgthomas", // <- it's also my Twitter username 😄
    },
  });

  console.log("New User:");
  console.log(newUser);

  // We create a new tweet and we link it to our new user
  const firstTweet = await prisma.tweet.create({
    data: {
      text: "Hello world!",
      userId: newUser.id,
    },
  });

  console.log("First tweet:");
  console.log(firstTweet);

  // We fetch the new user again (by its unique email address)
  // and we ask to fetch its tweets at the same time
  const newUserWithTweets = await prisma.user.findUnique({
    where: {
      email: "hello@herewecode.io",
    },
    include: { tweets: true },
  });

  console.log("User object with Tweets:");
  console.dir(newUserWithTweets);
}

main()
  .catch((e) => {
    throw e;
  })
  .finally(async () => {
    await prisma.$disconnect();
  });
Note: If you want to discover the different instructions you can use, a good Prisma documentation page is the CRUD one.
Time to run the index.ts file.
Before doing it, open your package.json file and search for the scripts section. You will need to add a command to start the project using ts-node.
If you want, you can replace your scripts section with the following code:
"scripts": {
  "dev": "ts-node ./index.ts",
  "test": "echo \"Error: no test specified\" && exit 1"
},
Then, in your terminal, you can type the command below and read the output to see if everything is working well:
$ npm run dev
Note: In the command above, we run the dev script from our package.json.
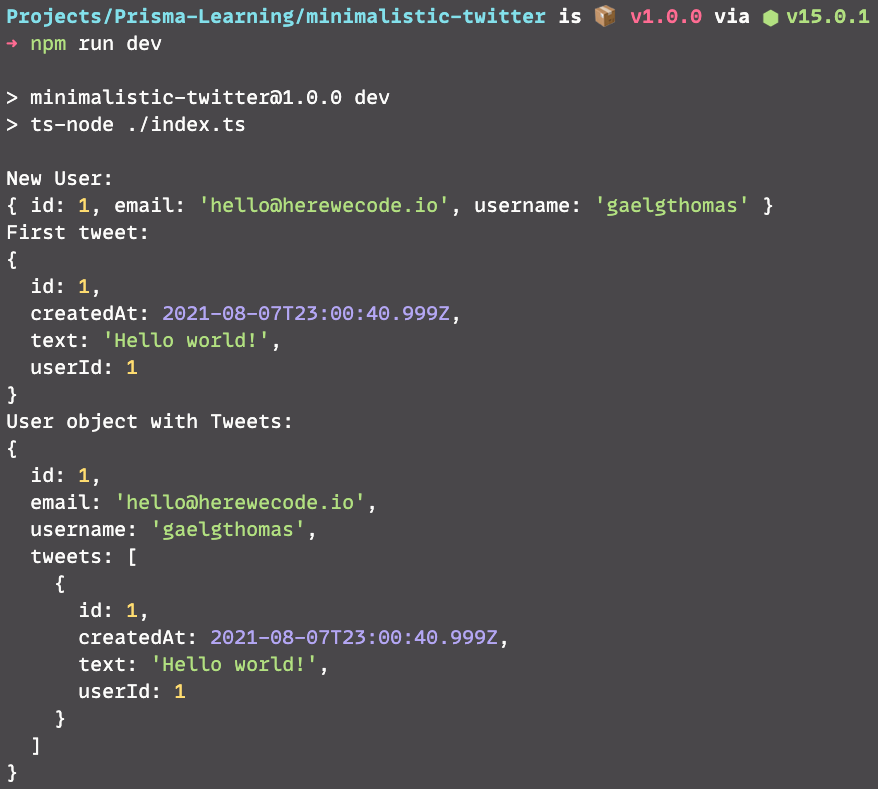 NPM test output using Prisma
It's working! You got your first user and tweet. 👏 Now that you've set up your first database using Prisma, you can add some features to it. Here are some ideas:
- add more information in the User entity (birthday, address, biography, and so on)
- add a like system (each tweet can have likes, each user can have a liked tweet list)
The Code is available on Github – Node JS with Prisma and SQLite
If you want to get the complete code, you can find it on my GitHub.
-> GitHub: Prisma SQLite example
Thanks for reading until the end!
I hope you will use Prisma in one of your next projects. 🎉
I'm starting to tweet more consistently. If you want to get more tips and resources about web programming -> Find me on my Twitter 🐦