
By Popoola Temitope
Form building in React can be complex and time-consuming, requiring state management, validation, and error handling.
To simplify this process, the Formik library provides an intuitive solution for building forms in React. Formik has a straightforward API and built-in validation, making collecting and manipulating input data in React applications easy.
What is Formik?
[Formik](https://formik.org/) is a popular open-source library for building and processing form data in React applications. It provides many utility components and functions that make handling form data in a React application more enjoyable.
Traditional form-management method in React requires creating a universal or single useState() hook for each form field, adding an event listener to each field, and triggering a method to update them individually.
// Infuriating traditional react form management method

import { useState } from "react";

function InputForm() {
  const [input1, setInput1] = useState("");
  const [input2, setInput2] = useState("");

  const handleInputChange = (event) => {
    const { name, value } = event.target;
    if (name === "input1") {
      setInput1(value);
    } else if (name === "input2") {
      setInput2(value);
    }
  };

  const handleSubmit = (event) => {
   // . . .
  };

  return (
    <form onSubmit={handleSubmit}>
      <input name="input1" value={input1} onChange={handleInputChange} />
      <input name="input2" value={input2} onChange={handleInputChange} />
      <button type="submit">Submit</button>
    </form>
  );
}

export default InputForm;
On the other hand, Formik handles all of these tedious operations for us under the hood. We only need to import its provided components – our form data are readily available.
<Formik
  onSubmit={(formData) => {
    console.log(formData);
  }}
>
  {({ isSubmitting }) => (
    <Form>
      <Field type="text" name="fullname" placeholder="Enter fullname" />
      <Field type="email" name="email" placeholder="Enter address" />
      <button type="submit">Submit</button>
    </Form>
  )}
</Formik>;
In addition to helping us handle form data, Formik provides some other mechanisms that let us validate form fields, track form submission state, and handle errors.
This tutorial will show you how to use Formik in a React app by creating a simple registration form.
How to Install Formik
To start with Formik, let's create a new React app using the below command:
npx create-react-app my-app
cd my-app
npm start
Once we have our React app set up, we can install Formik with the following command:
npm install formik --save
Once we've installed Formik, we can import its components and utilize them in our application.
import { Formik, Form, Field, ErrorMessage } from 'formik';
In the above import code, we have the following:
- The
Formcomponent wraps all the form fields and provides essential context for using Formik's tools. This includes managing the form's state, handling validation, and submitting the form. Fieldis a component provided by Formik that represents a form field. We can use this component to render an input, select, or other form elements. It automatically handles the state of the field, such as its value and validation.ErrorMessageis a component provided by Formik that renders an error message for a specific field. We can use this component to display validation errors for a field. This is especially helpful for displaying form errors in a user-friendly way.
How to Create a Form with Formik
We can create a form input by wrapping the form and its fields inside the Formik component. The code below is an example of creating form input using Formik:
import React from "react";
import { Formik, Form, Field, ErrorMessage } from "formik";
function App() {
 return (
   <div className="App">
     <center>
       <h1>Register a new account</h1>
       <Formik>
         {({ isSubmitting }) => (
           <Form>
             <Field
               type="text"
               name="fullname"
               placeholder="Enter your fullname"
             />
             <ErrorMessage name="fullname" component="div" />

             <Field
               type="email"
               name="email"
               placeholder="Enter email address"
             />
             <ErrorMessage name="email" component="div" />

             <Field type="password" name="password" />
             <ErrorMessage name="password" component="div" />

             <button type="submit" disabled={isSubmitting}>
               Submit
             </button>
           </Form>
         )}
       </Formik>
     </center>
   </div>
 );
}
export default App;
In the above code, the Formik component wraps the form and provides utilities like form validation and submission handling. The Field component defines each form input, such as fullname, email, and password, while the ErrorMessage component displays validation errors for each field.
The isSubmitting prop is passed to the render prop function, which is used to disable the submit button while the form is submitted.
Next, we must set the field's initial values by passing the initialValues prop. We can set the initial values for fullname, email, and password using the code below:
<Formik initialValues={{ fullname: "", email: "", password: "" }}>
Form Validation with Formik
When creating forms, it's essential to validate input data to prevent errors and provide an interactive user experience. The code below shows how to validate form input data using Formik.
<Formik
         initialValues={{ fullname: "", email: "", password: "" }}
         validate={(values) => {
           const errors = {};
           if (!values.fullname) {
             errors.fullname = "Required";
           }

           if (!values.email) {
             errors.email = "Required";
           } else if (
             !/^[A-Z0-9._%+-]+@[A-Z0-9.-]+\.[A-Z]{2,}$/i.test(values.email)
           ) {
             errors.email = "Invalid email address";
           }
           if (!values.password) {
             errors.password = "Required";
           }
           return errors;
         }}
       >
In the code above, we use the validate prop to define a validation function that will be called whenever the user interacts with the form. This function takes the current values of the form fields as a parameter and returns an object that specifies any errors in the form data.
Form Submission With Formik
Formik uses an onSubmit function to handle form data whenever the submit button gets clicked. It first validates the data using the validation function.
To process a form using the onSubmit function, add the following code to the Formik component:
 <Formik
   initialValues={{ fullname: "", email: "", password: "" }}
   // . . .
   onSubmit={(values, { setSubmitting }) => {
     setTimeout(() => {
       alert(JSON.stringify(values, null, 2));
       setSubmitting(false);
     }, 400);
   }}
>
From the code above, the onSubmit function is called when the form is submitted and uses the setSubmitting function to update the Formik component's state during the submission process.
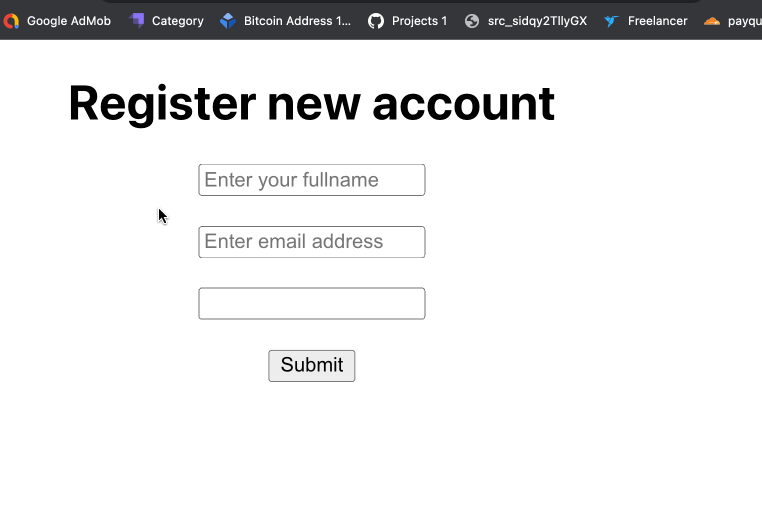
Here is the output of the form we created using Formik:
Conclusion
Formik is a React library that makes building forms easy and intuitive, especially when creating complex forms or trying to save time during development.
In this tutorial, we learned how to use Formik to create and manage form states in React applications. If you want to learn more about Formik, you can check out their official documentation.