
By Scott Spence
A developer portfolio is a great way to showcase your current skill level to potential employers.
This guide will go from hello world to a fully-featured portfolio project to show your current projects with images and links to source code. You'll also build an accompanying blog where you can detail what you have learned along the way.
Hi 👋, my name is Scott, and I have been blogging about my journey through web development since July 2016.
I'm a freeCodeCamp alumnus – I started my freeCodeCamp journey back in 2016 – and have been a professional developer since March, 2018.
I have written about how to build a Gatsby blog from scratch in the past and want to take you through doing the same again, this time with Svelte!
This quite an extensive guide (33 sections!) so I've added a table of content's to help you navigate around the post:
- What we're going to build
- Who's this guide for?
- The stack (what technology we'll be using)
- What is Svelte?
- What is SvelteKit?
- What is Vite?
- What is GraphQL?
- What is GraphCMS?
- How to Set Up GraphCMS
- How to Query Content
- How to Create Your Svelte Project
- How to Show GraphQL Data on the Index Page
- How to Add Markup for the Index Page
- How to Build the First Svelte Component
- How to Style in Svelte
- How to Style with Tailwind and DaisyUI
- How to Style the Projects Component
- How to Use the SvelteKit
__layoutFile - How to Build the Landing Page with Projects Listed
- How to Use SvelteKit Routing
- How to Build the Blog
- How to Build the Navbar and Footer Components
- How to Add a Theme Switch
- How to Add the About Page
- How to Make a Sitemap
- Robots.txt
- RSS Feed Generation
- Email Signup with Revue
- Continuous Deployment with Vercel
- Google Search Console
- Resources
- What we have accomplished
What we're going to build
We will build a fully-featured portfolio and blog with the framework that took the top spot for most loved framework on the Stack Overflow developer survey in 2021 – Svelte.
Using Svelte with GraphCMS means you can control the adding and removing of content on your site without the need to push any changes to Git.
Features:
- Landing page with projects listed
- Blog
- Theme switch
- Sitemap
- RSS feed generation
- Robots.txt
- Continuous Deployment with Vercel
- Build integrations to publish and build the site on content changes
There's also an optional email signup section with resources mentioned, but it's not essential to this project we're about to start. You can find resources for that toward the end.
One thing that's typically not covered with guides like this is actual deployment and getting your site on search engines like Google. But here, I'll be going through the whole process so you can have something you will be proud of at the end.
If you want to take it a step further with analytics, then check out my guide on configuring a Svelte project with Fathom Analytics, the privacy-first analytics provider. But I didn't include it here, as it's a paid feature and out of the scope of free.
Prerequisites
This guide comes with a few presumptions for the reader:
- An understanding of HTML, CSS, and JavaScript (the holy trinity of web development)
- A GitHub account or similar (GitLab or Bitbucket). Not essential but some hosting services require you to connect a Git repository.
- A development environment, Node.js installed on your machine version 14+, a terminal, and a text editor like VS Code.
- There are browser options like GitHub codespaces or Gitpod if you don't have these configured.
If you don't have a development environment set up there's no need to worry – you can use Gitpod to spin up an environment with this link: http://gitpod.io/#https://github.com/spences10/sveltekit-skeleton
This will get you started with the SvelteKit skeleton which is created when you use the CLI to create a new SvelteKit project.
I'll be using Microsoft's Visual Studio Code (VS Code) along with the VS Code integrated Git client.
There'll be a Git commit at the end of each section. This is optional but helps get you into the habit of committing regularly. It's also useful for when you want to deploy the project at the end.
Who's this guide for?
If you are well on your way through the freeCodeCamp curriculum and want to have something to show where your current skill level is, this guide will be a great accompaniment.
This guide will give you all you need to get started with Svelte and give you the confidence to start making your own projects with it.
The stack (what technology we'll be using)
Although I have mentioned a lot of the technology we'll be using, I'll take this opportunity to list out what we'll be using whilst we go through this guide.
- SvelteKit – the framework we'll use to create the pages and components
- Tailwind + daisyUI – how we'll style the project
- Tailwind CSS Typography to take care of styling the text content
- Marked to convert the Markdown content to HTML
- GraphCMS – where we'll store the content for the project details and blog posts
- graphql-request – used to query data from the GraphCMS API
What is Svelte?
Svelte is a component framework that allows you to write pages and components in what you're used to – HTML, CSS and JavaScript. It is an open-source front end compiler created by Rich Harris and maintained by the Svelte core team members.
Note that it is a compiler. This means that all the HTML, CSS, and JavaScript are built up-front into standalone JavaScript modules that reduces the load on the client (the browser).
It's compiled, rather than shipping a JavaScript run-time to the browser like React or Vue. This produces a much leaner project being shipped to the browser.
What is SvelteKit?
SvelteKit is a framework that has the Svelte language at it's core with some added features. These include file-based routing, endpoints, and layouts, to name a few.
Endpoints in SvelteKit are modules that you can write in JavaScript to create HTTP methods (get, post, delete), which can be accessed in SvelteKit via the SvelteKit fetch API. More on this later.
What is Vite?
Vite is the build tool you use to compile SvelteKit projects. Vite was created by Evan You, the creator of Vue. Vite is framework-agnostic and a great addition to the SvelteKit toolset.
What is GraphQL?
GraphQL is a query language for APIs, giving users and clients the flexibility to ask for the data they need when they need it.
A GraphQL query looks like this:
 A GraphQL query displaying the query on the left and the results on the right
On the left is the query which is for the name field in the project model with the "data" being returned in the resulting query on the right.
The query returned in JavaScript Object Notation (JSON) is what can be consumed by the client (a browser, a mobile app, an in store display or a fridge).
What is GraphCMS?
GraphCMS is a headless GraphQL-based Content Management System (CMS) that will let you spin up a back end for your content delivery.
You can do this in minutes with the click of a button from one of the provided templates or you can build your own schema with the simple user interface (UI).
How to Set Up GraphCMS
The team over at GraphCMS created a template for this, so setting up the backend for this is a one click deploy.
You'll need to log into GraphCMS first. You can log in with your GitHub account or authenticate via other means.
Once you are logged in you will be presented with your GraphCMS dashboard. If this is your first time using GraphCMS you can scroll down the page to "Developer Portfolio & Blog" in the "Create a new project" section. Select "Developer Portfolio & Blog" and click "+ Create project".
We're then prompted to give our project a name. I'm going to call it "Portfolio and Blog", and the description can be left blank for now. You can pick the data centre closest to you for where your project will be hosted. I'm in the UK so I'll pick the UK data centre.
 Pick your data centre
Note, if you are adding your own content then toggle "Include template content?" on.
 Leave this toggled if you are going to add your content at a later date.
As a side note, all content for GraphCMS is served from a globally distributed CDN so there's no need to worry about latency for users not near your specified data centre.
Click the "Create project" button at the bottom of the page.

Once the project has finished being provisioned you are presented with what plan you want to use. Pick the community "Free forever" plan.

There will be another prompt to ask you if you want to invite teammates. Just select "Invite later".
The GraphCMS dashboard will look like this. All of the project sections are on the panel on the left. In the next section we'll be taking a look at those.
 The GraphCMS dashboard with arrows pointing to the Schema, Content, Assets and API Playground sections.
How to Query Content
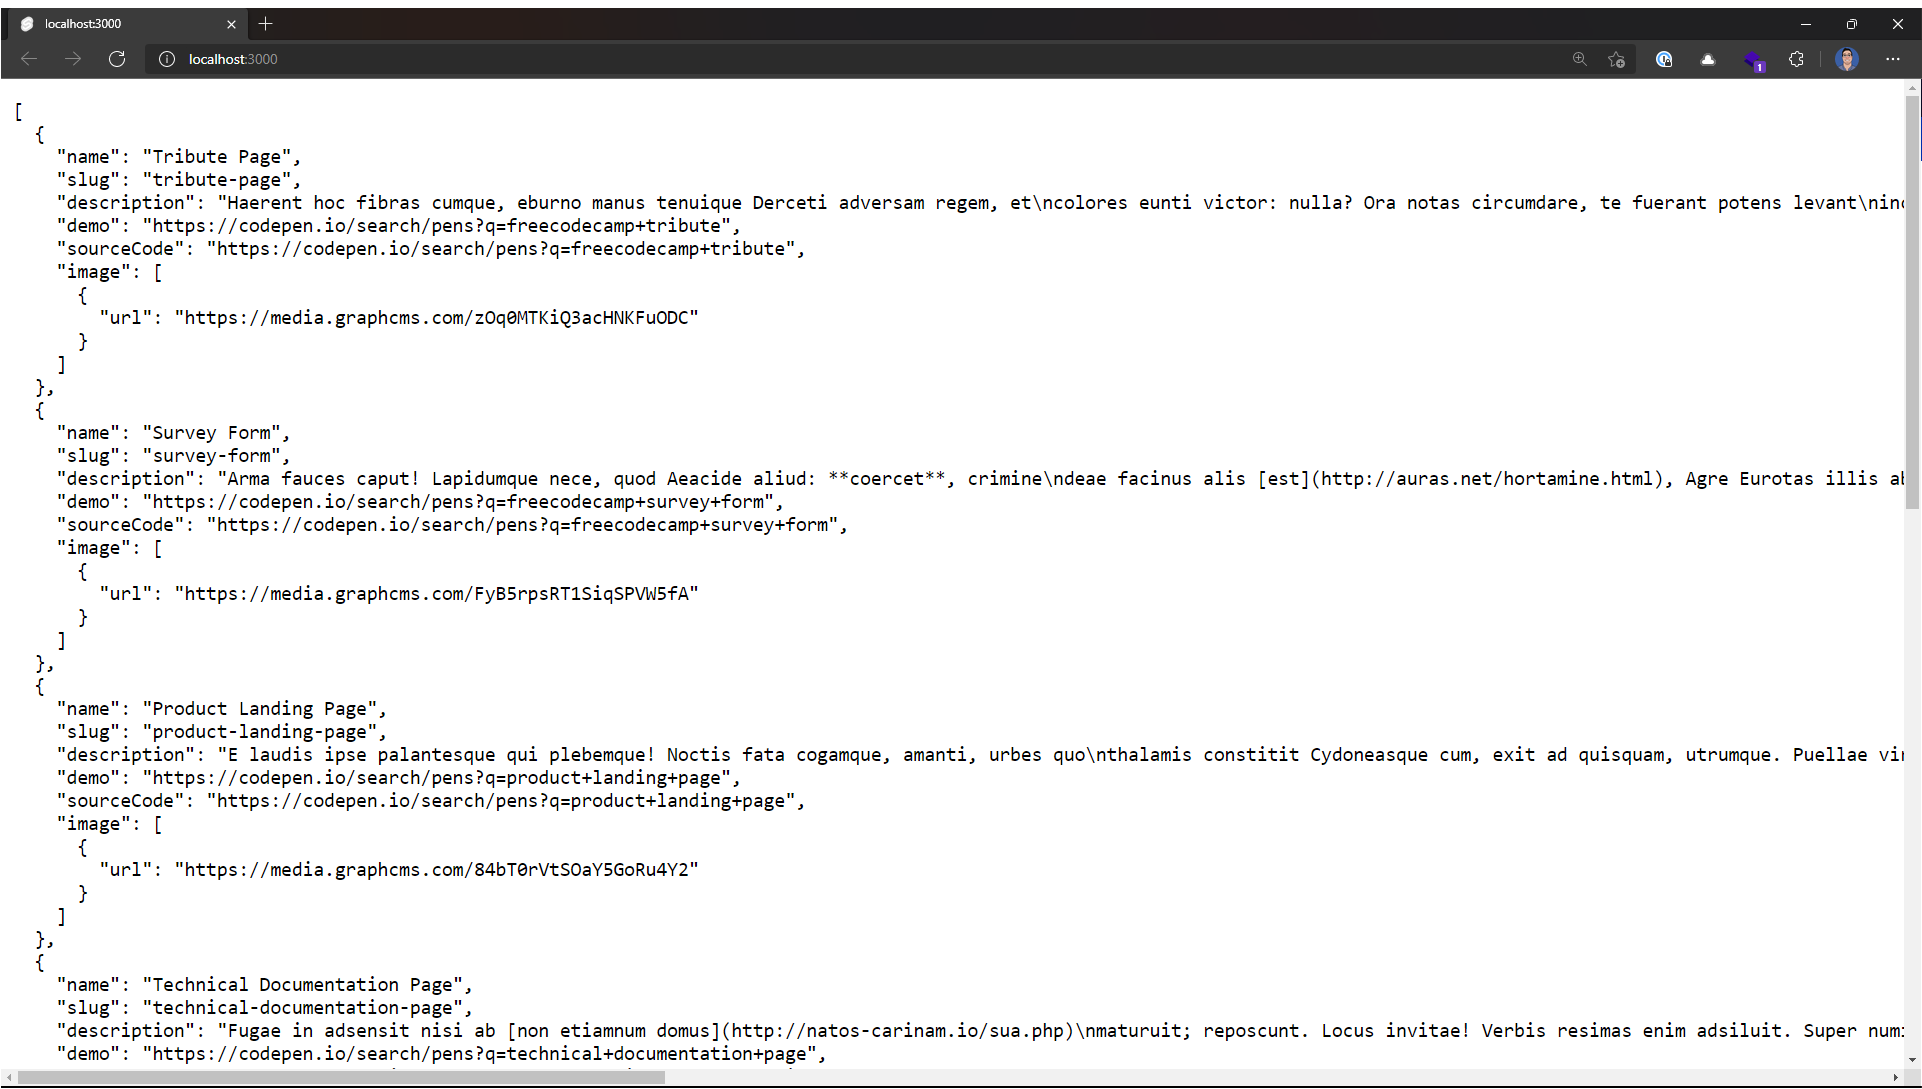
Let's make our first GraphQL query. This is going to be a list of all the projects added to the CMS that are in the project model.
Go to the API playground and enter the following GraphQL query into the "New Query" tab in the GraphQL playground.
query GetProjects {
  projects {
    name
    slug
    description
    demo
    sourceCode
    image {
      url
    }
  }
}
This query is selecting the projects model then each field that is contained in that model.
How to Create Your Svelte Project
If you're using Gitpod you can skip to creating a .env file. If you're setting up locally then let's get started. From the terminal we can create our project with the following npm command:
npm init svelte@next my-developer-portfolio
From the CLI I'll pick the following options:
? Which Svelte app template? › - Use arrow-keys. Return to submit.
    SvelteKit demo app
❯   Skeleton project
? Use TypeScript? › No
? Add ESLint for code linting? › No
? Add Prettier for code formatting? › Yes
I'll follow the rest of the instructions from the CLI. If you take a look at the output from the CLI you'll also notice a couple of other features we'll be taking advantage of soon. Here's what my output looks like:
Your project is ready!
✔ Prettier
  https://prettier.io/docs/en/options.html
  https://github.com/sveltejs/prettier-plugin-svelte#options

Install community-maintained integrations:
  https://github.com/svelte-add/svelte-adders

Next steps:
  1: cd my-developer-portfolio
  2: npm install (or pnpm install, etc)
  3: git init && git add -A && git commit -m "Initial commit" (optional)
  4: npm run dev -- --open

To close the dev server, hit Ctrl-C

Stuck? Visit us at https://svelte.dev/chat
Take note of the "Install community-maintained integrations" section with Svelte Adders – we'll be using one of those later for adding Tailwind.
Now to change directory (CD) into the project folder, initialise a Git repository, and install the dependencies:
# cd into project directory
cd my-developer-portfolio
# initialise a new git repo and make first commit
git init && git add -A && git commit -m "Initial commit"
# install dependencies
npm install # or 'npm i' for shorthand
I'll open my text editor and check out the project. I have VS Code installed so using the code command will open it and the . specified the current directory:
code .
Time to check that everything is up and running as expected, so let's spin up the dev server:
# start the dev server
npm run dev
Now that we've validated everything is working as expected, it's time to make a .env file. This is where the GraphQL API URL is going to live. You can create the file with your text editor user interface (UI) if you choose. I'll be using the following command from the root of my project to create the file:
# Ctrl-c to stop the dev server
touch .env
echo VITE_GRAPHQL_API= >> .env
That command from the terminal is creating a .env file then adding VITE_GRAPHQL_API= into that file.
In the .env file, add the "Content API" URL from the GraphCMS project.
The settings panel can be accessed form the sidebar:
 GraphCMS project settings
Then "API access":

Then click on the "Content API" URL. This will copy it to the clipboard for you:
 Select the content API URL
Now add that to the .env file. It should now look something like this:
VITE_GRAPHQL_API=https://api-region.graphcms.com/v2/projectid/master
How to Show GraphQL Data on the Index Page
Let's make our first request to our GraphQL API!
First up, to get some data on the page we're going to make the request to the GraphQL API from the index page.
To do that we'll need to install a couple of dependencies, graphql-request and graphql. graphql-request is what we'll be using to send our GraphQL queries to the GraphQL API. graphql is the JavaScript implementation of the GraphQL language.
npm i -D graphql-request graphql
Note the -D in the install command there. That's because Svelte doesn't need any run-time dependencies as it compiles the code upfront before sending it to the browser.
Let's start by adding a script block with the context of module <script context="module"> and import the gql tag and the GraphQLClient from graphql-request.
We'll also define a SvelteKit load function. This is so we can grab the data from the API before the page mounts (loads).
<script context="module">
  import { gql, GraphQLClient } from 'graphql-request'

  export const load = async () => {

  }
</script>
Inside the SvelteKit load function we can then define a new GraphQL client. The client accepts a URL (the GraphCMS API URL) and an options object.
We're going to put in the VITE_GRAPHQL_API we created earlier. Note that the variable starts with VITE_ which means that Vite can use this variable. We'll need to import it with import.meta.env, and it should look a lot like this:
<script context="module">
  import { gql, GraphQLClient } from 'graphql-request'

  export const load = async () => {
    const client = new GraphQLClient(
      import.meta.env.VITE_GRAPHQL_API
    )
</script>
Now that the client is defined we can use it to pass a query to the GraphCMS GraphQL API.
Taking the query we made earlier to query for all projects, we can add that to a query variable to use with the GraphQL client we defined.
The query uses the GraphQL gql language tag inside backticks gql```. Then we can destructure the projects from theawait`'ed response we get from the GraphQL client:
<script context="module">
  import { gql, GraphQLClient } from 'graphql-request'

  export const load = async () => {
    const client = new GraphQLClient(
      import.meta.env.VITE_GRAPHQL_API
    )

    const query = gql`
      query GetProjects {
        projects {
          name
          slug
          description
          demo
          sourceCode
          image {
            url
          }
        }
      }
    `

    const { projects } = await client.request(query)
  }
</script>
Now that the client has the query, we can return the data from the response of the client projects and return them as props for the page to use.
The data from the GraphQL API can now be passed to the page as props in the return of the load function:
<script context="module">
  import { gql, GraphQLClient } from 'graphql-request'

  export const load = async () => {
    const client = new GraphQLClient(
      import.meta.env.VITE_GRAPHQL_API
    )

    const query = gql`
      query GetProjects {
        projects {
          name
          slug
          description
          demo
          sourceCode
          image {
            url
          }
        }
      }
    `

    const { projects } = await client.request(query)

    return {
      props: {
        projects,
      },
    }
  }
</script>
Now that the data is being returned we need to bring that into the page.
We can do that in the <script> tags on the page. So yes there two sets of script tags – the first <script context="module"> to run the SvelteKit load function before the page loads (or mounts), then the regular <script> tags to define any JavaScript needed on the index.svelte file and to also to accept the props which is projects.
In the last section here we're accepting the projects returned from the load function with export let projects in the <script> tags. Now that variable can be used in the page.
For illustration purposes I'm adding the projects variable into a <pre> tag and stringifying the results with {JSON.stringify(projects, null, 2)}. This is temporary so that we can validate and visualise the data coming into the page.
<script context="module">
  import { gql, GraphQLClient } from 'graphql-request'

  export const load = async () => {
    const client = new GraphQLClient(
      import.meta.env.VITE_GRAPHQL_API
    )

    const query = gql`
      query GetProjects {
        projects {
          name
          slug
          description
          demo
          sourceCode
          image {
            url
          }
        }
      }
    `

    const { projects } = await client.request(query)

    return {
      props: {
        projects,
      },
    }
  }
</script>

<script>
  export let projects
</script>

<pre>{JSON.stringify(projects, null, 2)}</pre>
Time to start up the dev server and see how things look now:
npm run dev
Here's the output which looks really similar to the Projects GraphQL output in the GraphQL playground we made earlier:
 localhost output after running
 npm run dev
I know I really walked you through every step of that one. That's to highlight the different sections of what we're doing.
This will be a similar pattern for the rest of of the project.
The following steps will look like this:
- Make a GraphQL query to define the data needed.
- Give that query to the GraphQL client.
- Work with the returned data from the client in the page.
Refactor the GraphQL client
As we'll be using the GraphQL client in more than one page, it's time to move that out into its own file so that it can be reused throughout the project.
Svelte has a lib folder for files that are reused throughout the project but there's not a folder (or directory if you prefer that term) for that yet – so it's time to create one. We can create a graphql-client.js file for the GraphQL client to go in:
# make the folder
mkdir src/lib
# create the file
touch src/lib/graphql-client.js
Now to move out the client from the index page to the newly created src/lib/graphql-client.js file:
import { GraphQLClient } from 'graphql-request'
const GRAPHQL_ENDPOINT = import.meta.env.VITE_GRAPHQL_API

export const client = new GraphQLClient(GRAPHQL_ENDPOINT)
In the src/routes/index.svelte I can remove the initialisation of the client and import the client from its newly created file in the lib folder.
Here's the difference. If you're not familiar with a Git diff, then the + and - next to the lines means that those lines are added (+ ) or removed (-):
<script context="module">
+  import { client } from '$lib/graphql-client'
-  import { gql, GraphQLClient } from 'graphql-request'
+  import { gql } from 'graphql-request'

  export const load = async () => {
-   const client = new GraphQLClient(import.meta.env.VITE_GRAPHQL_API)

    const query = gql`
      query GetProjects {
        projects {
          name
          slug
          description
          demo
          sourceCode
          image {
            url
          }
        }
      }
    `

    const { projects } = await client.request(query)

    return {
      props: {
        projects,
      },
    }
  }
</script>

<script>
  export let projects
</script>

<pre>{JSON.stringify(projects, null, 2)}</pre>
With that done we can start using the refactored client in our index page.
Let's commit our changes to Git before moving onto the next section:
git add .
git commit -m "Show GraphQL data on index page"
How to Add Markup for the Index Page
Up until now we've really only displayed the data from the API endpoint in a pre tag. Time to change that by breaking up the data returned from the GraphQL API into sections on the index page.
So let's start by removing the <pre> tag, adding in a <h1> for the page title, then in a <div> we can use one of the Svelte expressions to loop through the data with Svelte {#each}.
The each expression takes in the projects object. Then you can work with a variable for that, let's say project, and you can reference the various properties on that variable.
Here's an example of how that could look:
{#each projects as project}
  <div>
    <img src={project.image[0].url} alt={project.name} />
    <a href={`/projects/${project.slug}`}>
      <div>
        <h2>{project.name}</h2>
        <p>
          {project.description.slice(0, 80)}...
        </p>
      </div>
    </a>
  </div>
{/each}
To take it a step further we can de-structure the properties from that part of the loop so there's no need to reference the specific properties from project.
Note that the image.url is also being de-structured here as well.
So instead of {#each projects as project} we can do this {#each projects as { name, slug, description, image }}.
Here's how the src/routes/index.svelte file should look now:
<script context="module">
  import { client } from '$lib/graphql-client'
  import { gql } from 'graphql-request'

  export const load = async () => {
    const query = gql`
      query GetProjects {
        projects {
          name
          slug
          description
          tags
          demo
          sourceCode
          image {
            url
          }
        }
      }
    `
    const { projects } = await client.request(query)

    return {
      props: {
        projects,
      },
    }
  }
</script>

<script>
  export let projects
</script>

<h1>Recent Projects by Me</h1>

<div>
  {#each projects as { name, slug, description, image }}
    <div>
      <img src={image[0].url} alt={name} />
      <a href={`/projects/${slug}`}>
        <div>
          <h2>{name}</h2>
          <p>
            {description.slice(0, 80)}...
          </p>
        </div>
      </a>
    </div>
  {/each}
</div>
How to Build the First Svelte Component
What we're going to do now is make our first Svelte component. This will be for the project card we made in the last code block.
This is so we can reuse that code in other parts of the project. So, it's going to be everything inside the {#each} loop we did to display each project on the index page, this section here:
<div>
  <img src={image[0].url} alt={name} />
  <a href={`/projects/${slug}`}>
    <div>
      <h2>{name}</h2>
      <p>
        {description.slice(0, 80)}...
      </p>
    </div>
  </a>
</div>
Let's create a lib folder and a project-card.svelte component to go in that folder:
# make components folder
mkdir src/lib/components
# create the component file
touch src/lib/components/project-card.svelte
In that file we can now add in the markup for the project card:
<div>
  <img src={image[0].url} alt={name} />
  <a href={`/projects/${slug}`}>
    <div>
      <h2>{name}</h2>
      <p>
        {description.slice(0, 80)}...
      </p>
    </div>
  </a>
</div>
The markup at the moment has the variables for the image URL, the project name, and description. Currently this won't work because those variables are not referenced anywhere.
Inside some <script> tags we can define the variables that are expected by the component.
<script>
  export let url = ''
  export let name = ''
  export let slug = ''
  export let description = ''
</script>

<div>
  <img src={url} alt={name} />
  <a href={`/projects/${slug}`}>
    <div>
      <h2>{name}</h2>
      <p>
        {description.slice(0, 80)}...
      </p>
    </div>
  </a>
</div>
With the component now ready to accept the variables for the project, we can pass them into the component on the index page.
<script context="module">
  import ProjectCard from '$lib/components/project-card.svelte'
  import { client } from '$lib/graphql-client'
  import { gql } from 'graphql-request'

  export const load = async () => {
    const query = gql`
      query GetProjects {
        projects {
          name
          slug
          description
          tags
          demo
          sourceCode
          image {
            url
          }
        }
      }
    `
    const { projects } = await client.request(query)

    return {
      props: {
        projects,
      },
    }
  }
</script>

<script>
  export let projects
</script>

<h1>Recent Projects by Me</h1>

<div>
  {#each projects as { name, slug, description, image }}
    <ProjectCard {name} {description} url={image[0].url} {slug} />
  {/each}
</div>
The component is being imported between the <script> tags, and then the individual variables from the loop are being passed into it.
Let's take a quick look at the variables being passed. They could be defined like this:
<ProjectCard
  name={name}
  description={description}
  url={image[0].url}
  slug={slug}
/>
Because the expected props on the component are the same as what's being passed, then there is no need to label the props. So this is what we can use:
<ProjectCard {name} {description} url={image[0].url} {slug} />
Note that the image property is an array (as the project can take multiple images) so we're referencing the first index of that array.
Let's commit this before moving onto the next section:
git add .
git commit -m "Add first component"
How to Style in Svelte
With Svelte being a superset of HTML, this means that you can style your .svelte files the same way you would in HTML files.
Adding some <style> tags at the bottom of the file means you can style the elements on the page:
<p>Hello Svelte</p>

<style>
  p {
    color: red;
    font-size: 2rem;
  }
</style>
This will style all the <p> elements in that file with red font and a font size of 2rem.
You get a lot of control this way, allowing you to specify stiles to that file alone.
This is just an example, and it's not how I will be doing the styling for this project. I'm instead opting for Tailwind CSS.
How to Style with Tailwind and DaisyUI
Styling is a very opinionated and personal subject, so what I'll be doing may not fit with what you have in mind.
For that reason I'll keep styling to a minimum and try not to focus too much on it.
I'll be using Tailwind CSS and daisyUI for the speed at which I can create components and styles. If this isn't for you, you can continue styling as suggested in the last section.
I am going to be using svelte-add to configure the project to use TailwindCSS. The Svelte Adders project I mentioned earlier does all the configuration for you with an npm command:
npx svelte-add@latest tailwindcss
# install configured dependencies
npm i
The svelte-add command configured the project for use with Tailwind. It also added a file in src/routes called __layout.svelte – we'll come to this shortly. For now know that it's there, and we will be using it in an upcoming section.
I'm also going to be using a couple of TailwindCSS plugins – these are daisyUI and the TailwindCSS Typography plugin.
daisyUI is a great resource for pre-made components, and you can pick out a number of them from the site. Which is what I'll be doing for the header and footer components.
Tailwind CSS Typography is really useful for styling the content we're getting back from the API. It's a great set of defaults from the Tailwind Labs team.
I'll install them via the terminal:
npm i -D @tailwindcss/typography daisyui
Then I can configure them in the tailwind.config.cjs file:
plugins: [
  require('@tailwindcss/typography'),
  require('daisyui'),
],
There's some additional configuration needed for the TailwindCSS Typography plugin to remove the max width. Here's what the full tailwind.config.cjs looks like:
const config = {
  content: ['./src/**/*.{html,js,svelte,ts}'],

  theme: {
    extend: {
      typography: {
        DEFAULT: {
          css: {
            maxWidth: null,
          },
        },
      },
    },
  },

  plugins: [require('@tailwindcss/typography'), require('daisyui')],
}

module.exports = config
Let's spin up the dev server and validate the install. The project font will be different now.
Commit the changes and we'll move onto the next section:
git add .
git commit -m "Add Tailwind CSS and daisyUI"
How to Style the Projects Component
Ok, now I can add in some styles for the src/components/project-card.svelte file.
This uses several Tailwind classes, and will probably be as much as we deviate from the pre-packaged classes we get from daisyUI:
<script>
  export let url = ''
  export let name = ''
  export let slug = ''
  export let description = ''
</script>

<div class="relative group card shadow-2xl col-span-2">
  <img src={url} alt={name} class="object-cover h-full" />
  <a href={`/projects/${slug}`}>
    <div
      class="absolute bottom-0 left-0 right-0 lg:opacity-0 group-hover:opacity-100 bg-primary p-4 duration-300 text-primary-content"
    >
      <h2 class="font-bold lg:text-xl">{name}</h2>
      <p class="text-sm lg:text-xl">
        {description.slice(0, 80)}...
      </p>
    </div>
  </a>
</div>
On the containing div we're adding a relative position then using the Tailwind group class to apply the group-hover on the div containing the description content.
Because the containing div has a relative position on it we can then absolutely position the description div at the bottom of the containing div with bottom-0, left-0 and right-0 so it spans the bottom of the containing div.
The lg: class is so that when the user is on a smaller screen, the div shows regardless of mouse hover.
Let's commit that to Git an move onto the next section:
git add .
git commit -m "Style Projects component"
How to Use the SvelteKit __layout File
For global styles we can use the special SvelteKit __layout.svelte file. We can use it to control the global styles and also to get external information you want to pass down to any pages or components used in the project.
For now let's add some container classes for responsive screen sizes:
<script>
  import '../app.css'
</script>

<main class="container max-w-3xl mx-auto px-4 mb-20">
  <slot />
</main>
Commit that to Git, then onto the next section:
git add .
git commit -m "Add layout container CSS classes"
How to Build the Landing Page with Projects Listed
Let's get started with the landing page. On the landing page we're going to want to display some information about the Author and the Projects.
We already have the projects query defined and in use on the src/routes/index.svelte page. We're also going to want to get data from the author model for use in the index page.
What we're going to need to do is create another GraphQL query for the author in the load function of the src/routes/index.svelte page. Let's hop on over to the GraphCMS GraphQL playground and define that now:
query GetAuthors {
  authors {
    name
    intro
    bio
    slug
    picture {
      url
    }
  }
}
Ok, so, we have a projects query and an authors query. Onto getting data with these two queries now!
To achieve this we're going to use the JavaScript [Promise.all](https://developer.mozilla.org/en-US/docs/Web/JavaScript/Reference/Global_Objects/Promise/all) method to get the data from both endpoints and return them for use in the project.
<script context="module">
  import ProjectCard from '$lib/components/project-card.svelte'
  import { client } from '$lib/graphql-client'
  import { gql } from 'graphql-request'

  export const load = async () => {
    const authorsQuery = gql`
      query GetAuthors {
        authors {
          name
          intro
          bio
          slug
          picture {
            url
          }
        }
      }
    `
    const projectsQuery = gql`
      query GetProjects {
        projects {
          name
          slug
          description
          tags
          demo
          sourceCode
          image {
            url
          }
        }
      }
    `
    const [authorReq, projectsReq] = await Promise.all([
      client.request(authorsQuery),
      client.request(projectsQuery),
    ])
    const { authors } = authorReq
    const { projects } = projectsReq

    return {
      props: {
        projects,
        authors,
      },
    }
  }
</script>

<script>
  export let projects
  export let authors
</script>

<h1 class="font-bold text-center mb-20 text-5xl">
  Welcome to my Portfolio
</h1>

{#each authors as { name, intro, picture: { url } }}
  <div class="flex mb-40 items-end">
    <div class="mr-6">
      <h2 class="text-3xl mb-4 font-bold tracking-wider">{name}</h2>
      <p class="text-xl mb-4">{intro}</p>
    </div>

    <img class="mask mask-squircle h-48" src={url} alt={name} />
  </div>
{/each}

<div
  class="grid gap-10 md:grid-cols-4 md:px-10 lg:grid-cols-6 lg:-mx-52"
>
  {#each projects as { name, slug, description, image }}
    <ProjectCard {name} {description} url={image[0].url} {slug} />
  {/each}
</div>
Wow! There's a lot in here now.
Those two GraphQL queries are really taking up a lot of space in that load function. Let's take a minute to refactor them out of here so they can be used elsewhere. It'll also help clean up this page as it's getting a bit busy now with GraphQL queries taking up most of the file.
How to Refactor the GraphQL Queries
Let's grab those two queries at the top of the file there, these two:
const authorsQuery = gql`
  query GetAuthors {
    authors {
      name
      intro
      bio
      slug
      picture {
        url
      }
    }
  }
`
const projectsQuery = gql`
  query GetProjects {
    projects {
      name
      slug
      description
      tags
      demo
      sourceCode
      image {
        url
      }
    }
  }
`
And add them to their own JavaScript file. Let's create that now:
# create the graphql-queries.js file
touch src/lib/graphql-queries.js
Then we can take the queries from the src/routes/index.svelte file and add them in there:
import { gql } from 'graphql-request'

export const authorsQuery = gql`
  query GetAuthors {
    authors {
      name
      intro
      bio
      slug
      picture {
        url
      }
    }
  }
`

export const projectsQuery = gql`
  query GetProjects {
    projects {
      name
      slug
      description
      tags
      demo
      sourceCode
      image {
        url
      }
    }
  }
`
Note that they now have export in front of the const. This is so they can be exported from this file for use in the src/routes.index.svelte file.
In the src/routes.index.svelte I can now import those queries, cleaning up the file a little by removing all the noise of the queries in the load function. Here's what it should look like now:
<script context="module">
  import ProjectCard from '$lib/components/project-card.svelte'
  import { client } from '$lib/graphql-client'
  import { authorsQuery, projectsQuery } from '$lib/graphql-queries'

  export const load = async () => {
    const [authorReq, projectsReq] = await Promise.all([
      client.request(authorsQuery),
      client.request(projectsQuery),
    ])
    const { authors } = authorReq
    const { projects } = projectsReq

    return {
      props: {
        projects,
        authors,
      },
    }
  }
</script>

<script>
  export let projects
  export let authors
</script>

<svelte:head>
  <title>My Portfolio project</title>
</svelte:head>

<h1 class="font-bold text-center mb-20 text-5xl">
  Welcome to my Portfolio
</h1>

{#each authors as { name, intro, picture: { url } }}
  <div class="flex mb-40 items-end">
    <div class="mr-6">
      <h2 class="text-3xl mb-4 font-bold tracking-wider">{name}</h2>
      <p class="text-xl mb-4">{intro}</p>
    </div>

    <img class="mask mask-squircle h-48" src={url} alt={name} />
  </div>
{/each}

<div
  class="grid gap-10 md:grid-cols-4 md:px-10 lg:grid-cols-6 lg:-mx-52"
>
  {#each projects as { name, slug, description, image }}
    <ProjectCard {name} {description} url={image[0].url} {slug} />
  {/each}
</div>
Whoa! What's this <svelte:head> doing here?
The Svelte Head API allows us to add HTML meta data to the project – so, tags like the page title like in the above example but also meta tags for Google, Facebook, and Twitter. Also monetization.
This implementation will give the browser tab a title of "My Portfolio project".
Apart from the head component being added in here, we're also using the data from the authors query to display the data from the authors model on GraphCMS.
Commit the changes to Git:
git add .
git commit -m "Landing page with projects listed"
Ok, nice – we've got our landing page sorted.
How to Use SvelteKit Routing
Now we have a nice landing page with links to projects. But clicking on a link will take us to a 404 page. That's because the route for that page doesn't exist yet.
Let's create that now. We'll be using SvelteKit file-based routing to do this.
We'll need to create a file which will take the slug from the projects card and use that for the path for the project. We can make the file first:
# make the projects folder
mkdir src/routes/projects
# create the [slug].svelte file
touch src/routes/projects/'[slug]'.svelte
In the src/routes/projects/[slug].svelte we can define a SvelteKit load function which receives a context variable. Let's first take a look at what we get in the context variable:
<script context="module">
  export const load = async context => {
    console.log('=====================')
    console.log('context', context)
    console.log('=====================')
    return {}
  }
</script>
Refreshing the route for localhost:3000/projects/survey-form will give output in the terminal like this:
=====================
context {
  url: URL {
    href: 'http://localhost:3000/projects/survey-form',
    origin: 'http://localhost:3000',
    protocol: 'http:',
    username: '',
    password: '',
    host: 'localhost:3000',
    hostname: 'localhost',
    port: '3000',
    pathname: '/projects/survey-form',
    search: '',
    searchParams: URLSearchParams {},
    hash: ''
  },
  params: { slug: 'survey-form' },
  props: {},
  session: [Getter],
  fetch: [AsyncFunction: fetch],
  stuff: {}
}
=====================
What we're interested in here is the params.slug property which we can use to make a query to the GraphQL API.
Let's hop on over to the GraphQL playground in our GraphCMS project. There, we'll make a query to filter on a project where the slug matches what's being returned from the SvelteKit load function here:
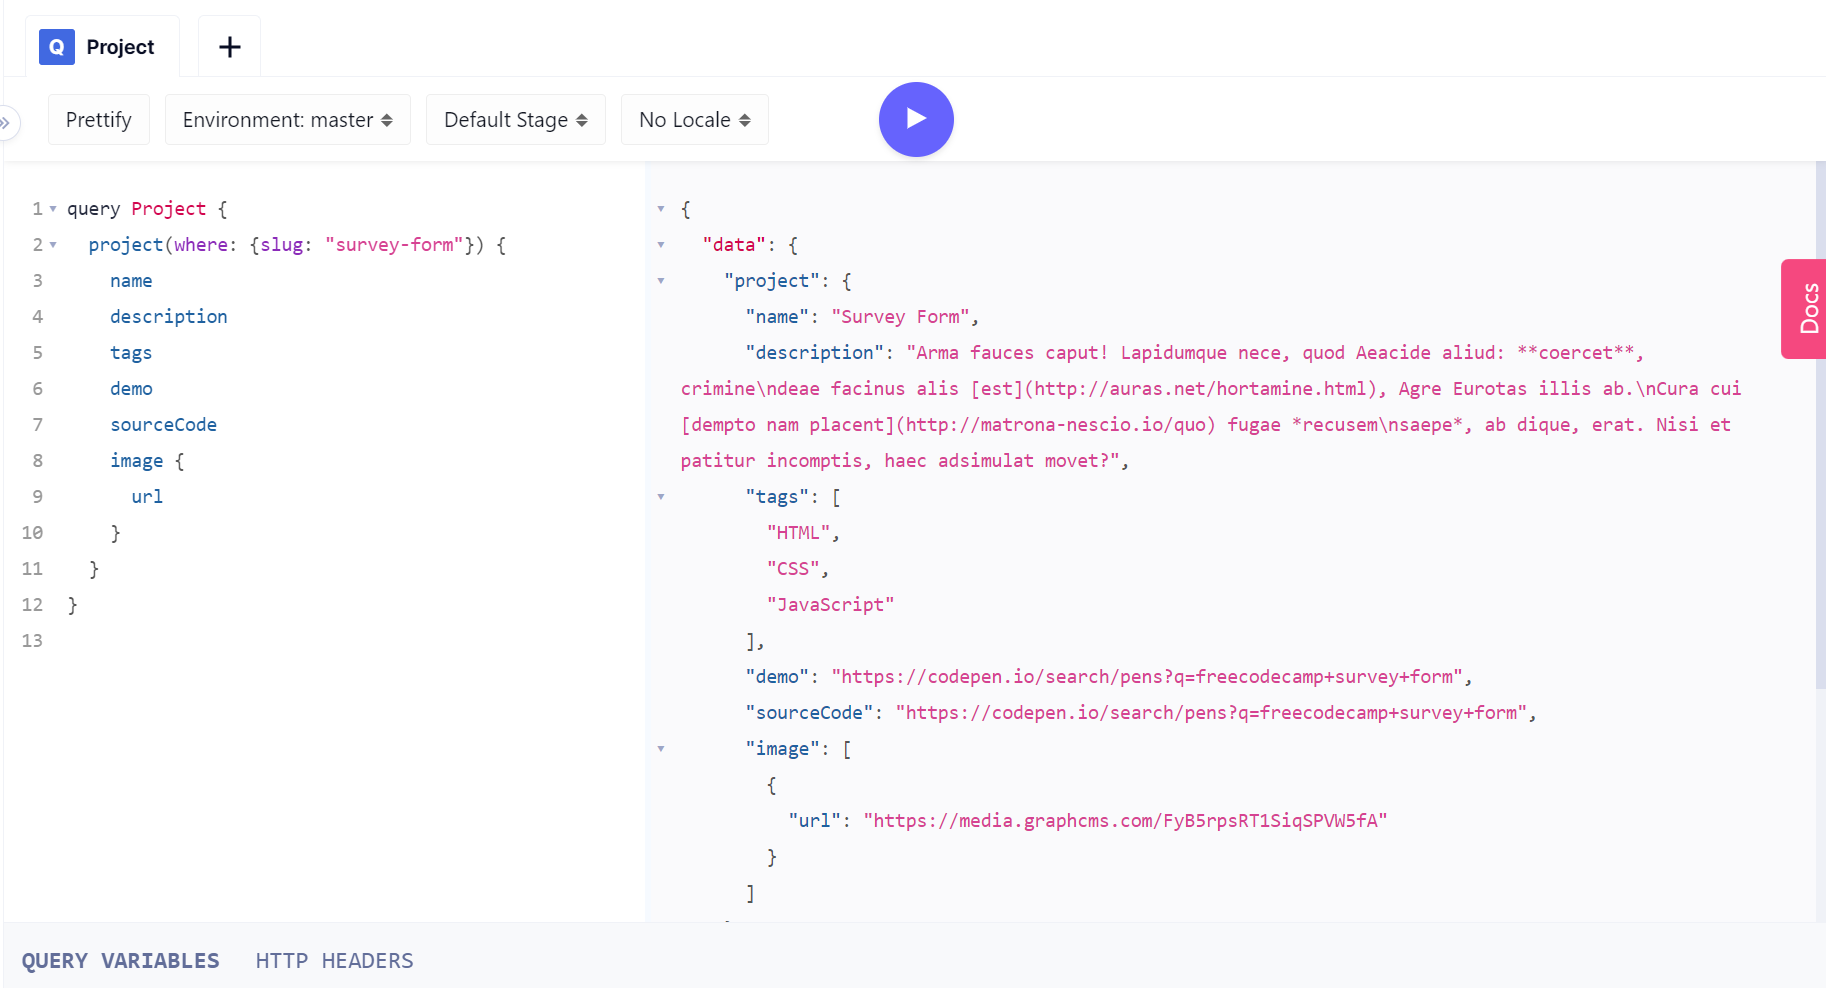 GraphQL query to query for project where slug matches "survey-form"
In the image, here I've defined a query to filter on the slug field where "survey-form" is being passed to the query.
That's great for that one query, but we want a way to pass variables to the query for each individual project slug we have. Let's take a look at using variables in GraphQL now.
I'll add some parenthesis to the end of the query name, and in those parenthesis I'll define a variable query GetProject($slug: String!) {. The $ denotes it's a variable while the : String! denotes the data type of the variable.
Because GraphQL is strongly typed, this needs to be defined so that GraphQL knows how it can use the variable. The exclamation point ! at the end indicates that the variable is required for the query to work.
Now I can use the variable in place of the hardcoded "survey-form" I used previously:
query GetProject($slug: String!) {
  project(where: {slug: $slug}) {
    name
    description
    tags
    demo
    sourceCode
    image {
      url
    }
  }
}
If I try run that query now I get the following error:
{
  "errors": [
    {
      "message": "variable 'slug' must be defined"
    }
  ],
  "data": null,
}
So to get this running in the GraphQL playground here, I can use the "QUERY VARIABLES" panel you may have noticed in the last image. Clicking on that will open the panel and I can add in the variable value there:

Now with the slug variable defined in the query panel I'm able to run the query.
Ok that's great! How do I use that in the project?
Great question! I want a way to pass that query variable to the GraphQL client with the query.
We can do this much the same way we did it for the index page. This is the same repeating pattern now – and this time we're going to accept the slug variable to use in the query I've defined.
Before we get to that, let's add that project query to the src/lib/graphql-queries.js file:
import { gql } from 'graphql-request'

export const authorsQuery = gql`
  query GetAuthors {
    authors {
      name
      intro
      bio
      slug
      picture {
        url
      }
    }
  }
`

export const projectsQuery = gql`
  query GetProjects {
    projects {
      name
      slug
      description
      tags
      demo
      sourceCode
      image {
        url
      }
    }
  }
`

export const projectQuery = gql`
  query GetProject($slug: String!) {
    project(where: { slug: $slug }) {
      name
      slug
      description
      tags
      demo
      sourceCode
      image {
        url
      }
    }
  }
`
So, there's a bit of repetition going on in this file, now, with the name, slug, description, tags, demo, sourceCode and image.url being repeated in both the Projects and Project queries.
We can use a GraphQL fragment here to re-use the fields on the model. Here's what it looks like:
const PROJECT_FRAGMENT = gql`
  fragment ProjectDetails on Project {
    name
    slug
    description
    tags
    demo
    sourceCode
    image {
      url
    }
  }
`
All the fields are in one query now, the fragment is named ProjectDetails and that is on the Project model. Now that can be used in the Projects and Project queries by spreading (...) the ProjectDetails into the queries:
import { gql } from 'graphql-request'

export const authorsQuery = gql`
  query GetAuthors {
    authors {
      name
      intro
      bio
      slug
      picture {
        url
      }
    }
  }
`

const PROJECT_FRAGMENT = gql`
  fragment ProjectDetails on Project {
    name
    slug
    description
    tags
    demo
    sourceCode
    image {
      url
    }
  }
`

export const projectsQuery = gql`
  ${PROJECT_FRAGMENT}
  query GetProjects {
    projects {
      ...ProjectDetails
    }
  }
`

export const projectQuery = gql`
  ${PROJECT_FRAGMENT}
  query GetProject($slug: String!) {
    project(where: { slug: $slug }) {
      ...ProjectDetails
    }
  }
`
One thing I'm going to need to do now, before we go any further, is use a dependency for the Markdown content of the project description.
This is to take the Markdown content for the project description and turn it into HTML so that it can be presented on the page. I'm going to use marked here:
npm i -D marked
Now that the query is defined we can use it in the src/routes/projects/[slug].svelte file:
<script context="module">
  import { client } from '$lib/graphql-client'
  import { projectQuery } from '$lib/graphql-queries'
  import { marked } from 'marked'

  export const load = async ({ params }) => {
    const { slug } = params
    const variables = { slug }
    const { project } = await client.request(projectQuery, variables)

    return {
      props: {
        project,
      },
    }
  }
</script>

<script>
  export let project
</script>

<svelte:head>
  <title>My Portfolio | {project.name}</title>
</svelte:head>

<div class="sm:-mx-5 md:-mx-10 lg:-mx-20 xl:-mx-38 mb-5">
  <img
    class="rounded-lg"
    src={project.image[0].url}
    alt={project.title}
  />
</div>

<h1 class="text-4xl font-semibold mb-5">{project.name}</h1>

<div class="mb-5 flex justify-between">
  <div>
    {#if project.tags}
      {#each project.tags as tag}
        <span
          class="badge badge-primary mr-2 hover:bg-primary-focus cursor-pointer"
          >{tag}</span
        >
      {/each}
    {/if}
  </div>
</div>

<div
  class="mb-5 prose flex prose-a:text-primary hover:prose-a:text-primary-focus"
>
  <a class="mr-5" href={project.demo}>Demo</a>
  <a href={project.sourceCode}>Source Code</a>
</div>

<article class="prose prose-xl">
  {@html marked(project.description)}
</article>
In the src/routes/projects/[slug].svelte file we're doing pretty much the same as we did with the src/routes/index.svelte file except we're using params: { slug } to pass the slug value to the GraphQL client to get the data relating to that slug.
{@html} is used to display the contents as HTML. Use this with caution if you do not trust the source of the HTML – but in our case we know we can trust the HTML because we put it there! 😊
Let's get that committed to Git before moving on:
git add .
git commit -m "Add project page using SvelteKit routing"
How to Build the Projects Index Page
Now to create an index for the projects. It's much like the landing page, but this time it's only to list out the projects.
I'll create an index for the projects route:
touch src/routes/projects/index.svelte
Now navigating to localhost:3000/projects will show that file.
Time to repeat the pattern used to get the projects list on the index page but without the author information:
<script context="module">
  import ProjectCard from '$lib/components/project-card.svelte'
  import { client } from '$lib/graphql-client'
  import { projectsQuery } from '$lib/graphql-queries'

  export const load = async () => {
    const { projects } = await client.request(projectsQuery)

    return {
      props: {
        projects,
      },
    }
  }
</script>

<script>
  export let projects
</script>

<svelte:head>
  <title>My Portfolio projects</title>
</svelte:head>

<h1 class="font-bold mb-20 text-center text-5xl">
  Recent Projects by Me
</h1>

<div
  class="grid gap-10 md:grid-cols-4 md:px-10 lg:grid-cols-6 lg:-mx-52"
>
  {#each projects as { name, slug, description, image }, index}
    <ProjectCard
      {name}
      {description}
      url={image[0].url}
      {index}
      {slug}
    />
  {/each}
</div>
Nice! Now navigating to localhost:3000/projects gives us a dedicated projects page.
Let's move on to repeating these patterns we've learned for the blog index page and the individual blog posts.
Commit to Git the current changes before moving on:
git add .
git commit -m "Add projects index page"
How to Build the Blog
Time for the blog now. This is pretty much the same approach as with the projects, but let's go through the process again.
- Make a GraphQL query to define the data needed.
- Give that query to the GraphQL client.
- Work with the returned data from the client in the page.
Make a GraphQL query for the posts. As we'll be following the same pattern as with the projects (query for all projects and filter for a specific project) we can make a GraphQL fragment for the data we want to get, both on all posts and a single post.
const POST_FRAGMENT = gql`
  fragment PostDetails on Post {
    title
    slug
    date
    content
    tags
    coverImage {
      url
    }
    authors {
      name
    }
  }
`
We can then use the same pattern as before where we use the fragment in both a Posts and Post query:
export const postsQuery = gql`
  ${POST_FRAGMENT}
  query GetPosts {
    posts {
      ...PostDetails
    }
  }
`

export const postQuery = gql`
  ${POST_FRAGMENT}
  query GetPost($slug: String!) {
    post(where: { slug: $slug }) {
      ...PostDetails
    }
  }
`
With the POST_FRAGMENT and postsQuery and postQuery added to the src/lib/graphql-queries.js file we can make a posts route then add in a [slug].svelte file and a index.svelte file.
mkdir src/routes/posts
touch src/routes/posts/{'[slug]'.svelte,index.svelte}
Let's tackle the posts index page first then we can move onto individual posts with the slug file.
The first section we have done a few times now, defining a SvelteKit load function then using the GraphQL client to query for the posts:
<script context="module">
  import { client } from '$lib/graphql-client'
  import { postsQuery } from '$lib/graphql-queries'
  import { marked } from 'marked'

  export const load = async () => {
    const { posts } = await client.request(postsQuery)

    return {
      props: {
        posts,
      },
    }
  }
</script>

<script>
  export let posts
</script>

<svelte:head>
  <title>Portfolio | Blog</title>
</svelte:head>
Now we need to add the markup for the page. Using the daisyUI card classes, we can define a pretty decent looking card, then loop through the posts tags and finally link out to the post page.
<h1 class="text-4xl mb-10 font-extrabold">Blog posts</h1>
{#each posts as { title, slug, content, coverImage, tags }}
<div class="card text-center shadow-2xl mb-20">
<figure class="">
<img
class=""
src={coverImage.url}
alt={`Cover image for ${title}`}
/>
</figure>
<div class="card-body prose">
<h2 class="title">{title}</h2>
{@html marked(content).slice(0, 150)}
<div class="flex justify-center mt-5 space-x-2">
{#each tags as tag}
<span class="badge badge-primary">{tag}</span>
{/each}
</div>
<div class="justify-center card-actions">
<a href={`/posts/${slug}`} class="btn btn-outline btn-primary"
>Read ⇒</a
>
</div>
</div>
</div>
{/each}
Time to repeat that pattern again!
SvelteKit load function using the GraphQL client passing in the post query and variable coming from the page params:
<script context="module">
  import { client } from '$lib/graphql-client'
  import { postQuery } from '$lib/graphql-queries'
  import { marked } from 'marked'

  export const load = async ({ params }) => {
    const { slug } = params
    const variables = { slug }
    const { post } = await client.request(postQuery, variables)

    return {
      props: {
        post,
      },
    }
  }
</script>

<script>
  export let post

  const { title, date, tags, content, coverImage } = post
</script>

<svelte:head>
  <title>Blog | {title}</title>
</svelte:head>
Then for the markup on the page, utilising the Tailwind CSS Typography classes here for beautiful markup:
<div class="sm:-mx-5 md:-mx-10 lg:-mx-20 xl:-mx-38 mb-5">
  <img
    class="rounded-xl"
    src={coverImage.url}
    alt={`Cover image for ${title}`}
  />
</div>

<div class="prose prose-xl">
  <h1>{title}</h1>
</div>

<p class="text-secondary text-xs tracking-widest font-semibold">
  {new Date(date).toDateString()}
</p>

<div class="mb-5 flex justify-between">
  <div>
    {#if tags}
      <div class="mt-5 space-x-2">
        {#each tags as tag}
          <span class="badge badge-primary">{tag}</span>
        {/each}
      </div>
    {/if}
  </div>
</div>

<article div class="prose prose-lg">
  {@html marked(content)}
</article>
Commit our changes now:
git add .
git commit -m "Add posts index page and slug page"
Ok, now we have a lot of pages on the site to look at, but no way to navigate around them yet.
How to Build the Navbar and Footer Components
I'm going to grab some pre-made components now from daisyUI for the footer and navbar. Let's create the files first before hopping over to the daisyUI site to grab them:
touch src/lib/components/{footer.svelte,navbar.svelte}
Those curly braces in that command create both the files for us.
How to Make the Footer Component
First up, we can do the footer component. I'll be using the second of the footer footer-center components on the daisyUI components footer section. This is what it looks like:

And here's the markup for that component:
<footer class="p-10 footer bg-base-200 text-base-content footer-center">
  <div class="grid grid-flow-col gap-4">
    <a class="link link-hover">About us</a>
    <a class="link link-hover">Contact</a>
    <a class="link link-hover">Jobs</a>
    <a class="link link-hover">Press kit</a>
  </div>
  <div>
    <div class="grid grid-flow-col gap-4">
      <a>
        <svg xmlns="http://www.w3.org/2000/svg" width="24" height="24" viewBox="0 0 24 24" class="fill-current">
          <path d="M24 4.557c-.883.392-1.832.656-2.828.775 1.017-.609 1.798-1.574 2.165-2.724-.951.564-2.005.974-3.127 1.195-.897-.957-2.178-1.555-3.594-1.555-3.179 0-5.515 2.966-4.797 6.045-4.091-.205-7.719-2.165-10.148-5.144-1.29 2.213-.669 5.108 1.523 6.574-.806-.026-1.566-.247-2.229-.616-.054 2.281 1.581 4.415 3.949 4.89-.693.188-1.452.232-2.224.084.626 1.956 2.444 3.379 4.6 3.419-2.07 1.623-4.678 2.348-7.29 2.04 2.179 1.397 4.768 2.212 7.548 2.212 9.142 0 14.307-7.721 13.995-14.646.962-.695 1.797-1.562 2.457-2.549z"></path>
        </svg>
      </a>
      <a>
        <svg xmlns="http://www.w3.org/2000/svg" width="24" height="24" viewBox="0 0 24 24" class="fill-current">
          <path d="M19.615 3.184c-3.604-.246-11.631-.245-15.23 0-3.897.266-4.356 2.62-4.385 8.816.029 6.185.484 8.549 4.385 8.816 3.6.245 11.626.246 15.23 0 3.897-.266 4.356-2.62 4.385-8.816-.029-6.185-.484-8.549-4.385-8.816zm-10.615 12.816v-8l8 3.993-8 4.007z"></path>
        </svg>
      </a>
      <a>
        <svg xmlns="http://www.w3.org/2000/svg" width="24" height="24" viewBox="0 0 24 24" class="fill-current">
          <path d="M9 8h-3v4h3v12h5v-12h3.642l.358-4h-4v-1.667c0-.955.192-1.333 1.115-1.333h2.885v-5h-3.808c-3.596 0-5.192 1.583-5.192 4.615v3.385z"></path>
        </svg>
      </a>
    </div>
  </div>
  <div>
    <p>Copyright © 2021 - All right reserved by ACME Industries Ltd</p>
  </div>
</footer>
One thing to note here: if you don't like the SVGs directly in the HTML here, they can be abstracted out into their own components and imported into the footer file. Because Svelte is a superset of HTML, this makes breaking up large files into manageable components possible.
Let's do that now to reduce the file size and make it easier to parse. So, first I'll create the icon files:
touch src/lib/components/{twitter-icon.svelte,you-tube-icon.svelte,facebook-icon.svelte}
Now I can remove the <svg> tags from the footer component, and add them to their respective files.
Here's what the Twitter one looks like. You can repeat this for the remaining components:
<svg
  xmlns="http://www.w3.org/2000/svg"
  width="24"
  height="24"
  viewBox="0 0 24 24"
  class="fill-current"
>
  <path
    d="M24 4.557c-.883.392-1.832.656-2.828.775 1.017-.609 1.798-1.574 2.165-2.724-.951.564-2.005.974-3.127 1.195-.897-.957-2.178-1.555-3.594-1.555-3.179 0-5.515 2.966-4.797 6.045-4.091-.205-7.719-2.165-10.148-5.144-1.29 2.213-.669 5.108 1.523 6.574-.806-.026-1.566-.247-2.229-.616-.054 2.281 1.581 4.415 3.949 4.89-.693.188-1.452.232-2.224.084.626 1.956 2.444 3.379 4.6 3.419-2.07 1.623-4.678 2.348-7.29 2.04 2.179 1.397 4.768 2.212 7.548 2.212 9.142 0 14.307-7.721 13.995-14.646.962-.695 1.797-1.562 2.457-2.549z"
  />
</svg>
There's a few bit's with this we want to change before we use it in our project here.
In the footer element, change the background from bg-base-200 to bg-primary and change text-base-content to text-primary-content.
<footer
  class="p-10 footer bg-primary text-primary-content footer-center"
>
Then there's the links to be added in the next section:
<div class="grid grid-flow-col gap-4">
  <a class="link link-hover" href="/projects">Portfolio</a>
  <a class="link link-hover" href="/posts">Blog</a>
  <a class="link link-hover" href="/about">About</a>
</div>
You can add in the hard-links to the social providers for now. Although they are available in the Social model.
For the copyright section at the end of the file, I'll add in some JavaScript to get the current year so there's no need to worry about updating this again.
<p>
Copyright © {`${new Date().getFullYear()}`} - All right reserved
by ME
</p>
Here's the adjusted file now:
<script>
import FacebookIcon from './facebook-icon.svelte'
import TwitterIcon from './twitter-icon.svelte'
import YouTubeIcon from './you-tube-icon.svelte'
</script>
<footer
class="p-10 footer bg-primary text-primary-content footer-center"
>
<div class="grid grid-flow-col gap-4">
<a class="link link-hover" href="/projects">Portfolio</a>
<a class="link link-hover" href="/posts">Blog</a>
<a class="link link-hover" href="/about">About</a>
</div>
<div>
<div class="grid grid-flow-col gap-4">
<a href="https://twitter.com">
<TwitterIcon />
</a>
<a href="https://youtube.com">
<YouTubeIcon />
</a>
<a href="https://facebook.com">
<FacebookIcon />
</a>
</div>
</div>
<div>
<p>
Copyright © {`${new Date().getFullYear()}`} - All right reserved
by ME
</p>
</div>
</footer>
With the imported SVGs there's a lot of noise removed from the file and it's a lot nicer to read.
Now that we have our footer component we're going to want to have it persisted across route (page) changes. The __layout.svelte file is the perfect place for this so let's go and add it in there:
<script>
  import Footer from '$lib/components/footer.svelte'
  import '../app.css'
</script>

<main class="container max-w-3xl mx-auto px-4 mb-20">
  <slot />
</main>
<Footer />
Let's commit our footer component to Git then move onto the next section:
git add .
git commit -m "Add footer component"
How to Make the Navbar Component
Now for the navbar component, I'll be using the second to last of the navbar components on the daisyUI components navbar section. This is what it looks like:

There's a lot of SVGs in this example that I'm not going to be using, so I'll remove them. Keep them if you prefer, but for the sake of readability I'll be removing them. There only really needs to be links in there for the Portfolio page, Blog page, and the About page.
Here's what the markup looks like for it with the SVGs removed:
<div
  class="navbar mb-2 shadow-lg bg-neutral text-neutral-content rounded-box"
>
  <div class="flex-1 px-2 mx-2">
    <span class="text-lg font-bold">Portfolio and Blog</span>
  </div>
  <div class="flex-none hidden px-2 mx-2 lg:flex">
    <div class="flex items-stretch">
      <a class="btn btn-ghost btn-sm rounded-btn" href="/projects">
        Portfolio
      </a>
      <a class="btn btn-ghost btn-sm rounded-btn" href="/posts"
        >Blog</a
      >
      <a class="btn btn-ghost btn-sm rounded-btn" href="/about"
        >About</a
      >
    </div>
  </div>
</div>
Note that I have added href tags here to point to the various pages in the project.
We should add that in the same place as the footer in the __layout.svelte file so we can see the changes as we go through building this component:
<script>
  import Footer from '$lib/components/footer.svelte'
  import Navbar from '$lib/components/navbar.svelte'
  import '../app.css'
</script>

<Navbar />
<main class="container max-w-3xl mx-auto px-4 mb-20">
  <slot />
</main>
<Footer />
Some more changes to add to this now: I'll increase mb-2 up to mb-16, and also I'll remove rounded-box and replace it with a sticky class so the navbar persists on scrolling through long pages sticky top-0 z-10.
One last thing to do is replace the <span> tag with "Portfolio and Blog" in it to an a tag so that we can navigate back to the home page by clicking there:
<a class="text-lg font-bold" href="/">Portfolio and Blog</a>
Here's what the file looks like now:
<div
  class="navbar mb-16 shadow-lg bg-neutral text-neutral-content sticky top-0 z-10"
>
  <div class="flex-1 px-2 mx-2">
    <a class="text-lg font-bold" href="/">Portfolio and Blog</a>
  </div>

  <div class="flex-none hidden px-2 mx-2 lg:flex">
    <div class="flex items-stretch">
      <a class="btn btn-ghost btn-sm rounded-btn" href="/projects">
        Portfolio
      </a>
      <a class="btn btn-ghost btn-sm rounded-btn" href="/posts"
        >Blog</a
      >
      <a class="btn btn-ghost btn-sm rounded-btn" href="/about"
        >About</a
      >
    </div>
  </div>
</div>
Very nice! But wait – what about smaller screen sizes? You may have noticed that if you're on a smaller screen, the links for Portfolio, Blog, and About are missing.
In the class for the containing div on the links flex-none hidden px-2 mx-2 lg:flex, this is going to hide the elements until the screen size gets to the large breakpoint (lg:), then the display will be set to flex.
Let's use some additional daisyUI classes from the dropdown section to show when the screen size is below lg:
<div class="dropdown dropdown-left lg:hidden">
  <div tabindex="0" class="m-1 btn">Links</div>
  <ul
    tabindex="0"
    class="bg-neutral rounded-box shadow text-neutral-content p-2 w-52 menu dropdown-content "
  >
    <a class="btn btn-ghost btn-sm rounded-btn" href="/projects">
      Portfolio
    </a>
    <a class="btn btn-ghost btn-sm rounded-btn" href="/posts">
      Blog
    </a>
    <a class="btn btn-ghost btn-sm rounded-btn" href="/about">
      About
    </a>
  </ul>
</div>
So when the screen size is below the lg: Tailwind breakpoint the above dropdown, classes will be shown.
Here's what the full file looks like:
<div
  class="navbar mb-16 shadow-lg bg-neutral text-neutral-content sticky top-0 z-10"
>
  <div class="flex-1 px-2 mx-2">
    <a class="text-lg font-bold" href="/">Portfolio and Blog</a>
  </div>

  <div class="dropdown dropdown-left lg:hidden">
    <div tabindex="0" class="m-1 btn">Links</div>
    <ul
      tabindex="0"
      class="bg-neutral rounded-box shadow text-neutral-content p-2 w-52 menu dropdown-content "
    >
      <a class="btn btn-ghost btn-sm rounded-btn" href="/projects">
        Portfolio
      </a>
      <a class="btn btn-ghost btn-sm rounded-btn" href="/posts">
        Blog
      </a>
      <a class="btn btn-ghost btn-sm rounded-btn" href="/about">
        About
      </a>
    </ul>
  </div>

  <div class="flex-none hidden px-2 mx-2 lg:flex">
    <div class="flex items-stretch">
      <a class="btn btn-ghost btn-sm rounded-btn" href="/projects">
        Portfolio
      </a>
      <a class="btn btn-ghost btn-sm rounded-btn" href="/posts"
        >Blog</a
      >
      <a class="btn btn-ghost btn-sm rounded-btn" href="/about"
        >About</a
      >
    </div>
  </div>
</div>
Sweet! We've now got a nice responsive nav menu for mobile users.
Time to commit the changes we've made to Git:
git add .
git commit -m "Add navbar component"
Footer and navbar sorted, now let's move onto the theme switch.
How to Add a Theme Switch
All modern sites have a theme switch, so let's take a look at implementing that on our site. Saadeghi (the creator of daisyUI) has made the really nice package to take care of this for us called theme-change so we should install that now:
npm i -D theme-change
Now we can use that in the __layout.svelte file like this:
<script>
  import Footer from '$lib/components/footer.svelte'
  import Navbar from '$lib/components/navbar.svelte'
  import { onMount } from 'svelte'
  import { themeChange } from 'theme-change'
  import '../app.css'

  onMount(async () => {
    themeChange(false)
  })
</script>

<Navbar />
<main class="container max-w-3xl mx-auto px-4 mb-20">
  <slot />
</main>
<Footer />
So, let's break this down and see what's happening here. The onMount is code run once the page is visible in the browser (once it's loaded/mounted). Once the page has loaded then we're initialising themeChange. This will change the data-act-class for the desired theme.
Currently there's no way to set it, so let's change that now on the src/app.html file:
<!DOCTYPE html>
<html lang="en" data-theme="dracula">
  <head>
    <meta charset="utf-8" />
    <meta name="description" content="" />
    <link rel="icon" href="/favicon.png" />
    <meta
      name="viewport"
      content="width=device-width, initial-scale=1"
    />
    %svelte.head%
  </head>
  <body>
    <div id="svelte">%svelte.body%</div>
  </body>
</html>
Here we're adding the default theme of Dracula on the containing html for the whole project with data-theme="dracula". You can play about with this with all the provided themes from daisyUI – try changing dracula to corporate and see it change!
Ok, that's nice, but how do I change it? Right – let's do that now. Rather than fill up the post with more code I'm going to link to a GitHub repository that has it already packaged up for us in SvelteKit theme switch. That component is an HTML select element that has all the daisyUI themes listed in it.
Copy the contents of that file and add it to a theme-select.svelte component, which doesn't exist yet – so, let's create that now:
touch src/lib/components/theme-select.svelte
Remove the class="mb-8" from the containing div and add in some additional styles to the select element. Here's the diff:

Now that we have a theme select component, we should add it somewhere accessible throughout the project. Where do you think that should go? You guessed it – the navbar.svelte file:
<script>
  import ThemeSelect from './theme-select.svelte'
</script>

<div
  class="navbar mb-16 shadow-lg bg-neutral text-neutral-content sticky top-0 z-10"
>
  <div class="flex-1 px-2 mx-2">
    <a class="text-lg font-bold" href="/"> Portfolio and Blog </a>
  </div>

  <div class="dropdown dropdown-left lg:hidden">
    <div tabindex="0" class="m-1 btn">Links</div>
    <ul
      tabindex="0"
      class="bg-neutral rounded-box shadow text-neutral-content p-2 w-52 menu dropdown-content "
    >
      <a class="btn btn-ghost btn-sm rounded-btn" href="/projects">
        Portfolio
      </a>
      <a class="btn btn-ghost btn-sm rounded-btn" href="/posts">
        Blog
      </a>
      <a class="btn btn-ghost btn-sm rounded-btn" href="/about">
        About
      </a>
    </ul>
  </div>

  <div class="flex-none hidden px-2 mx-2 lg:flex">
    <div class="flex items-stretch">
      <a class="btn btn-ghost btn-sm rounded-btn" href="/projects">
        Portfolio
      </a>
      <a class="btn btn-ghost btn-sm rounded-btn" href="/posts">
        Blog
      </a>
      <a class="btn btn-ghost btn-sm rounded-btn" href="/about">
        About
      </a>
      <div class="px-4">
        <ThemeSelect />
      </div>
    </div>
  </div>
</div>
So here, we're importing the ThemeSelect component and adding in a containing div for the theme select at the end of our pages list.
You can also add it so it is available on mobile view if you so choose.
Commit the changes to Git:
git add .
git commit -m "Add theme select to navbar"
How to Add the About Page
Let's add in that about page we're linking to in the navbar.
touch src/routes/about.svelte
In this page we can use the authorsQuery we created for the home page to display the author information. Here's the full file:
<script context="module">
  import { client } from '$lib/graphql-client'
  import { authorsQuery } from '$lib/graphql-queries'
  import { marked } from 'marked'

  export const load = async () => {
    const { authors } = await client.request(authorsQuery)

    return {
      props: {
        authors,
      },
    }
  }
</script>

<script>
  export let authors
  const {
    name,
    intro,
    bio,
    picture: { url },
  } = authors[0]
</script>

<svelte:head>
  <title>My Portfolio project | About {name}</title>
</svelte:head>

<h1 class="font-bold text-center mb-20 text-5xl">About Me</h1>

<div class="flex mb-40 items-end">
  <div class="mr-6">
    <h2 class="text-3xl mb-4 font-bold tracking-wider">{name}</h2>
    <p class="text-xl mb-4">{intro}</p>
  </div>

  <img class="mask mask-squircle h-48" src={url} alt={name} />
</div>

<article div class="prose prose-lg">
  {@html marked(bio)}
</article>
Now to commit those changes to Git:
git add .
git commit -m "Add about page"
How to Make a Sitemap
OPTIONAL: Let search engines know what's on your site. A sitemap will help web crawlers know the contents of your site.
I have made an extensive post on how to create a sitemap with SvelteKit if you want to take a look at that for more detail.
This is a SvelteKit endpoint that will return an XML file detailing the contents of the site.
If you want to create one, then make a file for it:
touch src/routes/sitemap.xml.js
Here's the full file:
import { client } from '$lib/graphql-client'
import { gql } from 'graphql-request'

const website = 'https://www.myporfolioproject.com'

export const get = async () => {
  const query = gql`
    query Posts {
      posts {
        title
        slug
      }
    }
  `
  const { posts } = await client.request(query)
  const pages = [`about`]
  const body = sitemap(posts, pages)

  const headers = {
    'Cache-Control': 'max-age=0, s-maxage=3600',
    'Content-Type': 'application/xml',
  }
  return {
    headers,
    body,
  }
}

const sitemap = (
  posts,
  pages
) => `<?xml version="1.0" encoding="UTF-8" ?>
<urlset
  xmlns="https://www.sitemaps.org/schemas/sitemap/0.9"
  xmlns:news="https://www.google.com/schemas/sitemap-news/0.9"
  xmlns:xhtml="https://www.w3.org/1999/xhtml"
  xmlns:mobile="https://www.google.com/schemas/sitemap-mobile/1.0"
  xmlns:image="https://www.google.com/schemas/sitemap-image/1.1"
  xmlns:video="https://www.google.com/schemas/sitemap-video/1.1"
>
  <url>
    <loc>${website}</loc>
    <changefreq>daily</changefreq>
    <priority>0.7</priority>
  </url>
  ${pages
    .map(
      page => `
  <url>
    <loc>${website}/${page}</loc>
    <changefreq>daily</changefreq>
    <priority>0.7</priority>
  </url>
  `
    )
    .join('')}
  ${posts
    .map(
      post => `
  <url>
    <loc>${website}/posts/${post.slug}</loc>
    <changefreq>daily</changefreq>
    <priority>0.7</priority>
  </url>
  `
    )
    .join('')}
</urlset>`
This is a simplified version to generate a sitemap. If you want the full version then you can check out the source code for the project.
A little more detail on this file now. Similar to how we can have pages and components in SvelteKit, we can also have endpoints. Endpoints in SvelteKit can handle HTTP methods like get, post, and delete.
A quick note on the file notation here: the .xml.js may look a bit odd. This is so that SvelteKit can understand the return type of the endpoint. In this case we want to return XML, but there are other types you can use, like JSON.
In that function we're defining a get function, adding a GraphQL query for the posts, then returning the posts from the query for use in the XML.
How to Use a SvelteKit Endpoint
Now that we've defined our endpoint in src/routes/sitemap.xml.js we can access the data right away. By going to that route in the browser we can see the data returned from that endpoint.
From the browser, go to localhost:3000/sitemap.xml – this will give us the data back from the GraphQL API on our GraphCMS project.
Robots.txt
OPTIONAL: Let search engine robots know what to index. This tells web crawlers like the Googlebot what to and what not to index on your site.
Pages you might not want to index could be things like an admin panel or settings page.
The robots.txt can go in the static folder. Let's create the file now:
touch static/robots.txt
In the case of this project, it's ok for the Googlebot to crawl it all. So our robots.txt file can look like this:
# https://www.robotstxt.org/robotstxt.html
User-agent: *
Disallow:
This is saying to the web crawler to index everything on the site.
RSS Feed Generation
OPTIONAL: Let users have changes made to your site show up in their RSS apps. Again I'll leave this up to you to implement. Much in the same way as the sitemap was created, you can implement a SvelteKit endpoint to generate the XML needed for an RSS feed.
touch src/routes/rss.xml.js
Here's an example file:
import { client } from '$lib/graphql-client'
import { gql } from 'graphql-request'

const name = 'My Portfolio'
const website = 'https://myportfolio.com'

export const get = async () => {
  const query = gql`
    query Posts {
      posts {
        title
        slug
      }
    }
  `
  const { posts } = await client.request(query)
  const body = xml(posts)

  const headers = {
    'Cache-Control': 'max-age=0, s-maxage=3600',
    'Content-Type': 'application/xml',
  }
  return {
    headers,
    body,
  }
}

const xml =
  posts => `<rss xmlns:dc="https://purl.org/dc/elements/1.1/" xmlns:content="https://purl.org/rss/1.0/modules/content/" xmlns:atom="https://www.w3.org/2005/Atom" version="2.0">
  <channel>
    <title>${name}</title>
    <link>${website}</link>
    <description>This is my portfolio!</description>
    ${posts
      .map(
        post =>
          `
        <item>
          <title>${post.title}</title>
          <description>This is my portfolio!</description>
          <link>${website}/posts/${post.slug}/</link>
          <pubDate>${new Date(post.date)}</pubDate>
          <content:encoded>${post.previewHtml}
            <div style="margin-top: 50px; font-style: italic;">
              <strong>
                <a href="${website}/posts/${post.slug}">
                  Keep reading
                </a>
              </strong>
            </div>
          </content:encoded>
        </item>
      `
      )
      .join('')}
  </channel>
</rss>`
There's a lot to unpack in that, so what I have done is made an extensive post on setting up an RSS feed on your SvelteKit site. This will give you all the information you need to get set up.
Email Signup with Revue
OPTIONAL: If you want to take this a step further with endpoints, you can add a newsletter sign up page using the Revue API. I've detailed that in a post if you want to take that route.
There's also a great video from WebJeda on collecting Google forms data in a SvelteKit project if you want to take that route.
Continuous Deployment with Vercel
If you have been following along up to this point (thank you by the way 🙏), you might be wondering why we've been making Git commits at the end of each section. Well all that has been leading up to this section.
I'll be using Vercel for deployment. If you don't already have an account you can sign up with your preferred provider – I'll be using GitHub.
If you want to deploy your site as it is, right now, you can use the Vercel CLI using:
npx vercel
No need to install the CLI, as it's all done for you with the npx command. You'll be walked through the deployment by the CLI.
Here's the output from running the command and selecting the default for each question (enter):
? Set up and deploy “~/repos/my-developer-portfolio”? [Y/n] y
? Which scope do you want to deploy to? Scott Spence
? Link to existing project? [y/N] n
? What’s your project’s name? my-developer-portfolio
? In which directory is your code located? ./
Auto-detected Project Settings (SvelteKit):
- Build Command: svelte-kit build
- Output Directory: public
- Development Command: svelte-kit dev --port $PORT
? Want to override the settings? [y/N] n
🔗 Linked to spences10/my-developer-portfolio (created .vercel and added it to .gitignore)
🔍 Inspect: https://vercel.com/spences10/my-developer-portfolio/78bRRjiweZsipYbu8Q4Bg9JRmvGR [2s]
Now going to the URL from the CLI indicated with 🔍 Inspect I can watch the project being built on Vercel. Great, our site is up and running! This is a one time deployment though, so if there are future changes then I'll need to use the CLI again.
 Vercel deployment preview page
You may have noticed on the deploy preview page on Vercel that there is a section that says "No repository".

We can add a GitHub repository so that any future changes that are made to the project will be built when the changes are pushed to GitHub.
So, first up we need to add our project to GitHub – let's do that now. If you're already logged into GitHub you can go to the new repository link that you can get to by clicking the plus icon in the far right corner in GitHub.
 New repository link
In the new page add in the details for the project:
 New GitHub project with description
Then click the "Create repository" button:


The next screen will give you the Git commands you need. As the project is already created, I can use the second set of commands:
git remote add origin git@github.com:spences10/my-developer-portfolio.git
git branch -M main
git push -u origin main
Note that if you're following along, you'll need to take the commands given to you on your repository page rather than using the ones mentioned here, as that will point to my GitHub spences10.
Now that the repo is created on GitHub, I can connect it to Vercel. From the deploy preview page I can select the project by clicking the project name in the header:

This will take me to the project dashboard:
 Vercel project dashboard
From here I can click on the "Connect Git repository" button which will take me to the Git section in the project settings:
 Connect a Git repository in the Vercel settings menu
Clicking GitHub will bring up a list of projects:
 Select the GitHub repository to link
Clicking the "Connect" button will connect the repository. You may have also noticed the "Domains" setting here as well. You can configure your domain here or change the current name with a .vercel.app domain.
One other thing to note here is the "Environment Variables" section in the settings. This will need to have the VITE_GRAPHQL_API environment variable added here:
 _Add VITE_GRAPHQLAPI environment variable to the Vercel settings
Now any time there are any changes pushed to GitHub, Vercel will build the site.
How to Publish and Build on Content Changes
Rather than having to push a change to GitHub to create a new build of the project when only the content has changed, you can do this with a GraphCMS integration.
From the Settings panel in GraphCMS, go to the integrations section:
 Select the integrations section in the settings panel
Click on the Vercel integration – there's also integrations for Netlify and Gatsby Cloud:
 Click on the Vercel integration
Click "Enable" for the Vercel integration:
 Enable the Vercel integration
Click the "Connect to Vercel" button when prompted:

Click "Authorise GraphCMS" to make deployments for you on Vercel:

In the "Build projects" section, select your Vercel project from the dropdown selection. The "Display name" is what will appear in the side panel on your content pages. The branch name is the branch you want to deploy to Vercel from GitHub – I use main for the production branch.
There's also an option to specify what models you want to have the integration enabled on. In this case I'm using them all, so selecting "Select all" then finally clicking the "Enable" button:

If I now go to the content section on the GraphCMS project and select a content model to edit an entry, there's a "Start building Production" button that will kick off a new build any time it's clicked.
Here's the Author model and the Vercel integration on the right hand panel:

Google Search Console
OPTIONAL: This is an optional step if you own your own domain. A good way to have your site ranked on the search engines is to use the Google search console.
https://search.google.com/search-console

Add the TXT record to your domain using the Vercel CLI. You can add it manually in the domains section of Vercel as well:
vercel dns add my-developer-portfolio.com @ TXT google-site-verification=g99pqa_kSHiq6AzLtk4HF00tyJhQVt1gGzfUoJQrTPQ
Once your site has been verified, you can add in your sitemap and click the submit button.
 Add sitemap to Google search console
That's it! You'll now need to wait for the Googlebot to do it's thing and index your site. You should start seeing search queries coming in over time.
Resources
Here are some of the resources I used to make the content on the blog I created throughout this guide.
- Images with Lorem.space - placeholder image generator
- Markdown with Lorem Markdownum (jaspervdj.be)
- Bio generation with Character Biography Generator (character-generator.org.uk)
- Ideal cover image sizes: The Ideal Cover Photo Size for Each of the Major Social Media Platforms (buffer.com)
You can check these links for further information on Svelte and SvelteKit
If you want the source code for this project then you can check out the GitHub repo for all the code. If you have any issues then feel free to log an issue or reach out on Twitter.
What we have accomplished
Time to recap what we've achieved here. We have gone from hello world through to fully featured portfolio and blog!
We covered getting data from a GraphQL API and displaying that data on a page of the project. We then implemented a GraphQL client to retrieve only the data we needed.
We added the all important sitemap so that the site could be discovered and indexed by search engines like Google.
An optional touch was adding in an RSS feed so that anyone that uses an RSS reader can be notified of any new content that is added to the site.
Finally we deployed our finished project to Vercel for the world to see.
Thanks
Thank you so much for taking the time to go through this guide. I hope it gave you all you need to start making your own projects with Svelte.
If you like the content you can check out much more from me on my blog or you can follow me on Twitter.