By Yisroel Yakovson
Building A Full Stack Server
This article guides you through creating a live, development quality API and back end. It should take you about an hour. And, by the way, it will be free!
This is the second of a series of 3 articles about full graph stacks. Check out How To Build A Cutting Edge Server Now for an introduction.
I’m assuming that you know how to code, but not that you’re advanced. This is a full stack project. It touches on a lot of new tools, so you need not feel intimidated if you don’t understand everything. You’ll have some learning curves ahead, but not too steep.
The idea, as explained in the first article, is to focus on specifying your app’s graph of data types. Then to use new tools that generate an app from it.
As I wrote in the first article, I went with the GRANDstack project. I don’t claim that it’s the only viable approach, but I recommend that you at least check it out. My team decided on our own that we wanted to go with React, GraphQL, Apollo, and a graph database. The GRANDstack consists of these exactly, so the discovery excited me.
But the real excitement begins with the package neo4j-graphql-js. It generates (Prisma style) a set of mutations and resolvers from TypeDefs. If you don’t know what that means, read on.
On the GRANDstack Kickstarter page, a video shows how to create a full stack from start to finish. That was where I started.
One problem with writing these articles is that featured packages are under development. Many things that you still need to do today may be automatic within weeks. I want to summarize the steps and explain how to do some of the things you need that are still missing. But the staff at Neo4j is working on them. If you see that this info is outdated at any point, please post an update below.
Alternative Approaches
Before we start, let me repeat that I’m not calling GRANDstack the only or even the best approach to a Full Graph Stack.
Many alternatives use Prisma to convert a GraphQL schema to an underlying database. Make sure to check out GraphCool. As of this writing, these systems are more developed and leave less work for the developer. A good example is auth.
The Prisma approach also has less lock-in to a particular database. In practice, changing the database wouldn’t be that hard with GRANDstack. But the cipher queries and the directives are unique to Neo4j.
That said, the GRANDstack Project is explicitly focused on the idea of a Full Graph Stack. I recommend them because they are responsive and devoted to the vision. It is also very straightforward.
Setup
Create a Project
- Download the starter. Click
DOWNLOAD STARTERfrom GRANDstack, or download it from their GitHub page. I used the GitHub page to be sure I had the latest version (it should be anyway). - Unzip to a folder and name it for your app project
- It is wise to move the new app folder to a general project folder.
Set up Git
I recommend that you not do a thing until you start using Git to handle version control.
- Install Git if you don’t have it.
- In a text editor, modify
.gitignorein the root project directory to include under#dependenciesa line forapi/node_modulesand a line forui/node_modules. As of this writing,.gitignorecontained onlynode_modules. - Move to the root directory of the project in a terminal, and create a new git project:
git init git add . # adds the relevant filesgit status # optional to view the files if you are interestedgit commit -m “Initial App Files” #or whatever name you'd like
You can perform git add . and git commit -m "some description" as often as you like. See the endless documentation about Git online. You can learn about branches, commits, reverting, and everything about version control.
Make the Sample Back End
Note that your project code has two directories: api and ui. These articles only focus on the api directory, for creating an API server and back end. For more about the ui, check out the GRANDstack Kickstarter video. You can also view the tutorials at GRANDstack.
Build the Back End
You need to build the code. You can use npm for that. In the terminal, move to api, and perform these steps:
npm install # pulls in all of the node modules needed for the apinpm start # begins the app
That should initiate the app. You should see something like this in your terminal:
$ npm start
> grand-stack-starter-api@0.0.1 start /home/israel/projects/events2/api> nodemon --exec babel-node src/index.js
[nodemon] 1.18.3[nodemon] to restart at any time, enter `rs`[nodemon] watching: *.*[nodemon] starting `babel-node src/index.js`GraphQL API ready at http://0.0.0.0:4000/
Open that link, and you should see a GraphQL Playground page.
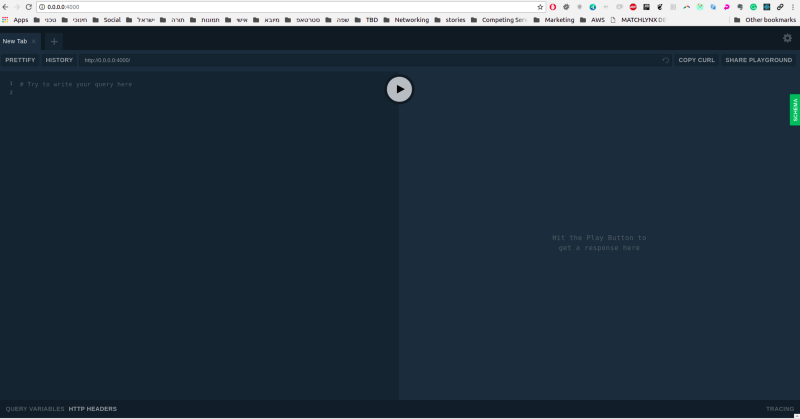
You can click the green SCHEMA tab on the right, and you’ll see a schema for a sample database. The only thing you’re missing is the database itself.
Set up a sample database
You’ll have to register with Neo4j to use their sandbox in the steps given below. I recommend getting onto their Slack channel from the beginning. In particular, if you follow the steps below I’d join the #grand-stack channel so that you can ask questions. The project is evolving quickly, so it’s important to stay connected. They are pretty receptive to ideas and responsive to problems. In the past few weeks, they’ve implemented several ideas that I and others have proposed.
Spin up a Blank Database
- Login at Neo4j Sandbox. (As stated at the beginning, you need to create an account if you don’t have one.)
- Find “Blank Database” and click on it. It should generate and show up after a minute under Your Current Sandboxes.
- Click the Details tab, and you’ll see something like this:
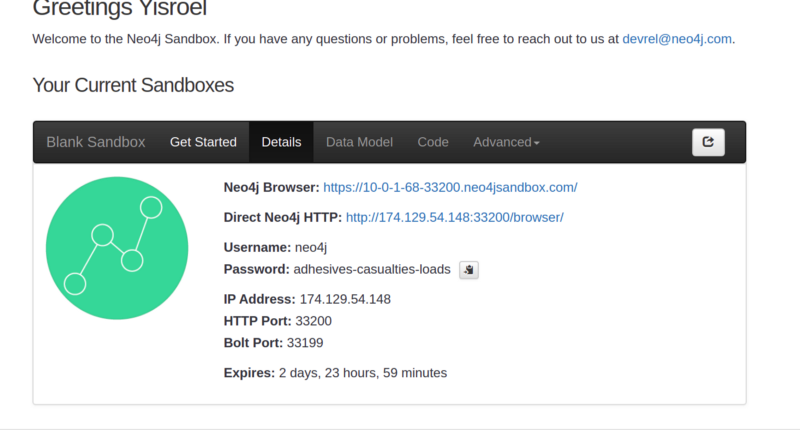
You’ve now generated a live database. You can visit it in the browser at the top link.
Connect Your Project to the Database
Open the api/.env file, which contains some global variables used in the API:
NEO4J_URI=bolt://localhost:7687NEO4J_USER=neo4jNEO4J_PASSWORD=letmeinGRAPHQL_LISTEN_PORT=4000GRAPHQL_URI=http://localhost:4000
You need to set some of these from the Details tab of your sandbox
- Copy the IP Address (e.g. in the example shown above it is
174.129.54.148), and then the bolt port e.g.33199. Use them together to create a new value forNEO4J_URIin theapi/.envfile, replacingbolt://localhost:7687. Note that a colon separates them. E.g. the first line in this case would beNEO4J_URI=bolt://174.129.54.148:33199. - Also, copy from Details the sandbox db password (e.g. in this case
adhesives-casualties-loads) and replace the default passwordletmein. - Of course, make sure you’ve saved your changes. Then return to your terminal, hit
ctrl-c, once again enternpm start, and return to http://0.0.0.0:4000/ and reload. - Now enter the following mutation in the left pane:
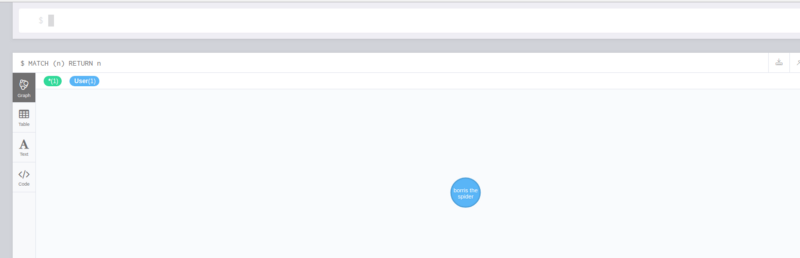
# Try to write your query heremutation { CreateUser (id: "borris", name: "borris the spider") { id }}
Hit the arrow button in the middle to execute, and you should see the results of the mutation in the right button:
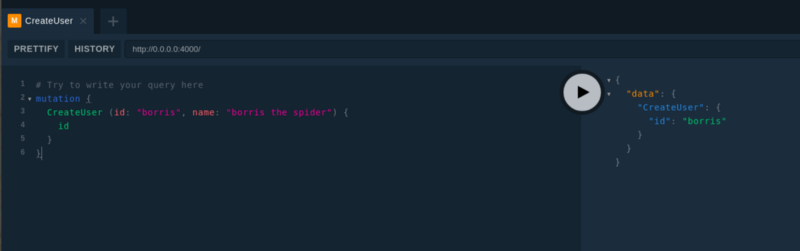
If so, congratulations! You already have a functional API server running locally.
Don’t forget to commit your changes to Git. Back in the root directory of your app (not in API), enter:
git add .git commit -m "Working Sandbox Db"
Inspect the Data Directly
Now, click the link to Neo4j Browser at the top of the Details in your Neo4j Sandbox. (In the case shown above, it is [https://10-0-1-68-33200.neo4jsandbox.com/](https://10-0-1-68-33200.neo4jsandbox.com/.)).))
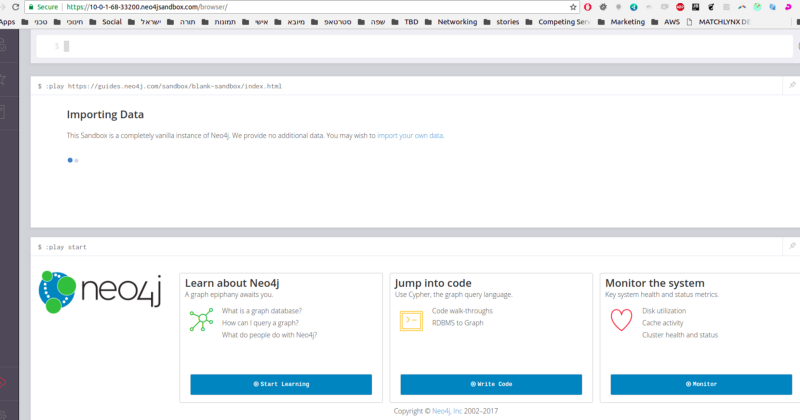
You can read about how to use it at Neo4j. But for our purposes, enter the following query at the prompt: MATCH (n) RETURN n. That query returns all of the nodes in the database. Click the arrow button on the right to execute, and you should see the new node that you created:
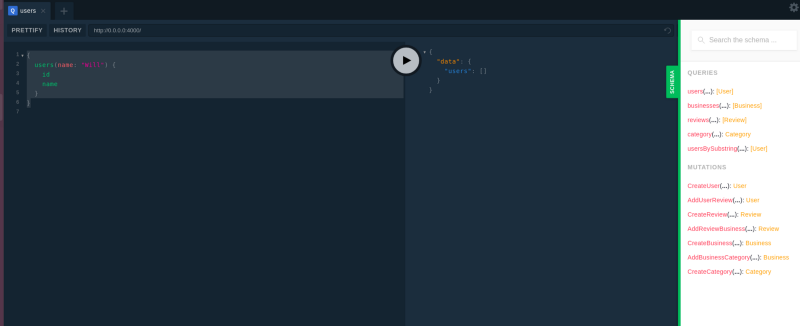
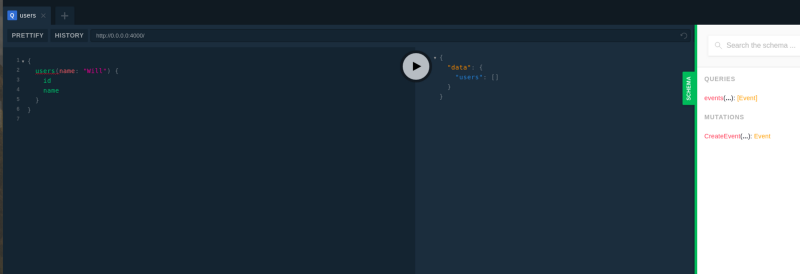
You can get back to a terminal in your api directory and enter npm seedDb if you like. After a minute or so you’ll see the seed data that comes with the starter package for their sample database. You can then play with Playground making queries like this:
{ users(name: "Will") { id name }}
Or, you can just move on to the next step.
Add your Own GraphQL Schema
Click on the green SCHEMA button in the Playground interface. You will see a schema that came with the sample database:
Now it’s time to replace that with your own schema.
- Open the current sample schema
api/src/graphql-schema.js, and see the source for that data. It’s in thetypeDefsdeclaration. - Learn minimally what you must about GraphQL Type Schemas. You must be able to implement your own needed types and some queries. It’s straightforward.
- Start with one or two types and experiment, building it up gradually. To create a query, you’re going to have to change both
typeDefsandresolvers(beneathtypeDefsin the same file). Fortunately, your resolvers will be simple. Just callneo4jgraphqlfrom the neo4j-graphql-ps package, as in the sample database. - Save changes to the file, and confirm that npm is updating. Then refresh the Playground tab and confirm that the new Schema is showing up.
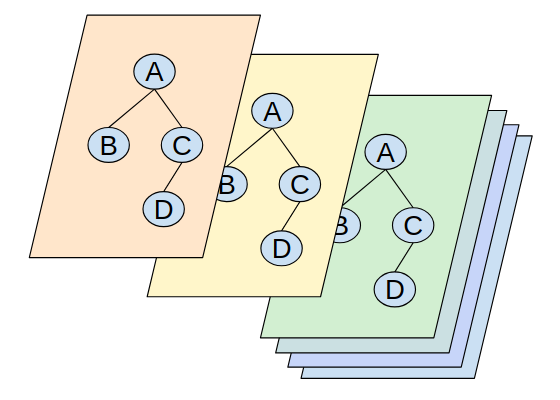
The introductory article about full graph stacks mentioned a sample app for events. Here was its sample app data type graph:
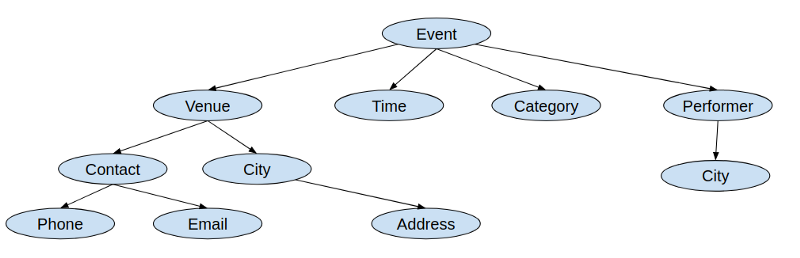
That’s a lot to add all at once, but it’s not hard to start. We work from the top down, and GraphQL is extremely forgiving.
Understanding neo4j-graphql-js
It would help to understand a bit about how the server uses neo4j-graphql-js.
The call to augmentSchema in index.js is what is creating all the mutations. That includes the CRUD functions (Create, Update and Delete) for each of the types created. Also, the Add and Remove functions for creating relationships.
Relationships between types generate relationship functions. When a type X returns Type Y as a field, that indicates a relationship. Add and Remove functions are generated when the precise relationship is defined using:
- a
@cypherdirective or - a
@relationdirective with a direction of “OUT”.
The other important function is neo4jgraphql, which implements a resolver. The documentation of the package explains the details.
The documentation was updated just last week on the GRANDstack documentation page. (This writing is August 19, 2018). The documentation is still a bit minimal. For instance, the critical augmentSchema function is not discussed in the documentation. They do discuss mutations and they show an example using it. But the documentation is helpful. So are the examples contained in the starter package and in the examples brought there.
You might also check the documentation for [neo4j-graphql](https://github.com/neo4j-graphql/neo4j-graphql). but some things there may not have made it into the ps version yet.
Initial Changes
You can remove all the types in the example, but note that you should not entirely remove the Query type. You will need it for your queries, as you can see in GraphQL documentation.
Here’s an example of the simplest possible beginning for the events app schema:
export const typeDefs = `type Event { id: ID! name: String}type Query { events(id: ID, name: String): [Event]}`;export const resolvers = { Query: { events: neo4jgraphql, }};
After saving, check for a reassuring message in the terminal where npm start is running. Something like this:
[nodemon] restarting due to changes…[nodemon] starting `babel-node src/index.js`GraphQL API ready at http://0.0.0.0:4000/
Refresh Playground in the browser and clicking the SCHEMA buttons. You should see the new schema:
You can then start adding more types.
Add your own data
- At your Sandbox prompt, enter
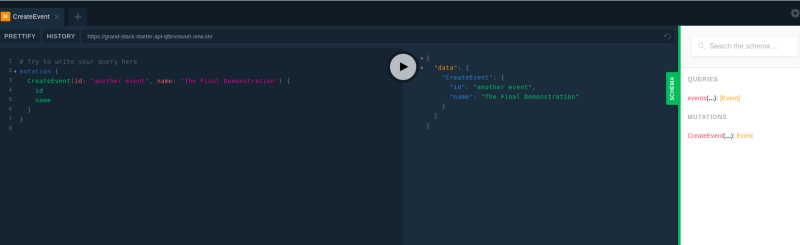
MATCH (n) DETACH DELETE n. That will delete any data you added for the sample schema that came with the project. - Use the generated mutations in your new schema to create some data. For instance:
mutation { CreateEvent(id: "my event", name: "The Big Event") { id name }}
Go Live
The only thing left is to move your server to a live site so that your front end can call it. (Oh, and you will have to create the front end — go to the ui directory of your app folder to deal with that). The video in the GRANDstack Kickstart page recommends using Now.
Go to Now Desktop and click download. But: the desktop app doesn’t currently work for Linux. I’m on Ubuntu, so I just used their command line interface. That’s what I use in this instructions.
- Once you’ve installed on your machine, log in. You should be able to return to the Now site and see your name or picture at the top right.
- Go to the
apidirectory and typenow. You’ll be prompted a few times to enter things. If all goes well, you’ll get a long series of output in the terminal ending with a success message:
$ now> Read more about how to update here: https://zeit.co/update-cli> Deploying ~/projects/events2/api under xxxxxxxxxx@gmail.com> Your deployment's code and logs will be publicly accessible because you are subscribed to the OSS plan.> NOTE: You can use `now --public` or upgrade your plan (https://zeit.co/account/plan) to skip this prompt> Upload [=============-------] 66% 0.1s (192.48KB) [4 files]> Using Node.js 8.11.3 (default)> https://grand-stack-starter-api-qibrvosvuh.now.sh [in clipboard] (bru1) [7s]> Synced 4 files (192.48KB) [7s]> Building…> ▲ npm install> ✓ Using "package-lock.json"> ⧗ Installing 13 main dependencies…> Building "nodemon@1.18.1" remotely> Building "nodemon@1.18.1" remotely> Building "nodemon@1.18.1" remotely> Building "nodemon@1.18.1" remotely> Error: Error parsing `package.json` for nodemon-1.18.1.tar> at extract (/snapshot/ace/lib/extract.js:36:11)> at process._tickCallback (internal/process/next_tick.js:188:7)> at <anonymous>> ▲ npm install> > protobufjs@6.8.6 postinstall /home/nowuser/src/node_modules/protobufjs> node scripts/postinstall> > > nodemon@1.18.1 postinstall /home/nowuser/src/node_modules/nodemon> node bin/postinstall || exit 0> > Love nodemon? You can now support the project via the open collective:> > https://opencollective.com/nodemon/donate> > npm WARN grand-stack-starter-api@0.0.1 No repository field.> npm WARN optional SKIPPING OPTIONAL DEPENDENCY: fsevents@1.2.4 (node_modules/fsevents):> npm WARN notsup SKIPPING OPTIONAL DEPENDENCY: Unsupported platform for fsevents@1.2.4: wanted {"os":"darwin","arch":"any"} (current: {"os":"linux","arch":"x64"})> > added 564 packages in 9.426s> ▲ Snapshotting deployment> ▲ Saving deployment image (9.0M)> Build completed> Verifying instantiation in bru1> [0] > [0] grand-stack-starter-api@0.0.1 start /home/nowuser/src> [0] nodemon --exec babel-node src/index.js> [0] > [0] [nodemon] 1.18.1> [0] [nodemon] to restart at any time, enter `rs`> [0] [nodemon] watching: *.*> [0] [nodemon] starting `babel-node src/index.js`> ✔ Scaled 1 instance in bru1 [13s]Open that url, and you should see your playground. Try it to be sure that it’s working:
The most important thing is a line indicating your live endpoint:
https://grand-stack-starter-api-qibrvosvuh.now.sh [in clipboard]
Open that URL, and you should see your playground. Try it to be sure that it’s working:
What You Have Achieved
That’s it — a live development server, with very little time and no money down! You have a full stack. But unlike a LAMP stack, this stack includes the API itself. Note that all you had to modify was was typeDefs and resolvers.
Understand that this is not yet production quality:
- Your time is very limited to use this without setting up a permanent database. You can now play with this on your front end until your Neo4j Sandbox expires. That will be 3 days, but you can request an extra seven. And of course, you can always create a new Sandbox. If you like, you can also store a set of mutations at
api/src/seed/seed-mutations.js. You can run it with the commandnpm seedDbwhenever you change to a new sandbox. - Whenever you want to change your version on now, the URL will change. You can set up an alias to allow your code to handle that, but it’s not ideal long-term.
But for an MVP, and for initial development, it is enough and is free. If you have a domain, you can use any hosting service set up a CNAME record to run your Now page from it.
Check out Making Your Full Graph Stack Production Quality to learn how to deploy for release.