
By Shawn Toubeau
In this article, I will go over how I built my Twitter lyric bot and how you’ll be able to set up your very own.
Procedure
Here’s a list of the components we have to set up.
- Twitter Account
- Text Editor/IDE
- The bot
- Heroku Automation
Setup New Twitter Application
To create a new Twitter application, go here. You will need to apply for developer access. After you submit the application, it may take a while but Twitter will notify you when you get accepted.
Setup Editor/IDE
Now you’re going to want to set up your editor. My preference is VS Code, so that’s what I’ll be using.
Make sure you have Git and Node installed.
Go ahead clone the following git repository to your computer.
git clone https://github.com/ShawnToubeau/lyric-bot.git
Code Walk Trough
The 3 main files that the bot consists of are bot.js, lyrics.txt, and .env.
SideNote: Your clone of the project will not contain a .env file because of the .gitignore, thus we will be creating our own later down in the article!
bot.js
Starting in bot.js, we start by importing Twit, fs, and dotenv.
Twit is a module that supports the Twitter Developer API.
Fs, or file system, is a file I/O nodule that allows us to interact with our lyrics.txt file.
Dotenv is a module that reads in environment variables stored in our .env file.
const Twit = require('twit');
const fs = require('fs');
require('dotenv').config();
const order = 4; // length of each n-gram
let nGrams = {};
const Bot = new Twit({
consumer_key: process.env.TWITTER_CONSUMER_KEY,
consumer_secret: process.env.TWITTER_CONSUMER_SECRET,
access_token: process.env.TWITTER_ACCESS_TOKEN,
access_token_secret: process.env.TWITTER_ACCESS_TOKEN_SECRET
});
nGrams is the object that keeps track of substring occurrences so that we are able to use a probability to generate our own lyrics randomly. You can read more about them here.
And Bot is…well...our Bot! We need to define some variables to make it work. Using the dotenv module, we can grab the values stored in our .env file.
Next we define a few functions as follows:
pickRandomStart()
function pickRandomStart(lyrics) {
const random = Math.floor(Math.random()*lyrics.length)
return lyrics.substring(random, random + order)
}
This selects the starting point for where we grab our first n-gram.
makeEngramModel()
function makeEngramModel(lyrics) {
for (let i = 0; i < lyrics.length - order; i++) {
const gram = lyrics.substring(i, i + order);
if (!nGrams[gram]) {
nGrams[gram] = [];
}
nGrams[gram].push(lyrics.charAt(i + order));
}
}
This creates the model that tracks the order and occurrences of all the n-grams parsed from the lyrics. By using the number of occurrences as the n-gram’s probability, it allows us to generate new lyrics in a random order.
tweet()
function tweet() {
fs.readFile('lyrics.txt', 'utf8', function(error, lyrics) {
if (error) {
console.log(error.message);
} else {
makeEngramModel(lyrics);
let currentGram = pickRandomStart(lyrics);
// checks to see if the start of the tweet doesn't start
// with punctuation or special characters and ends with a space
while (!currentGram.match(/^[0-9a-zA-Z]+$/)) {
currentGram = pickRandomStart(lyrics);
}
let tweet = currentGram;
// runs until char limit is reached while finishing the last word it was on
for (let j = 0; (j < 150) || (tweet.charAt(j).match(/^[0-9a-zA-Z]+$/)); j++) {
const possibilities = nGrams[currentGram];
const next = possibilities[Math.floor(Math.random()*possibilities.length)];
tweet += next;
const len = tweet.length;
currentGram = tweet.substring(len-order, len);
}
console.log(tweet)
Bot.post('statuses/update', {status: tweet}, function(error, tweet, response) {
if (error) {
console.log("Error making post. ", error.message);
};
});
}
});
}
Last but not least, this is the part that interacts with the bot. It starts by reading in the lyrics using the fs module and then it create the n-gram model using the lyrics variable. It selects a random starting point to use as the first n-gram which will be the start of the new lyrics. It performs a check to see whether the first n-gram contains only alphanumeric characters, because then it has a higher chance to start somewhat more sensical.
It then chains randomly selected n-grams that pair with the last n-gram added to the tweet variable. It does this for at least 150 characters and like before, performs a check to see if it will end on an alphanumeric n-gram. If it does not end on a alphanumeric n-gram, it then will keep chaining from the model until it does.
And finally the bot makes a post request with the lyrics as the tweet payload.
Now that we have a good idea how how our code works, run the following command:
npm install
in the lyric-bot project folder.
This installs the necessary modules () // and explains what npm install does.
Configuration
Now you’ll want to copy in a set of lyrics into the lyrics.txt file.
Then create a .env file. This will store your Twitter API tokens.
Inside the new file, paste the following:
TWITTER_CONSUMER_KEY=
TWITTER_CONSUMER_SECRET=
TWITTER_ACCESS_TOKEN=
TWITTER_ACCESS_TOKEN_SECRET=
and copy the respective tokens from your app’s developer console, once you get your developer application approved.
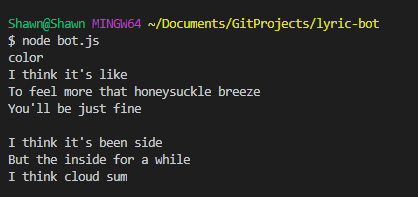
Time to test it!
Type
node bot.js
And take a look at the console!
And check out the Twitter account too, of course:
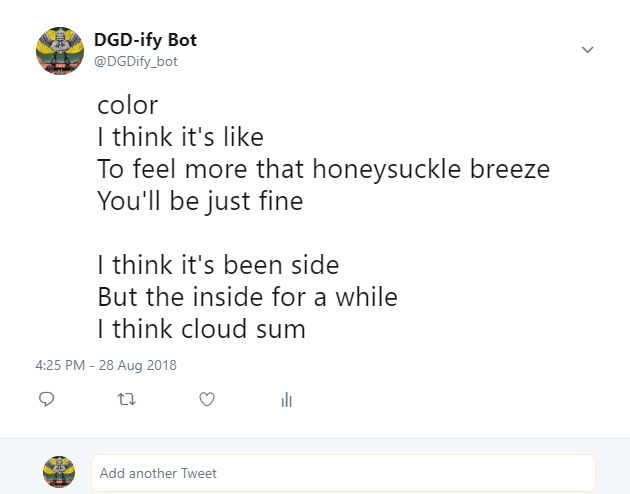
TA DA!
You now have a working twitter bot that is able to post newly generated song lyrics! ?
Hold on though, we still have to automate it…
Heroku Deployment
Go over to Heroku.com and login. If you don’t have an account, you can create a free one! ?
Now, from the main dashboard, create a new app by clicking New->Create new app.
Enter an available name then click Create App.
Here is your app’s main control panel!
If you scroll down in the ‘Deploy’ tab, you will see instructions for ‘Deploy using Heroku Git’. Follow the steps here, and once you’ve successfully deployed your app continue on to the next step.
Automation
Go over to the ‘Overview’ tab and click ‘Configure Add-Ons’. Then, in the add-on search bar, type ‘ Heroku Scheduler’ and select it. A dialog will pop-up, hit ‘Provision’.
Once added, you can then click on the add-on and create these things called ‘jobs’. Jobs are essentially tasks that get executed by Heroku Scheduler.
You’ll want to click ‘Add new job’ and a configure window will appear. In the command option, type the following:
node bot.js
and select the frequency you want to run the command. Once done click save.
And with that you have successfully deployed a Twitter lyric bot! ?
Acknowledgments
Most of the code for creating the custom text is credited to Daniel Shiffman. You can find his material here!
The lyric data I used in this article was sampled from a song called Daylily by Movements.
Big thank you to Morgan Allgrove-Hodges for giving feedback and fixing my silly grammar mistakes! ?
Connect with me on LinkedIn or follow me on Twitter! I love making new connections ?
~ Shawn Toubeau