
By Claus Höfele
How to use Swift to develop custom skills for the Amazon Echo
The Alexa Voice Service is Amazon’s cloud service that understands natural language and allows users to interact with devices by using their voice. You usually associate Alexa with Amazon’s voice-enabled speakers, such as the Echo, but Alexa can potentially run on any connected device with a microphone and a speaker.
Unlike Apple’s Siri, whose extensions are limited to specific domains, Alexa’s API enables developers to implement a broad range of custom voice services called “skills.” Using Swift allows iOS developers (like me) to expand their existing skill set to include server-side programming and take part in the trend towards voice user interfaces.
Ingredients
Simply put, Alexa sends your skill a JSON message with the user’s intent and your code answers with a JSON message that determines what Alexa will answer to the user.
Since I prefer to implement this functionality in Swift, I use AlexaSkillsKit, a Swift library that I wrote. It takes care of parsing JSON requests from Amazon, generating the proper responses and providing convenience methods to handle Alexa features.
The code for your custom skill can run as either a stand-alone web service or an AWS Lambda function. Using Lambda, Amazon’s serverless computing platform, Amazon will take care of scaling and running your Swift code — this is the reason I’ll use this deployment type for the finished skill. As you’ll see, however, the web service option is really useful while developing your skill.
Note that out of the box, Lambda only supports code written in JavaScript (Node.js), Python, and Java. But it’s easy to extend this to executables written in any programming language you want. My article Serverless Swift provides a step-by-step guide on how to do this.
To summarize, you’ll need the following for your Alexa skill:
- An implementation of your skill’s functionality in Swift using AlexaSkillsKit
- A Lambda function set up with your Swift code using the AWS Console
- An Alexa Skill configured in the Alexa Console that triggers your Lambda function
Note that the Alexa Console and the AWS Console are two separate services that you need to sign up for.
The Sample Project
To simplify your first steps, I created a repo with a sample app. swift-lambda-app contains code and scripts to quickly get you started with writing a custom Alexa skill in Swift and deploying it to AWS Lambda.
The sample app uses a standard Swift Package Manager directory layout and package file thus swift build, swift test and swift package generate-xcodeproj work as expected. Check out the SPM documentation for more info.
There are three targets:
- AlexaSkill: this is a library with the code that implements the custom Alexa skill. It’s a separate library so it can be used by the other two targets. Also, libraries have
ENABLE_TESTABILITYenabled by default which allows you to access internal methods and properties in your unit tests. - Lambda: The command line executable for deployment to Lambda. This program uses stdin and stdout for processing data.
- Server (macOS only): To simplify implementing a custom Alexa Skill, the server provides an HTTP interface to the AlexaSkill target. This HTTP server can be exposed publicly via ngrok and configured in the Alexa console, which enables you to develop and debug an Alexa skill with code running on your development computer. This target is macOS only because it wasn’t possible to cleanly separate target dependencies and I didn’t want to link libraries intended for server development to the Lambda executable used for deployment.
For development, I recommend a Test-driven Development approach against the library target, because this results in the quickest turnaround for code changes. Uploading to Lambda to quickly verify changes isn’t really an option because of slow uploading times. Exposing your functionality via HTTPS as described below, however, enables you to test and debug your functionality in a slightly different way.
Implementing a Custom Alexa Skill
Start with implementing the RequestHandler protocol. AlexaSkillsKit parses requests from Alexa and passes the data on to methods required by this protocol.
public protocol RequestHandler { func handleLaunch(request: LaunchRequest, session: Session, next: @escaping (StandardResult) -> ())
func handleIntent(request: IntentRequest, session: Session, next: @escaping (StandardResult) -> ())
func handleSessionEnded(request: SessionEndedRequest, session: Session, next: @escaping (VoidResult) -> ())}
For example, a launch request would result in AlexaSkillsKit calling the handleLaunch() method.
import Foundationimport AlexaSkillsKit
public class AlexaSkillHandler : RequestHandler { public init() {} public func handleLaunch(request: LaunchRequest, session: Session, next: @escaping (StandardResult) -> ()) { let standardResponse = generateResponse(message: "Hello Swift") next(.success(standardResponse: standardResponse, sessionAttributes: session.attributes)) }}
In the request handler, your custom skill can implement any logic your skill requires. To enable asynchronous code (for example calling another HTTP service), the result is passed on via the next callback. next takes a enum that’s either .success and contains an Alexa response or .failure in case a problem occurred.
To keep things simple, we’ll pass back a message that Alexa will speak out loud to the user:
func generateResponse(message: String) -> StandardResponse { let outputSpeech = OutputSpeech.plain(text: message) return StandardResponse(outputSpeech: outputSpeech)}
Debugging Your Code with Local HTTP Server
Invocation of a RequestHandler as part of a Swift server is done via Amazon’s HTTPS API where the Alexa service calls your server with a POST request. In the following code, Kitura is used as a web framework, but any other web framework would work equally well:
import Foundationimport AlexaSkillsKitimport AlexaSkillimport Kiturarouter.all("/") { request, response, next in var data = Data() let _ = try? request.read(into: &data) let requestDispatcher = RequestDispatcher(requestHandler: AlexaSkillHandler()) requestDispatcher.dispatch(data: data) { result in switch result { case .success(let data): response.send(data: data).status(.OK) case .failure(let error): response.send(error.message).status(.badRequest) } next() }}Kitura.addHTTPServer(onPort: 8090, with: router)Kitura.run()
To run a local HTTPS server:
- Make sure the sample builds by running swift build
- Generate an Xcode project with swift package generate-xcodeproj
- Open the generated Xcode project, select the Server scheme and run the product (CMD-R). This will start a server at port 8090
- Install ngrok via brew cask install ngrok. This tool allows you to expose a local HTTP server to the internet
- Run ngrok http 8090 and copy the HTTPS URL generated by ngrok (it looks similar to https://c4ba192c.ngrok.io)
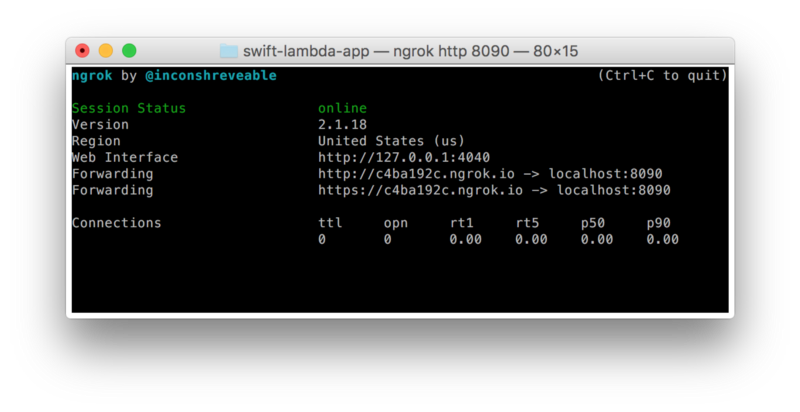
ngrok exposes your local server to the public internet thus allowing the Alexa Voice Service to call into your custom skill running in Xcode.
Configuring the Alexa Skill
To hook up your custom skill to Alexa:
- Go to the Alexa console and create a new skill
- Skill type: Custom Interaction Model
- Intent:
{"intents": [{"intent": "TestIntent"}]} - Sample utterances: “TestIntent test swift”
- SSL Certificate: Select “My development endpoint is a sub-domain of a domain that has a wildcard certificate from a certificate authority”
- Service endpoint type: HTTPS (use the URL from ngrok)
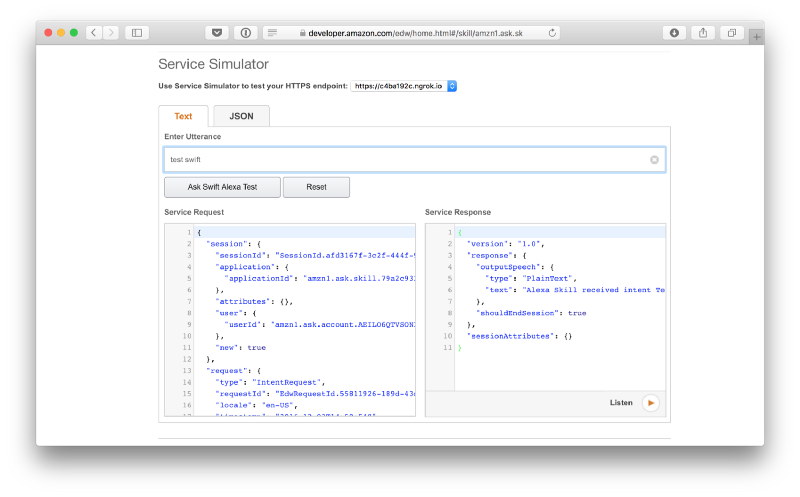
Now you can test the skill in the Alexa Console’s Service Simulator using the utterance “test swift”. This will call your local server allowing you to modify and debug your code while interacting with the Alexa service.
Running Tests for Your Code
Before uploading to Lambda, it’s worthwhile to run your unit tests in a Linux environment and run integration tests that simulate the execution environment. The sample provides run-unit-tests.sh to do the former and run-integration-tests.sh to do the latter.
run-unit-tests.sh builds and tests the Lambda target inside a Swift Docker container based on Ubuntu because there's currently no Swift compiler for Amazon Linux (based on RHEL). Executables built on different Linux distributions are compatible with each other if you provide all dependencies necessary to run the program. For this reason, the script captures all shared libraries required to run the executable using ldd.
To prove that the resulting package works, run-integration-tests.sh runs a release build of the Swift code inside a Docker container that comes close to Lambda’s execution environment (unfortunately, Amazon only provides a few Docker images that don't necessarily match what Lambda is using).
The integration with Lambda is done via a small Node.js script that uses the _childprocess module to run the Swift executable. The script follows Amazon's recommendations to run arbitrary executables in AWS Lambda.
After configuring Travis, you can run the same integration script also for every commit.
Deploying Your Code to Lambda
For Lambda, you need to create an executable that takes input from stdin and writes output to stdout. This can be done with the following code:
import Foundationimport AlexaSkillsKitimport AlexaSkilldo { let data = FileHandle.standardInput.readDataToEndOfFile() let requestDispatcher = RequestDispatcher(requestHandler: AlexaSkillHandler()) let responseData = try requestDispatcher.dispatch(data: data) FileHandle.standardOutput.write(responseData)} catch let error as MessageError { let data = error.message.data(using: .utf8) ?? Data() FileHandle.standardOutput.write(data)}
Note that this code uses the same RequestHandler that was used for the HTTP server thus minimizing the differences to the development environment.
To deploy your code to Lambda:
- Run run-integration-tests.sh to produce a zip file at .build/lambda/lambda.zip with all required files to upload to Lambda
- Create a new Lambda function in the AWS Console in the US East/N. Virginia region (for Europe use EU/Ireland)
- Use an Alexa Skills Kit trigger
- Runtime: NodeJS 4.3
- Code entry type: ZIP file (upload the lambda.zip file from the previous step)
- Handler: index.handler
- Role: Create from template or use existing role
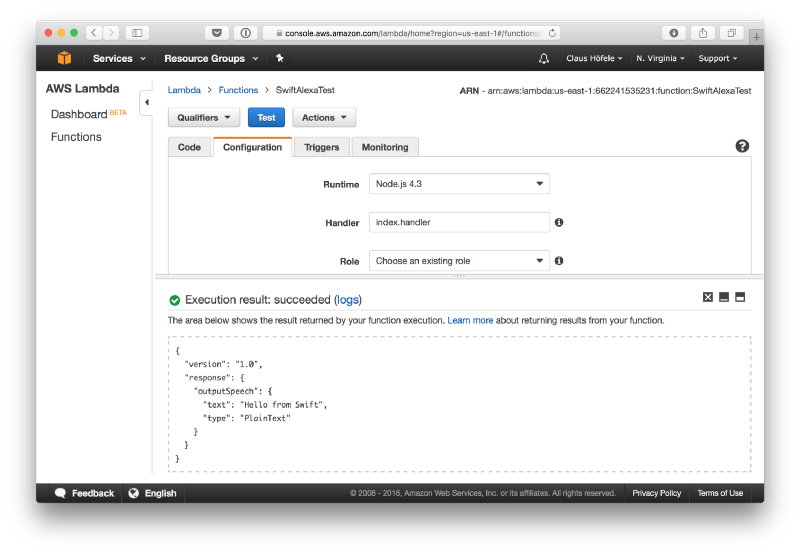
Once you uploaded the Lambda function, you can use the test actions in the AWS Console, for example by using a Start Session action.
Configuring the Alexa Skill for Lambda
After creating the Lambda function, you can now create an Alexa skill. If you have previously created an Alexa skill for the local HTTP server — the only difference is the service endpoint:
- Go to the Alexa console and create a new skill
- Skill type: Custom Interaction Model
- Intent:
{"intents": [{"intent": "TestIntent"}]} - Sample utterances: “TestIntent test swift”
- Service endpoint type: AWS Lambda ARN (use the ARN for the Lambda function from the AWS Console)
Now you can test the skill in the Alexa Console using the utterance “test swift”. More details on configuring Alexa skills can be found on Amazon’s developer portal.
Wrapping Up
Check out the swift-lambda-app repo on GitHub for the code and scripts to develop and deploy a simple Alex skill in Swift. In future articles, I’ll provide more details on how to write useful skills. Meanwhile, you can browse Amazon’s documentation or contact me on Twitter if you have any question.