
By Sampurna Chapagain
If you are a Google Chrome user, you've probably used some extensions in the browser.
Have you ever wondered how to build one yourself? In this article, I will show you how you can create a Chrome extension from scratch.
Table Of Contents
- What is a Chrome Extension?
- What will our Chrome Extension Look Like?
- How To Create a Chrome Extension
- Creating a manifest.json file
- Conclusion
What is a Chrome Extension?
A chrome extension is a program that is installed in the Chrome browser that enhances the functionality of the browser. You can build one easily using web technologies like HTML, CSS, and JavaScript.
Creating a chrome extension is similar to creating a web application, but it requires a manifest.json file which we will discuss in the last section of this post.
What Will our Chrome Extension Look Like?
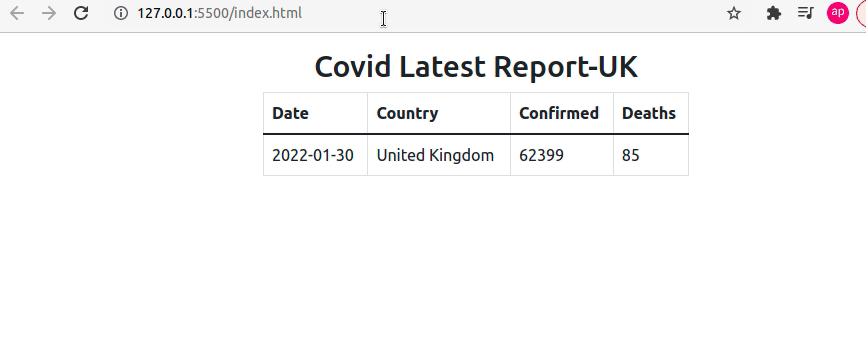
 Latest Covid Report of UK-Chrome Extension
As you can see, the above chrome extension displays the latest data on Coronavirus (COVID-19) in the UK. We will be looking into how to create this extension in this blog post.
Here, we will be using the https://api.coronavirus.data.gov.uk/v1/data API in order to fetch data. We will only display the latest record for the simplicity of this post.
The complete source code of this project can be found on GitHub.
How to Create a Chrome Extension
First of all, we need to create an empty folder where we will add our HTML, CSS, and JavaScript files.
Inside the folder, let’s create an index.html file with this HTML boilerplate code:
<!DOCTYPE html>
<html>
<head>
    <title>Covid-19 Stats- UK</title>
    <meta charset="utf-8">
</head>
<body>
</body>
</html>
Now, let’s add a link to the Bootstrap CDN in the head tag. We will be using the Bootstrap framework here so that we don't have to write some extra CSS in this example.
<head>
    <title>Covid-19 Stats- UK</title>
    <meta charset="utf-8">
    <link href="https://cdn.jsdelivr.net/npm/bootstrap@5.1.3/dist/css/bootstrap.min.css" rel="stylesheet">
</head>
In the demo, we saw that the records are displayed as a table. So now we need to work on creating a table.
<!DOCTYPE html>
<html>
<head>
    <title>Covid-19 Stats- UK</title>
    <meta charset="utf-8">
    <link href="https://cdn.jsdelivr.net/npm/bootstrap@5.1.3/dist/css/bootstrap.min.css" rel="stylesheet">
</head>
<body>
    <div class="container mt-3" style="width: 450px;">
        <h2 class="text-center">Covid Latest Report-UK</h2>
        <table class="table table-bordered">
            <thead>
            <tr>
                <th>Date</th>
                <th>Country</th>
                <th>Confirmed</th>
                <th>Deaths</th>
            </tr>
            </thead>
            <tbody>
            <tr>
                <td id="date"></td>
                <td id="areaName"></td>
                <td id="latestBy"></td>
                <td id="deathNew"></td>
            </tr>
            </tbody>
        </table>
    </div>
</body>
<script src="script.js"></script>
</html>
The code above creates a table with a width of 450px. There are four different headings in a table: Date, Country, Confirmed, and Deaths.
Here, you can see that each table data td has been assigned different IDs. We will be using the value of these IDs in JavaScript to update the table data. Also, here we have loaded the JavaScript in the end after loading all the HTML content.
Now, since the table has been displayed, we need to work on writing JavaScript in order to fetch data from the API.
Let's create a script.js file and add the following code:
async function fetchData() {
    const res=await fetch ("https://api.coronavirus.data.gov.uk/v1/data");
    const record=await res.json();
    document.getElementById("date").innerHTML=record.data[0].date;
    document.getElementById("areaName").innerHTML=record.data[0].areaName;
    document.getElementById("latestBy").innerHTML=record.data[0].latestBy;
    document.getElementById("deathNew").innerHTML=record.data[0].deathNew;
}
fetchData();
Now, let’s break down the above code:
- Here we are using the async function called
fetchData. - The data is being fetched from the https://api.coronavirus.data.gov.uk/v1/data API.
- The JSON data is stored in a variable called
record. - The HTML content of td with ids
date,areaName,latestByanddeathNeware updated by the corresponding values of API.
If we check the browser, we will be able to see the following result.
 Latest Covid Report of UK - Browser Preview
The data is being fetched from the API and it keeps on updating as soon as the data in API changes.
Manifest.json File
As we discussed earlier, building a Chrome extension is similar to building any web application. The only difference is that the Chrome extension requires a manifest.json file where we keep all the configurations.
The manifest.json file contains all the necessary information required to build the Chrome extension. It is the first file the extension checks and everything is loaded from this single file.
Now, let's create a manifest.json file in the root folder and add the following code:
{
    "name": "Covid-19 Stats UK",
    "version": "1.0.0",
    "description": "latest covid data of UK",
    "manifest_version": 3,
    "author": "Sampurna Chapagain",
    "action":{
        "default_popup": "index.html",
        "default_title": "Latest Covid Report"
    }
}
Our manifest.json file contains the value of name, version, description, manifest_version (3 in this case, which is the latest manifest version), author, and action fields. In the action field, there's the value for default_popup which contains the path to the HTML file which is index.html in this example.
You can have a look here to see all configurations of a manifest.json file.
Now, since we've also added the manifest.json file we are ready to add this project as an extension in our Chrome browser.
For that, we need to go to Select More Tools and then choose Extensions from the browser menu as shown in the picture below:
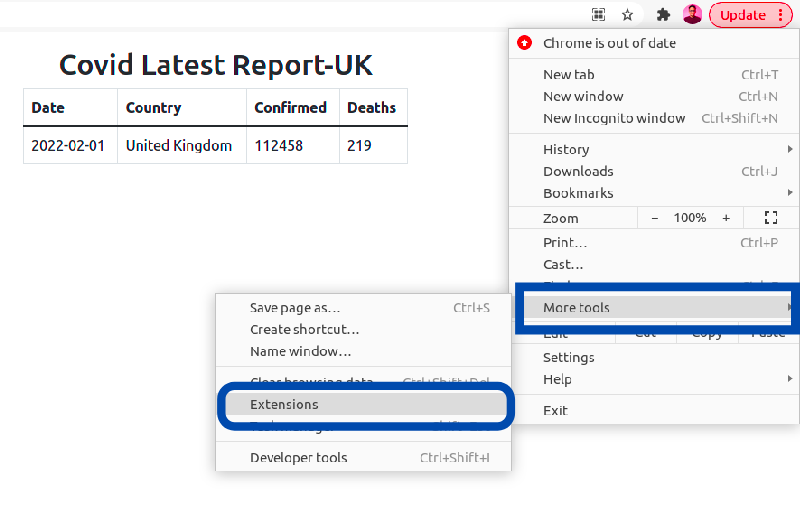 Navigating to extensions in Chrome
After choosing Extensions, it redirects to the extensions page in Chrome. Make sure to enable the Developer mode here.
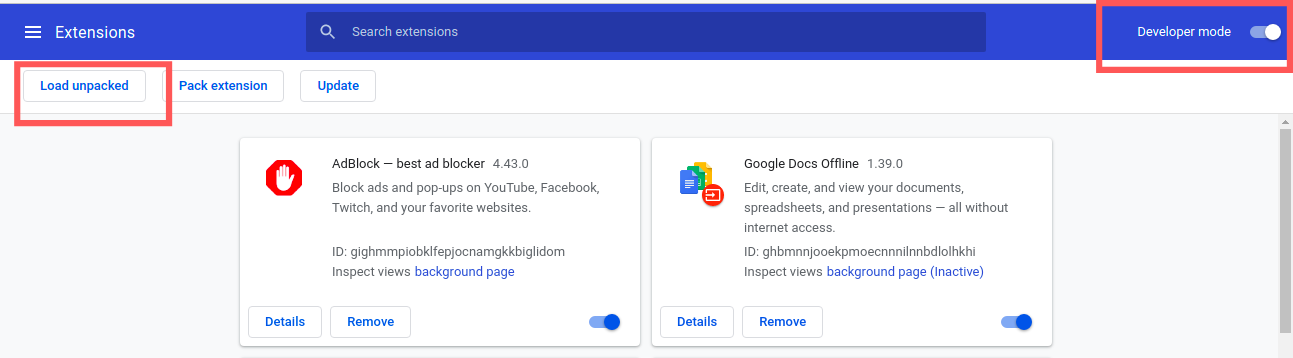
Once that's done, you need to click the Load unpacked button which will allow us to load our project in the Chrome extension store.
Now, the extension is available in our Chrome extension store. You can also pin the extension in the browser as shown in the gif below:
 Pin extension to the browser
This extension works only in your browser. If you want to publish it on the Chrome Web Store, you can follow this link.
Conclusion
If you have some HTML, CSS, and JavaScript knowledge, you can easily build Chrome extensions. I hope after reading this blog post, you will create some cool extensions.
Happy Coding!
You can find me on Twitter for daily content related to Web Development.