By Matthew Choi
This tutorial is the second part of building Tesla’s battery range calculator with React.
In part 1, after constructing the project through create-react-app, we implemented each component by subdividing the UI. We managed the state and event using local state and props, and completed the entire app.
If you haven’t read it yet, be sure to check out Part 1, which focuses on React, here:
Building Tesla’s Battery Range Calculator with React (Part 1)
_In this series of articles, I will walk you through the process of building Tesla’s battery range calculator with React…_medium.freecodecamp.com
In this installment, we’ll introduce Redux, a state management solution, to see how we can transform our application into an application that manages the state of the app with Redux.
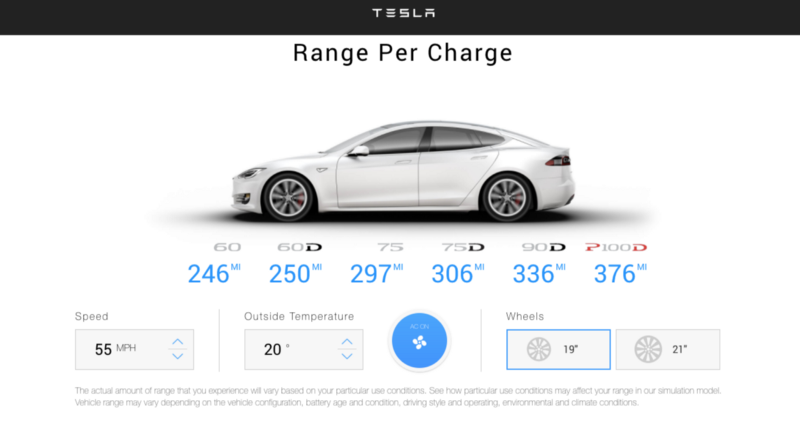
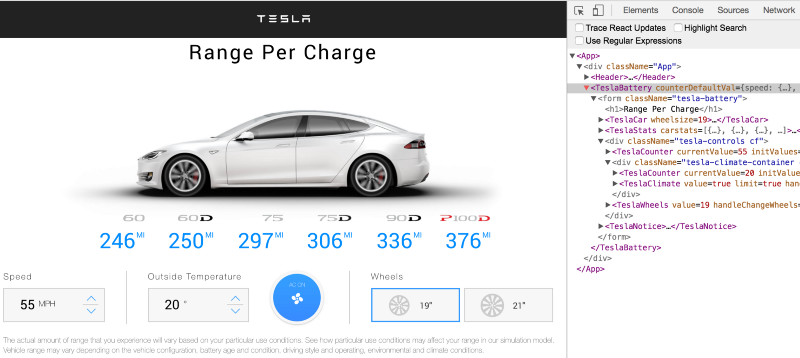
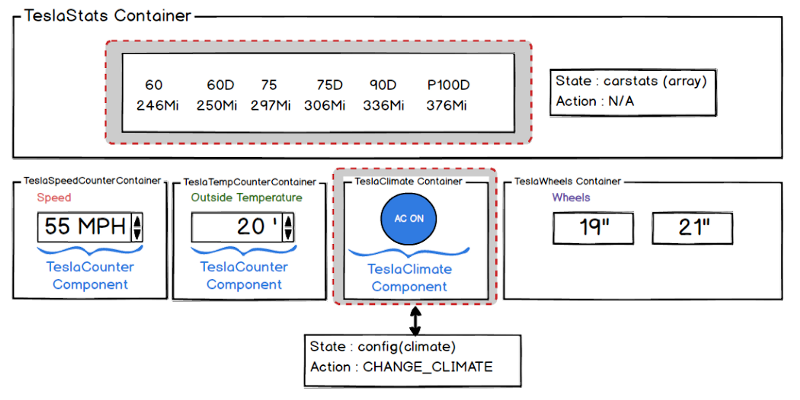
This is the final image of our application in part 2:
? Check out the part 2 live demo.
Before we taking a look into what Redux is, let’s see why we need to use Redux to solve problems.
1. What problem do we solve?
Redux is getting becoming the de facto way to build React apps. But should Redux be used in all React apps? At the very least, not all apps will need an ambitious state management solution from the beginning.
Today’s front-end development trends are component-based. Components can have data state and UI state, and the state that they need to manage becomes more and more complicated as your app grows.
State management solutions have emerged to solve the following problems, and Redux is becoming popular as a standard among other solutions.
- components share state
- state should be accessible from anywhere
- components need to mutate the state
- components need to mutate the state of other components
Redux is a state management library, which is a tool that allows you to store the state of our app somewhere, mutate the state, and receive the updated state.
In other words, with Redux, we have one place where we can refer the state, change the state, and get the updated state.
Redux was written with React in mind, but it is also framework-agnostic and even can be used with Angular or jQuery applications.
I recommend you read Dan Abramov’s You Might Not Need Redux before choosing Redux.
2. Data flow in Redux
As you saw in the part 1, in React, the data is passed through the component using props. This is called unidirectional data flow that flows from parent to child.
Due to these characteristics, communication between components other than parent-child relationship is not clear.
React does not recommend direct component-to-component communication as shown above. There is a suggested way for this in React, but you have to implement it yourself.
According to React docs:
For communication between two components that don’t have a parent-child relationship, you can set up your own global event system. … Flux pattern is one of the possible ways to arrange this.
This is where Redux comes in handy.
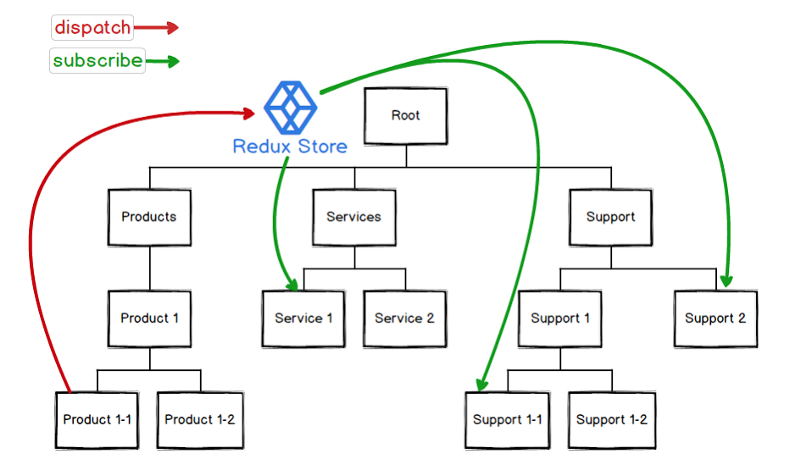
Redux provides a solution for managing all application state in a single place called a store.
The component then dispatches the state change to the store instead of passing it directly to the other components
The components that need to be aware of state changes can subscribe to the store.
Redux is, in a word, a state container that represents and manages the state of an app as a single object from a JavaScript-based application.
3. Redux Core Concept
Redux itself is very simple. The state of the app we created in the last article can be represented as a generic object like this:

This object is the same as the model without setters.
To change this state in Redux, you must dispatch an action.
Actions are plain objects describing what happened in the app, and serve as the sole way to describe an intention to mutate the data. It’s one of the fundamental design choices of Redux.
Here are some examples to be implemented in our app soon.
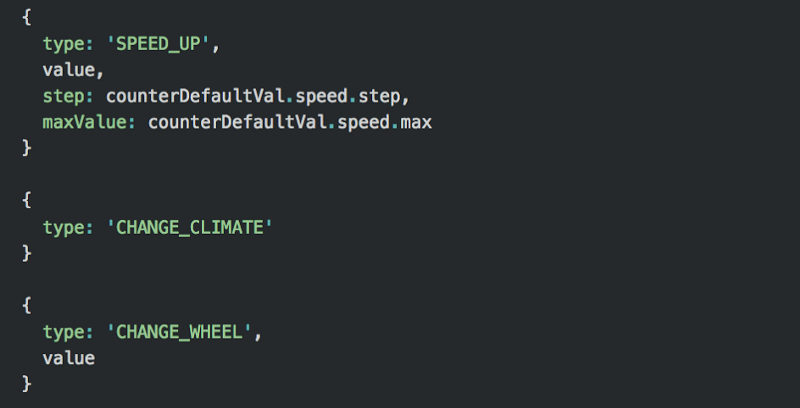
Forcing all of these state changes into action will give us a clear understanding of what’s going on in your app. When something happens, we can see why it happened.
Now we need a function called reducer to bind these states and actions together. Reducer is nothing more than a function that takes a state and an action as arguments and returns a new state.
In a word:
(state, action) => state
Actions only describe that something happened and don’t specify how the application’s state changes in response. This is the job of reducers.
Here is one example of a reducer to implement in our app:
4. Redux Three Principles
I’ve mentioned Flux a few times. Flux is a pattern of state management, not a downloadable tool like Redux. Redux, on the other hand, is a practical implementation of the Flux pattern and has three main principles.
4.1 Single source of truth
The state of the entire application is stored in an object tree within a single store.
Since all states exist in one place, this is called a single source of truth.
This one-store approach of Redux is one of the primary differences between it and Flux’s multiple store approach.
What are the advantages of a single state tree? This makes it easier to debug applications or perform internal inspections and to easily implement some features that were previously difficult to implement (for example, undo / redo).
4.2 State is read-only
The only way to change the state is to emit an action that describes what happened.
In other words, the application does not directly change the state, but instead expresses the intention to transform the state by passing the action.
In fact, if you look at the Redux API, you can see that it consists of just four methods:
store.dispatch(action)store.subscribe(listener)store.getState()replaceReducer(nextReducer)
As you can see, there is no setState() method. Therefore, passing an action is the only channel that can mutate the state of the application.
4.3 Changes are made with pure functions
You write reducers as pure functions to specify the concrete way the state tree is transformed by action.
Reducers are pure functions that take a previous state and action and return a new state. Keep in mind that you must return a new state object instead of changing the old state.
“Given the same arguments, it should calculate the next state and return it. No surprises. No side effects. No API calls. No mutations. Just a calculation.” — Redux Docs
The pure function has the following characteristics:
- It does not make outside network or database calls.
- Its return value depends solely on the values of its parameters.
- Its arguments should be considered “immutable”, meaning they should not be changed.
- Calling a pure function with the same set of arguments will always return the same value.
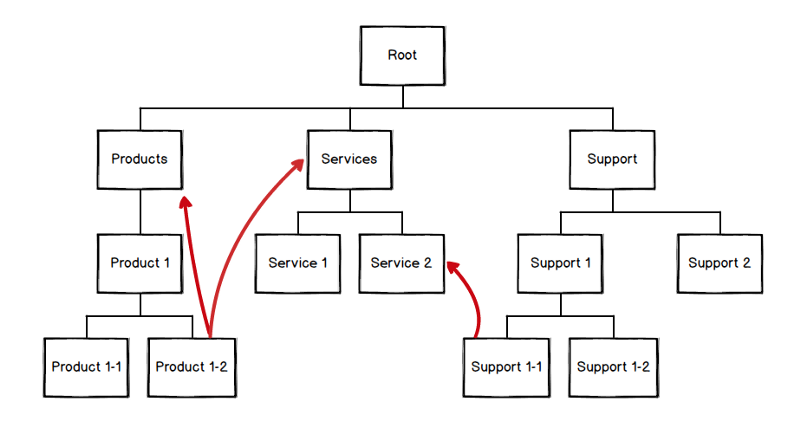
5. Divide The App Into Containers and Components
Now, let’s re-build our Tesla calculator app that we made in Part 1 as a Redux version.
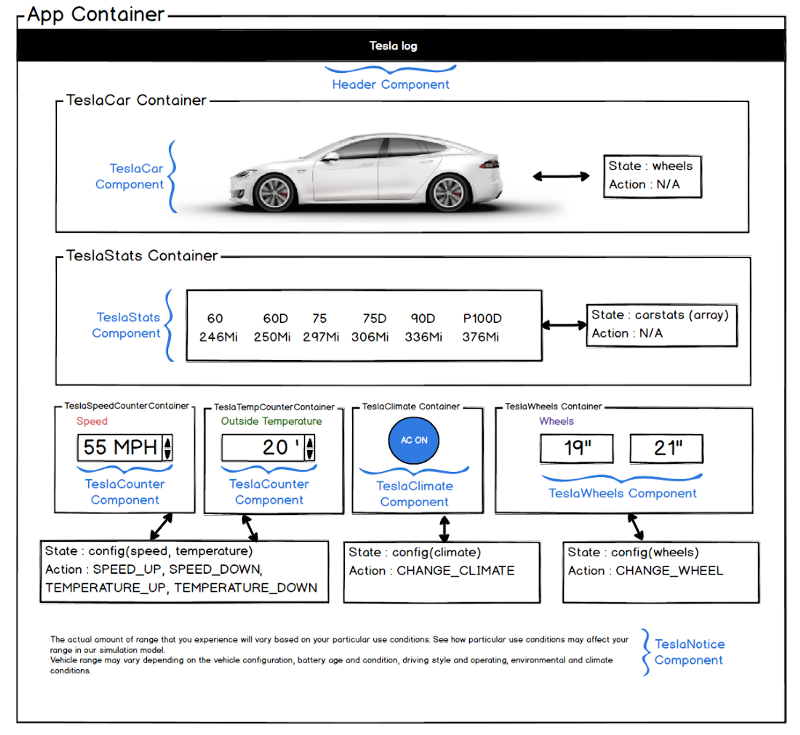
First, let’s look at the overall component UI layout of the app that will be implemented in this article.
Placing React and Redux logic inside a single component can be messy, so it is recommended that you create a Presentational component for presentation purposes only, and a Container component, an upper wrapper component that handles Redux and dispatches actions.
The role of the parent Container component is to provide state values to presentational components, to manage events, and to communicate with Redux on behalf of presentational components.
6. List State and Actions For Each Component
Refer to the entire component layout to create a list of states and actions for each component:
TeslaCar Container : state : wheels action : N/A
TeslaStats Container : state : carstats(array) action : N/A TeslaSpeedCounter Container : state : config.speed action : SPEED_UP, SPEED_DOWN
TeslaTempCounter Container : state : config.temperature action : TEMPERATURE_UP, TEMPERATURE_DOWN TeslaClimate Container : state : config.climate action : CHANGE_CLIMATE
TeslaWheel Container : state : config.wheel action : CHANGE_WHEEL
7. Set up part 1 project code base
If you want to go directly to part 2 without looking at part 1, you need to build the codebase first by cloning the part 1 code.
After the npm start, let’s make sure the application works.

- npm install
- npm start
8. Create Action Creators For Each Action
Now that you’ve created an action list, it’s time to create action creators.
An action creator is a function that literally creates an action object. In Redux, action creators simply return an action object and pass the argument value if necessary.
changeWheel action creator sample :
const changeWheel = (value) => { return { type: 'CHANGE_WHEEL', value }}
These action creators are passed to the dispatch function as the result value, and the dispatch is executed.
dispatch(changeWheel(size))
The dispatch function can be accessed directly from the store as store.dispatch(), but in most cases it will be accessed using a helper like react-redux’s connect(). We’ll look at connect later.
8.1 Create Action.js
Create an index file in the src/actions directory and define action creators as follows:
src/actions/index.js
import { counterDefaultVal } from '../constants/counterDefaultVal';
export const speedUp = (value) => { return { type: 'SPEED_UP', value, step: counterDefaultVal.speed.step, maxValue: counterDefaultVal.speed.max }}
export const speedDown = (value) => { return { type: 'SPEED_DOWN', value, step: counterDefaultVal.speed.step, minValue: counterDefaultVal.speed.min }}
export const temperatureUp = (value) => { return { type: 'TEMPERATURE_UP', value, step: counterDefaultVal.temperature.step, maxValue: counterDefaultVal.temperature.max }}
export const temperatureDown = (value) => { return { type: 'TEMPERATURE_DOWN', value, step: counterDefaultVal.temperature.step, minValue: counterDefaultVal.temperature.min }}
export const changeClimate = () => { return { type: 'CHANGE_CLIMATE' }}
export const changeWheel = (value) => { return { type: 'CHANGE_WHEEL', value }}
export const updateStats = () => { return { type: 'UPDATE_STATS' }}
- Check out index.js
Because we need default values based on the action creator, we define this constant value in constants/counterDefaultVal under src directory and import it.
src/constants/counterDefaultVal.js
export const counterDefaultVal = { speed: { title: "Speed", unit: "mph", step: 5, min: 45, max: 70 }, temperature: { title: "Outside Temperature", unit: "°", step: 10, min: -10, max: 40 }}
- Check out counterDefaultVal.js
9. Create Reducers For Each Action
Reducers are functions that receive state and action objects from a Redux store and return a new state to be stored back into Redux.
It’s important not to directly modify the given state here. Reducers must be pure functions and must return a new state.
- Reducer functions are called from the Container that will be created when a user action occurs.
- When the Reducer returns a state, Redux passes the new state to each component, and React renders each component again.
9.1 Immutable Data Structures
- JavaScript primitive data type(number, string, boolean, undefined, and null) => immutable
- Object, array and function => mutable
Changes to the data structure are known to be buggy. Since our store consists of state objects and arrays, we need to implement a strategy to keep the state immutable.
There are three ways to change the state here:
ES5
// Example Onestate.foo = '123';
// Example TwoObject.assign(state, { foo: 123 });
// Example Threevar newState = Object.assign({}, state, { foo: 123 });
In the example above, the first and second mutate the state object. The second example mutates because Object.assign() merges all its arguments into the first argument.
The third example doesn’t mutate the state. It merges the contents of state and { foo: 123 } into a new empty object which is the first argument.
The spread operator introduced in ES6 provides a simpler way to keep the state immutable.
ES6 (ES2015)
const newState = { ...state, foo: 123 };
For more information about the spread operator, see here.
9.2 Create a Reducer for ChangeClimate
First, we will create ChangeClimate through test-driven development method.
In Part1, our app was generated through create-react-app, so we basically use jest as test runner.
The jest looks for a test file using one of the following naming conventions:
Files with .js suffix in __tests__ foldersFiles with .test.js suffixFiles with .spec.js suffix
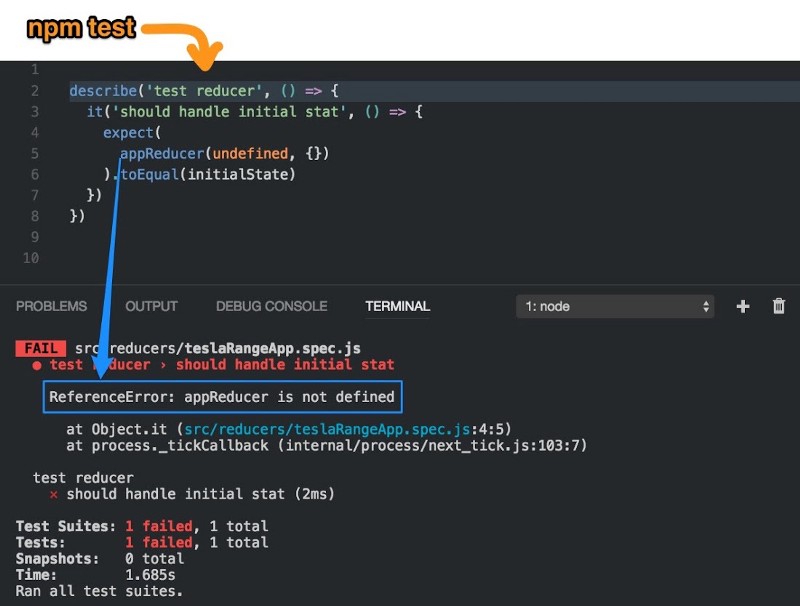
Create teslaRangeApp.spec.js in src/reducers and create a test case.
describe('test reducer', () => { it('should handle initial stat', () => { expect( appReducer(undefined, {}) ).toEqual(initialState) })})
After create the test, run the npm test command. You should be able to see the following test failure message. This is because we have not written the appReducer yet.
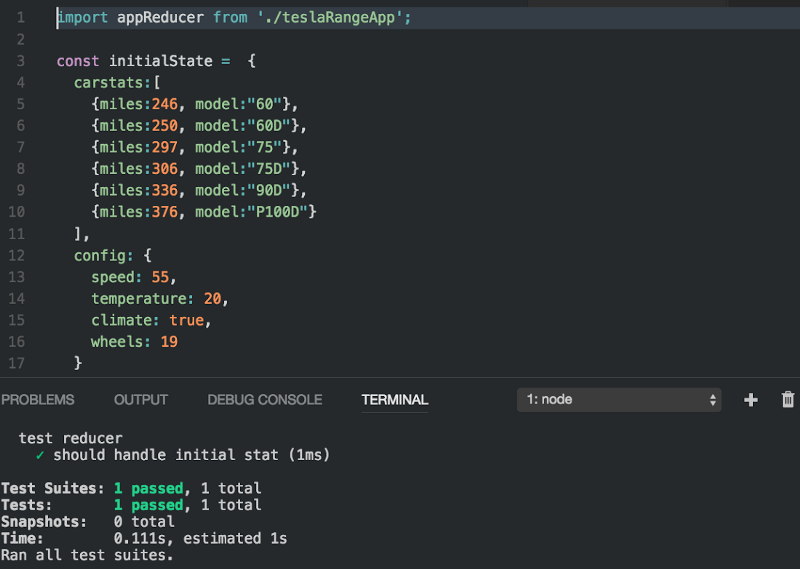
To make the first test successful, we need to create teslaRangeApp.js in the same reducers directory and write initial state and reducer functions.
src/reducers/teslaRangeApp.js
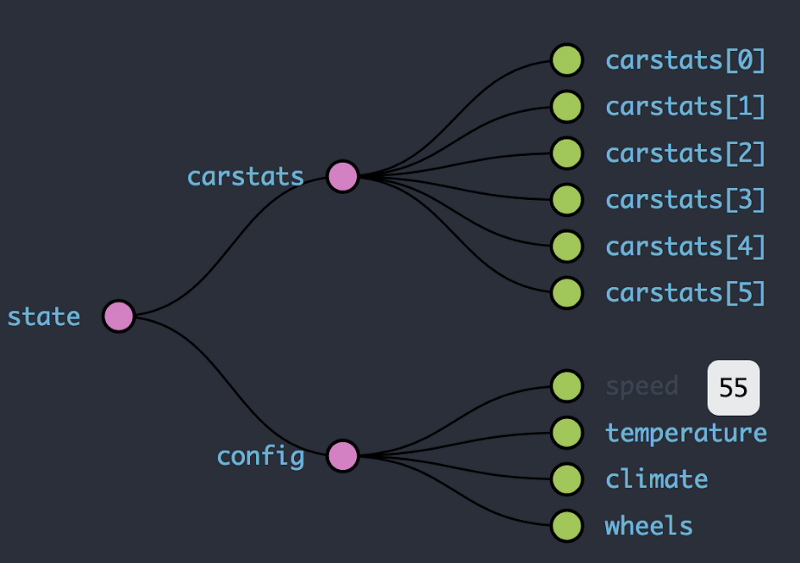
const initialState = { carstats:[ {miles:246, model:"60"}, {miles:250, model:"60D"}, {miles:297, model:"75"}, {miles:306, model:"75D"}, {miles:336, model:"90D"}, {miles:376, model:"P100D"} ], config: { speed: 55, temperature: 20, climate: true, wheels: 19 }}
function appReducer(state = initialState, action) { switch (action.type) { default: return state }}
export default appReducer;
Next, import teslaRangeApp.js from teslaRangeApp.spec.js and set initialState.
src/reducers/teslaRangeApp.spec.js
import appReducer from './teslaRangeApp';
const initialState = { carstats:[ {miles:246, model:"60"}, {miles:250, model:"60D"}, {miles:297, model:"75"}, {miles:306, model:"75D"}, {miles:336, model:"90D"}, {miles:376, model:"P100D"} ], config: { speed: 55, temperature: 20, climate: true, wheels: 19 }}
describe('test reducer', () => { it('should handle initial stat', () => { expect( appReducer(undefined, {}) ).toEqual(initialState) })})
Run npm test again and the test will succeed.
In the current test case, the action type is {}, so the initialState is returned.
Now let’s test the CHANGE_CLIMATE action.
Add the following climateChangeState and CHANGE_CLIMATE test cases to teslaRangeApp.spec.js.
const climateChangeState = { carstats:[ {miles:267, model:"60"}, {miles:273, model:"60D"}, {miles:323, model:"75"}, {miles:334, model:"75D"}, {miles:366, model:"90D"}, {miles:409, model:"P100D"} ], config: { speed: 55, temperature: 20, climate: false, wheels: 19 }}
it('should handle CHANGE_CLIMATE', () => { expect( appReducer(initialState,{ type: 'CHANGE_CLIMATE' }) ).toEqual(climateChangeState) })
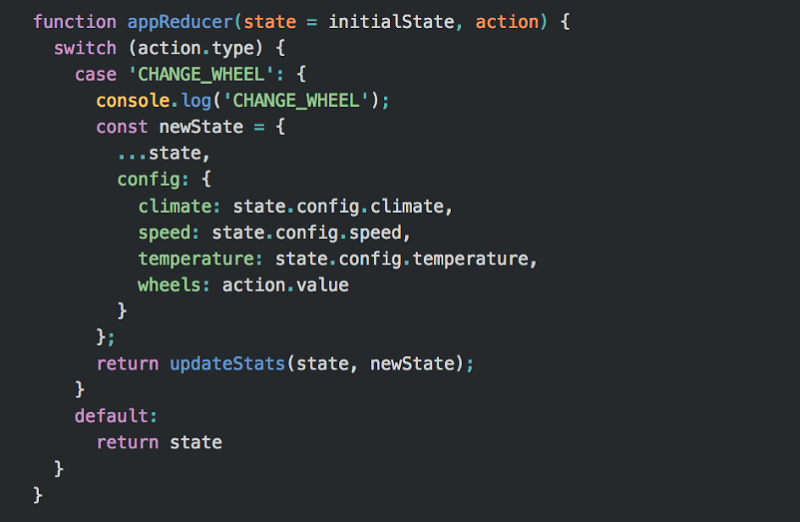
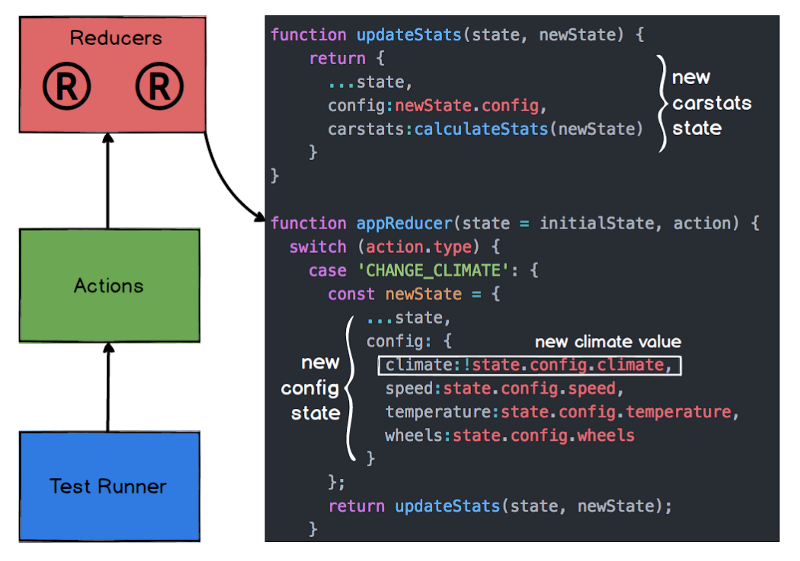
Then add the CHANGE_CLIMATE case, updateStats, and calculateStats functions to teslaRangeApp.js. Then import the BatteryService.js that was used in part 1.
import { getModelData } from '../services/BatteryService';
function updateStats(state, newState) { return { ...state, config:newState.config, carstats:calculateStats(newState) } }
function calculateStats(state) { const models = ['60', '60D', '75', '75D', '90D', 'P100D']; const dataModels = getModelData(); return models.map(model => { const { speed, temperature, climate, wheels } = state.config; const miles = dataModels[model][wheels][climate ? 'on' : 'off'].speed[speed][temperature]; return { model, miles }; });}
function appReducer(state = initialState, action) { switch (action.type) { case 'CHANGE_CLIMATE': { const newState = { ...state, config: { climate: !state.config.climate, speed: state.config.speed, temperature: state.config.temperature, wheels: state.config.wheels } }; return updateStats(state, newState); } default: return state }}
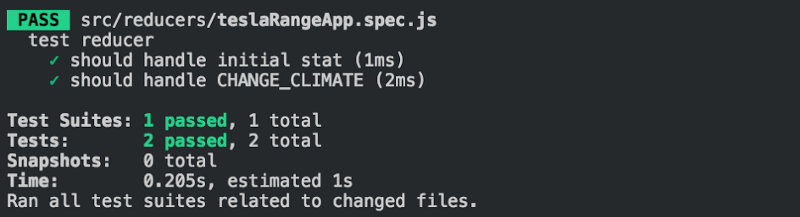
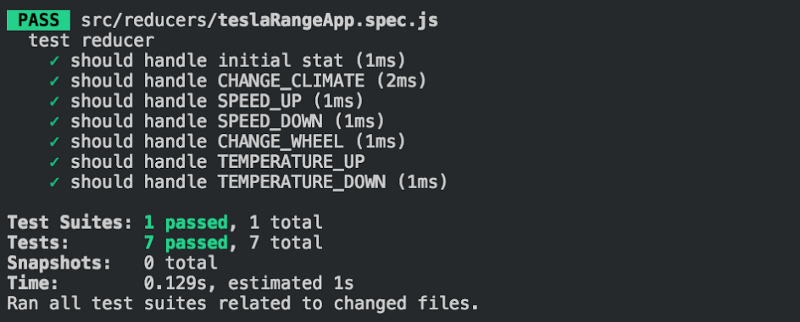
If you check the test results, you can see that the two test cases are successful.
What we have implemented so far is that the changes in the state that occur when the user turns the air conditioner on and off in the application through the test runner only from the viewpoint of Action and Reducer without Redux Store or View.
- Check out teslaRangeApp.js as we’ve written it so far
- Check out teslaRangeApp.spec.js
9.3 Create Reducer for others
If you create the rest of the test cases by referring to the above method, you finally define the teslaRangeApp.js file in which the reducers of all the apps are defined and the teslaRangeApp.spec.js to test them.
The final code can be found at:
After completing the code and testing, a total of seven test cases must succeed.
10. The views: smart and dumb components
As mentioned in 5. Divide The App Into in Containers and Components, we will create Presentational components (dumb components) for presentation purposes and a Container components (smart components) which are wrapper component responsible for Actions while communicating with Redux.
Smart components are responsible for the actions. If a dumb component underneath them needs to trigger an action, the smart component will pass a function through props, and the dumb component can then treat that as a callback.
We already have dumb components for presentation purposes in part 1, and will reuse them.
Here we create container components as upper wrapper around each dumb components.
10.1 The view layer binding
Redux needs some help to connect the store to the view. It needs something to bind the two together. This is called the view layer binding. In an app that uses react, this is react-redux.
Technically, a container component is just a React component that uses store.subscribe() to read a part of the Redux state tree and supply props to a presentational component it renders.
Hence, we can manually create container components, but this is not recommended for Redux official docs. This is because react-redux performs many performance optimizations that are difficult to perform manually.
For this reason, instead of writing the container component by hand, we write it using the connect() function provided by react-redux.
Let’s install the necessary packages first.
- npm install –save redux
- npm install –save react-redux
10.2 TeslarCar Container
To use connect(), you need to define a special function called mapStateToProps. This function tells you how to convert the current Redux store state to props to be passed to the presentation component.
The TeslarCar container takes the wheelsize stored in the current store and passes it to props so that it can be rendered by the TeslarCar component. This props will be updated every time the state is updated.
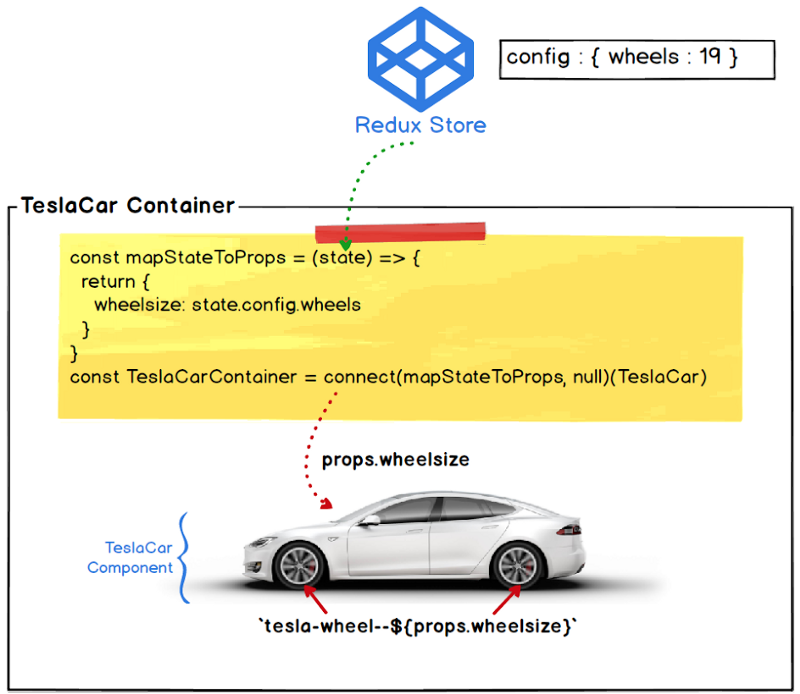
After defining the mapStateToProps function, we defined the connect() function as shown below.
const TeslaCarContainer = connect(mapStateToProps, null)(TeslaCar)
connect() accepts mapDispatchToProps as the second argument, which takes the dispatch method of the store as its first argument. In the TeslaCar component, we do not need an action, so we have to pass null.
Another parenthesis in connect()() may look weird. This form actually means two function calls, the first connect() returns another function, and the second function needs you to pass a React component. In this case it’s our TeslaCar component. This pattern is called currying or partial application and is a form of functional programming.
Create src/containers/TeslaCarContainer.js and write the code.
Check out TeslaCarContainer.js
10.3 TeslaStats Container
As with the TeslaCar container, define only the mapStatToProps function and pass it to connect() in TeslaStats container.
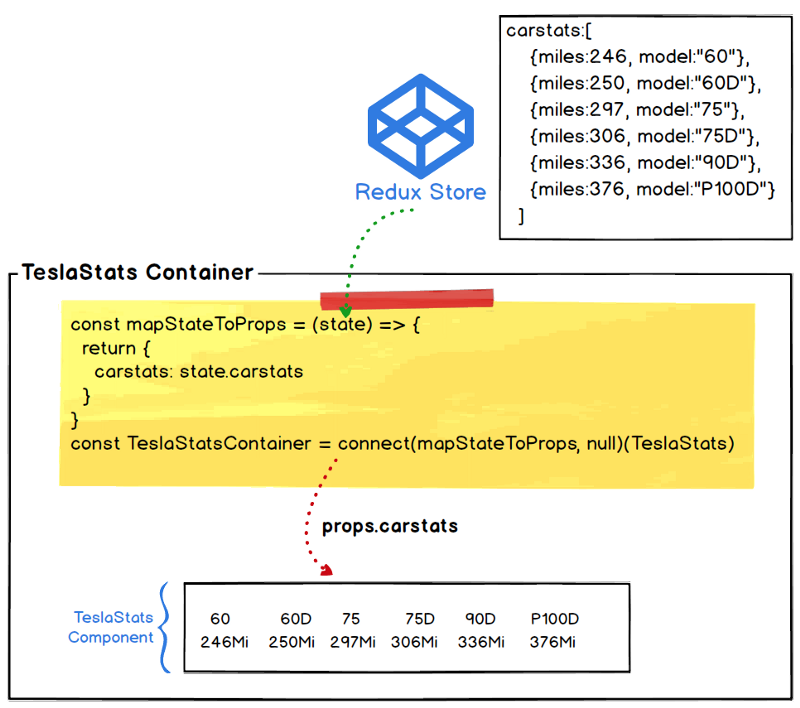
Create src/containers/TeslaStatsContainer.js and write the code.
Check out TeslaStatsContainer.js
10.4 TeslaSpeedCounter Container
The TeslaSpeedCounter container defines an additional mapDispatchToProps function to handle the user actions that occur in the TeslaSpeedCounter component.
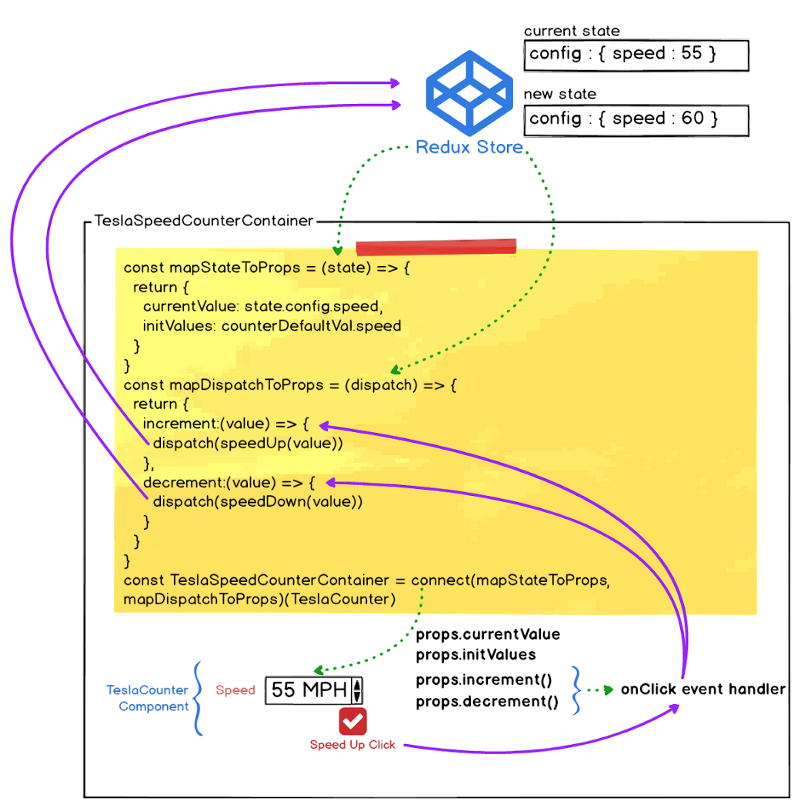
Create src/containers/TeslaSpeedCounterContainer.js and write the code.
Check out TeslaSpeedCounterContainer.js
10.5 TeslaTempCounter Container
The TeslaTempCounter container is almost identical to the TeslaSpeedCounter except for the state and action creators being passed.
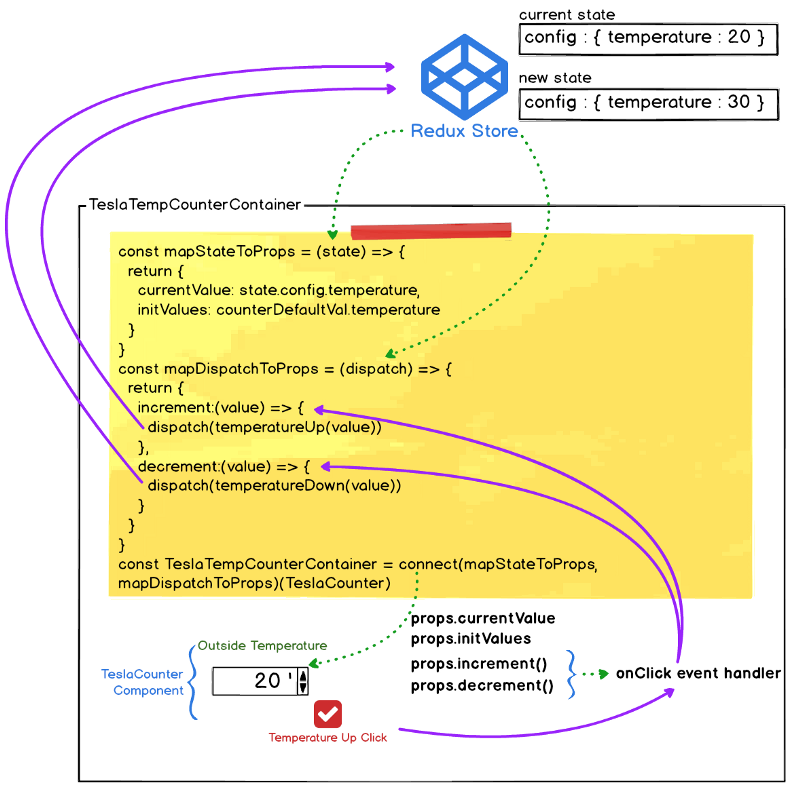
Create src/containers/TeslaTempCounterContainer.js and write the code.
Check out TeslaTempCounterContainer.js
10.6 TeslaClimateContainer
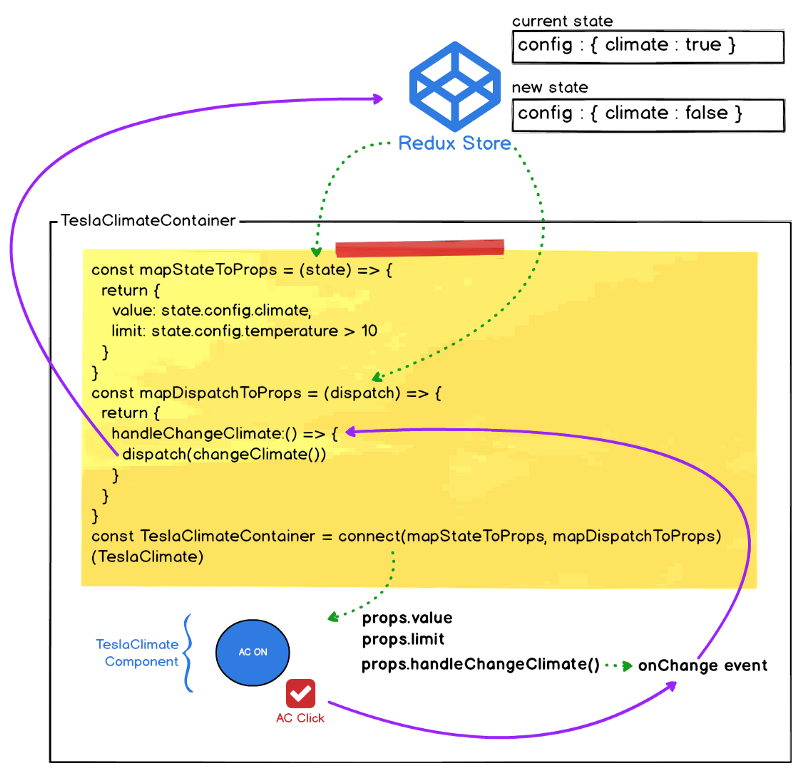
Create src/containers/TeslaClimateContainer.js and write the code.
Check out TeslaClimateContainer
10.7 TeslaWheelsContainer
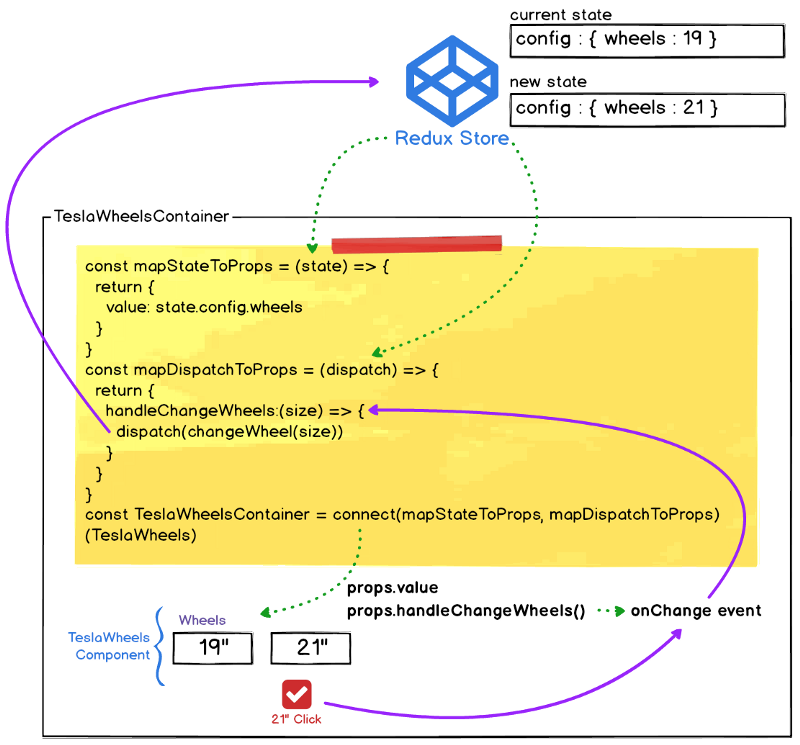
Create src/containers/TeslaWheelsContainer.js and write the code.
Check out TeslaWheelsContainer.js
We have created the container components corresponding to the presentation components generated in part 1 through connect() of react-redux.
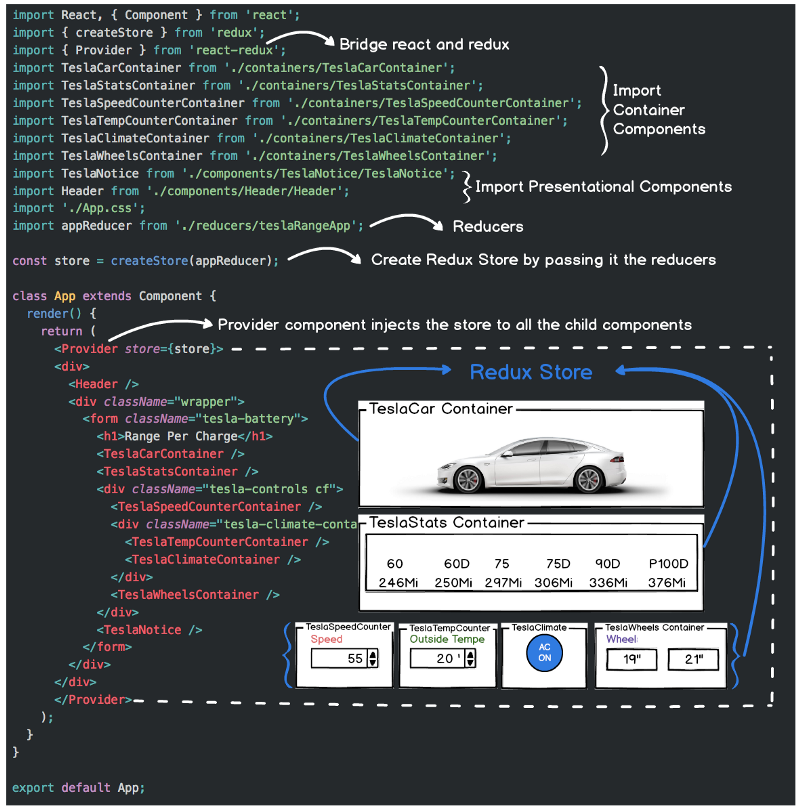
11. Provider
Let’s put together all the things we’ve done so far and make our apps work. So far we have defined action objects and created action creators that create action objects. And when an action occurs, we have created reducers that actually treat and return a new state. We then created a container component that connects each of the presentation components to the Redux store.
Now every container component needs a way to access the store, which is what the Provider does. The Provider component wraps the entire application and allows subcomponents to communicate with the store via connect().
The top-level component of our app, App.js, looks like this:
Check out App.js
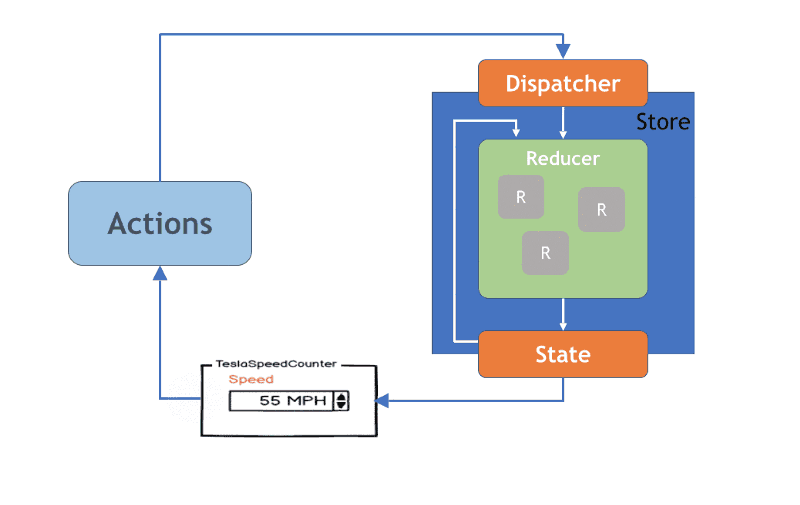
12. How they all work together
Finally, all the puzzle pieces were completed. Now let’s look at the following animation as an example of when all the puzzle pieces are tied together and the user triggers the speed up event.
Now run npm start and it will be compiled normally and the application will be started.
But there are still a few things to do.
- First, copy all the contents of /containers/TeslaBattery.css that you created in part 1 and add them to App.css.
Check out App.css
- Next, open /components/TeslaCounter/TeslaCounter.js and modify the onClick event handler as follows: This is because part 2 no longer handles event handling in TeslaBattery.js.
onClick={(e) => props.increment(e, props.initValues.title)}-->onClick={(e) => { e.preventDefault(); props.increment(props.currentValue)}}
onClick={(e) => props.decrement(e, props.initValues.title)}-->onClick={(e) => { e.preventDefault(); props.decrement(props.currentValue)}}
- Next, let’s not use props repeatedly by using ES6 Object destructuring.
const TeslaCounter = (props) => ( <p className="tesla-counter__title">{props.initValues.title}</p> ...
-->const TeslaCounter = ({ initValues, currentValue, increment, decrement }) => ( <p className="tesla-counter__title">{initValues.title}</p> ...
Check out TeslaCounter.js
Finally, our Redux version of Tesla Battery Range Calculator app is complete!
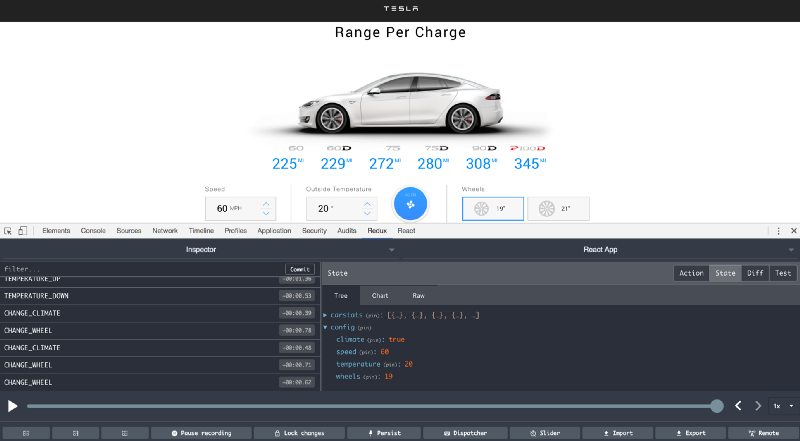
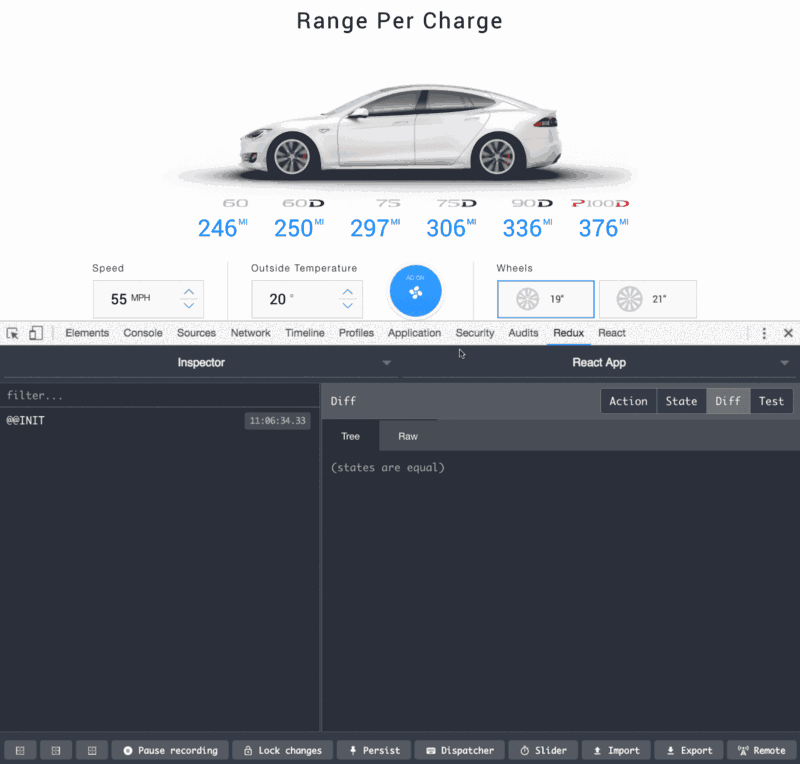
13. One more thing: Redux Dev Tools
The Redux Dev Tool makes it much easier to view Redux state tracking and take advantage of cool features like time travel debugging.
We’ll install it on Chrome here.
- Chrome extension install
- Add for Redux store
Open the App.js file and modify the createStore part as follows:
const store = createStore(appReducer);-->const store = createStore(appReducer, window.__REDUX_DEVTOOLS_EXTENSION__ && window.__REDUX_DEVTOOLS_EXTENSION__());
- Check on browser
Before you go on to the next part:
- Check out the final project code
- Check out the live demo