
You know that the passwords chosen by the people you support are probably not strong enough to protect your infrastructure against a serious attack. And even the few exceptions to the rule are probably being reused on multiple servers and accounts. You beg and nag, but it’s a losing battle.
But all is not entirely lost. The problem of keeping track of
sufficiently complex passwords can be largely solved by using a good
password vault like KeePass2 or LastPass. And the problem of overusing
passwords can be at least blunted by implementing a single sign-on
solution like Kerberos. Ok. Not like Kerberos, but Kerberos.
Still, dumb mistakes are always going to happen.
So what’s bound to happen to the one or two users who care enough to dream up good, strong passwords for each server they access? Every now and then they’ll forget a password, of course. That won’t be a problem if there’s another admin with sudo power who can log into the server and run passwd to create a new password for the user.
sudo  passwd username
[sudo] password for yourname:
Enter new UNIX password:
Retype new UNIX password:
passwd: password updated successfully
But if your unlucky and forgetful user was the only admin with an account on that machine, you’ve got trouble. Except that you don’t. chroot — the grandfather of all Linux virtualization — is going to save your day.
Here, as I wrote in chapters 6 and 9 in my Linux in Action book, is one way that it might work. Use a live-boot drive to power up the server that’s got you locked out.
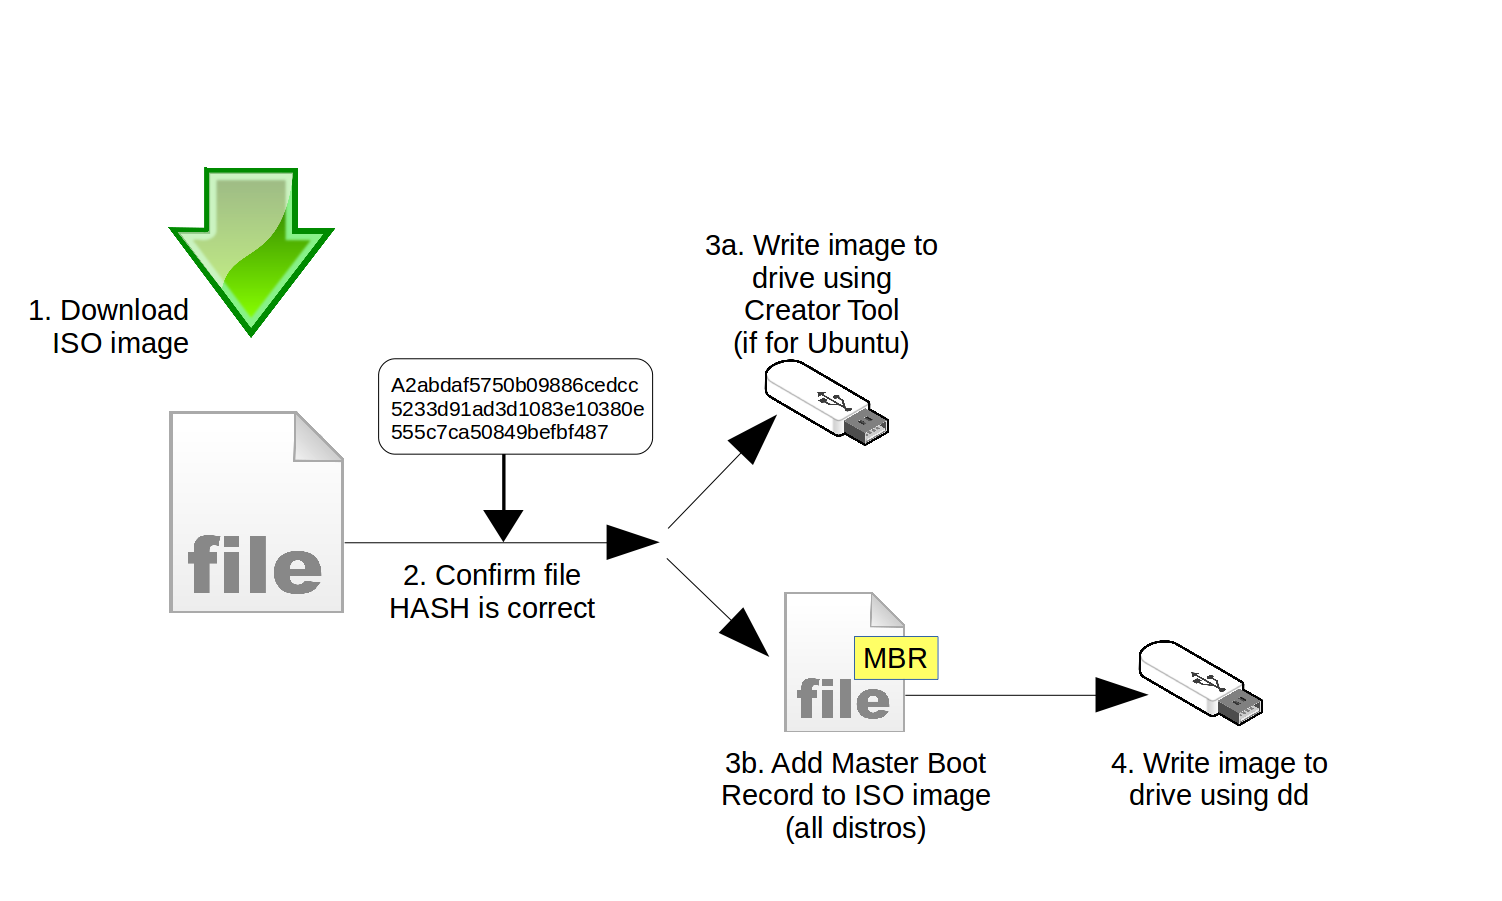 Steps for creating a Linux live boot USB
Then open a terminal and run lsblk to determine the designation of your root partition on the server’s hard disk, and mount the root partition to a temporary directory.
mkdir /run/mountdir/
mount /dev/sdb1 /run/mountdir/
Then you whisper the magic words and you’re in:
chroot /run/mountdir/
root@ubuntu:/#
That’s all it takes. At this point, you’re free to run commands as though you were working on a running version of the physical hard drive. Use passwd to give your admin a new password to replace the lost one and, after typing exit to shut down your chroot session, reboot the machine (without the live-boot USB). Everything should now be fine.
To encrypt or not to encrypt
Encrypting the data on your storage drives using tools like ecryptfs or dm-crypt makes it a great deal less likely that your data will be compromised. But on the other hand, many rescue and recovery operations like the above chroot trick simply won’t work on an encrypted volume.
Striking a balance between security and accessibility isn’t an exact
science. Many admins, for instance, will leave local servers and desktop workstations unencrypted — because they’re at least protected by locked office doors — but insist that mobile devices be encrypted.
Recovering a locked VM
You can apply the magic of chroot to clean up all kinds messes. Locked out of a local server (or LXC container)? Feel free to open a chroot shell to disable or even reconfigure your firewall.
Getting that done on a physical machine should be straightforward by now. But here’s how it would work on an LXC container.
First of all, stop the container and then run chroot against the rootfs directory
that’s within the directory hierarchy used by your LXC container ( var/lib/lxc/
your-container-name/ ). The command prompt you’ll get will allow you to execute commands as if the container was actually running. Now disable ufw or, if you prefer, run the necessary commands to fix the problem and then exit the chroot shell. When you start the container back up again, you should now have SSH access.
lxc-stop -n your-container-name
chroot /var/lib/lxc/your-container-name/rootfs/
ufw disable
exit
lxc-start -d -n your-container-name
This article is excerpted from my Manning “Linux in Action” book. There’s lots more fun where this came from, including a hybrid course called Linux in Motionthat’s made up of more than two hours of video and around 40% of the text of Linux in Action. Who knows…you might also enjoy my recently published Learn Amazon Web Services in a Month of Lunches.