
By Zafar Saleem
As you may have seen in my previous blog, it is possible to make CRUD operations in vanilla JavaScript. However, it can be a hard decision to choose vanilla JavaScript as it gets messier at some point. Moreover, adding event listeners to dynamically added DOM elements is a pain, as we saw. It gets even more complicated for large-scale projects.
One solution is to use modern frameworks such as Angular, React, and so on. This blog post is based on the same concept as the previous example, but using Angular.
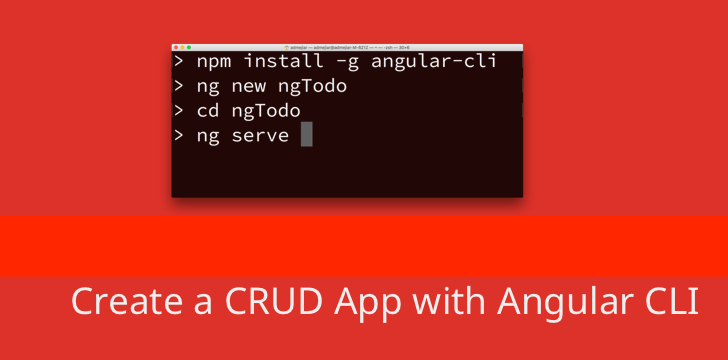
This blog assumes that you already installed Angular-cli on your machine. Once you have it, then create a new application using the below command.
ng new ngTodo
Wait for a few seconds once the project is created, and then cd into this project. The first thing we need is to create a new component using the below command.
ng generate component todo
This will create a folder with the name todo inside the src/app folder. This folder consists of todo.component.ts, todo.component.html, todo.component.css and todo.component.spec.ts files.
All of the JavaScript will be written in the .ts file. Actually the TypeScript template code (that is why the file extension is .ts) goes to todo.component.html file, the styles to todo.component.css, and todo.component.spec.ts is for tests.
To get started, the first thing that needs to be done is to add this component inside “app.component.html” file like so:
<app-todo></app-todo>
Now when you run “ng serve” and load the app in the browser, the todo component will be loaded.
Now it’s time to head over to the todo.component.ts file.
There should be some boilerplate code written by angular-cli. All of our code goes inside the TodoComponent class.
import { Component, OnInit } from '@angular/core';
@Component({
selector: 'app-todo',
templateUrl: './todo.component.html',
styleUrls: ['./todo.component.css']
})
export class TodoComponent implements OnInit {
constructor() { }
ngOnInit() { }
}
Let’s first explain the above boilerplate code. First we import the Component decorator and OnInit interface from the Angular core. Below is the definition of a decorator.
Decorator marks a class as an Angular component and allows us to set configuration metadata that determines how the component should be processed, instantiated, and used at runtime.
Whereas
Interface is a lifecycle hook that is called after Angular has initialized all data-bound properties of a directive. Define an
ngOnInit()method to handle any additional initialization tasks.
Then we are exporting the TodoComponent class to make it available for import in the rest of the project. For this example we will only need this component to be imported in app.module.ts to initiate the component.
Since we created this component using angular-cli, that part is already taken care of. If you look into the app.module.ts file, you will see the TodoComponent class is imported and added to the declarations array. Let’s add some code now.
Just like our previous example, add a mockData property to the class like below.
import { Component, OnInit } from '@angular/core';
@Component({ selector: 'app-todo', templateUrl: './todo.component.html', styleUrls: ['./todo.component.css']})export class TodoComponent implements OnInit {
// mockData array the includes list of objects with items mockData: any = [ { id: '1', title: 'Buy Milk.', done: false, date: new Date() }, { id: '2', title: 'Meeting with Ali.', done: false, date: new Date() }, { id: '3', title: 'Tea break.', done: false, date: new Date() }, { id: '4', title: 'Go for a run.', done: false, date: new Date() } ];
constructor() { }
ngOnInit() { }
}
As you can see, we also added the type “any” to mockData. TypeScript brings strictly type functionality to JavaScript, but in this case that really does not matter. If you leave that part from it, it should still be fine.
Let’s add some more properties to this class which will be used later.
import { Component, OnInit } from '@angular/core';
@Component({ selector: 'app-todo', templateUrl: './todo.component.html', styleUrls: ['./todo.component.css']})export class TodoComponent implements OnInit {
mockData: any = [ { id: '1', title: 'Buy Milk.', done: false, date: new Date() }, { id: '2', title: 'Meeting with Ali.', done: false, date: new Date() }, { id: '3', title: 'Tea break.', done: false, date: new Date() }, { id: '4', title: 'Go for a run.', done: false, date: new Date() } ];
// properties to show hide edit form, set updated value and id. show: boolean = false; value: string; id: number;
constructor() {}
ngOnInit() { }
}
The show property is used to show editForm, the value property is used to set the value of edit title, whereas id is used to assign the id of the currently edited item. We will see this later.
Before going into further discussion, let’s add an html template that we are going to use.
<div class="sections"> <div class="edit-popup" *ngIf="show"> <input type="text" name="" class="edit-item" value="{{value}}" #item> <button class="btn-update" (click)="update(item.value)">Update</button> </div>
<input type="text" name="" class="item" #item> <button class="btn-add-item" (click)="create(item.value)">Add</button>
<ul> <li *ngFor="let item of mockData"> <span [ngClass]="{'done': item.done}">{{item.title}}</span> <button (click)="remove(item.id)">Delete</button> <button (click)="edit(item.id, item.title)">Edit</button> <button (click)="setTaskComplete(item.id)">Complete</button> </li> </ul></div>
This is where a bunch of differences can be seen. The first thing that is noticeable is “edit-popup”. It has an *ngIf conditional directive which shows and hides this piece of html code based on the value of “show” which is either true or false. That is the property that comes from the TodoComponent we setup earlier.
Then simply put the value (title) using {{}} braces inside the input text field. Finally add a click event which will call the update function and pass the value of the input field as an argument.
Then there’s the ul list which shows all items. As you can see, the li element has *ngFor which is a repeater directive. It loops through mockData and inside it we access the current object and display its title.
The [ngClass] directive adds the done class to the li item based on the value of done and property of the item. If it is true, add the done class which puts line-trough on the li item to indicate that this task was achieved.
It also has its buttons which are Delete, Edit and Complete buttons. And each of them has click events which call its respective function and pass the current item’s id. In the edit function alongside id, the title is also passed as an argument.
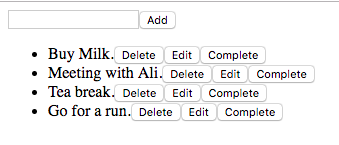
So that’s it for the template. Let’s head back to the TodoComponent. Here we do not need any render function which we had in vanilla JavaScript.The mockData list and *ngFor directive do the job for rendering. So the R part of CRUD is done. Run the angular server using “ng serve” and load the application in your browser. You should have similar results like below:
Let’s now create the function which is the C in CRUD.
import { Component, OnInit } from '@angular/core';
@Component({ selector: 'app-todo', templateUrl: './todo.component.html', styleUrls: ['./todo.component.css']})export class TodoComponent implements OnInit {
mockData: any = [ { id: '1', title: 'Buy Milk.', done: false, date: new Date() }, { id: '2', title: 'Meeting with Ali.', done: false, date: new Date() }, { id: '3', title: 'Tea break.', done: false, date: new Date() }, { id: '4', title: 'Go for a run.', done: false, date: new Date() }];
show: boolean = false; value: string; id: number;
constructor() {}
// Create function to create new item. create(item) { this.mockData.push({ id: Date.now(), title: item, done: false, date: new Date() }); }
ngOnInit() { }
}
The Create function is triggered when the ADD button is clicked from the template. This is very easy to understand and follow. First, it accesses the mockData array using the this keyword and pushes a new object with appropriate properties (like id, title, done and date etc). This will do the job.
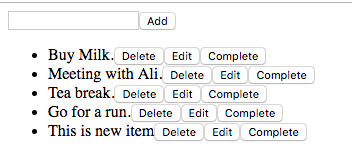
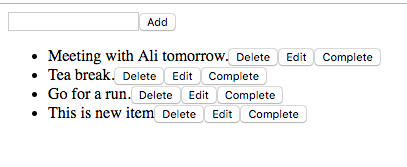
Refresh your browser and type “This is a new item” and press the ADD button — you’ll get a similar result to the above.
Now let’s continue to the remove/delete function which is the D part of CRUD.
import { Component, OnInit } from '@angular/core';
@Component({ selector: 'app-todo', templateUrl: './todo.component.html', styleUrls: ['./todo.component.css']})export class TodoComponent implements OnInit {
mockData: any = [ { id: '1', title: 'Buy Milk.', done: false, date: new Date() }, { id: '2', title: 'Meeting with Ali.', done: false, date: new Date() }, { id: '3', title: 'Tea break.', done: false, date: new Date() }, { id: '4', title: 'Go for a run.', done: false, date: new Date() } ];
show: boolean = false; value: string; id: number;
constructor() {}
create(item) { this.mockData.push({ id: Date.now(), title: item, done: false, date: new Date() }); }
// delete/remove function goes here. remove(id) { this.mockData = this.mockData.filter(item => { if (item.id !== id) { return item; } }); }
ngOnInit() { }
}
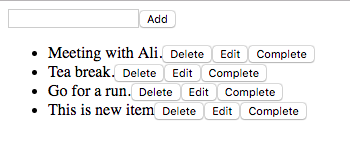
Again very simple. Filter through mockData and find the current element using the item’s id that is to be deleted and the id of the current element from mockData. And return all the items except the one that matches this element.
Refresh your browser and delete the first item from the list. It should be deleted from the screen as below:
For update, again, it’s the same as the vanilla JavaScript example: edit is part of two steps. First show the edit form, and second update the item. First let’s show the edit form which is “edit-popup”:
import { Component, OnInit } from '@angular/core';
@Component({ selector: 'app-todo', templateUrl: './todo.component.html', styleUrls: ['./todo.component.css']})export class TodoComponent implements OnInit {
mockData: any = [ { id: '1', title: 'Buy Milk.', done: false, date: new Date() }, { id: '2', title: 'Meeting with Ali.', done: false, date: new Date() }, { id: '3', title: 'Tea break.', done: false, date: new Date() }, { id: '4', title: 'Go for a run.', done: false, date: new Date() } ];
show: boolean = false; value: string; id: number;
constructor() {}
create(item) { this.mockData.push({ id: Date.now(), title: item, done: false, date: new Date() }); }
remove(id) { this.mockData = this.mockData.filter(item => { if (item.id !== id) { return item; } }); }
// this function does the same as renderEditForm in previous blog. edit(id, title) { this.show = true; this.value = title; this.id = id; }
ngOnInit() { }
}
The above function simply sets some TodoComponent attributes — that is, set this.show to true which displays the form. Set the value of this.value to the item’s title that is to be updated, and set this.id to the item’s id. All these attributes can then be accessed in the template and we can use them accordingly.
Now press the EDIT button for the first item and you should be able to see the edit form appear at the top of the page:
Now it’s time to write the update function that actually performs update operations — this is the U part of CRUD.
import { Component, OnInit } from '@angular/core';
@Component({ selector: 'app-todo', templateUrl: './todo.component.html', styleUrls: ['./todo.component.css']})export class TodoComponent implements OnInit {
mockData: any = [ { id: '1', title: 'Buy Milk.', done: false, date: new Date() }, { id: '2', title: 'Meeting with Ali.', done: false, date: new Date() }, { id: '3', title: 'Tea break.', done: false, date: new Date() }, { id: '4', title: 'Go for a run.', done: false, date: new Date() } ];
show: boolean = false; value: string; id: number;
constructor() {}
create(item) { this.mockData.push({ id: Date.now(), title: item, done: false, date: new Date() }); }
remove(id) { this.mockData = this.mockData.filter(item => { if (item.id !== id) { return item; } }); }
edit(id, title) { this.show = true; this.value = title; this.id = id; }
// function that performs update update(title) { this.mockData.map(item => { if (item.id === this.id) { item['title'] = title; } });
this.show = false; }
ngOnInit() { }
}
This function gets the title, that is the value of the updated input text field, as an argument. Then map through mockData and place a check to find the item that needs to be updated based on its id. Once found, replace the title property with the edited one and set this.show to false to hide the edit form.
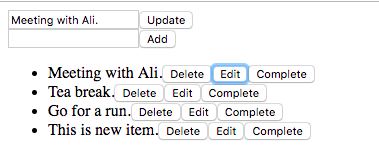
With this part, when you press the UPDATE button, after entering the updated title you should see the updated title like this:
The final part is to mark the task as done, which function is below.
import { Component, OnInit } from '@angular/core';
@Component({ selector: 'app-todo', templateUrl: './todo.component.html', styleUrls: ['./todo.component.css']})export class TodoComponent implements OnInit {
mockData: any = [ { id: '1', title: 'Buy Milk.', done: false, date: new Date() }, { id: '2', title: 'Meeting with Ali.', done: false, date: new Date() }, { id: '3', title: 'Tea break.', done: false, date: new Date() }, { id: '4', title: 'Go for a run.', done: false, date: new Date() } ];
show: boolean = false; value: string; id: number;
constructor() {}
create(item) { this.mockData.push({ id: Date.now(), title: item, done: false, date: new Date() }); }
remove(id) { this.mockData = this.mockData.filter(item => { if (item.id !== id) { return item; } }); }
edit(id, title) { this.show = true; this.value = title; this.id = id; }
update(title) { this.mockData.map(item => { if (item.id === this.id) { item['title'] = title; } });
this.show = false; }
setTaskComplete(id) { this.mockData.map(item => { if (item.id === id) { item['done'] = true; } }); }
ngOnInit() { }
}
This does pretty much the same stuff: map through mockData and find the item to be set as done based on id, and set its done property to true.
Finally, add some CSS in the todo.component.css file below.
.done { text-decoration: line-through;}
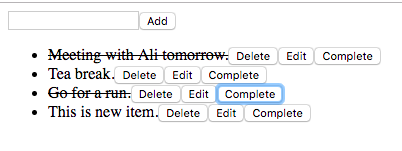
The above CSS adds a line-through to any element that has the done class, in this case tasks that are completed.
After this, press a couple of Complete buttons and you should see something similar like this:
You can see the difference between this example and the previous one using vanilla JavaScript. Angular allows us to write an approach that’s easy to understand, maintain and scale. This is beneficial in large scale applications. Vanilla JavaScript does the job, but really gets complicated once the application grows.
To get all the code written in this example, go ahead and clone the below repository.