By Ameer Jhan
If you have an existing Xamarin.Forms codebase and want to add validation without affecting your code behind or view model, then this is for you. ?
What made me write this article?
Our team designed and developed a Xamarin mobile app with multiple forms with zero validations, since we had less time and we were okay with back end validations alone.
As time passed our need to add front end validation grew with the app. So we decided to add validations without affecting our code behind or view model. There were no articles to help us with this strategy, so I decided to write one.
Prerequisites
I assume that you are comfortable with Xamarin Behaviors. If not, please read the below documentation — it is very simple and straightforward.
Xamarin.Forms Behaviors - Xamarin
_Behaviors lets you add functionality to user interface controls without having to subclass them. Behaviors are written…_docs.microsoft.com
What we will end up with
The result will be highly readable and declarative validations on the xaml, keeping the code behind and view model away from validation!
Things to note
Whenever the code is too long to digest in a single explanation, I will break it into multiple sections and will use three ellipses(…) in place of code from previous or upcoming sections.
So what is the plan?

We can plan our way pretty well if we can think about the basic things that happens while validating:
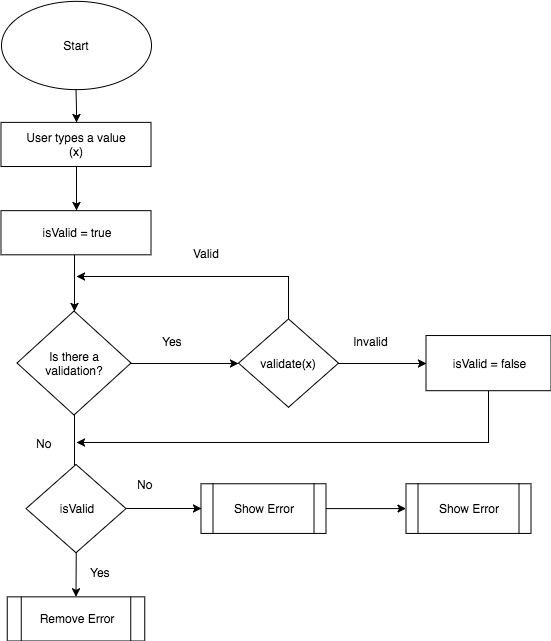
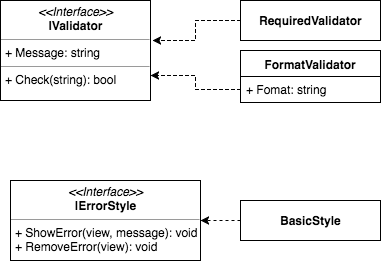
The above flowchart is a very abstract representation of our entire design. To shed more light onto the actual code, take a look at the following image:
Enough is enough — let’s code!
The following interface helps in maintaining the consistency across different validators we define.
Now let us write some implementations for a few common validators.
Some validators may need few extra parameters. For example, FormatValidator requires a format parameter, and those parameters can be added as fields in the class.
There are number of ways to display an error. You might prefer to display it right below the control, or you might prefer to show it as a summary at the top of the form. To accommodate these different styles of showing errors, we define an interface for it to maintain consistency.
For the sake of simplicity, I have implemented a very basic error style which just adds and removes a label below the control being validated.
Now it is time for the Xamarin Behavior part, which glues together all the above code.
_style: This field is initialised with our custom BasicErrorStyle implementation. This will help us show and remove the error whenever its needed.
_view: This is the control on which this validation is placed.
PropertyName: This is the property of the control which is to be validated against validation rules, let's say Text property of a Entry control or SelectedItem property of a picker control.
Validators: This is the list of validation rules against which the control property will be validated.
The Validate() method runs through all the validation rules and executes the Check method on the property value of the control. If all the validation rules pass, then the RemoveError method is called on _style. Otherwise the ShowError method is called on _style.
The remaining part of code just attaches and detaches the OnPropertyChanged, OnUnFocussed method to PropertyChanged and UnFocussed event of the control whenever this behavior is added to the xaml.
When these events are triggered, they call the Validate() method we defined earlier which in-turn adds or removes the error as needed.
How to use it

Yes the wait is finally over! Now you can add these validations to your xaml by importing the necessary xaml namespaces.
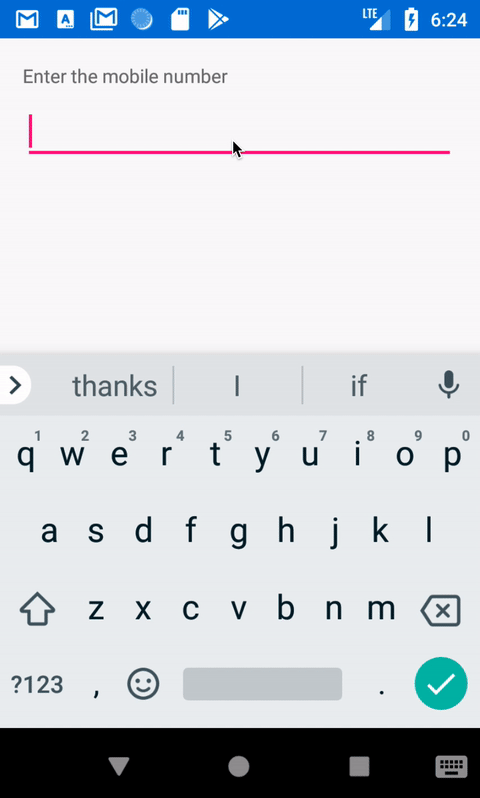
If you run the app now, you should experience something like this:
Validating the entire form
Now comes the next challenge: how we know whether the entire form is valid? That is, how do we know that all the controls in the form have valid data?
To accomplish this, we create another behavior called ValidationGroupBehavior, in which we group the controls that are to be validated together to validate an entire form.
_validationBehaviors: this is a list of validation behaviors from various controls to be validated.
IsValidProperty: this is a bindable property which you can access in the xaml to check whether the form is valid or not.
We expose two methods, namely Add() and Remove(), to help the controls add or remove themselves from a particular validation group.
We also expose a method, Update(), to help the controls for refreshing the validity of the form whenever their data changes. This method in turn runs all the validations in the _validationBehaviors and sets the value of the IsValid property accordingly.
Refactoring our ValidationBehavior
Let’s do a little refactoring to our ValidationBehavior class to accommodate the validation grouping of controls:
We have added a property called Group to store the validation group to which the control belongs. The Group.Add() and Group.Remove() methods are called when this behavior is attached or detached, respectively, from a control. In turn, this adds or remove the control from a particular validation group. Whenever the control loses focus, it updates the validity of the group by calling the Group.Update() method.
ValidationGroupBehavior in action
Update the xaml file as shown below to see the awesomeness of the validation groups:
The above code adds the ValidationGroupBehavior to the parent element of all controls, and then it adds its reference to the Group property of the Validator in the control. You can then use the IsValid property of the validation group to enable or disable a submit button. Fancy stuff, right?
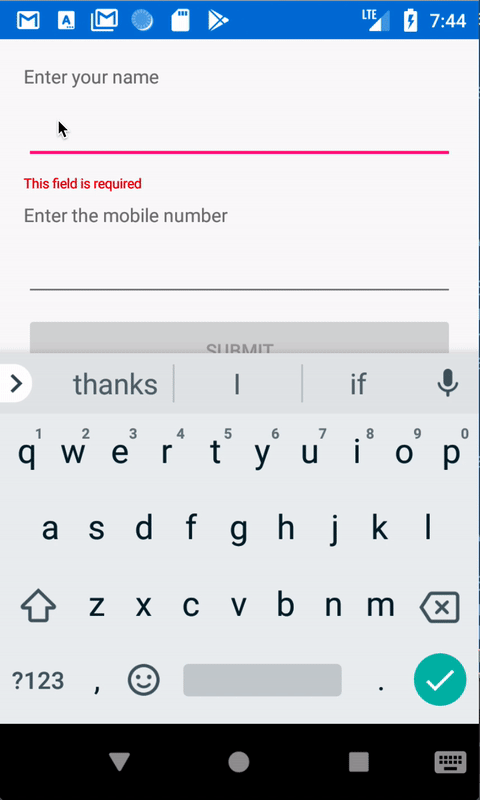
If you run the app now, you should see something like this:
What about async validators?

I can hear the question buzzing through your mind. One good thing about our design is that it can be extended very easily with little effort. This can be achieved by just declaring another interface as shown below:
You can now create an implementation for an async validator, let's say AsyncUserExists, which returns a task that resolves to a boolean. Add a new property to ValidationBehavior called AsyncValidators and add async validators to that property. A little async and await addition to the validation process will solve our problem.
Are we done at last?
We’ve covered quite a bit of info in a very simple way. But there are few nice-to-have features that you can try yourself:
- Debounce for async validators
- Check if the control is dirty (user typed something) or not before showing an error
Confused?

If you are confused or have some gray areas, feel free to reach out to me in the comments. You can also refer to my demo app in GitHub which I have linked below.
ameerthehacker/XamarinFormValidationDemo
_XamarinFormValidationDemo - This is a demo app for my medium blog on xamarin form validations_github.com
TL;DR
If you are lazy like me, or don't want to write a whole lot to get the above functionality, then you can wait until I develope a NuGet package for xamarin form validations using the above strategy. You are welcome to contribute to it, and I have linked to it below.
ameerthehacker/XamarinFormValidation
_XamarinFormValidation - Delcarative, flexible and highly configurable validations in Xamarin without a sweat :hearts:_github.com
If you found this article helpful, give me some claps ?