By Zhuowei Zhang
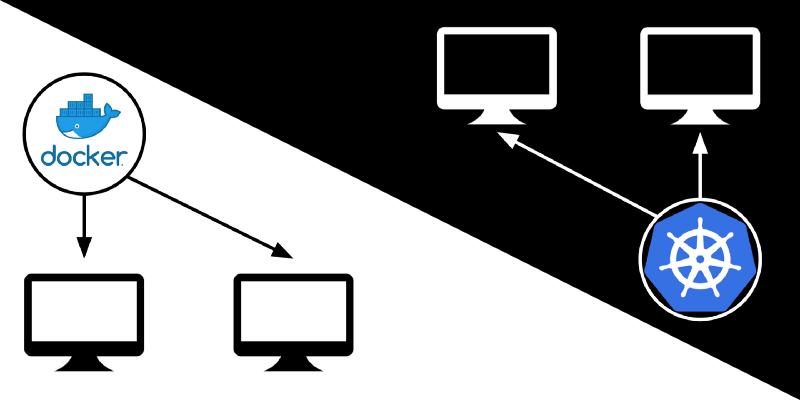
I installed Docker Swarm and Kubernetes on two virtual machines. I found that Docker Swarm is very easy to install and configure, while Kubernetes is slightly harder to setup but still simple to use.
Introduction
I’ve wanted to try containers for years: manually setting up servers takes time, isn’t reproducible, and is likely to introduce differences between my local testing environment and production. Containers offers a solution to all these problems, and make it much easier to run more instances of an application. This can make a service more scalable.
To run a scalable service, you need a Container Orchestration engine to distribute the load by running containers on multiple computers and sending requests to each instance of the application. According to New Relic, two popular orchestration engines are Docker Swarm and Kubernetes. I decided to try both by deploying the same application with each engine.
Creating the container
I decided to use Samba for the test application. Samba is a popular file server that allows Linux computers to share files to Windows computers. It communicates using TCP on port 445.
This is my first time working with Docker, so I modified an off-the-shelf Samba container to include the file I wanted to serve.
Following Docker’s tutorial, I manually launched the container from the command line to make sure it works:
docker build -t sambaonly-v1 .
docker run --init -p 445:445 -i sambaonly-v1
and indeed, I was able to connect to the Samba server in the container with [smbclient](https://www.samba.org/samba/docs/current/man-html/smbclient.1.html):
zhuowei@dora:~$ smbclient \\\\localhost\\workdir -U %
WARNING: The "syslog" option is deprecated
Try "help" to get a list of possible commands.
smb: \> ls
.                               D        0  Fri Oct  5 12:14:43 2018
..                              D        0  Sun Oct  7 22:09:49 2018
hello.txt                       N       13  Fri Oct  5 11:17:34 2018
102685624 blocks of size 1024. 72252576 blocks available
smb: \>
Now that I know the container works, I can use it in a container orchestration engine.
Preparing the virtual machines
I created two virtual machines running Ubuntu 18.04 in VirtualBox.
I added an additional network card to each virtual machine, setup for Internal Networking so they can talk to each other:
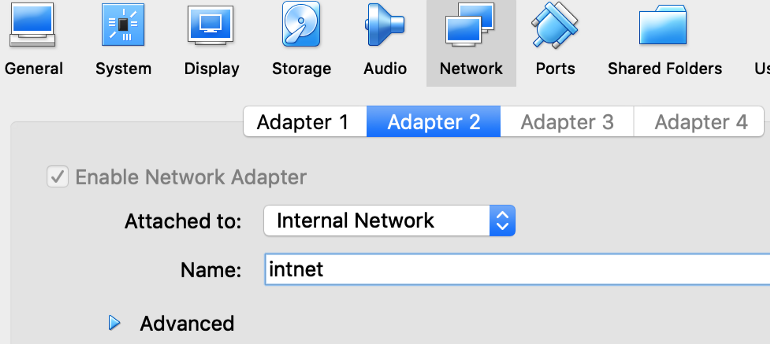
Then I added a DHCP server to assign IP addresses for each virtual machine:
VBoxManage dhcpserver add --netname intnet --ip 10.133.7.99 --netmask 255.255.255.0 --lowerip 10.133.7.100 --upperip 10.133.7.200 --enable
Now the virtual machines can communicate with each other. This gives my main virtual machine the IP address 10.133.7.100.
Docker Swarm
Docker Swarm is a container orchestration engine integrated into Docker itself. When I found it, I was skeptical: why use it instead of the much more famous Kubernetes? The answer: Docker Swarm is focused on simplicity over configuration. It felt like the iOS of container orchestration engines compared to Kubernetes’ Android.
Setting up Docker Swarm
Docker Swarm is pleasantly easy to setup: all I have to install is Docker and docker-compose. Then, following the official tutorial, I ran the only command needed to start the manager node, passing in the IP address of the current virtual machine:
zhuowei@dora:~$ docker swarm init --advertise-addr 10.133.7.100
Swarm initialized: current node (abcdefghijklmnopqrstuvwxy) is now a manager.
To add a worker to this swarm, run the following command:
docker swarm join --token SWMTKN-1-abcdefghijklmnopqrstuvwxyzabcdefghijklmnopqrstuvwx-abcdefghijklmnopqrstuvwxy 10.133.7.100:2377
To add a manager to this swarm, run 'docker swarm join-token manager' and follow the instructions.
That’s it: the Docker engine is now running in Swarm mode.
Next, I deployed a private Docker registry so that other nodes can pull images, again following the setup instructions:
docker service create --name registry --publish published=5000,target=5000 registry:2
Deploying the app
Docker Swarm uses the Docker Compose format to specify the containers to run and the ports they export.
Following the Docker Compose tutorial, I created this Docker Compose manifest:
version: '3.7'
services:
  samba:
    image: 127.0.0.1:5000/samba
    build: sambaonly
    init: true
    stdin_open: true
    ports:
      - "445:445"
This tells Docker Compose to build the Dockerfile from the “sambaonly” directory, upload/pull built containers to my newly setup private registry, and export port 445 from the container.
To deploy this manifest, I followed Docker Swarm’s tutorial. I first used Docker Compose to build and upload the container to the private registry:
docker-compose build

docker-compose push
After the container is built, the app can be deployed with docker stack deploy command, specifying the service name:
$ docker stack deploy --compose-file docker-compose.yml samba-swarm
Ignoring unsupported options: build
Creating network samba-swarm_default
Creating service samba-swarm_samba
zhuowei@dora:~/Documents/docker$ docker stack services samba-swarm
ID           NAME                  MODE       REPLICAS IMAGE PORTS
yg8x8yfytq5d samba-swarm_samba     replicated 1/1
And now the app is running under Samba Swarm. I tested that it still works with smbclient:
zhuowei@dora:~$ smbclient \\\\localhost\\workdir -U %
WARNING: The "syslog" option is deprecated
Try "help" to get a list of possible commands.
smb: \> ls
.                               D        0  Fri Oct  5 12:14:43 2018
..                              D        0  Sun Oct  7 22:09:49 2018
hello.txt                       N       13  Fri Oct  5 11:17:34 2018

102685624 blocks of size 1024. 72252576 blocks available
smb: \>
Adding another node
Once again, Docker Swarm’s simplicity shines through here. To setup a second node, I first installed Docker, then ran the command that Docker gave me when I setup the swarm:
ralph:~# docker swarm join --token SWMTKN-1-abcdefghijklmnopqrstuvwxyzabcdefghijklmnopqrstuvwx-abcdefghijklmnopqrstuvwxy 10.133.7.100:2377

This node joined a swarm as a worker.
To run my application on both nodes, I ran Docker Swarm’s scale command on the manager node:
zhuowei@dora:~/Documents/docker$ docker service scale samba-swarm_samba=2
samba-swarm_samba scaled to 2 overall progress: 2 out of 2 tasks
1/2: running [==================================================>]
2/2: running [==================================================>] verify: Service converged
On the new worker node, the new container showed up:
ralph:~# docker container ls
CONTAINER ID IMAGE COMMAND CREATED STATUS PORTS NAMES
7539549283bd 127.0.0.1:5000/samba:latest "/usr/sbin/smbd -FS …" 20 seconds ago Up 18 seconds 445/tcp samba-swarm_samba.1.abcdefghijklmnopqrstuvwxy
Testing load balancing
Docker Swarm includes a built-in load balancer called the Mesh Router: requests made to any node’s IP address is automatically distributed across the Swarm.
To test this, I made 1000 connections to the manager node’s IP address with nc:
print("#!/bin/bash")
for i in range(1000):
    print("nc -v 10.133.7.100 445 &")
print("wait")
Samba spawns one new process for each connection, so if the load balancing works, I would expect about 500 Samba processes on each node in the Swarm. This is indeed what happens.
After I ran the script to make 1000 connections, I checked the number of Samba processes on the manager (10.133.7.100):
zhuowei@dora:~$ ps -ef|grep smbd|wc
506 5567 42504
and on the worker node (10.133.7.50):
ralph:~# ps -ef|grep smbd|wc
506 3545 28862
So exactly half of the requests made to the manager node were magically redirected to the first worker node, showing that the Swarm cluster is working properly.
I found Docker Swarm to be very easy to setup, and it performed well under (a light) load.
Kubernetes
Kubernetes is becoming the industry standard for container orchestration. It’s significantly more flexible than Docker Swarm, but this also makes it harder to setup. I found that it’s not too hard, though.
For this experiment, instead of using a pre-built Kubernetes dev environment such as [minikube](https://kubernetes.io/docs/setup/minikube/), I decided to setup my own cluster, using Kubeadm, WeaveNet, and MetalLB.
Setting up Kubernetes
Kubernetes has a reputation for being difficult to setup: you might’ve heard of the complicated multi-step process from the Kubernetes the Hard Waytutorial.
That reputation is no longer accurate: Kubernetes developers have automated almost every step into a very easy-to-use setup script called kubeadm.
Unfortunately, because Kubernetes is so flexible, there’s still a few steps that the tutorial on using [kubeadm](https://kubernetes.io/docs/setup/independent/create-cluster-kubeadm/) doesn't cover, so I had to figure out which network and load balancer to use myself.
Here’s what I ended up running.
First I had to disable Swap on each node:
root@dora:~# swapoff -a
root@dora:~# systemctl restart kubelet.service
Next, I setup the master node (10.133.7.100) with the following command:
sudo kubeadm init --pod-network-cidr=10.134.0.0/16 --apiserver-advertise-address=10.133.7.100 --apiserver-cert-extra-sans=10.0.2.15
The --pod-network-cidr option assigns an internal network address to all the nodes on the network, used for internal communications within Kubernetes.
The --apiserver-advertise-address and --apiserver-cert-extra-sansoptions were added because of a quirk in my VirtualBox setup: the main virtual network card on the VMs (which has IP 10.0.2.15) can only access the Internet. I had to clarify that other nodes have to access the master using the 10.133.7.100 IP address.
After running this command, Kubeadm printed some instructions:
Your Kubernetes master has initialized successfully!
To start using your cluster, you need to run the following as a regular user:

mkdir -p $HOME/.kube
sudo cp -i /etc/kubernetes/admin.conf $HOME/.kube/config
sudo chown $(id -u):$(id -g) $HOME/.kube/config

You should now deploy a pod network to the cluster.
Run "kubectl apply -f [podnetwork].yaml" with one of the options listed at:
https://kubernetes.io/docs/concepts/cluster-administration/addons/
You can now join any number of machines by running the following on each node as root:

kubeadm join 10.133.7.100:6443 --token abcdefghijklmnopqrstuvw --discovery-token-ca-cert-hash sha256:abcdefghijklmnopqrstuvwxyzabcdefghijklmnopqrstuvwxyzabcdefghijkl
I missed these instructions the first time, so I didn’t actually finish setup. I then spent a whole week wondering why none of my containers worked!
The Kubernetes developers must’ve be like:
After I finally read the instructions, I had to do three more things:
- First, I had to run the commands given by
kubeadmto setup a configuration file. - By default, Kubernetes won’t schedule containers on the master node, only on worker nodes. Since I only have one node right now, the tutorial showed me this command to allow running containers on the only node:
kubectl taint nodes --all node-role.kubernetes.io/master-
- Finally, I had to choose a network for my cluster.
Installing networking
Unlike Docker Swarm, which must use its own mesh-routing layer for both networking and load balancing, Kubernetes offers multiple choices for networking and load-balancing.
The networking component allows containers to talk to each other internally. I did some research, and this comparison article suggested Flannel or WeaveNet as they are easy to setup. Thus, I decided to try WeaveNet. I followed the instructions from the kubeadm tutorial to apply WeaveNet’s configuration:
kubectl apply -f "https://cloud.weave.works/k8s/net?k8s-version=$(kubectl version | base64 | tr -d '\n')"
Next, to allow containers to talk to the outside world, I need a load balancer. From my research, I had the impression that most Kubernetes load balancer implementations are focused on HTTP services only, not raw TCP. Thankfully, I found MetalLB, a recent (one-year old) project that’s plugging this gap.
To install MetalLB, I followed its Getting Started tutorial, and first deployed MetalLB:
kubectl apply -f https://raw.githubusercontent.com/google/metallb/v0.7.3/manifests/metallb.yaml
Next, I allocated the IP range 10.133.7.200–10.133.7.230 to MetalLB, by making and applying this configuration file:
kubectl apply -f metallb-config.yaml
Deploying the app
Kubernetes’ service configuration files are more verbose than Docker Swarm’s, due to Kubernetes’ flexibiity. In addition to specifying the container to run, like Docker Swarm, I have to specify how each port should be treated.
After reading Kubernetes’ tutorial, I came up with this Kubernetes configuration, made of one Service and one Deployment.
# https://kubernetes.io/docs/tasks/run-application/run-single-instance-stateful-application/
kind: Service
apiVersion: v1
metadata:
  name: samba
  labels:
    app: samba
spec:
  ports:
    - port: 445
      protocol: TCP
      targetPort: 445
  selector:
    app: samba
  type: LoadBalancer

---
This Service tells Kubernetes to export TCP port 445 from our Samba containers to the load balancer.
apiVersion: apps/v1
kind: Deployment
metadata:
  name: samba
  labels:
    app: samba
spec:
  selector:
    matchLabels:
      app: samba
  replicas: 1
  template:
    metadata:
      labels:
        app: samba
    spec:
      containers:
        - image: 127.0.0.1:5000/samba:latest
          name: samba
          ports:
            - containerPort: 445
          stdin: true
This Deployment object tells Kubernetes to run my container and export a port for the Service to handle.
Note the replicas: 1 — that's how many instances of the container I want to run.
I can deploy this service to Kubernetes using kubectl apply:
zhuowei@dora:~/Documents/docker$ kubectl apply -f kubernetes-samba.yaml
service/samba configured
deployment.apps/samba configured
and, after rebooting my virtual machine a few times, the Deployment finally started working:
zhuowei@dora:~/Documents/docker$ kubectl get pods
NAME                   READY STATUS  RESTARTS AGE
samba-57945b8895-dfzgl 1/1   Running 0        52m
zhuowei@dora:~/Documents/docker$ kubectl get service samba
NAME  TYPE         CLUSTER-IP     EXTERNAL-IP  PORT(S)       AGE
samba LoadBalancer 10.108.157.165 10.133.7.200 445:30246/TCP 91m
My service is now available at the External-IP assigned by MetalLB:
zhuowei@dora:~$ smbclient \\\\10.133.7.200\\workdir -U %
WARNING: The "syslog" option is deprecated
Try "help" to get a list of possible commands.
smb: \> ls
.                               D        0  Fri Oct  5 12:14:43 2018
..                              D        0  Sun Oct  7 22:09:49 2018
hello.txt                       N       13  Fri Oct  5 11:17:34 2018

102685624 blocks of size 1024. 72252576 blocks available
smb: \>
Adding another node
Adding another node in a Kubernetes cluster is much easier: I just had to run the command given by kubeadm on the new machine:
zhuowei@davy:~$ sudo kubeadm join 10.133.7.100:6443 --token abcdefghijklmnopqrstuvw --discovery-token-ca-cert-hash sha256:abcdefghijklmnopqrstuvwxyzabcdefghijklmnopqrstuvwxyzabcdefghijkl

(snip...)

This node has joined the cluster:* Certificate signing request was sent to apiserver and a response was received.
* The Kubelet was informed of the new secure connection details.

Run 'kubectl get nodes' on the master to see this node join the cluster.
Odd quirks of my setup
I had to make two changes due to my VirtualBox setup:
First, since my virtual machine has two network cards, I have to manually tell Kubernetes my machine’s IP address. According to this issue, I had to edit
/etc/systemd/system/kubelet.service.d/10-kubeadm.conf
and change one line to
Environment="KUBELET_CONFIG_ARGS=--config=/var/lib/kubelet/config.yaml --node-ip=10.133.7.101"
before restarting Kubernetes:
root@davy:~# systemctl daemon-reload
root@davy:~# systemctl restart kubelet.service
The other tweak is for the Docker registry: since the new node can’t access my private registry on the master node, I decided to do a terrible hack and share the registry from my master node to the new machine using ssh:
zhuowei@davy:~$ ssh dora.local -L 5000:localhost:5000
This forwards port 5000 from the master node, dora (which runs my Docker registry) to localhost, where Kubernetes can find it on this machine.
In actual production, one would probably host the Docker registry on a separate machine, so all nodes can access it.
Scaling up the application
With the second machine setup, I modified my original Deployment to add another instance of the app:
replicas: 2
After rebooting both the master and the worker a few times, the new instance of my app finally exited CreatingContainer status and started to run:
zhuowei@dora:~/Documents/docker$ kubectl get pods
NAME                   READY STATUS  RESTARTS AGE
samba-57945b8895-dfzgl 1/1   Running 0        62m
samba-57945b8895-qhrtl 1/1   Running 0        12m
Testing Load Balancing
I used the same procedure to open 1000 connections to Samba running on Kubernetes. The result is interesting.
Master:
zhuowei@dora$ ps -ef|grep smbd|wc
492 5411 41315
Worker:
zhuowei@davy:~$ ps -ef|grep smbd|wc
518 5697 43499
Kubernetes/MetalLB also balanced the load across the two machines, but the master machine got slightly fewer connections than the worker machine. I wonder why.
Anyways, this shows that I finally managed to setup Kubernetes after a bunch of detours. When I saw the containers working, I felt like this guy.
Comparison and conclusion
Features common to both: Both can manage containers and intelligently load balance requests across the same TCP application across two different virtual machines. Both have good documentation for initial setup.
Docker Swarm’s strengths: simple setup with no configuration needed, tight integration with Docker.
Kubernetes’ strengths: flexible components, many available resources and add-ons.
Kubernetes vs Docker Swarm is a tradeoff between simplicity and flexibility.
I found it easier to setup Docker Swarm, but I can’t just, for example, swap out the load balancer for another component — there’s no way to configure it: I would have to disable it all together.
On Kubernetes, finding the right setup took me a while thanks to the daunting amount of choices, but in exchange, I can swap out parts of my cluster as needed, and I can easily install add-ons, such as a fancy dashboard.
If you just want to try Kubernetes without all this setup, I suggest using [minikube](https://kubernetes.io/docs/setup/minikube/), which offers a prebuilt Kubernetes cluster virtual machine, no setup needed.
Finally, I’m impressed that both engines supported raw TCP services: other infrastructure-as-a-service providers such as Heroku or Glitch only supports HTTP(s) website hosting. The availability of TCP services means that one can deploy one’s database servers, cache servers, and even Minecraft servers using the same tools to deploy web applications, making container orchestration management a very useful skill.
In conclusion, if I were building a cluster, I would use Docker Swarm. If I were paying someone else to build a cluster for me, I would ask for Kubernetes.
What I learned
- How to work with Docker containers
- How to setup a two-node Docker Swarm cluster
- How to setup a two-node Kubernetes cluster, and which choices would work for a TCP-based app
- How to deploy an app to Docker Swarm and Kubernetes
- How to fix anything by rebooting a computer enough times, like I’m still using Windows 98
- Kubernetes and Docker Swarm aren’t as intimidating as they sound