

Building modern web applications usually involves a lot of data. Managing these data (databases) during development and production can be a lot.
This is especially true if there's more than one developer, and multiple environments where changes have to be manually implemented.
Database migrations help developers manage these changes easily, across multiple environments and developers.
This article explains:
- What database migrations are.
- How to get started with database migrations in PHP using Phinx.
- How to manage tables in your database.
This article is meant for readers with basic PHP knowledge. It will help you learn to easily (and better) manage your databases.
What Are Database Migrations?
In basic terms, migrations contain changes that you wish to make to your database. These changes could be creating or dropping a table, adding or removing some field(s) from a table, changing column types, and many more.
These files make it easy to make these same changes across multiple systems as anyone with the files can just run them, and have their database updated.
So in a real life scenario, some developer on the team could make a change to the users table to allow the gender field to accept more than the default male and female options, maybe a third other option.
After making this change, the developer creates a migration. This migration includes changes that they have made to the database – in this case a change to a column on a table – and other developers can easily get this change to their own local databases by running the migrations.
Migrations are like version control for your database, allowing your team to define and share the application's database schema definition. If you have ever had to tell a teammate to manually add a column to their local database schema after pulling in your changes from source control, you've faced the problem that database migrations solve. - Laravel
Many popular web frameworks already have support for migrations built in. But in this article, we explore using migrations in vanilla PHP.
Learn more about database migrations here.
What Is Phinx?
Phinx is a PHP library that makes it ridiculously easy to manage the database migrations for your PHP app. - Phinx
Phinx makes it possible to manage migrations easily regardless of whether you're using a PHP framework or not. It is also very easy to install (as we will see later on).
It ships with a couple of commands to make operations easier. It is fully customisable (you can do whatever you want with it 🙃). It also works in multiple environments, meaning you can have some production migrations, testing migrations, and dev migrations.
Phinx Installation
You can add Phinx to any PHP project using composer.
$ mkdir php-migrations
$ cd php-migrations
$ composer init
The first command creates a folder in your current directory, php-migrations, and the second command moves into it. The last command starts an interactive shell.
Follow the prompt, filling in the details as required (the default values are fine). You can set the project description, author name (or contributors' names), minimum stability for dependencies, project type, license, and define your dependencies.
When you get to the dependencies part, install the robmorgan/phinx phinx package as a dependency.
Accept the other defaults and proceed to generating the composer.json file. The generated file should look like this currently:
{
    "name": "zubair/php-migrations",
    "description": "A simple tutorial on how to use and manage migrations in PHP applications.",
    "type": "project",
    "require": {
        "robmorgan/phinx": "^0.12.10"
    },
    "license": "ISC",
    "autoload": {
        "psr-4": {
            "Zubs\\": "src/"
        }
    },
    "authors": [
        {
            "name": "Zubs",
            "email": "zubairidrisaweda@gmail.com"
        }
    ]
}
Init Phinx
After installing Phinx, you need to initialise it. You can do this very easily using its binary installed in the vendor folder.
$ ./vendor/bin/phinx init
This creates phinx's configuration file as a PHP file. It could be created as a JSON file too. I prefer JSON for configurations, so I will use the JSON format.
$ ./vendor/bin/phinx init --format=json
Here's what the default configuration file looks like:
{
    "paths": {
        "migrations": "%%PHINX_CONFIG_DIR%%/db/migrations",
        "seeds": "%%PHINX_CONFIG_DIR%%/db/seeds"
    },
    "environments": {
        "default_migration_table": "phinxlog",
        "default_environment": "development",
        "production": {
            "adapter": "mysql",
            "host": "localhost",
            "name": "production_db",
            "user": "root",
            "pass": "",
            "port": 3306,
            "charset": "utf8"
        },
        "development": {
            "adapter": "mysql",
            "host": "localhost",
            "name": "development_db",
            "user": "root",
            "pass": "",
            "port": 3306,
            "charset": "utf8"
        },
        "testing": {
            "adapter": "mysql",
            "host": "localhost",
            "name": "testing_db",
            "user": "root",
            "pass": "",
            "port": 3306,
            "charset": "utf8"
        }
    },
    "version_order": "creation"
}
In this configuration file, notice how Phinx expects that you have a db/migrations path (for your migrations) by default. You can change this if you want, but I think it's fine and I'll be keeping it.
$ mkdir db && db/migrations
You can read more about these configurations in the official documentation.
Phinx also ships with commands for different actions to make it easier to use in our projects.
How to Create A Migration
Phinx uses classes for its migrations. To create a new migration (say, one to create a posts table), use the create command with the name of the migration.
$ ./vendor/bin/phinx create PostsTableMigration
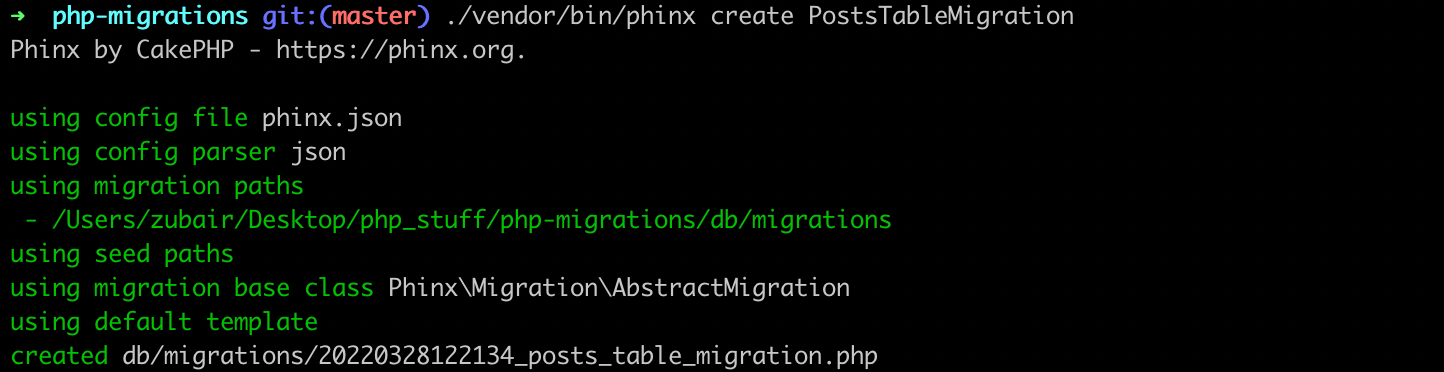 Creating A Migration
This creates a 20220328122134_posts_table_migration.php file in the db/migrations directory created earlier. This file is named using the YYYYMMDDHHMMSS_my_new_migration.php format. In this format, the first 14 characters, YYYYMMDDHHMMSS, are representations of the current timestamp.
The 20220328122134_posts_table_migration.php looks like this currently:
<?php
declare(strict_types=1);

use Phinx\Migration\AbstractMigration;

final class PostsTableMigration extends AbstractMigration
{
    /**
     * Change Method.
     *
     * Write your reversible migrations using this method.
     *
     * More information on writing migrations is available here:
     * https://book.cakephp.org/phinx/0/en/migrations.html#the-change-method
     *
     * Remember to call "create()" or "update()" and NOT "save()" when working
     * with the Table class.
     */
    public function change(): void
    {

    }
}
This file (and all other migrations created using Phinx) extends the Phinx\Migration\AbstractMigration class. This class has all the methods you need to interact with your database.
This migration file also includes a change method. This method was introduced recently to Phinx in version 0.2.0 to implements Phinx's idea of reversible migrations.
These are migration files with just one method, change, that contains logic for performing some action, leaving Phinx to figure out how to reverse it. Rather than the traditional use of two methods, up and down, to create and reverse actions.
Phinx still allows you use up and down methods. But it gives the change method preference over them when they are used together. It ignores them.
How to Manage Tables
Tables are the basis on which structured databases are built and are the most important part of what Phinx offers.
You can easily manage database tables using PHP code with Phinx. Phinx offers a powerful table() method. This method retrieves an instance of the Table object.
How to Create a Table
Creating a table is really easy using Phinx. You create a new instance of the Table object using the table() method with the table name.
$table = $this->table('posts');
Next, you can add columns with their settings.
$table->addColumn('title', 'string', ['limit' => 20])
    ->addColumn('body', 'text')
    ->addColumn('cover_image', 'string')
    ->addTimestamps()
    ->addIndex(['title'], ['unique' => true]);
Here, I've created columns title, body, cover_image, created_at, and updated_at. I also set the type of the title to be a string with 20 or fewer characters.
I set the body to be a text field, so it can hold long posts. The cover_image is also a string field that uses the default size of a string (255).
The created_at and updated_at fields are timestamps automatically generated in the addTimestamps() method.
Finally, I set the title field to be unique (as it would be in a real blog).
You can get all the available column types by checking the Valid Column Types. You can also get all the available column options by checking the Valid Column Options.
Finally, you can say that the database should be created by using the create method.
$table->create();
In the end, your migration file's change method should look like this:
public function change(): void
{
    $table = $this->table('posts');

    $table->addColumn('title', 'string', ['limit' => 20])
        ->addColumn('body', 'text')
        ->addColumn('cover_image', 'string')
        ->addTimestamps()
        ->addIndex(['title'], ['unique' => true]);

     $table->create();
}
We can now run this migration to create our table.
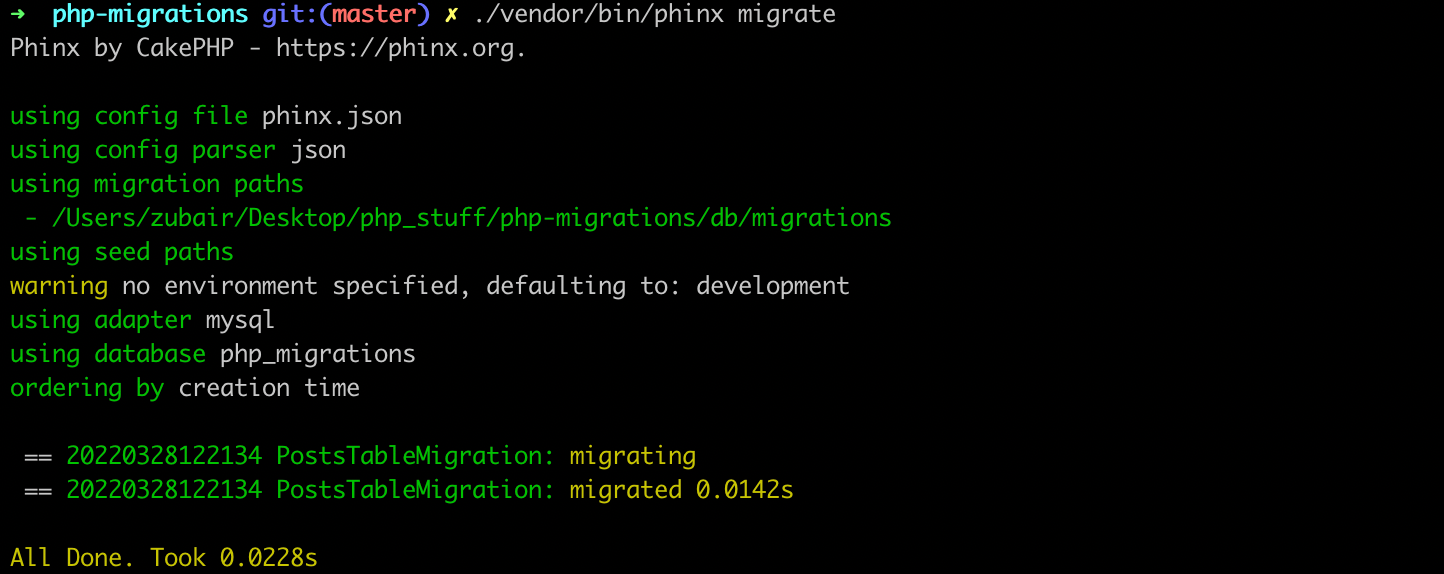
How to Run Migrations
After creating migrations, the next step is to enforce these desired changes in the database. Running migrations actually enforces these changes.
$ ./vendor/bin/phinx migrate
 Running a migration
This image shows the result of the migration. You can see the time taken to run the migration.
Now, if you check your database GUI tool, you'll notice that the posts table was created with an additional field, the id field. This field is also the primary field by default. And it also auto-increments.
 posts table.
You may change the primary key to some other key by either specifying some other field as the primary field, or by mapping the id field to the desired primary field. The latter includes the auto incrementing ability of the normal id field.
$table = $this->table('posts', [
    'id' => false,
    'primary_key' => ['posts_key']
]);

$table = $this->table('posts', [
    'id' => 'posts_key',
]);
In the first method, the primary key to be used has to be a column on the table (it is not auto-created).
You may also set which environment you want to run the migrations.
$ ./vendor/bin/phinx migrate -e testing
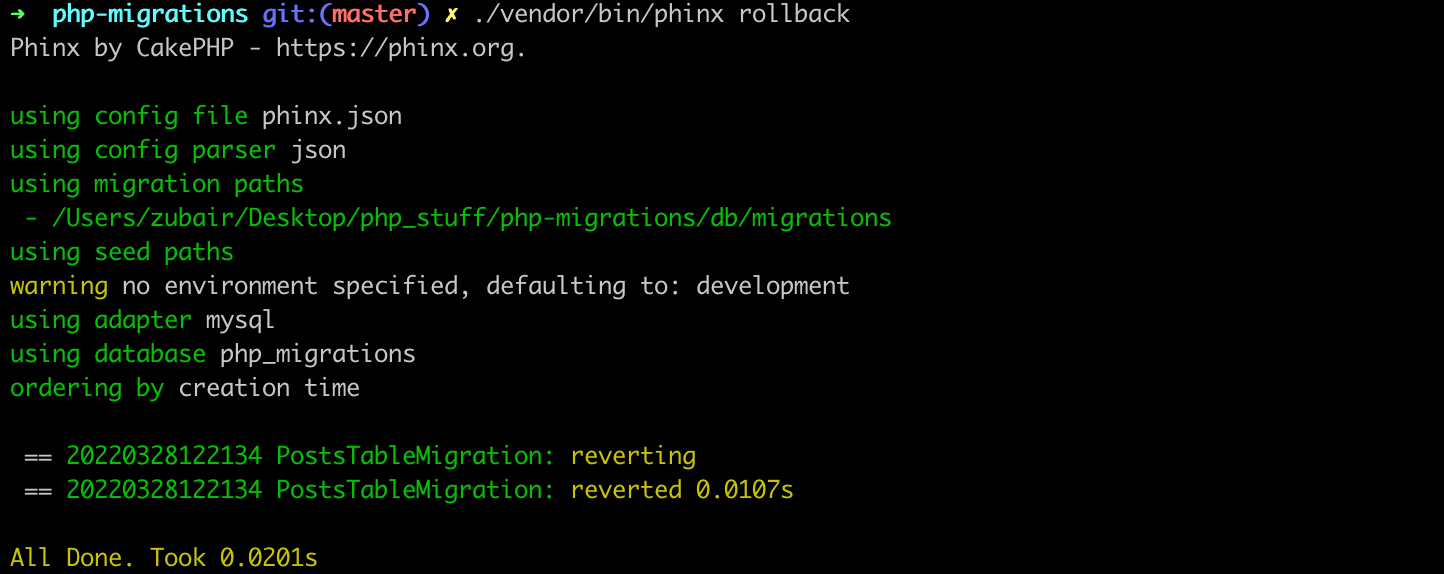
How to ReverseMigrations
Migrations can be reversed by being run down. This is the reverse of migrating up. The table previously created will be dropped, columns added will be removed, and the database will be returned to its initial pre-migration state.
$ ./vendor/bin/phinx rollback
 Reversing a migration
How to Check Migration Status
As your application size increases, it is expected that your database migrations will increase. Due to this, at some point, you may wish to check the status of your migrations, to know which have been run, and which have not.
$ ./vendor/bin/phinx status
 Checking migration status
How to Drop a Table
You can easily use the drop method, followed by the save method to persist the change, on the Table object.
$this->table('posts')->drop()->save();
How to Rename a Table
$table = $this->table('posts');

$table->rename('articles')
    ->update();
To drop a table, get the table. Then use the rename method with the new name, followed by the update method to persist this change.
How to Change a Table's Primary Key
You can also change a table's primary key very easily.
$table = $this->table('posts');

$table->changePrimaryKey('new_primary_key');

$table->update();
Conclusion
Now you know how to set up migrations in your PHP applications.
If you have any questions or relevant advice, please get in touch with me to share them.
To read more of my articles or follow my work, you can connect with me on LinkedIn, Twitter, and Github. It’s quick, it’s easy, and it’s free!