

I've been playing around with testing lately. One thing I tried to do was to test the endpoints of my Express application.
Setting up the test was the hard part. People who write about tests don't actually teach you how they set it up. I could not find any useful information about this, and I had to try and figure it out.
So today, I want to share the setup I created for myself. Hopefully, this can help you when you create your own tests.
Table of Contents
Setting up Jest and Supertest
First, let's talk about the stack.
The Stack
- I created my app with Express.
- I used Mongoose to connect to MongoDB
- I used Jest as my test framework.
You might have expected Express and Mongoose because everyone else seems to use those two frameworks. I used them too.
But why Jest and not other test frameworks?
Why Jest
I don't like Facebook, so I didn't want to try anything that was created by Facebook's team. I know it sounds silly, but that was the truth.
Before Jest, I tried out all sorts of test frameworks. I tried Tap, Tape, Mocha, Jasmine, and AVA. Each test framework has its own pros and cons. I almost ended up with AVA, but I didn't go with AVA because I found it hard to set up. Eventually, I tried Jest out because Kent C. Dodds recommended it.
I fell in love with Jest after trying it out. I love it because:
- It's easy to setup
- The watch-mode is amazing
- When you
console.logsomething, it actually shows up without any difficulty (this was a bitch with AVA).
Setting up Jest
First, you need to install Jest.
npm install jest --save-dev
Next, you want to add tests scripts to your package.json file. It helps to add the test and test:watch scripts (for one-off testing and watch-mode respectively).
"scripts": {
  "test": "jest",
  "test:watch": "jest --watch"
},
You can choose to write your test files in one of the following formats. Jest picks them up for you automatically.
jsfiles in the__tests__folder- files named with
test.js(likeuser.test.js) - files named with
spec.js(likeuser.spec.js)
You can place your files however you like. When I tested endpoints, I put the test files together with my endpoints. I found this easier to manage.
- routes
  |- users/
    |- index.js
    |- users.test.js
Writing your first test
Jest includes describe, it and expect for you in every test file. You don't have to require them.
describelets you wrap many tests together under one umbrella. (It is used for organizing your tests).itlets you run a test.expectlets you perform assertions. The test passes if all assertions passes.
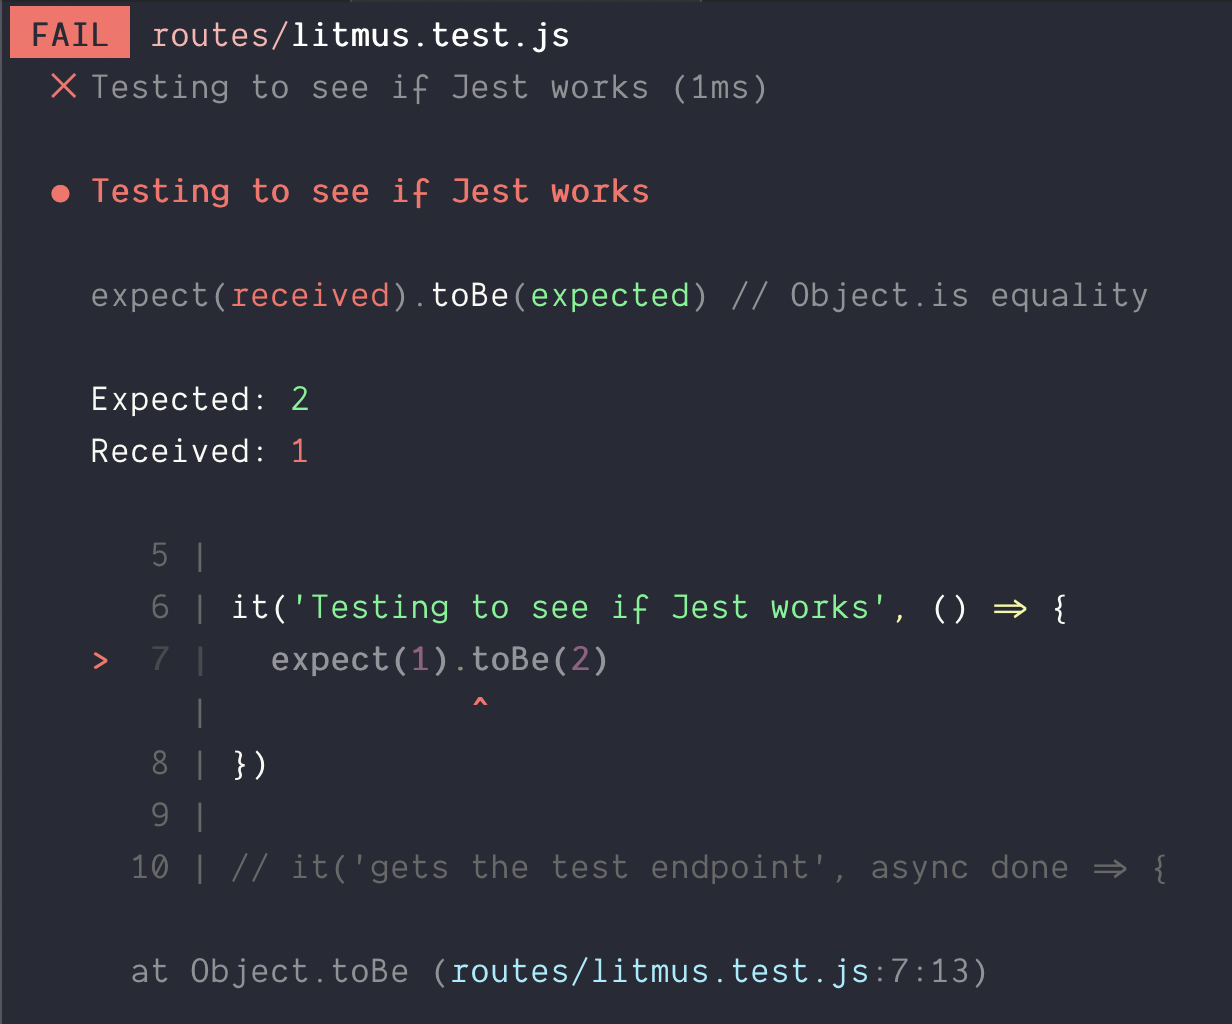
Here's an example of a test that fails. In this example, I expect that 1 should be strictly equal to 2. Since 1 !== 2, the test fails.
// This test fails because 1 !== 2
it("Testing to see if Jest works", () => {
  expect(1).toBe(2);
});
You'll see a failing message from Jest if you run Jest.
npm run test:watch
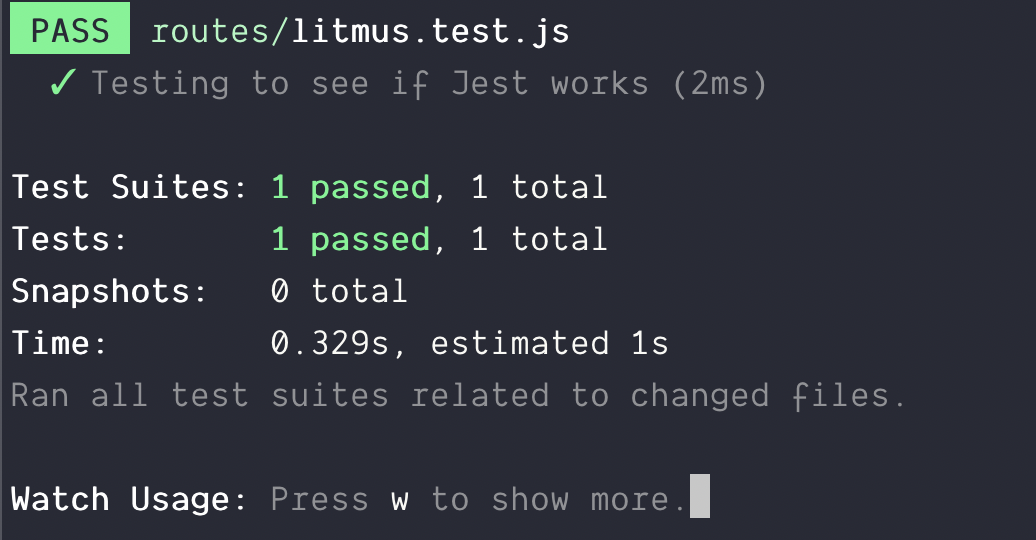
You can make the test pass by expecting 1 === 1.
// This passes because 1 === 1
it("Testing to see if Jest works", () => {
  expect(1).toBe(1);
});
This is the most basic of tests. It's not useful at all because we haven't testing anything real yet.
Asynchronous tests
You need to send a request to test an endpoint. Requests are asynchronous, which means you must be able to conduct asynchronous tests.
This is easy with Jest. There are two steps:
- Add the
asynckeyword - Call
donewhen you're done with your tests
Here's what it can look like:
it("Async test", async done => {
  // Do your async tests here

  done();
});
Note: Here's an article on Async/await in JavaScript if you don't know how to use it.
Testing Endpoints
You can use Supertest to test endpoints. First, you need to install Supertest.
npm install supertest --save-dev
Before you can test endpoints, you need to setup the server so Supertest can use it in your tests.
Most tutorials teach you to listen to the Express app in the server file, like this:
const express = require("express");
const app = express();

// Middlewares...
// Routes...

app.listen(3000);
This doesn't work because it starts listening to one port. If you try to write many test files, you'll get an error that says "port in use".
You want to allow each test file to start a server on their own. To do this, you need to export app without listening to it.
// server.js
const express = require("express");
const app = express();

// Middlewares...
// Routes...

module.exports = app;
For development or production purposes, you can listen to your app like normal in a different file like start.js.
// start.js
const app = require("./server.js");
app.listen(3000);
Using Supertest
To use Supertest, you require your app and supertest in the test file.
const app = require("./server"); // Link to your server file
const supertest = require("supertest");
const request = supertest(app);
Once you do this, you get the ability to send GET, POST, PUT, PATCH and DELETE requests. Before we send a request, we need to have an endpoint. Let's say we have a /test endpoint.
app.get("/test", async (req, res) => {
  res.json({ message: "pass!" });
});
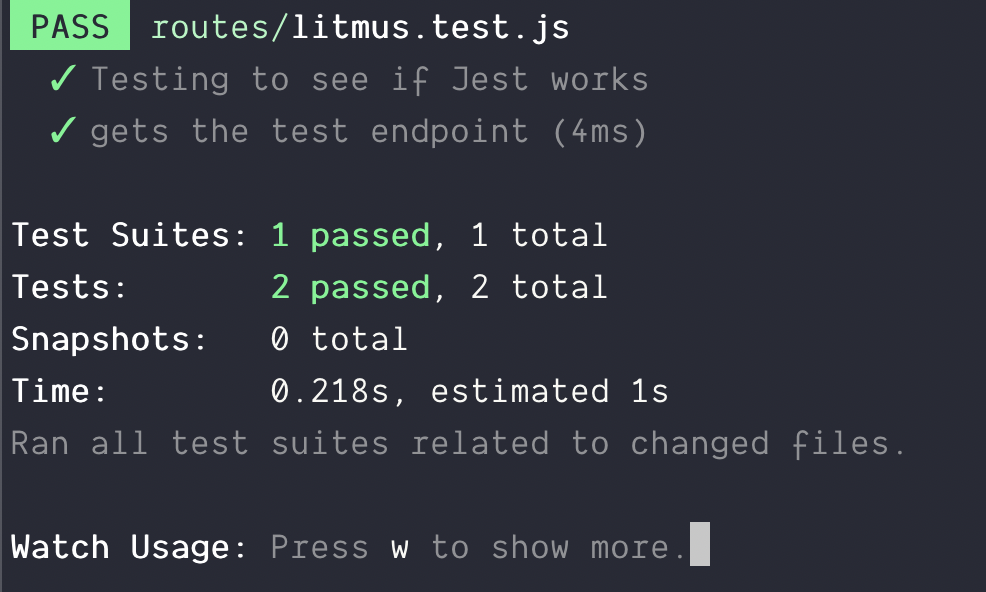
To send a GET request to /test, you use the .get method from Supertest.
it("Gets the test endpoint", async done => {
  // Sends GET Request to /test endpoint
  const res = await request.get("/test");

  // ...
  done();
});
Supertest gives you a response from the endpoint. You can test both HTTP status and the body (whatever you send through res.json) like this:
it("gets the test endpoint", async done => {
  const response = await request.get("/test");

  expect(response.status).toBe(200);
  expect(response.body.message).toBe("pass!");
  done();
});
Connecting Jest and Mongoose
The hard part about testing a backend application is setting up a test database. It can be complicated.
Today, I want to share how I setup Jest and Mongoose.
Setting up Mongoose with Jest
Jest gives you a warning if you try to use Mongoose with Jest.

If you don't want to see this error, you need to set testEnvironment to node in your package.json file.
"jest": {
  "testEnvironment": "node"
}
Setting up Mongoose in a test file
You want to connect to a database before you begin any tests. You can use the beforeAll hook to do so.
beforeAll(async () => {
  // Connect to a Mongo DB
});
To connect to a MongoDB, you can use Mongoose's connect command.
const mongoose = require("mongoose");
const databaseName = "test";

beforeAll(async () => {
  const url = `mongodb://127.0.0.1/${databaseName}`;
  await mongoose.connect(url, { useNewUrlParser: true });
});
This creates a connection to the database named test. You can name your database anything. You'll learn how to clean them up later.
Note: Make sure you have an active local MongoDB Connection before you test. Your tests will fail if you don't have an active local MongoDB Connection. Read this to learn how to create a local MongoDB connection.
Creating databases for each test file
When you test, you want to connect to a different database for each test file, because:
- Jest runs each test file asynchronously. You won't know which file comes first.
- You don't want tests to share the same database. You don't want data from one test file to spill over to the next test file.
To connect to a different database, you change the name of the database.
// Connects to database called avengers
beforeAll(async () => {
  const url = `mongodb://127.0.0.1/avengers`;
  await mongoose.connect(url, { useNewUrlParser: true });
});
// Connects to database power-rangers
beforeAll(async () => {
  const url = `mongodb://127.0.0.1/power-rangers`;
  await mongoose.connect(url, { useNewUrlParser: true });
});
Sending a POST request
Let's say you want to create a user for your app. The user has a name and an email address. Your Mongoose Schema might look like this:
const mongoose = require("mongoose");
const Schema = mongoose.Schema;

const userSchema = new Schema({
  name: String,
  email: {
    type: String,
    require: true,
    unique: true
  }
});

module.exports = mongoose.model("User", userSchema);
To create a user, you need to save the name and email into MongoDB. Your route and controller might look like this:
const User = require("../model/User"); // Link to your user model

app.post("/signup", async (req, res) => {
  const { name, email } = req.body;
  const user = new User({ name, email });
  const ret = await user.save();
  res.json(ret);
});
To save the user into the database, you can send a POST request to signup. To send a post request, you use the post method. To send data along with the POST request, you use the send method. In your tests, it'll look like this.
it("Should save user to database", async done => {
  const res = await request.post("/signup").send({
    name: "Zell",
    email: "testing@gmail.com"
  });
  done();
});
Note: If you run this code two times, you'll get an E1100 duplicate key error. This error occurred because:
- We said the
emailshould beuniquein the Schema above. - We tried to create another user with
testing@gmail.com. even though one already exists in the database. (The first one was created when you sent the first request).

Cleaning up the database between tests
You want to remove entries from the database between each test. This ensures you always start with an empty database.
You can do this with the afterEach hook.
// Cleans up database between each test
afterEach(async () => {
  await User.deleteMany();
});
In this code above, we only cleared the User collection in the database. In a real scenario, you want to clear all collections. You can use the following code to do so:
async function removeAllCollections() {
  const collections = Object.keys(mongoose.connection.collections);
  for (const collectionName of collections) {
    const collection = mongoose.connection.collections[collectionName];
    await collection.deleteMany();
  }
}

afterEach(async () => {
  await removeAllCollections();
});
Testing the Endpoint
Let's begin our tests. In this test, we will send a POST request to the /signup endpoint. We want to make sure:
- The user gets saved to the database
- The returned object contains information about the user
Checking if the user was saved to the database
To check whether the user gets saved into the database, you search the database for the user.
const User = require("../model/User"); // Link to your user model

it("Should save user to database", async done => {
  const res = await request.post("/signup").send({
    name: "Zell",
    email: "testing@gmail.com"
  });

  // Searches the user in the database
  const user = await User.findOne({ email: "testing@gmail.com" });

  done();
});
If you console.log user, you should see something like this:
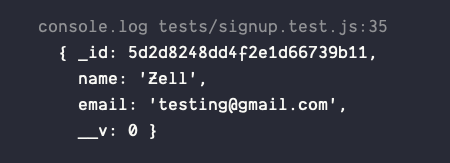
This means our user got saved to the database. If we want to confirm the user has a name and an email, we can do expect them to be true.
it("Should save user to database", async done => {
  // Sends request...

  // Searches the user in the database
  const user = await User.findOne({ email: "testing@gmail.com" });
  expect(user.name).toBeTruthy();
  expect(user.email).toBeTruthy();

  done();
});
Checking if the returned object contains the information about the user
We want to make sure the returned object contains the user's name and email address. To do this, we check the response from the post request.
it("Should save user to database", async done => {
  // Sends request...

  // Searches the user in the database...

  // Ensures response contains name and email
  expect(res.body.name).toBeTruthy();
  expect(res.body.email).toBeTruthy();
  done();
});
We're done with our tests now. We want to delete the database from MongoDB.
Deleting the database
To delete the database, you need to ensure there are 0 collections in the database. We can do this by dropping each collection we used.
We'll do after all our tests have run, in the afterAll hook.
afterAll(async () => {
  // Removes the User collection
  await User.drop();
});
To drop all your collections you can use this:
async function dropAllCollections() {
  const collections = Object.keys(mongoose.connection.collections);
  for (const collectionName of collections) {
    const collection = mongoose.connection.collections[collectionName];
    try {
      await collection.drop();
    } catch (error) {
      // This error happens when you try to drop a collection that's already dropped. Happens infrequently.
      // Safe to ignore.
      if (error.message === "ns not found") return;

      // This error happens when you use it.todo.
      // Safe to ignore.
      if (error.message.includes("a background operation is currently running"))
        return;

      console.log(error.message);
    }
  }
}

// Disconnect Mongoose
afterAll(async () => {
  await dropAllCollections();
});
Finally, you want to close the Mongoose connection to end the test. Here's how you can do it:
afterAll(async () => {
  await dropAllCollections();
  // Closes the Mongoose connection
  await mongoose.connection.close();
});
That's everything you need to do to setup Mongoose with Jest!
Refactoring
There's a lot of code that goes into beforeEach, afterEach, and afterAll hooks. We will be using them for every test file. It makes sense to create a setup file for these hooks.
// test-setup.js
const mongoose = require("mongoose");
mongoose.set("useCreateIndex", true);
mongoose.promise = global.Promise;

async function removeAllCollections() {
  const collections = Object.keys(mongoose.connection.collections);
  for (const collectionName of collections) {
    const collection = mongoose.connection.collections[collectionName];
    await collection.deleteMany();
  }
}

async function dropAllCollections() {
  const collections = Object.keys(mongoose.connection.collections);
  for (const collectionName of collections) {
    const collection = mongoose.connection.collections[collectionName];
    try {
      await collection.drop();
    } catch (error) {
      // Sometimes this error happens, but you can safely ignore it
      if (error.message === "ns not found") return;
      // This error occurs when you use it.todo. You can
      // safely ignore this error too
      if (error.message.includes("a background operation is currently running"))
        return;
      console.log(error.message);
    }
  }
}

module.exports = {
  setupDB(databaseName) {
    // Connect to Mongoose
    beforeAll(async () => {
      const url = `mongodb://127.0.0.1/${databaseName}`;
      await mongoose.connect(url, { useNewUrlParser: true });
    });

    // Cleans up database between each test
    afterEach(async () => {
      await removeAllCollections();
    });

    // Disconnect Mongoose
    afterAll(async () => {
      await dropAllCollections();
      await mongoose.connection.close();
    });
  }
};
You can import the setup file for each test like this:
const { setupDB } = require("../test-setup");

// Setup a Test Database
setupDB("endpoint-testing");

// Continue with your tests...
There's one more thing I want to show you.
When you create tests, you want to seed the database with fake data.
Seeding a database
When you write tests for the backend, you need to test for four different kinds of operations:
- Create (for adding things to the database)
- Read (for getting things from the database)
- Update (for changing the database)
- Delete (for deleting things from the database)
The easiest type to test for is create operations. You put something into the database and test whether it's there.
For the other three types of operations, you need to put something into the database before you write the test.
Putting things into the database
The process where you add things to a database is called seeding a database.
Let's say you want to add three users to the database. These users contain a name and an email address.
const users = [
  {
    name: "Zell",
    email: "testing1@gmail.com"
  },
  {
    name: "Vincy",
    email: "testing2@gmail.com"
  },
  {
    name: "Shion",
    email: "testing3@gmail.com"
  }
];
You can use your models to seed the database at the start of the test.
const User = require("../model/User"); // Link to User model

it("does something", async done => {
  // Add users to the database
  for (const u of users) {
    const user = new User(u);
    await user.save();
  }

  // Create the rest of your test here
});
If you need these users for every test, the best way is to add them through the beforeEach hook. The beforeEach hook runs before every it declaration.
// Seed the database with users
beforeEach(async () => {
  for (u of users) {
    const user = new User(u);
    await user.save();
  }
});
You can also use Mongoose's create function to do the same thing. It runs new Model() and save(), so the code below and the one above does the same thing.
// Seed the database with users
beforeEach(async () => {
  await User.create(users);
});
create vs insertMany
Mongoose has a second method to help you seed the database. This method is called insertMany. insertMany is faster than create, because:
insertManysends one operation to the servercreatesends one operation for each document
However, insertMany does not run the save middleware.
Is triggering the save middleware important?
This depends on your seed data. If your seed data needs to go through the save middleware, you need to use create. For example, let's say you want to save a user's password into the database. You have this data:
const users = [
  {
    name: "Zell",
    email: "testing1@gmail.com",
    password: "12345678"
  },
  {
    name: "Vincy",
    email: "testing2@gmail.com",
    password: "12345678"
  },
  {
    name: "Shion",
    email: "testing3@gmail.com",
    password: "12345678"
  }
];
When we save a user's password into the database, we want to hash the password for security reasons. We usually hash the password through the save middleware.
// Hashes password automatically
userSchema.pre("save", async function(next) {
  if (!this.isModified("password")) return next();
  const salt = bcrypt.genSaltSync(10);
  const hashedPassword = bcrypt.hashSync(password, salt);
  this.password = hashedPassword;
});
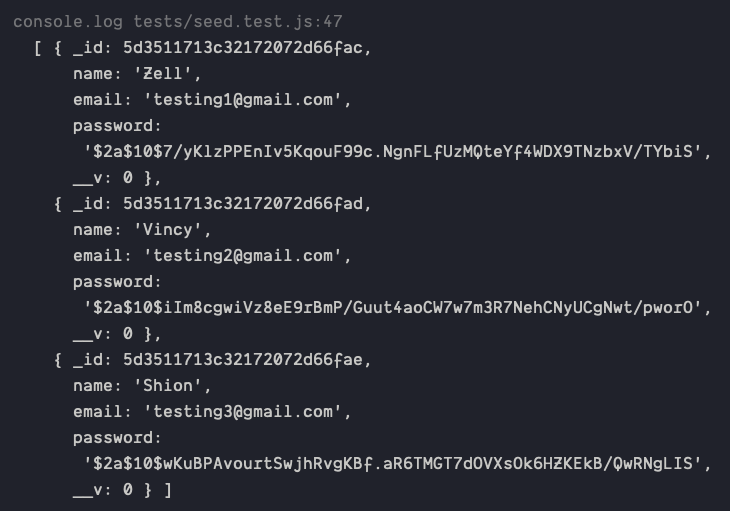
If you use create, you'll get users with hashed passwords:
If you use insertMany, you'll get users without hashed passwords:

When to use create, when to use insertMany
Since insertMany is faster than create, you want to use insertMany whenever you can.
Here's how I do it:
- If seed data does not require the
savemiddleware, useinsertMany. - If seed data requires
savemiddleware, usecreate. Then, overwrite seed data so it no longer requires thesavemiddleware.
For the password example above, I would run create first. Then, I copy-paste the hashed password seed data. Then, I'll run insertMany from this point onwards.
If you want to overwrite complicated seed data, you might want to get JSON straight from MongoDB. To do this, you can use mongoexport:
mongoexport --db <databaseName> --collection <collectionName> --jsonArray --pretty --out output.json
This says:
- Export
<collection>from<databaseName> - Creates output as a JSON Array, prettified, in a file called
output.json. This file will be placed in the folder where you run the command.
Seeding multiple test files and collections
You want a place to store your seed data so you can use them across all your tests and collections. Here's a system I use:
- I name my seed files according to their models. I seed a
Usermodel with theuser.seed.jsfile. - I put my seed files in the
seedsfolder - I loop through each seed file to seed the database.
To loop through each seed file, you need to use the fs module. fs stands for filesystem.
The easiest way to loop through the files is to create an index.js file in the same seeds folder. Once you have the index.js file, you can use the following code to look for all files with *.seed.js
const fs = require("fs");
const util = require("util");

// fs.readdir is written with callbacks.
// This line converts fs.readdir into a promise
const readDir = util.promisify(fs.readdir);

async function seedDatabase() {
  // Gets list of files in the directory
  // `__dirname` points to the `seeds/` folder
  const dir = await readDir(__dirname);

  // Gets a list of files that matches *.seed.js
  const seedFiles = dir.filter(f => f.endsWith(".seed.js"));
}
Once you have a list of seed files, you can loop through each seed file to seed the database. Here, I use a for...of loop to keep things simple.
async function seedDatabase() {
  for (const file of seedFiles) {
    // Seed the database
  }
}
To seed the database, we need to find the correct Mongoose model from the name of the seed file. A file called user.seed.js should seed the User model. This means:
- We must find
userfromuser.seed.js - We must capitalize
userintoUser
Here's a crude version that does what's required. (If you want to, you can make the code more robust with regex instead of split).
for (const file of seedFiles) {
  const fileName = file.split(".seed.js")[0];
  const modelName = toTitleCase(fileName);
  const model = mongoose.models[modelName];
}
Next, we want to make sure each file has a Model that corresponds to it. If the model cannot be found, we want to throw an error.
for (const file of seedFiles) {
  //...
  if (!model) throw new Error(`Cannot find Model '${modelName}'`);
}
If there's a corresponding model, we want to seed the database with the contents in the seed file. To do this, we need to read the seed file first. Here, since I used the .js extension, I can simply require the file.
for (const file of seedFiles) {
  //...
  const fileContents = require(path.join(__dirname, file));
}
For this to work, my seed files must export an array of data.
module.exports = [
  {
    name: "Zell",
    email: "testing1@gmail.com",
    password: "12345678"
  },
  {
    name: "Vincy",
    email: "testing2@gmail.com",
    password: "12345678"
  },
  {
    name: "Shion",
    email: "testing3@gmail.com",
    password: "12345678"
  }
];
Once I have the contents of the seed file, I can run create or insertMany.
async function seedDatabase(runSaveMiddleware = false) {
  // ...
  for (const file of seedFiles) {
    // ...

    runSaveMiddleware
      ? model.create(fileContents)
      : model.insertMany(fileContents);
  }
}
Here's the whole seedDatabase code:
const fs = require("fs");
const util = require("util");
const readDir = util.promisify(fs.readdir).bind(fs);
const path = require("path");
const mongoose = require("mongoose");

function toTitleCase(str) {
  return str.replace(/\w\S*/g, txt => {
    return txt.charAt(0).toUpperCase() + txt.substr(1).toLowerCase();
  });
}

async function seedDatabase(runSaveMiddleware = false) {
  const dir = await readDir(__dirname);
  const seedFiles = dir.filter(f => f.endsWith(".seed.js"));

  for (const file of seedFiles) {
    const fileName = file.split(".seed.js")[0];
    const modelName = toTitleCase(fileName);
    const model = mongoose.models[modelName];

    if (!model) throw new Error(`Cannot find Model '${modelName}'`);
    const fileContents = require(path.join(__dirname, file));

    runSaveMiddleware
      ? await model.create(fileContents)
      : await model.insertMany(fileContents);
  }
}
Why JS, not JSON?
It's the industry norm to use JSON to store data. In this case, I find it easier to use JavaScript objects because:
- I don't have to write opening and closing double-quotes for each property.
- I don't have to use double-quotes at all! (It's easier to write single-quotes because there's no need to press the shift key).
// Which is easier to write. JavaScript objects or JSON?

// JavaScript objects
module.exports = [
  {
    objectName: "property"
  }
][
  // JSON
  {
    objectName: "property"
  }
];
If you want to use JSON, make sure you change seedDatabase to work with JSON. (I'll let you work through the code yourself).
Adjusting the setupDB function
Earlier, I created a setupDB function to help set up databases for my tests. seedDatabase goes into the setupDB function since seeding is part of the setting up process.
async function seedDatabase(runSaveMiddleware = false) {
  // ...
}

module.exports = {
  setupDB(databaseName, runSaveMiddleware = false) {
    // Connect to Mongoose
    beforeAll(/*...*/);

    // Seed Data
    beforeEach(async () => {
      await seedDatabase(runSaveMiddleware);
    });

    // Cleans up database between each test
    afterEach(/*...*/);

    // Disconnect Mongoose
    afterAll(/*...*/);
  }
};
A Github Repository
I created a Github repository to go with this article. I hope this demo code helps you start testing your applications.
Thanks for reading. This article was originally posted on my blog. Sign up for my newsletter if you want more articles to help you become a better frontend developer.