By Jonathan Sexton
You’ve applied the “final” touches (as if any project is ever really finished…haha) to your portfolio and it looks great. You have some great projects listed. All of your contact info is there, and that one quote you searched hours for complements the flow so well.
Now, the only issue you have is it’s still on your local machine. You’re the only person who can see how your hard work came to fruition.
I’m here to help you change that with this article. Let’s get the formalities out of the way before we dig into the heart of this article.
As with all of my written work, I do not have any relationship or commercial interest with any of the services or platforms linked in this article. I do not receive any type of compensation for linking to these resources. I did some research and came up with the works linked herein.
There are, of course, alternatives to everything I have linked here. As always, I encourage you to do your own research and never take anything at face value.
We’ll look at two options for hosting your portfolio. Out of the two, the GitHub route requires significantly less work.
However, there are pros and cons to both that should be considered before making your choice.
Let’s dissect which option works best for you and your situation.
GitHub Pages
With less than ten actions, you can have a website publicly accessible through GitHub Pages. Let’s get started.
- Log into your GitHub account (if you don’t have one, it takes less than 5 minutes to set one up)
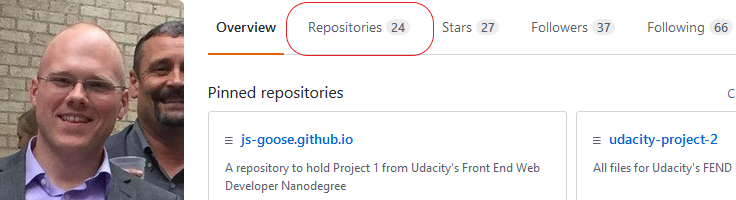
- Once logged in, click on Repositories section
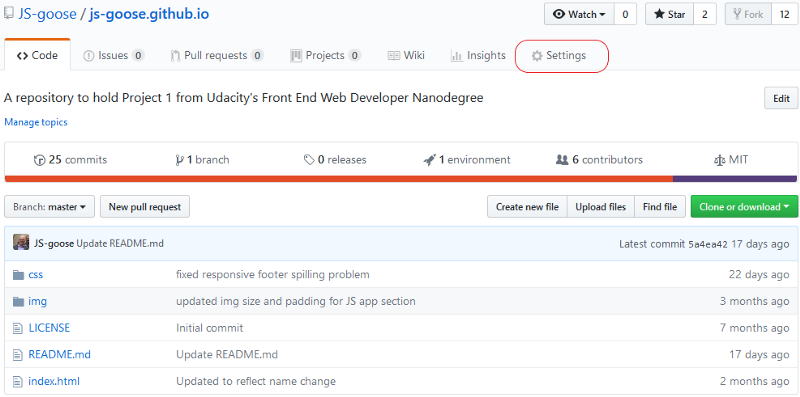
- Select the repository you want to use. In this article, it should be the one where your portfolio is hosted. But, you can publicly host any project.
- Once you are on the repo homepage, in the top right corner click Settings tab
- On the settings tab, scroll down to the section called GitHub Pages. Under the Source section, select the branch you want to host. (If you’re like me, there are several branches in most of your repos where you might try out new ideas or techniques. This option gives you the ability to select different branches to host). Click save.
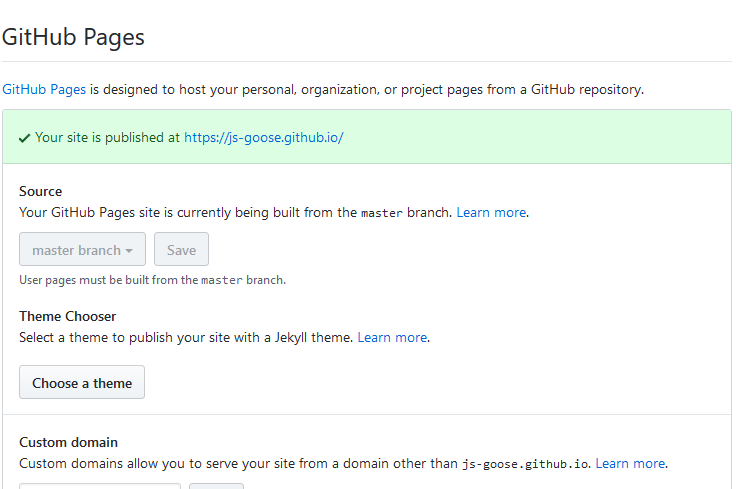
- You should receive a message with a green check mark beside it. It will tell you the action was successful and give the address for your newly hosted portfolio!
It could take up to 10 minutes for the site to become live — so be patient!
However, once it has loaded, you are set. If you wish to make changes to your portfolio, you can do them locally (on your machine). Then, just push changes to the repo. You could also make them directly in GitHub’s editor right on the webpage. These changes will be live within five minutes of you pushing them.
You can also use a custom domain name with the GitHub Pages hosting, but there is a little more work involved. That topic is beyond the scope of this article — but it is possible.
Congratulations! Your portfolio is now live for you to show off to the world!
Self hosted through a service
If you prefer not to go through GitHub Pages, there is another simple option you can use to show your portfolio off to the world.
This option involves a little more work and is not free. However, this option offers a finer amount of control and some extra goodies if you choose to take advantage of them.
Let’s get started!
If you haven’t already, you need to buy a domain name from one of the thousands of name marketplaces around the web. There are quite a few around, and a simple search will yield many great results.
When purchasing a domain name, you are given several options about how long you’d like to “rent” the name. If this is your first time purchasing a domain name, I would strongly encourage you to only pay for a year at most.
The reason I say this is because you may change your mind about the name you buy. You may want to rebrand, you may decide that you’re no longer interested in having your own paid domain name. In which case, you are stuck with that name.
This doesn’t mean you can’t purchase more domains — it just means you’ll have paid for something you didn’t have to. I have changed domain names twice now, and I’m happy I only chose to have them for a year.
When purchasing a domain name you should focus your attention on a service that offers free domain privacy (also called WHOIS protection). This is an important step to protecting your information against spam email/phone calls/physical mail.
Many times the provider you purchase your domain name from will also offer hosting packages. For the sake of simplicity, I would advise you to get your domain name and hosting package from the same provider.
You are not required to do this. However, if you choose separate domain name registrars and hosting package providers there are a few extra steps — ones which are beyond the scope of this article.
The hosting package you choose should be relative to your needs. In this case, you’ll only need something small that will host one site for now. You can always upgrade in the future.
So, you’ve purchased your domain name and your hosting package — now what? The images below are taken from my personal hosting platform Eco Web Hosting. They are a UK company and I believe in and support their mission. As I said before, I have no financial compensation in linking to their platform. I simply enjoy their service and their products.
Whichever hosting solution you choose may look different, but all of the steps are viable no matter where you choose to land.
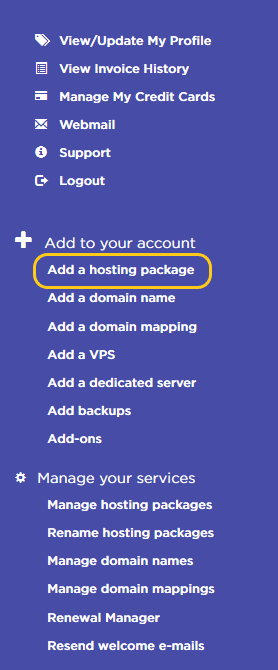
- Once logged into your account, look for something like “add new hosting package” or “create new hosting”
- Click that and come to the screen for you to provide details
- This section will ask for the domain name (which you purchased earlier) and where to send the welcome e-mail to (this e-mail will contain control panel log in information and other important information. Make sure to keep it for your records — you will need it later!).
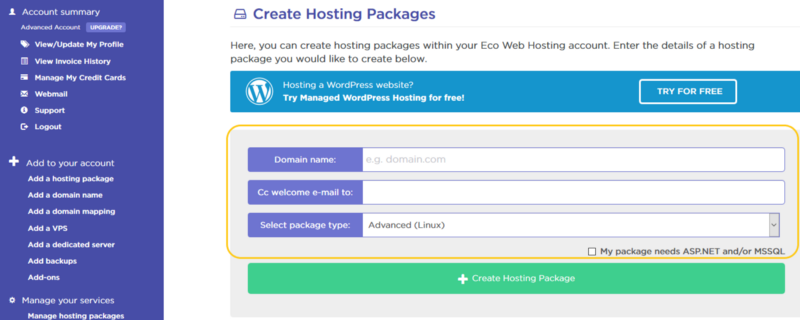
- Unless you specifically need ASP.NET or MSSQL, make sure to leave it as Linux for the package type
- You will get an e-mail with important information regarding all of the particulars about the hosting package you created
- Once you get it, follow the link to your control panel — again yours may look different but most have the same icons/links
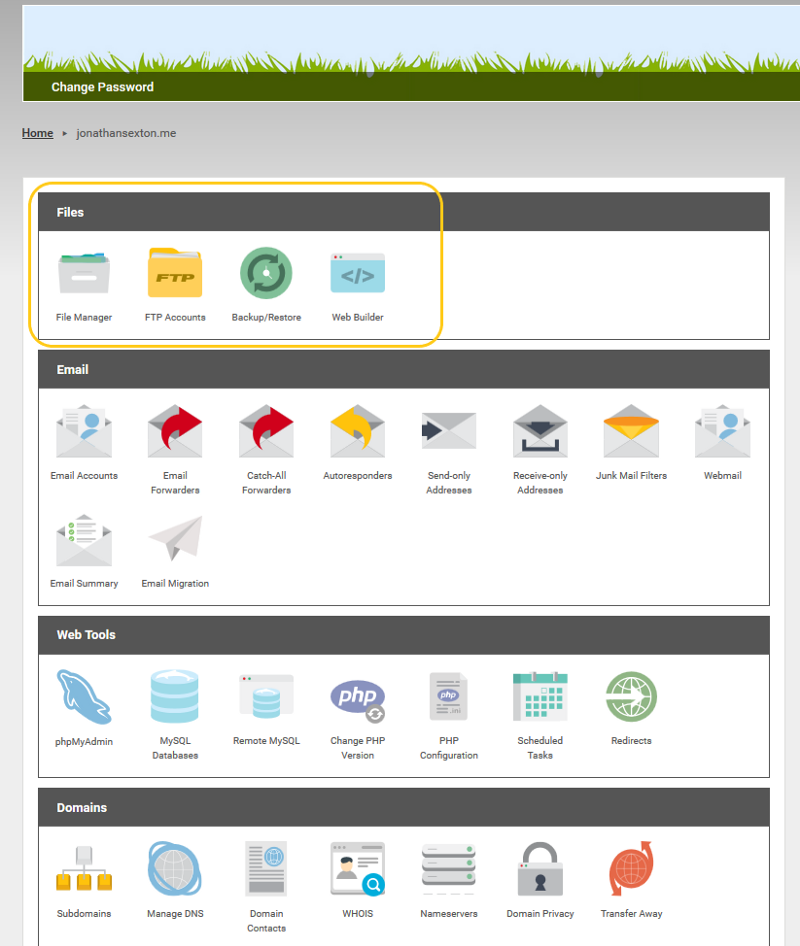
- The file manager is where all of the files for your website will be stored. You can either copy/paste from your local files, or you can upload them from an FTP client such as FileZilla. There are many free alternatives, but this is the one I use and like.
- If you choose to go the route of using an FTP client, you will need to set up an FTP account through your hosting package. Once you have set it up, within your FTP client you will need to provide the credentials (IP address, name, password, etc)
- You might also have to unlock FTP access — my host locks FTP access by default. I can unlock it for a period of time ranging between one hour and 28 days.
If you are uncomfortable using FTP and want to get your portfolio up and running, you can always just copy and paste your files into the file manager.
This is a less optimal way of getting the files on the server but it is just as effective. The files will need the same file structure as they have on your local machine in order to work properly.
Once your files have been uploaded or you’ve copy/pasted them ensure that you upload any images you want to use in the same fashion.
Congratulations! You have a new portfolio to showcase your work and to show the world!
The email that you got from your hosting package and/or the one you got when you purchased your domain name is extremely important. You’ll need to store it in a safe place. It contains all of your login information for your hosting package. If you lose it you can get another one sent, but it’s easier to just not lose the first one :)
Also, you should receive a follow up email from ICANN (Internet Corporation for Assigned Names and Numbers) anywhere from 2 to 14 days after you purchase your domain name. This organization is responsible for “coordinating the maintenance and procedures of several databases related to the namespaces and numerical spaces of the Internet, ensuring the network’s stable and secure operation”.
What you need to know is that if you fail to register or claim your domain with ICANN, your site will be inaccessible. So keep an eye out for it and ensure you follow the instructions within it.
Wrapping up
If, at any point, you need some help or would like to ask a question I’d be more than happy to help if I can. My contact info is in my profile. I can’t promise you results but I’ll do my best to help get your portfolio online!
I hope this article has been helpful for you and you’re proud of yourself for taking a large step in establishing your online presence. Make sure you drop a comment with a link to your portfolio — I’d love to check it out!
Please consider donating some claps as it helps others find my work. I’d also love to hear from you! Drop a comment or shout at me on Twitter — I’m always happy to connect with friendly faces and fellow developers!
I also have a blog where I post technical articles relating to front-end web development. You can sign up for my newsletter to stay up to date on all my writing adventures. Make sure to drop by and say hello!
As always, have a fantastic day full of coding, love, family, and happiness!