
By Elie Steinbock
I recently went through the challenge and ordeal of having to scale my Meteor app. It’s a project that had already been running in production for about a year. This summer the app became a lot more popular with thousands of preseason signups. My initial setup could no longer handle the load and I was faced with a scaling problem that had to be solved quickly.
This article describes the process I went through and some of the things I learnt along the way and my hope is that it will help others that face similar challenges in the future. It will cover the basics, such as what scaling is, and how load balancing works. It will also walk you through some basic setups, and show you how to scale your Meteor app.
Before the summer I didn’t have any prior experience scaling apps, and despite the fact that I had read up about the topic quite a bit, when I had to actually sit down and start dealing with the challenges myself I felt quite lost and wasn’t sure I’d be able to fix the problems. I also felt that many of the articles I had read online assumed a fair amount of knowledge that I didn’t yet have.
My hope is that this article will help bridge some of that gap. I’m far from an expert on scaling Meteor applications, but I hope this article provides value to others that find themselves in a similar situation to the one I found myself in.
Background
A bit of background about the app under discussion. It’s a draft-style fantasy football game for the English Premier League (soccer). Most of the signups happen the month before the season starts. Apart from all the signups, nearly all the drafts also happen in this month. The draft is when all users in a league come online to pick their team. Users pick their football players one at a time and the entire process is live with each user having between 30 seconds and 5 minutes per player pick.
At peak times the site had over 500 concurrent users online and 20 simultaneously drafts running. If the server becomes unresponsive during a draft, it completely ruins the user’s experience with players being picked for him automatically that he didn’t necessarily intend on picking, so it was extremely important to avoid this.
So What Is Scaling?
To many this might seem obvious, but not so long ago, I had no idea what this buzzword meant.
Scaling is what happens when your app takes off. Your server can only handle so much load. What happens when 10,000 people want to use your app at the same time? Your server won’t be able to handle it, so you either need to get a better server, or get more servers to run the app. This process is called scaling.
There are two ways to scale an app. One is known as vertical scaling, and the other is known as horizontal scaling. Vertical scaling involves getting a more powerful server. Horizontal scaling involves serving your site from multiple servers.
To use an analogy, if you have a shop and employ one worker and want to be able to serve more customers, you can either get a better, faster worker (vertical scaling), or you can hire more employees (horizontal scaling).
For web apps, vertical scaling is usually easier to do. At hosting companies such as DigitalOcean or AWS (Amazon Web Services), you can easily upgrade your virtual private server to a stronger configuration with increased RAM, CPUs and storage.
The problem with this approach is that there’s always a limit to how powerful you can make your server. At some point you’re going to have to scale horizontally. Using the example above, your business can only go so far with a single employee. At a certain point you’re going to have to hire more staff members.
When it comes to Meteor apps, you’re going to have to scale horizontally fairly early on. A Meteor app is really just a NodeJS app and therefore runs in a single process which means it can only make use of a single processor.
We can make use of multiple processors by running multiple instances of our app at the same time. These processors could belong to the same server or spread across multiple different servers. Running multiple instances of an app means running the same app on different IPs or ports, and spreading the load over the different instances of the app. All instances of the app still connect to the same database and all connected clients will instantly receive any database updates irrespective of the app instance they’re connected to (assuming you’re using MongoDB’s Oplog tailing feature. Otherwise the updates might take a few seconds).
Whether we run multiple instances of our app on a single server with multiple cores, or run multiple instances on multiple servers, what we’ve done is horizontal scaling and things work the same way in both cases.
Each platform will have its own scaling challenges. This article is about scaling Meteor apps. On other platforms you’ll be able to get away with vertical scaling for far longer. StackOverflow runs on 25 servers and could even make do with 5. That’s some serious load on each server and is mostly a case of awesome vertical scaling.
The Different Parts Of A Meteor App
We can split our app up into two logical components. The first part is the server that handles users’ requests sending the appropriate data back, and performs any tasks that need to be performed. The second part is the database that stores the app’s data.
The server interacts with the database querying it and updating it on a consistent basis.
We’re not going to talk too much about scaling MongoDB. It’s probably going to be a while before you reach a point at which you’ll have to scale your database. If you’d like to know more about this topic, this link could be a good place to start.
Things To Do Before Scaling Up The Server
A good place to start before you get down to scaling is to make sure your app is running as efficiently as possible. The recommended tool to use to check the performance of your app and which methods and publications are taking the most time to complete is Kadira. The basic plan is free so there’s really no reason not to use it. Use the articles at Kadira Academy to work out how best to optimize your app and where to devote your energy. In general, you want to optimize the methods and publications that run most often and take a long time to complete.
One thing that is absolutely necessary for good performance is to make use of MongoDB indexes. You do this in Meteor by writing:
_Posts.ensureIndex({userId: 1});
This creates an index on the userId field in the Posts collection. You can also create indexes in MongoDB itself. See more on MongoDB indexes here.
See this article by Differential for some additional performance tips.
When Do I Need To Start Worrying About Scaling?
If your Meteor app has over 100 users online at any one time, you’re probably going to have to start worrying about scaling. (Of course, you don’t know when your app is going to take off. You could jump from 5 to 500 concurrent users in a single day, so it’s worth being prepared before this happens.)
Depending on your app, you might be able to get up to 500 concurrent users on a single DigitalOcean droplet. My app struggles with 100–150 concurrent connections, at which point it hits 100% CPU. The bottleneck for most Meteor apps seems to be CPU and not RAM, so scaling horizontally is a must. You can add all the RAM you want, but it won’t help your app. Lack of CPU is what’s going to overload your app and you can only get more CPU power by making use of multiple CPUs (or multiple servers).
The following graph from Kadira shows what happens when your app is under too much pressure.
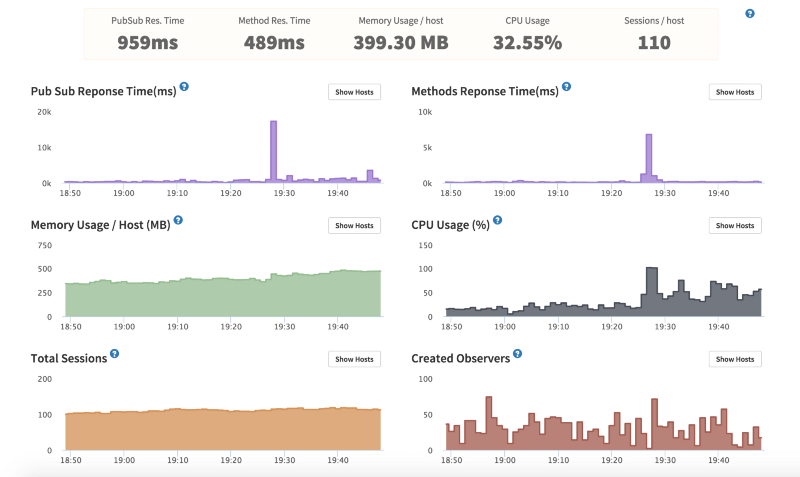 Kadira stats. 1 core, $10/month Digital Ocean droplet
At around 7:28 PM you can see that the average response time for publications was about 18 seconds and for methods about 7 seconds. This isn’t a good situation to be in. The high response time was caused by a big spike in CPU which hit 100% for a couple of minutes. RAM isn’t an issue because only about 500MB is being used at any one time and the VPS being used here has 1GB RAM.
Deployment
There are multiple ways to deploy your Meteor app. Here are some of the common solutions people use for production apps:
- Self-hosted on DigitalOcean or AWS
- Modulus.io
There’s also the free meteor.com hosting, but this should only be used for development purposes. MDG also just released Galaxy, but the pricing for that currently starts at $500 a month. MDG is working on providing cheaper plans for Galaxy as well as a free plan, but at the time of the writing of this article, these aren’t an option.
It’s also common for people to host the database at another provider. A popular one is Compose.io.
Update: You can now get Galaxy hosting starting at $29 per month. Compose.io no longer has a free plan. Another Mongo hosting provider called MLabs does. When you go into production (i.e. when development is over and people are actually using your app), you do not want to be using a free plan however.
My own setup is DigitalOcean + Compose.io.
If you’d like to read about other setups, see the deployment section on Meteorpedia.
My initial setup was a $10 per month DigitalOcean droplet. This gives you a one core VPS with 1GB RAM. You also get 30GB of storage, though you probably won’t use most of it.
I use Compose.io’s $18 per month Elastic Deployment plan for MongoDB database hosting. You can deal with the MongoDB stuff yourself, but it’s just extra work that I didn’t want to deal with.
To deploy I use a tool called Meteor Up (or Mup for short). You can take a look at it on GitHub here.
If you deploy on Modulus.io, they’ll take care of a lot of the scaling issues for you. If you want to run multiple instances of your app, all you have to do is move a slider up and down on the Modulus website. The more instances you run, the more it will cost you, but you can scale down whenever you want too.
I didn’t go with Modulus for deployment because I had some problems setting it up two years ago. I assume these issues would have been ironed out by now. The other issue is cost. It’s cheaper to deploy on DigitalOcean. The downside is that it might take up more of your time. Another advantage of going with DigitalOcean is finer grained control over your server.
An article comparing DO, Modulus.io and Heroku can be found here.
So how do you actually scale a Meteor app?
As noted above, my app is deployed on Digital Ocean using Meteor Up. With this setup you don’t have the luxury of using a slider to load up more instances. A standard mup.json file looks something like this:
{ “servers”: [ { “host”: “123.45.678.901”, “username”: “root”, “pem”: “~/.ssh/id_rsa”, “env”: {} }, { “host”: “333.22.444.555”, “username”: “root”, “pem”: “~/.ssh/id_rsa”, “env”: {} } ], “setupMongo”: false, “setupNode”: true, “nodeVersion”: “0.10.40”, “setupPhantom”: true, “appName”: “myapp”, “app”: “/Users/arunoda/Meteor/my-app”, “env”: { “PORT”: 80, “ROOT_URL”: “http://myapp.com”, “MONGO_URL”: “mongodb://arunoda:fd8dsjsfh7@hanso.mongohq.com:10023/MyApp", "MONGO_OPLOG_URL": "mongodb://.....", “MAIL_URL”: “smtp://postmaster%40myapp.mailgun.org:adj87sjhd7s@smtp.mailgun.org:587/” }, “deployCheckWaitTime”: 15}
Notice that I’ve listed two servers in the servers block. When you’re first getting started, you’ll only have one server listed. With the following setup, we’ll be deploying to ip addresses 123.45.678.901 and 333.22.444.555. After deployment, if you were to visit either of these ip addresses in your browser, you’d see the same thing and both servers would be connected to the same database.
Load Balancing
So we’ve deployed our site, but we don’t want users visiting the site at random ip addresses. We want them visiting our domain. So let’s say our domain name is awesomedomain.com (which is better than example.com, in my humble opinion). How do we get each of our two servers to deal with half of the requests?
One way of doing this is by using a tool called Nginx. From Wikipedia:
Nginx (pronounced “engine x”) is a web server with a strong focus on high concurrency, performance and low memory usage. It can also act as a reverse proxy server for HTTP, HTTPS, SMTP, POP3, and IMAP protocols, as well as a load balancer and an HTTP cache.
We’re going to use it for three things:
- As a reverse proxy
- As a load balancer
- For SSL support
What this means is that we’re going to run Nginx on one of our servers on port 80. Any traffic coming into the server from the web will be received by Nginx. Nginx will then forward the traffic on to instances of our Meteor app, which could be running on the same server on a different port, or a different server. Nginx will try and balance the number of requests that are sent to each instance.
Nginx being a reverse proxy means it forwards requests on to other places and then responds to the user.
Being a load balancer means it will split (balance) the load between the different instances of the app.
We’ll also use Nginx to provide us with SSL support. SSL support means that any data transferred between the user and our servers will be encrypted. Without SSL support, our Meteor site won’t work correctly in many countries, and it will also be fairly easy for people to hijack our users’ accounts or read any data that is transferred. Any site that uses HTTPS has SSL support.
SSL isn’t the focus of this article, but it is a must for any production app and Nginx can take care of the SSL stuff for you. To set up SSL with Nginx, see here. You don’t need to use Nginx for SSL support though. Meteor Up can also handle it using a tool called stud as shown here.
So how do we setup Nginx?
To do this, I recommend following the first step of this tutorial:
How To Deploy a Meteor.js Application on Ubuntu 14.04 with Nginx | DigitalOcean
_Deploy a Meteor.js application on Ubuntu 14.04 with Nginx and MongoDB. This tutorial shows you how to build and deploy…_www.digitalocean.com
Don’t bother following the rest of the tutorial. Meteor Up will take care of all that stuff for you automatically.
The article also explains how to use Nginx for SSL support.
Once all of that is working for you, you should have your app running at some domain. So far, Nginx hasn’t actually done much for us (except possibly SSL support.) We’re still not making use of our second Meteor instance, but that we’re going to fix that now.
To make use of more servers, you need to add the following code to the top of your Nginx file:
upstream myAppName { ip_hash; # for sticky sessions, more below server 123.45.678.901:3000; # server 1 server 333.22.444.555:3000; # server 2}
Your Nginx file should now look something similar to this:
upstream myAppName { ip_hash; # for sticky sessions, more below server 123.45.678.901:3000; # server 1 server 333.22.444.555:3000; # server 2}server { listen 80; server_name www.myapp.com # and all other "server" directives location / { # the "hostname" below must be same myAppName from upstream directive above proxy_pass http://myAppName; # and all other "location" directives }}
…where myAppName would be something like example.com or app.example.com.
The above code was adapted from Meteorpedia.
If you now reload Nginx (as described in the Digital Ocean article above) using:
nginx -t # check everything is okaynginx -s reload
The load will be split among your two Meteor instances.
If you’d like to add more instances in the future, all you have to do is add another line to Nginx upstream block and restart Nginx. Here’s an example that uses 4 Meteor instances, with 2 instances running on two different servers:
upstream myAppName { ip_hash; server 10.0.0.1:3000; # server 1, core 1 server 10.0.0.1:3001; # server 1, core 2 server 10.0.0.2:3000; # server 2, core 1 server 10.0.0.2:3001; # server 2, core 2 # or whatever other appropriate combination}
Removing instances just involves removing lines from the upstream block and restarting Nginx.
Load Balancing Algorithms
So if you just want to get things working, then following the above steps should work, but if you want to understand a little deeper, here’s a basic explanation of what we just did.
We’re using Nginx as a load balancer. For each request that comes in, Nginx has to decide which server to send it to. At the same time, Nginx has to be as quick as possible in doing its job, using as few resources as possible. Nginx is capable of handling 10,000 concurrent connections and simple load balancing algorithms are part of what makes this possible.
A simple algorithm that is used to decide where to send the next request is called “round robin.” In this algorithm, the load balancer sends client requests to each server in turn and once it gets to the end of the server list, starts the process again. The outcome for three servers is: 1, 2, 3, 1, 2, 3, 1, 2,…
There are many other algorithms that can also be used to decide which server to send a request to, but one constraint that Meteor requires us to follow is that each request from a user should be sent to the same instance. This is also known as “sticky sessions.” A user sticks with the same server the entire session.
This means we can’t use the round robin algorithm for our Meteor app, which doesn’t take into account which server the user first connected to. Instead we use the _iphash algorithm which is explained in the Nginx docs as follows:
With ip-hash, the client’s IP address is used as a hashing key to determine what server in a server group should be selected for the client’s requests. This method ensures that the requests from the same client will always be directed to the same server except when this server is unavailable.
Running Locally
You can try out running two instances of your app locally too. To do this open up two terminal windows and start one Meteor app on the standard port (3000) by running:
meteor
The database will now be running on port 3001.
In a separate terminal window run another instance of the app on port 4000 that connects to the same database by running the following:
export MONGO_URL=mongodb://localhost:3001/meteor
meteor --port 4000
You can now visit localhost:3000 or localhost:4000 in your web browser and both will make changes to the same database.
Things to be Aware of
There might be code in your app that you only want running once. For example, in my fantasy football game, I only want one server updating scores.
Another issue that can come up is that certain operations can be quite expensive. Again, updating scores in the game is quite a long process and I don’t want it interfering with the basic functioning of the app.
So how do you solve these problems?
There are multiple ways to deal with such a situation, but I’ll just outline what I did.
I set up a new droplet on Digital Ocean that doesn’t receive any traffic from the main website. It can be accessed at its IP address, but this droplet doesn’t receive any traffic from the website’s public URL. This instance is in charge of running all background tasks and any task that should only run once.
To make code specific to only one instance of the app, I make use of environment variables. In your local environment you can export variables in your terminal window as follows:
export ENV_VAR=valueOfOurVar
We did this before for _MONGOURL.
You can access environment variables in your Meteor app using:
process.env.ENV_VAR
In my app I can do something like this if I only want one instance of the app to run certain code:
if (process.env.RUN_BACKGROUND_TASKS === ‘true’) { // do some task}
I could also have used a pure microservices approach, but this would have taken a bit more time for me to set up and code sharing would have been harder.
When using Meteor Up, you can set environment variables for a specific instance as follows:
“servers”: [ { “host”: “...”, “username”: “...”, “pem”: “...”, “env”: { “ENV_VAR”: “123”, “RUN_BACKGROUND_TASKS”: “true” } } ],
There are also packages that don’t work well when running multiple instances of an app either. One package I came across that falls into this category is mizzao:user-status. This package tells you which users are online at any given time and doesn’t work properly when running multiple instances. One server will have an open connection to a specific client while the rest won’t and this package doesn’t know how to deal with such a situation. A closed connection implies a user is offline. A work around is to use the konecty:user-presence package instead.
You don’t want cron tasks running on multiple instances either. For this you can use the percolate:synced-cron package. I didn’t personally make use of it, but it looks like a good solution opting instead to restrict all cron tasks to a specific server, but it looks like a good solution.
Other Solutions
There are many ways to do what we did in this article. Using Nginx is not the only solution. For SSL support, we could have used stud instead as Meteor Up does. For load balancing we could have used a tool called HAProxy whose sole purpose is to be a load balancer.
Another approach to all this is to use the MeteorHacks Cluster package. It’s simply a Meteor package which you add as follows:
meteor add meteorhacks:cluster
To get see it working immediately on your own machine export the following environment variable to your terminal:
export CLUSTER_WORKERS_COUNT=2
If you now run your app, you should see two instances of your Meteor app start up. Here we made use of the cluster package’s multicore support. We can also use cluster to distribute load among multiple servers. You should look at the cluster docs to set this up.
Is it better to use MeteorHacks Cluster or Nginx?
I don’t know the answer to this question. I did have problems using MeteorHacks Cluster in production when making use of its multicore support. The app would work fine under low stress conditions, but under heavy load the app would randomly crash required a manual restart to get it working again. There’s an open issue on GitHub for it here. If you don’t use the multicore support this shouldn’t be an issue though.
My Final Setup
The database runs on Compose.io at a cost of $18/month per GB of space used.
The app currently runs on 8 DigitalOcean droplets:
($5/month droplet has 512MB RAM and 1 core, $10/month droplet has 1GB RAM and 1 core, $20/month droplet has 2GB RAM and 2 cores.)
- 1 $5/month droplet takes care of background tasks and doesn’t handle any user requests.
- 1 $20/month 2-core droplet runs Nginx and 2 Meteor instances of the app.
- 4 $10/month droplets (1 instance per droplet)
- 2 $5/month droplets (1 instance per droplet)
There’s also a $5/month droplet for the blog that runs on Ghost on a subdomain (this isn’t Meteor).
I’m also working on a mobile app and this will run on other droplets and will serve a different site to visitors. The client views/logic here is different, the server logic is the same.
Which Droplets To Choose?
So you may be wondering why my droplets are different sizes. At first I only used $10/month droplets, but since my bottleneck is CPU and not RAM, I should be able to replace all my $10/month droplets with $5/month droplets, since you get the same CPU power with each.
I’m in the process of testing this out now and seeing how it goes. You need to be careful that you don’t run out of RAM when using 512MB droplets. If you use the spiderable package, your server can crash when a search engine indexes your site and it will cause CPU to spike to 100%. You can get around this by using prerender.io instead of spiderable and/or adding swap space. If you’re using React then you can use server-side rendering for search engines instead of spiderable as explained here.
Autoscaling
It would be nice to be able to automatically load up more droplets when the site is under stress and take them down when no one is using it. My site is used a lot more during the weekends for example. It would be nice if I could automatically launch more droplets whenever there’s a lot of traffic and take them down when there’s less traffic.
I haven’t seen an easy solution to this yet for Meteor apps deployed on DigitalOcean, but making use of the DigitalOcean API this should be possible without too much work. It would cut down hosting costs significantly.
It seems to be quite easy to autoscale on Modulus as shown here. And you can read about autoscaling on AWS here and here.
Things I’d do Differently
I’d test that my app can run well on two servers at a much earlier stage in the development process. The jump from 1 server to 2 servers is fairly big if you’ve never done it before. The jump from 2 servers to 10 servers is tiny.
Other Resources on Scaling Meteor Apps
- meteorhacks:cluster
- Meteor Up (Mup)
- Meteorpedia
- MeteorHacks: Does Meteor Scale?
- Discover Meteor : Scaling Meteor: The Challenges of Real-time Apps
- Differential: Scaling Meteor to 20,000+ Users in 7 Days
Later Additions
I really liked the following post. It has some key info on load testing, a better Nginx setup, and using a CDN: https://medium.freecodecamp.com/minimum-viable-devops-919972dfd9e0