
Hey there! Ready to build something cool? In this tutorial, we're going to create a full stack notes app using React, Node.js, and PostgreSQL.
We'll start from scratch and end up with a fully functioning app where you can create, edit, and delete notes. Plus, we're adding validation on both the UI and the backend to keep things in check!
This guide is all about giving you the real-deal experience of building a web app. You'll get to learn how each piece of the puzzle fits together – from the front-end magic with React, to the server-side wonders with Node.js, and storing all the good stuff in a PostgreSQL database. And hey, we're making sure it looks good and works well on mobile screens too!
By the end of this, you’ll have a good grip on full stack development with React and Node, which you can carry with you into future projects. It’s all about learning by doing, and getting the skills to make your ideas come to life. So, grab a cup of coffee, roll up your sleeves, and let’s get coding!
Prerequisites
Since we will be focusing on how to build a project, there are a few prerequisites that will be needed to get the most out of this tutorial:
- Some knowledge about web development concepts (frontend, backend, databases, API's, REST).
- Some knowledge of JavaScript (variables, functions, objects, arrays, and so on).
- Basic understanding on React (how to create components, add styles, work with state).
- Basic understanding on Node.js/Express (working with APIs).
Table of Contents
- What We'll Build
- Challenge: Try it Yourself First!
- Video Tutorial
- PART 1 – Create the UI
- PART 2 - Create the Backend
- PART 3 - Connect UI to Backend
- The End - Why not try the bonus challenges?
What We'll Build
In this tutorial, we'll build a full stack notes app from scratch, using React, Node.js and PostgreSQL, with the following features:
- Create/Edit/Delete Notes
- Validation on the UI and Backend
- Responsive on mobile screens
Challenge: Try it Yourself First!
If you would like to attempt this project yourself first without looking at the tutorial, here's a few hints:
- Tackle one little piece at a time. For example, you would focus on getting the UI working on the UI first, and tackle the APIs later.
- Think about your data – What do you need to store? What data structure (for example, arrays) will you use to return the data via the API? How will you render this data on the UI?
- Don't forget about validation and error handling. What will happen if the user tries to save a note without a title field? How will you prevent this? (Hint: Forms and the
requiredfield will be your friend here) - Remember there is no perfect way to complete a project. The tutorial below is one way to tackle the problem. You can choose to go a different way, putting your own unique style on things. The main thing is that you start!
If you need more help on getting started yourself, you can find more hints and tips, starter code, and completed code you can reference over at codecoyotes.com.
Video Tutorial
PART 1 – Create the UI
We'll start this tutorial by creating the UI using some mock data. This lets us focus on our styling, and how things to look, without having to worry about creating a backend right away.
Create a New React App
Okay, first things first: let's set up our project structure. Open your terminal and navigate to your desktop. Our next step is to create a new folder that will hold both our UI and backend code. Let's name it notes-app:
mkdir notes-app
Once that's done, navigate into the newly created notes-app directory:
cd notes-app
Next, we'll create a new React app using TypeScript as our template. We'll use the npx create-react-app command for this, specifying TypeScript as the template:
npx create-react-app notes-app --template typescript
After you hit Enter, the process may take a few minutes to install all necessary packages. Once it's completed, open the notes-app folder in Visual Studio Code or your preferred IDE.
In Visual Studio Code, you should see that the notes-app is at the top level of your directory. As the course progresses, we will add a notes-app-server directory as well to keep all the code together in one place.
Now open a new terminal within your IDE and navigate to your React app's directory (let's assume you named it notes-app):
cd notes-app
Then, run the following command to start the front-end development server:
npm start
If all goes well, your browser will automatically open and display your new React app. You should see a spinning React logo, among other default assets.
Finally, let's clear out the boilerplate code to have a clean starting point for our app. Open src/App.tsx in your IDE and delete its content. This will be our new starting point for building the app.
Add UI Elements
Okay, the first thing we'll do is put some of our UI components in place. This will consist of the general markup and CSS, without involving any JavaScript. This gives us a glimpse of how we envision the layout, without having to concern ourselves with API calls or database interactions at this stage.
We'll navigate to .App.tsx and create a new component. Make sure to import our stylesheet from App.css. The first thing to add is a div with a class name of AppContainer. This will help position our form and the CSS grid for our notes.
Within this div, we'll include our form tags. Here, we'll add an input field for the title — this is where the user can enter the note title. We'll also include a textarea for the note content. Both of these fields will be set to required, enabling browser-native validation messages if the user tries to submit an incomplete form.
At the bottom of the form, we'll include a button of type submit, which will handle form submissions when clicked.
Off to the right, we'll add a div to contain our notes. This will be structured as a CSS grid. Initially, we'll populate this grid with a single note to see how it looks.
For our note, we'll have a header containing a delete button situated on the right-hand side. We'll display the user-entered title – for demonstration purposes, we're using a dummy title. We'll also include the content that the user entered.
Finally, we'll export our component at the very bottom.
Completed code for this section
import "./App.css";

const App = () => {
  return (
    <div className="app-container">
      <form className="note-form">
        <input placeholder="Title" required />
        <textarea placeholder="Content" rows={10} required />

        <button type="submit">Add Note</button>
      </form>
      <div className="notes-grid">
        <div className="note-item">
          <div className="notes-header">
            <button>x</button>
          </div>
          <h2>Note Title</h2>
          <p>Note content</p>
        </div>
      </div>
    </div>
  );
};

export default App;
Add CSS
Start the App
First, let's open a terminal and type npm start. This will launch the app in the browser. As you can see on the right-hand side, the appearance isn't great yet. This is because we haven't applied any styles. To fix this, we'll navigate to App.css and style the classes we added earlier.
You can download the styles from the link in the description if you prefer to copy and paste. Alternatively, feel free to follow along with the video and pause as needed. Remember, these styles are just examples for learning – they don't have to be perfect.
Style the Body and App Container
In App.css, the first thing we'll do is add some styles to the body. We'll give it a gray background and a margin to prevent the app from touching the browser window edges. Next, we'll style our App Container.
We're designing this mobile-first, meaning the default styles will target mobile screens. We'll use media queries for larger displays. This approach is optional, but often it's easier to start with mobile designs.
For mobile screens, we want our App Container to default to a single column layout, stacking our form and notes grid on top of each other.
Use Media Queries
We'll add a media query specifying that for screens larger than 600 pixels, we'll use a two-column layout. We'll define this using grid-template-columns.
The first column will be 200 pixels wide, accommodating the form. The second column will use 1fr, filling the remaining space. A 20-pixel gap will separate the two columns.
Style the Notes Grid
Next, let's style our notes grid. We'll use CSS grid and define grid-template-columns.
Each grid item will have a minimum width of 250 pixels and can expand to fill available space. Don't worry if this sounds confusing – it will become clear soon.
We'll also set grid-auto-rows to ensure each row is a minimum of 250 pixels tall, accommodating notes of different sizes while maintaining a consistent row height.
Style Individual Notes
For each note, we'll use Flexbox and set flex-direction to column, stacking the header, title, and content vertically. We'll also add some basic styles like border, padding, and background color. A box shadow will provide a finishing touch.
Style the Header and Delete Button
The header will also use Flexbox, and we'll set justify-content to flex-end to align the delete button to the right. The button will receive custom styles for a polished look.
Style the Form
Lastly, we'll style the form on the left column. Again, we'll use Flexbox with a column layout and a 20-pixel gap between elements. The text area and input fields will get borders, padding, and resized fonts. We'll also style the submit button and add hover effects.
Completed code for this section
body {
  margin: 20px;
  background-color: lightgrey;
}

.app-container {
  grid-template-columns: 1fr;
}

@media (min-width: 600px) {
  .app-container {
    display: grid;
    grid-template-columns: 200px 1fr;
    gap: 20px;
  }
}

.notes-grid {
  display: grid;
  grid-template-columns: repeat(auto-fill, minmax(250px, 1fr));
  grid-auto-rows: minmax(250px, auto);
  gap: 20px;
}

.note-item {
  display: flex;
  flex-direction: column;
  border: 1px solid #ccc;
  padding: 10px;
  border-radius: 5px;
  background-color: #f9f9f9;
  box-shadow: 0px 0px 10px rgba(0, 0, 0, 0.1);
  cursor: pointer;
}

.notes-header {
  display: flex;
  justify-content: flex-end;
}

.notes-header button {
  font-size: 16px;
  background: transparent;
  border: none;
  cursor: pointer;
  max-width: fit-content;
}

h2 {
  margin: 0;
}

.note-form {
  display: flex;
  flex-direction: column;
  gap: 20px;
}

textarea,
input {
  border-radius: 5px;
  border: 1px solid black;
  padding: 10px;
  font-size: 16px;
}

.note-form button {
  border-radius: 5px;
  background-color: rgb(64, 154, 184);
  border: none;
  padding: 10px;
  font-size: 16px;
  color: white;
}

.note-form button:hover {
  background-color: rgb(106, 175, 198);
  cursor: pointer;
}

.edit-buttons {
  display: flex;
  justify-content: space-evenly;
  gap: 5px;
}

.edit-buttons button {
  flex: 1;
}

.edit-buttons button:last-of-type {
  background-color: rgb(220, 89, 89);
  color: white;
}
Add Dummy Notes
Add Dummy Notes for CSS Grid Testing
Now that we have our CSS in place, the next step is to add dummy notes to our App component to test the responsiveness of our CSS grid. To achieve this, we'll navigate to App.tsx and import the useState hook from React.
Inside our App component, we'll store the notes within the useState hook. Whenever you have UI elements that can change, it's a good idea to manage them in the state. We'll initialize this with a dummy array of notes, where each note has an id, a title, and content:
const [notes, setNotes] = useState<Note[]>([
{
  id: 1,
  title: "test note 1",
  content: "bla bla note1",
},
{
  id: 2,
  title: "test note 2 ",
  content: "bla bla note2",
},
{
  id: 3,
  title: "test note 3",
  content: "bla bla note3",
},
{
  id: 4,
  title: "test note 4 ",
  content: "bla bla note4",
},
{
  id: 5,
  title: "test note 5",
  content: "bla bla note5",
},
{
  id: 6,
  title: "test note 6",
  content: "bla bla note6",
},
]);
Think of this as simulating an API call and storing the returned data in the state. The structure of this data will be similar to what we'll receive from our API requests when we eventually build out our backend.
Map Notes to Components
With our array of notes in state, we can now use the map function within our notes grid to display the markup for each note. The map function will run as many times as there are notes in the array. Instead of hardcoding the title and content, we'll pull these values from each note object:
<div className="notes-grid">
  {notes.map((note) => (
    <div className="note-item">
      <div className="notes-header">
        <button>x</button>
      </div>
      <h2>{note.title}</h2>
      <p>{note.content}</p>
    </div>
  ))}
</div>
Verify Responsiveness
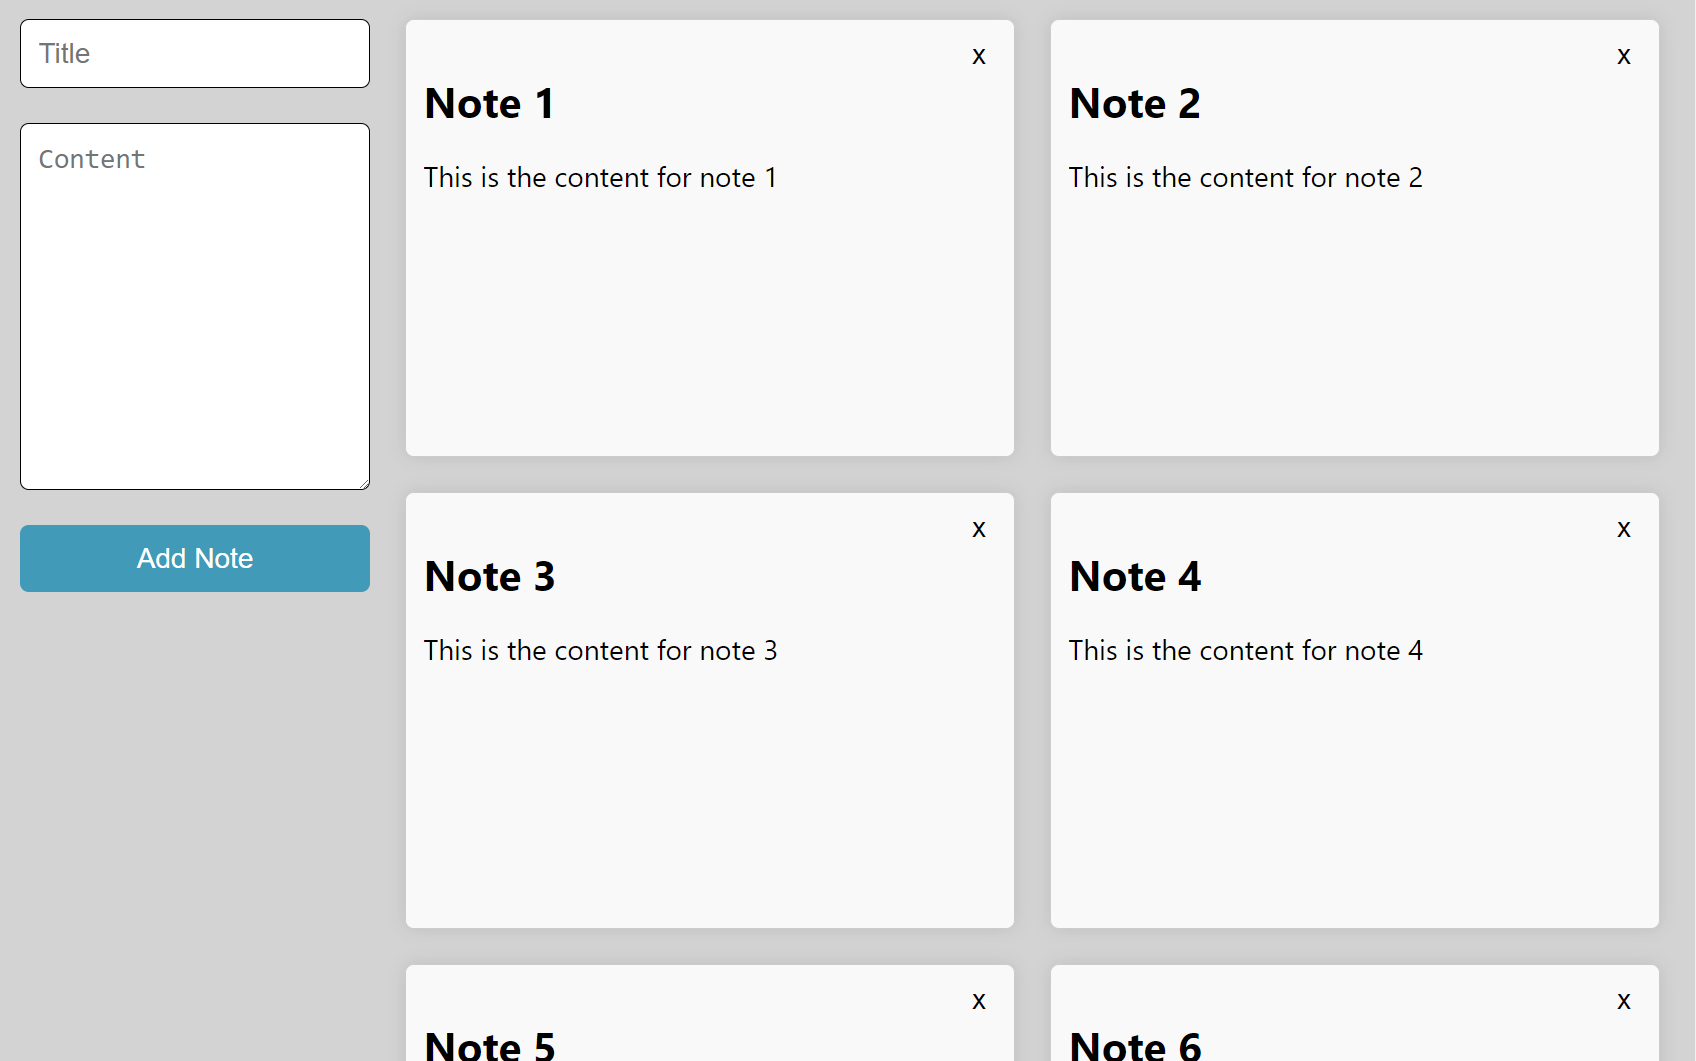
After these steps, you should see four notes displayed in the browser, populated with the values from the objects in the array.
To verify that our layout is responsive, you can change the window size. You'll see that the notes adjust based on the window size. When the window is at its smallest—simulating a mobile screen—the form will stack vertically above the notes grid.
Save Note Form
Now that we have our UI set up, let's focus on adding functionality to the form that allows us to create a new note. Initially, we'll implement this for the UI. Later, we'll make the data persistent by linking it to the backend, which we'll build separately.
Use State for Form Inputs in React
In React, when working with forms, it's a best practice to maintain a state variable for each form input. This enables React to control those inputs, making it easier to capture their values and use them programmatically.
In our code, we have two form inputs: one for the title and another for the content. For these, we'll set up two state variables called title and content:
const [title, setTitle] = useState("");
const [content, setContent] = useState("");
For the title input, we bind its value to the title state variable and update this state whenever the user types into the field:
<input
  value={title}
  onChange={(event) => setTitle(event.target.value)}
  placeholder="Title"
  required
></input>
Similarly, we'll handle the textarea for content:
<textarea
  value={content}
  onChange={(event) => setContent(event.target.value)}
  placeholder="Content"
  rows={10}
  required
></textarea>
Handle Form Submission
After binding our form inputs to state variables, the next step is to add a function that handles the form submission. We'll name this function handleAddNote:
const handleAddNote = (event: React.FormEvent) => {
  event.preventDefault();
  console.log("title: ", title);
  console.log("content: ", content);
};
In this function, we specify the parameter type as React.FormEvent to satisfy TypeScript's typing requirement. We also call event.preventDefault() to prevent the form from submitting and refreshing the page, which is its default behavior. Following that, we log the title and content state variables to the console.
Finally, we'll connect this function to the onSubmit event in our form:
<form onSubmit={handleAddNote}>{/* ...form inputs here... */}</form>
Test the Form
To test this setup, open the browser console, input a title and some content, and click the "Add Note" button. You should see the title and content values logged in the console, confirming that our form is capturing input as expected.
Handle the "Add Note" Functionality
Now that we've set up our state variables for the title and content, we can proceed to implement the function that handles adding a new note. This function will create a new note object and add it to our notes array, thereby updating the UI.
Create a New Note Object
First, let's create a new note object and specify its type as Note, taking advantage of TypeScript's type system:
const newNote: Note = {
  id: notes.length + 1,
  title: title,
  content: content,
};
Because we've explicitly typed our object, TypeScript's IntelliSense will assist us in populating the object, ensuring that we don't miss any required properties. For now, we'll set the id to the length of the current notes array plus one, although this id will eventually be generated by our backend database.
Update State with New Note
Once we have our new note object, we need to update our notes state array. We'll use the setNotes function for this purpose:
setNotes([newNote, ...notes]);
The new note object will be the first item in the new notes array, followed by the existing notes, which we'll spread into the new array using the spread operator. This effectively makes a copy of the old notes array and inserts it into the new one.
Clear the Form Inputs
Lastly, let's reset the title and content state variables to empty strings, improving the user experience by clearing the form once a note is added:
setTitle("");
setContent("");
Test the Functionality
And that's it! If you now go to the browser, input a title and some content, and then click "Add Note," you'll see your new note appear at the top of the list, and the form fields will be cleared, ready for a new entry.
Handle the "Update Note" Functionality
In this section, we'll focus on implementing the feature that allows users to update an existing note. When a user clicks on a note, we want to populate the title and content fields in our form with the note's existing values. We'll also add a "Save" and "Cancel" button.
Cleanup and Initial Setup
First, let's clean up our code by removing any console.log statements – they are no longer needed:
const [selectedNote, setSelectedNote] = useState<Note | null>(null);
Track the Selected Note
To track which note the user has clicked on, we'll create a new state variable called selectedNote. This state variable will have a type of Note or null to account for the possibility that no note is selected. We'll initialize this state to null.
Create the Click Handler
Next, let's create a function named handleNoteClick to handle the user's click event on a note. This function will take a note object as its argument:
const handleNoteClick = (note: Note) => {
  setSelectedNote(note);
  setTitle(note.title);
  setContent(note.content);
};
Within this function, we'll use setSelectedNote to save the clicked note to our selectedNote state. Additionally, we'll populate the title and content state variables with the values from the clicked note.
Update the UI
In the JSX for rendering each note, add an onClick event to the top-level div element for each note. Call the handleNoteClick function and pass the note object to it:
<div key={note.id} className="note-item" onClick={() => handleNoteClick(note)}>
  <div className="notes-header">
    <button>x</button>
  </div>
  <h2>{note.title}</h2>
  <p>{note.content}</p>
</div>
Since we are iterating over notes using the map function, this onClick handler will be added to each note automatically.
Save user changes
Now that we have the capability for the user to edit a note, we'll implement the functionality to save the changes they make to both the title and content of a note into our state.
The handleUpdateNote Function
Let's create a new function called handleUpdateNote:
const handleUpdateNote = (event: React.FormEvent) => {
  event.preventDefault();

  if (!selectedNote) {
    return;
  }

  const updatedNote: Note = {
    id: selectedNote.id,
    title: title,
    content: content,
  };

  const updatedNotesList = notes.map((note) => (note.id === selectedNote.id ? updatedNote : note));

  setNotes(updatedNotesList);
  setTitle("");
  setContent("");
  setSelectedNote(null);
};
Within this function, we use event.preventDefault() to prevent the form from automatically submitting when the "Save" button is clicked. We also validate if a note is selected. If not, we exit the function early to prevent potential errors.
Next, we form an updated note object based on the selected note's id and the updated title and content. After that, we utilize the map function to generate a new array of notes, replacing the selected note with our updated note where the id matches. The updated array is then set to our state using the setNotes function. Finally, we reset our title, content, and selectedNote state values to their initial states.
The handleCancel Function
We'll also implement a simple handleCancel function to reset our form and selected note when the user decides not to proceed with an update:
const handleCancel = () => {
  setTitle("");
  setContent("");
  setSelectedNote(null);
};
Update the JSX
Let's introduce conditional rendering in our JSX to display the appropriate buttons based on whether a note is selected for editing or not:
<form
  className="note-form"
  onSubmit={(event) => (selectedNote ? handleUpdateNote(event) : handleAddNote(event))}
>
  {/* ... other form elements ... */}
  {selectedNote ? (
    <div className="edit-buttons">
      <button type="submit">Save</button>
      <button onClick={handleCancel}>Cancel</button>
    </div>
  ) : (
    <button type="submit">Add Note</button>
  )}
</form>
Within our form's onSubmit event, we've added a conditional. If a note is selected, we'll trigger the handleUpdateNote function. Otherwise, the handleAddNote function will be executed.
Test the Implementation
After incorporating these changes, run your application. When you select a note, make modifications, and click on "Save", you'll observe the note gets updated.
Delete Notes from the UI
The last piece of functionality we need on the frontend before moving to the backend development is the ability to delete notes. You'll recall that we added a small "X" button to each note for this purpose. Clicking this button should remove the note from the UI. Let's jump back into the App.tsx file and implement this.
The deleteNote Function
First, create a function named deleteNote as follows:
const deleteNote = (event: React.MouseEvent, noteId: number) => {
  event.stopPropagation();

  const updatedNotes = notes.filter((note) => note.id !== noteId);

  setNotes(updatedNotes);
};
This function takes in two parameters: the event object and the noteId. The event.stopPropagation() line is crucial here because the delete button is nested within a clickable note. It prevents the deleteNote event from interfering with the click event on the note itself. This is especially important when dealing with nested onClick events.
The Filtering Logic
The core of the delete functionality lies in the filter method applied to the notes array. This method loops through the array and applies a function to each element, much like the map method. It will only return the notes whose IDs do not match the noteId provided, effectively removing the selected note.
We save this newly filtered array into a variable called updatedNotes and then update our state with it by calling setNotes(updatedNotes).
Add the onClick Event
After defining the deleteNote function, attach it to the delete button within the note. Pass in the event and the note ID, like so:
<button onClick={(event) => deleteNote(event, note.id)}>x</button>
Test the Functionality
Now, if you run your app and click the delete button on a given note, you will observe that the note disappears from the UI.
PART 2 - Create the Backend
After implementing UI functionalities, it's time to set up a backend that allows us to persist notes when the user adds, edits, or deletes them. For this, create a new folder in your project at the top level and name it notes-app-server. Even though it might seem like the server code is in the same directory as the UI, they are entirely separate and will run independently.
Initial Setup
- Open your terminal and navigate to the
notes-app-serverfolder you just created. - Run the following commands:
npm init
npm i ts-node typescript nodemon @types/cors @types/express @types/node --save-dev
npm i @prisma/client cors express prisma
npx tsc --init
npm init: Initializes a new npm module and gives you access to npm packages.npm i ... --save-dev: Installs development dependencies like TypeScript and type definitions.npm i ...: Installs production dependencies like Express and Prisma.
Modify package.json
After running the above commands, navigate to your package.json and update the scripts section with:
"start": "npx nodemon"
This script uses nodemon for hot-reloading.
Implement the Server
Now, within the notes-app-server directory, create a src folder and within it, an index.ts file. Insert the following code:
import express from "express";
import cors from "cors";

const app = express();

app.use(express.json());
app.use(cors());

app.get("/api/notes", async (req, res) => {
  res.json({ message: "success!" });
});

app.listen(5000, () => {
  console.log("server running on localhost:5000");
});
import express and cors: We import the required libraries for our server.const app = express();: Initializes a new Express application.app.use(express.json());: Parses the JSON body from incoming API requests.app.use(cors());: Adds CORS support.app.listen(5000, ...): This starts the server listening on port 5000.
Test
Finally, you can test the server by navigating to the notes-app-server directory in your terminal and running:
npm start
You should see the console log: server running on localhost:5000. To further test, you can use a curl command to hit the /api/notes endpoint. If everything is set up correctly, you'll get a JSON object back.
Create a Postgres Database
ElephantSQL is a PostgreSQL database hosting service that makes it easy to set up, maintain, and scale your PostgreSQL database. Here's how to get started with creating a database using ElephantSQL.
Step 1: Sign Up / Log In
- Navigate to the ElephantSQL website.
- If you don't have an account, you can sign up for free. If you already have one, go ahead and log in.
Step 2: Create a New Instance
- Once logged in, you'll find yourself on the "Dashboard" page.
- Click on the "Create New Instance" button.
- You'll be taken to a page where you can set the details for your new PostgreSQL database instance.
Step 3: Choose a Plan
- You can start with a free "Tiny Turtle" plan, which is perfect for small projects and testing.
- Select the plan that best suits your needs and click "Select".
Step 4: Configure Your Instance
- You'll be asked to name your instance. Choose a name that you'll remember and that describes the purpose of the database.
- You can also select the data center that is geographically closest to you or your users for better performance.
- Click on "Review" and then "Create instance" to finalize the creation.
Step 5: Access Your Database
- Once the instance is created, click on it in the Dashboard.
- Here, you'll see the "Details" tab which includes all the information you need to connect to your database:
URL,User & Default database,Password, and more.
Populate the DB
Step 1: Login to ElephantSQL
Open your web browser and navigate to the ElephantSQL website. Log
in to your account.
Step 2: Open your Instance
Once logged in, click on the name of the database instance you've set up.
Step 3: Navigate to the SQL Browser
In the left sidebar, find and click on "SQL Browser" or something similar (it might say "Browser").
Step 4: Run SQL Query
In the SQL Query editor that appears, you can type or paste in your SQL command:
INSERT INTO "public"."Note" (title, content)
VALUES ('test title', 'test content bla bla');
After entering the SQL, click on the "Execute" or "Run" button.
That should insert a new row into your Note table with the title 'test title' and content 'test content bla bla'.
Optional: Verify the Insert
You may also want to verify if the data has been inserted correctly. For that, you could use:
SELECT * FROM "public"."Note";
Run this SQL query in the same SQL browser, and it should return all rows from the Note table, including the one you've just inserted.
And that's it! You've inserted a new row into your table through the ElephantSQL web console.
Connect to DB from Node.js backend using Prisma
Step 1: Copy the ElephantSQL Connection URL
Once you've set up your ElephantSQL database, make sure to copy the connection URL that appears on your dashboard. This URL includes your username and password to the database, so keep it secure.
Step 2: Create an .env File
Navigate to your notes-app-server directory and create a new .env file:
touch .env
Open this file and add the following line to specify the database connection URL:
DATABASE_URL="your_connection_url_here"
Make sure not to commit this .env file to your Git repository to keep your credentials secure.
Step 3: Initialize Prisma
If you haven't installed Prisma yet, install it first:
npm install prisma --save-dev
Now, initialize Prisma in the notes-app-server directory:
npx prisma init
This command will create a new prisma folder containing a schema.prisma file.
Step 4: Configure schema.prisma
Open schema.prisma in your text editor. You'll see that Prisma has already generated some configurations for you. Update the datasource block to use the environment variable:
datasource db {
  provider = "postgresql"
  url      = env("DATABASE_URL")
}
Step 5: Create the Note Model
Below the datasource block, add a new model block to represent a Note:
model Note {
  id      Int     @id @default(autoincrement())
  title   String
  content String
}
Step 6: Generate Prisma Client and Database Table
Run the following command to generate your Prisma client and create the database tables:
npx prisma db push
Step 7: Add Prisma to Your Application
First, import Prisma at the top of your index.ts:
import { PrismaClient } from "@prisma/client";
Then, initialize the Prisma client:
const prisma = new PrismaClient();
Step 8: Query Your Database
Now you can use Prisma in your application to query the database. For example, in a GET endpoint:
app.get("/notes", async (req, res) => {
  const notes = await prisma.note.findMany();
  res.json(notes);
});
Optional: Install Thunder Client in VS Code
(Feel free to skip this step if you already have a preferred API client)
Using curl is useful for quickly testing APIs, but it becomes cumbersome when you need to build out more complex requests. For instance, handling POST requests with custom bodies and headers can be more complicated.
To make API requests more straightforward, we'll install a client designed for this purpose.
While there are several options like Postman, we're going to focus on installing Thunder Client within VS Code, which makes it simple to execute requests right from your IDE.
To install Thunder Client, navigate to the Extensions section in VS Code and type "Thunder Client" in the search bar. You'll find it in the list of available extensions, identifiable by its purple logo. Click "Install," and upon completion, you'll see a Thunder Client option appear on the left-hand taskbar of your IDE.
Once you've clicked on Thunder Client, a list of your past requests will display. To initiate a new request, click the "New Request" button at the top. This action opens a new tab within Visual Studio Code.
Before proceeding, ensure that your server is running. Open the terminal and verify this. We will use Thunder Client to test our GET endpoint and get familiar with the request-making process. In the URL bar, enter the address of your 'notes' endpoint and specify that it's a GET request.
Click "Send," and you'll see a small window displaying the response. If the status code is 200 and you see an array containing your note, you've successfully made a GET request. Thunder Client will be our tool of choice for testing subsequent create, update, and delete requests. Of course, feel free to use any other tool you're comfortable with for this purpose.
Create POST Endpoint
In this section, we'll add an endpoint to our Express application that allows us to create a new note. Locate the index.ts file and insert the following code below your existing GET endpoint:
app.post("/api/notes", async (req, res) => {
  const { title, content } = req.body;

  if (!title || !content) {
    return res.status(400).send("title and content fields required");
  }

  try {
    const note = await prisma.note.create({
      data: { title, content },
    });
    res.json(note);
  } catch (error) {
    res.status(500).send("Oops, something went wrong");
  }
});
The structure is similar to the GET endpoint, but we're using app.post this time. We specify the URL for this POST endpoint and then define our function.
Inside the function, the first task is to extract title and content from the req.body. This is what the UI will send when a user submits the "Add Note" form.
After obtaining title and content, we utilize the Prisma client that we set up earlier to create a new note. We pass the title and content to the prisma.note.create() method, which returns a new note object complete with an ID. This object is then sent back as a JSON response.
To test the endpoint, go to the Thunder Client tab in VS Code. Switch the HTTP method from GET to POST while keeping the URL the same. Click the "Body" tab, which should default to JSON, and input some test values for title and content. After hitting "Send," you should receive a 200 OK status along with the created note, containing an ID, title, and content.
For robustness, we've added validation and error-handling. If either title or content is missing, the server returns a 400 Bad Request status with an appropriate error message. To test this, remove either title or content from the request body and resend it. You should now see a 400 status code along with your error message.
Additionally, we use a try-catch block to handle any errors thrown by the Prisma client. This helps in cases of database connection issues or other unforeseen errors, preventing the backend from crashing.
Finally, you can test the GET endpoint again. It should now return two notes: the first one manually added to the database, and the second one just created through Thunder Client. Switch the method back to GET in Thunder Client and hit "Send"; you should see two notes in the response.
Create PUT Endpoint
In this segment of the tutorial, we'll focus on adding the ability to update a note. Add the following code snippet below the code for your previous POST endpoint:
app.put("/api/notes/:id", async (req, res) => {
  const { title, content } = req.body;
  const id = parseInt(req.params.id);

  if (!title || !content) {
    return res.status(400).send("title and content fields required");
  }

  if (!id || isNaN(id)) {
    return res.status(400).send("ID must be a valid number");
  }

  try {
    const updatedNote = await prisma.note.update({
      where: { id },
      data: { title, content },
    });
    res.json(updatedNote);
  } catch (error) {
    res.status(500).send("Oops, something went wrong");
  }
});
The structure of this app.put function is similar to the GET and POST endpoints you've already created. The major difference is the :id parameter in the URL. This acts as a placeholder, allowing you to specify the ID of the note you wish to update.
Inside the function, you'll notice we extract title and content from req.body, just like before. Additionally, we retrieve the ID from req.params and convert it to an integer using parseInt(), as our database stores IDs as integers.
We've added validation checks to ensure that the id exists and is a valid number. If either id, title, or content is missing or invalid, the API returns a 400 status code along with an error message.
Next, we use a try-catch block to attempt the update operation. Within the try section, we call the prisma.note.update() function. We specify the id in a where object and provide the new title and content via a data object. If the operation succeeds, the updated note is sent back in the response. In case of an error, the catch block will return a 500 status and an error message.
To test this, switch to your Thunder Client tab in VS Code. Update the method to PUT and set the URL to include the ID of the note you want to update, for example, /api/notes/3. In the request body, send JSON data with the new title and content. Upon hitting "Send", a 200 status should confirm the update. The returned note should reflect your changes.
To double-check, perform a GET request on the /api/notes endpoint. You should see the updated note in the list.
Lastly, test the validation by supplying an invalid ID, like a random string. The API should return an error message stating that the ID must be a valid number.
Create DELETE Endpoint
In addition to our existing endpoints, it's crucial to add validation for empty title or content fields in our app.put function, since these fields are required by our database. Revisit your app.put function in index.ts and add similar validation to what we added for the POST request. Specifically, if either title or content is empty, return a 400 status code along with an error message.
With that in place, let's move on to the DELETE endpoint. Add the following code just after your PUT endpoint:
app.delete("/api/notes/:id", async (req, res) => {
  const id = parseInt(req.params.id);

  if (!id || isNaN(id)) {
    return res.status(400).send("ID field required");
  }

  try {
    await prisma.note.delete({
      where: { id },
    });
    res.status(204).send();
  } catch (error) {
    res.status(500).send("Oops, something went wrong");
  }
});
This app.delete function works similarly to the update (app.put) endpoint. It also accepts an ID as part of the URL parameters (query params should be URL parameters or route parameters).
First, we validate that the provided ID is a valid number. If it isn't, we return a 400 status code and an accompanying error message.
Once the ID is validated, we proceed to delete the note using Prisma's delete method. In the try block, we specify which note to delete by its ID in the where object. Upon successful deletion, we return a 204 status code, which indicates 'No Content.' This is a standard way to signal to the frontend or API consumers that the deletion was successful.
If an error occurs during the deletion, the catch block returns a 500 status code along with a generic error message.
To test the new DELETE endpoint, switch your HTTP method to DELETE in your testing tool (like Thunder Client or Postman). Use the ID of the note you wish to delete, such as /api/notes/3, and hit 'Send'. You should receive a 204 status code, indicating the operation was successful. To confirm, perform a GET request on your /api/notes endpoint and observe that the note with the specified ID has indeed been removed.
PART 3 - Connect UI to Backend
Now that we have our backend and UI ready, it's time to connect them. We will do this by using the built in fetch function to call our backend from our UI.
Get and Display Notes
Let's dive back into our frontend code. Just below our state declarations at the top of our component, we're going to introduce a useEffect hook:
useEffect(() => {
  // ...
}, []);
Inside this useEffect, we'll define an asynchronous function named fetchNotes. We need to put this in a separate function because React does not support making the useEffect hook asynchronous directly:
const fetchNotes = async () => {
  // ...
};
To handle any potential errors from the API, we'll wrap our API logic inside a try-catch block:
try {
  // ...
} catch (e) {
  console.log(e);
}
Inside the try block, we use the native fetch function to make an API call. Our API is running at http://localhost:5000/api/notes. By default, fetch performs a GET request, which is what we need:
const response = await fetch("http://localhost:5000/api/notes");
After making the request, we'll process the response and convert it to JSON. The API returns an array of notes, which we'll capture in a variable named notes of type Note[]:
const notes: Note[] = await response.json();
If everything goes smoothly, the next step is to update our state with the notes fetched from the API:
setNotes(notes);
In the catch block, we'll log any errors that may occur:
console.log(e);
We've defined fetchNotes, but haven't called it yet. To invoke this function, add a call to fetchNotes() at the end of the useEffect block:
fetchNotes();
Lastly, add an empty dependency array to ensure that this code only runs once when the component is first mounted:
}, []);
After saving your changes, you should see the notes from your database displayed in the browser. If you've added or deleted notes directly through the database, those changes should be reflected here.
To wrap things up, you can remove any hardcoded array that you initially added to your notes state variable. Instead, populate it with the data fetched from the API:
const [notes, setNotes] = useState<Note[]>([]);
This ensures that the notes state is initially empty, then populated by the useEffect through the fetchNotes function.
Completed Code for this Section
  const [notes, setNotes] = useState<Note[]>([]);


  useEffect(() => {
    const fetchNotes = async () => {
      try {
        const response = await fetch(
          "http://localhost:5000/api/notes"
        );

        const notes: Note[] =
          await response.json();

        setNotes(notes);
      } catch (e) {
        console.log(e);
      }
    };

    fetchNotes();
  }, []);
Save New Note
Next, let's explore how to save a note to our backend. We already have a function called handleAddNote that deals with adding a note to the UI:
const handleAddNote = async (
  event: React.FormEvent
) => {
  // ...
};
To start, remove any code that manually creates a new note object on the frontend. This is because our backend will return this object with all its properties once the note has been saved to the database.
As in our previous example, we'll use a try-catch block to handle the API logic and error handling:
try {
  // API logic here
} catch (e) {
  console.log(e);
}
Place your existing state-changing function calls (setNotes, setTitle, and setContent) inside the try block. These will be executed after the API successfully saves the note:
setNotes([newNote, ...notes]);
setTitle("");
setContent("");
To call the API, we'll use the fetch function, similar to how we fetched notes. The difference is that this time, we need to pass a second argument to fetch to specify the HTTP method and payload:
const response = await fetch(
  "http://localhost:5000/api/notes",
  {
    method: "POST",
    headers: {
      "Content-Type": "application/json",
    },
    body: JSON.stringify({
      title,
      content,
    }),
  }
);
Don't forget to add the async keyword to the handleAddNote function signature if you haven't already, as we are using the await keyword inside the function.
The server will respond with the newly created note object, which we can then add to our UI. Convert the response to JSON and store it in a variable named newNote:
const newNote = await response.json();
Finally, in the catch block, we log any errors that might occur:
console.log(e);
Also, make sure to add headers to specify the content type of the data we are sending:
headers: {
  "Content-Type": "application/json",
}
Save your changes and test the functionality in the browser. Use the form to add a new note and click "Add Note." If everything is set up correctly, your new note should appear in the list.
Completed Code for this Section
  const handleAddNote = async (
    event: React.FormEvent
  ) => {
    event.preventDefault();
    try {
      const response = await fetch(
        "http://localhost:5000/api/notes",
        {
          method: "POST",
          headers: {
            "Content-Type": "application/json",
          },
          body: JSON.stringify({
            title,
            content,
          }),
        }
      );

      const newNote = await response.json();

      setNotes([newNote, ...notes]);
      setTitle("");
      setContent("");
    } catch (e) {
      console.log(e);
    }
  };
Save Updated Note
Next, let's explore how to save a note to our backend. We already have a function called handleAddNote that deals with adding a note to the UI:
const handleAddNote = async (
  event: React.FormEvent
) => {
  // ...
};
To start, remove any code that manually creates a new note object on the frontend. This is because our backend will return this object with all its properties once the note has been saved to the database.
As in our previous example, we'll use a try-catch block to handle the API logic and error handling:
try {
  // API logic here
} catch (e) {
  console.log(e);
}
Place your existing state-changing function calls (setNotes, setTitle, and setContent) inside the try block. These will be executed after the API successfully saves the note:
setNotes([newNote, ...notes]);
setTitle("");
setContent("");
To call the API, we'll use the fetch function, similar to how we fetched notes. The difference is that this time, we need to pass a second argument to fetch to specify the HTTP method and payload:
const response = await fetch(
  "http://localhost:5000/api/notes",
  {
    method: "POST",
    headers: {
      "Content-Type": "application/json",
    },
    body: JSON.stringify({
      title,
      content,
    }),
  }
);
Don't forget to add the async keyword to the handleAddNote function signature if you haven't already, as we are using the await keyword inside the function.
The server will respond with the newly created note object, which we can then add to our UI. Convert the response to JSON and store it in a variable named newNote:
const newNote = await response.json();
Finally, in the catch block, we log any errors that might occur:
console.log(e);
Also, make sure to add headers to specify the content type of the data we are sending:
headers: {
  "Content-Type": "application/json",
}
Save your changes and test the functionality in the browser. Use the form to add a new note and click "Add Note." If everything is set up correctly, your new note should appear in the list.
Completed Code for this Section
  const handleAddNote = async (
    event: React.FormEvent
  ) => {
    event.preventDefault();
    try {
      const response = await fetch(
        "http://localhost:5000/api/notes",
        {
          method: "POST",
          headers: {
            "Content-Type": "application/json",
          },
          body: JSON.stringify({
            title,
            content,
          }),
        }
      );

      const newNote = await response.json();

      setNotes([newNote, ...notes]);
      setTitle("");
      setContent("");
    } catch (e) {
      console.log(e);
    }
  };
Save Deleted Note
In this section, we'll discuss how to delete a note by invoking an API endpoint. We'll focus on the deleteNote function for this functionality:
const deleteNote = async (
  event: React.MouseEvent,
  noteId: number
) => {
  // ...
};
First, we need to make our function asynchronous to handle API calls. So, add the async keyword to the function declaration like this:
const deleteNote = async (
  event: React.MouseEvent,
  noteId: number
) => {
  // ...
};
Next, let's add a try-catch block to manage the API call. The catch block is essential for logging errors, which prevents the application from crashing unexpectedly:
try {
  // API logic here
} catch (e) {
  console.log(e);
}
Copy the existing UI-update logic you have and paste it into the try block, right after the API call. This ensures that the UI only updates if the API call is successful.
Now, let's get to the main part—making the API call to delete the note. To do so, we'll use the fetch API:
await fetch(
  `http://localhost:5000/api/notes/${noteId}`,
  {
    method: "DELETE",
  }
);
Note that the URL is a template string. It allows us to inject the ID of the note (noteId) that we want to delete. This noteId is passed into our deleteNote function when the user clicks the delete button corresponding to a specific note.
We specify the HTTP method as "DELETE" to indicate that we're requesting to delete a note:
method: "DELETE",
Unlike the 'add' or 'update' operations, there's no need to assign the API response to a variable, as we're not expecting any data to be returned:
await fetch(
  `http://localhost:5000/api/notes/${noteId}`,
  {
    method: "DELETE",
  }
);
After successfully deleting the note, we filter out the deleted note from our local notes state:
const updatedNotes = notes.filter(
  (note) => note.id !== noteId
);
setNotes(updatedNotes);
Finally, if everything goes smoothly and you save your changes, try running the application in the browser. Click the delete button for a specific note, and then refresh the page. You'll see that the note has been removed successfully.
Completed Code for this Section
  const deleteNote = async (
    event: React.MouseEvent,
    noteId: number
  ) => {
    event.stopPropagation();

    try {
      await fetch(
        `http://localhost:5000/api/notes/${noteId}`,
        {
          method: "DELETE",
        }
      );
      const updatedNotes = notes.filter(
        (note) => note.id !== noteId
      );

      setNotes(updatedNotes);
    } catch (e) {
      console.log(e);
    }
  };
The End - Why not try the bonus challenges?
Congratulations on making it to the end! If you enjoyed this project, I have created a list of additional challenges to try over at codecoyotes.com.
If you have any questions or suggestions feel free to drop me a message here. See you in the next one!