

React (also known as React.js or ReactJS) is a free and open-source front-end JavaScript library for creating UI component-based user interfaces.
React is maintained by Meta (previously Facebook) along with a community of individual developers and organizations.
According to the 2021 Stack Overflow developer survey, React surpassed jQuery as the most commonly used web framework with about 40.14% of the market share. It was also the most desired, with one in every four developers using it. React is also used by over 8000 industry leaders.
In this article, we will see reasons why you should learn React and how to get started with it.
Why Learn React?
There are many reasons why you should learn React, but here are some of the most frequently mentioned points highlighted by many React experts:
React is easy to use
Many people, including myself, like React for its simplicity, flexibility, performance, usability, virtual DOM, components, and many other features.
Working with React simplifies our lives as developers because of its straightforward and modular infrastructure, which allows us to build and maintain our applications much more quickly.
There is a high demand for React developers
In the United States, the average yearly salary for a React developer is $120,000. Many businesses and companies use React, which forces them to look for new talent on a daily basis.
If you have any reservations about learning or becoming a React developer, reconsider. There's no need to worry – there will likely always be a job for you as a React developer because there are thousands of open positions right now (even remotely).
It is not difficult to learn the basics of React
This could be interpreted differently, as learning React as a complete beginner coder will undoubtedly take longer than learning JavaScript as an expert. But what I mean is that React is not difficult to grasp once you have thoroughly understood the fundamentals of JavaScript.
React also allows you to reuse simple pieces of functionality across your React web app.
To summarize, React is relatively simple to learn, has a large community of support with many open-source projects on Github, and offers many job opportunities.
Learning React will also help you better understand JavaScript, which will come in handy throughout your career.
Since React is a JavaScript framework, it is critical to understand certain JavaScript fundamentals in order to flow and understand React. Here is a detailed article on all of these fundamental JavaScript concepts and methods such as map, filter, and many others. This will help you learn React faster.
How to Install React
The best way to install React or create a React project is to install it with create-react-app. This is one of the steps that most beginners struggle with, but in this guide, we'll go over how to get started properly and successfully.
We'll be using our terminal for this (you can either make use of an in built terminal or download any you prefer). One prerequisite is to have Node.js installed on your PC, knowing full well that NPM (or, alternatively, Yarn) is required. We'll be using NPM for this guide.
To confirm that you have Node installed on your PC, just launch your terminal/command prompt and type node -v and npm -v to see which versions you have.
Because create-react-app requires that you have NPX installed, you'll need to make sure your Node version is not less than v14.0.0 and your NPM version is not less than v5.6.
Suppose you have an older version of NPM, you could use the following command to update it:
npm update -g
Once you've figured out NPM, you can now install React with create-react-app.
If you find it difficult working with terminals, you can check out this article on how to use the command line for beginners.
What is Create-react-app?
Though the name explains what it does, you might start to wonder what create-react-app really means.
Creating a React app manually is complicated and time-consuming, but create-react-app makes it much easier by automating all the configuration and package installation.
create-react-app is the best way to start building a new single-page application in React.
If you are interested in learning how to create a React app manually without create-react-app, you can check out this guide.
How to Create a React Application
The first step is to start your terminal/command prompt, navigate to the folder where you want to save your React application, and then execute this command:
npx create-react-app my-app
Note: my-app is the name of the application we are creating, but you can change it to any name of your choice.
The installation process may take a few minutes. After it is done, you should see a folder that appears in your workspace with the name you gave your app. Congratulations!
How to Run Your React Application
Now, head back to the terminal, and the first thing you need to do is navigate to the directory where the app was installed using cd my-app. Then finally run npm start to see your app live on localhost:3000.
You should see something like this:

Directory Structure
We've just finished the first part of this article. Now let's figure out what each file and folder in our React application means and does. This is critical either as a beginner or an experienced React developer.
The directory structure of your newly created React app looks like this when you open it:

Let’s now start by explaining these folders and what they stand for:
node_modules folder
The node_modules folder contains all of our dependencies, and this folder is ignored when we set up source control. But it is important to note that the package.json file works in tandem with the node_modules folder because it contains information about all of the dependencies as well as some script commands.
If you delete the node_modules folder, the application will break because you'll no longer have your dependencies.
To re-install these dependencies, you can use npm install – this will check the pakage.json file for a list of the dependencies and then install all of them. This will make it easy for you to push your code online or share your code with others without having to share the heavy node_modules folder.
Note: This is not just for create-react-app.
public folder
Although the majority of the work will be done in the src folder, the public folder contains some static files, such as the HTML file. You could, for example, change the title of your web app, add CDNs such as Google Fonts, and so on.
Note: Don't be afraid of this file because it's just a regular HTML file. The only code to remember is the div with the id root where the entire React application will be placed.
<div id="root"></div>
.gitignore file
Just as the name suggests, it’s a file that specifies which files and folders will be ignored by our source control.
When you open the file, you will see a list of files that are being ignored, including the node_modules and build folder. You can decide to add some particular files or folders.
build folder
The build folder is another folder that you can't see right now, but that you'll see when you build your project.
This will create a production-ready folder of static assets that can be hosted or deployed using a drag-and-drop option on a platform like Netlify.
src folder
So far, we've covered some fundamental folders, but our main concern is the src folder, which is where development takes place. Here's what the src folder looks like:

Let's start with the fundamental files: App.js, index.js, index.css, and App.css (you can delete every other file for now).
App.js
This is where all of your components will eventually meet. The name of the file isn't important, but it's good practice to keep this name so that other developers can understand your code.
index.js
This is the starting point for your application. More specifically, this is where you target the root id from the index.html file and render the App.js file, which is where your entire file (components and pages) will meet.
import React from 'react';
import ReactDOM from 'react-dom';
import App from './App';

ReactDOM.render(
  <React.StrictMode>
    <App />
  </React.StrictMode>,
  document.getElementById('root')
);
App.css and index.css
These both contain styles for your application. The index.css file contains global styling and the App.css file almost works the same as it does for the App.js file – but whether we use a CSS file is entirely up to us. While getting started, we can choose to delete one and use only one CSS file.
Understanding JSX
JSX is a JavaScript Extension Syntax used in React to easily write HTML and JavaScript together.
Writing code in React takes a long time because you have to use the React.createElement function every time, even if you are just adding a simple div.
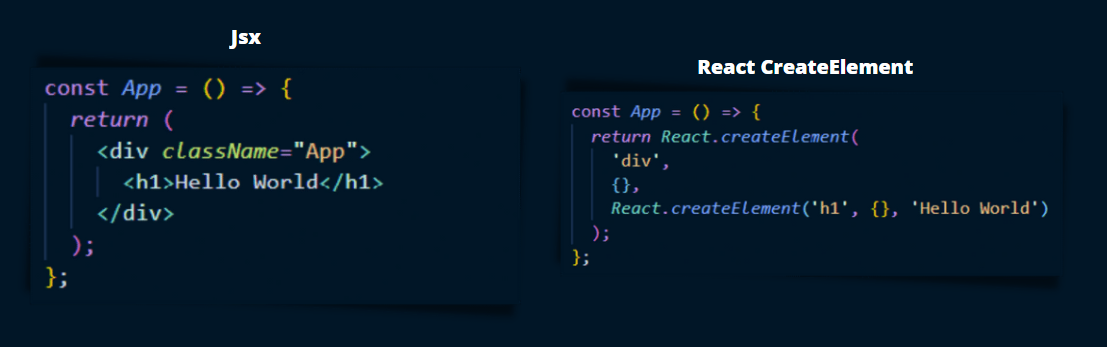
The image above depicts the exact same code written in JSX and with React.createElement. You can tell which is easier to write, understand, and manage by comparing the two.
create-react-app internally uses Babel for the JSX to JavaScript conversion, so you don't have to worry about configuring your own babel configuration with Webpack.
Some Do’s and Don’t of JSX
Make sure you're aware of some of these important details so that some bugs don't get in your way:
Your markup is usually placed after the return statement, either as a single line of code or as a block code.
All of your code should be wrapped in a single tag. This could be a
div, a tag with no content (<>), or any other tag.
const App = () => {
  return (
      <h1>JSX Title</h1>
      <p>This is first JSX Element!</p>
      <p>This is another JSX Element</p>
  );
};
This works fine with normal markup but would result in a major error because React requires adjacent elements to be wrapped in a parent tag. This simply means that for this code to run, it must be wrapped in a parent tag, such as a div, section, article, and so on.
const App = () => {
  return (
    <div>
      <h1>JSX Title</h1>
      <p>This is first JSX Element!</p>
      <p>This is another JSX Element</p>
    </div>
  );
};
You can also make use of the React.Fragment component.
How to Add Comments to JSX Code
As a developer, it's now standard practice to always add comments to your code, and JSX is no exception. You can either use the shortcut command (Cmd + / (Mac) or Ctrl + / shortcut keys to either add or remove a particular comment).
Note: We can pretty much do anything with JSX. You can read this article to learn more about how JSX works.
In summary, JSX just provides syntactic sugar for the React.createElement (component, props, ...children) function.
What Next?
Now that you know how to get started with React, the next step is to learn it properly, understand its functionalities, and so on.
Nowadays, there are a lot of great resources available for learning React, so many that it is difficult to determine which are current and useful.
Instead of attempting to take several courses at once, the best thing to do is find a helpful tutorial and complete it. Check out freeCodeCamp's Free React Course for 2022 or Learn React - Full Course for Beginners.
Conclusion
So far in this article, you've learned what React is, why you should learn React, how to install it on your machine. You've also learned what each of the files in its directory structure does.
From this point there is a lot to learn about React and I wish you good luck as you continue on in your studies. If you enjoyed this article, you can support me by either buying me a coffee or following me on Twitter.
Embark on a journey of learning! Browse 200+ expert articles on web development. Check out my blog for more captivating content from me.
Thanks for reading!