

Have you ever been confused by how Git and GitHub work? Don’t fret — you are not alone. Git and GitHub can be tricky sometimes, but by the end of this post you will have a good grasp of the two.
At first, it may be tempting to believe Git and GitHub are the same thing. But in reality they are not. Indeed, it is possible to use Git without GitHub! And ultimately, the two exist for different purposes.
This post will begin by taking a good look at the purposes of Git and GitHub. Afterward, we will learn about the main differences between these two vital technologies.
Without any further ado, let’s get it started with Git.
What is Git?
Git is a Distributed Version Control System (DVCS) used to save different versions of a file (or set of files) so that any version is retrievable at will.
Git also makes it easy to record and compare different file versions. This means that the details about what changed, who changed what, or who initiated an issue are reviewable anytime.
But if Git is a Distributed Version Control System, what exactly do those terms mean?
What does “distributed” mean?
The term “distributed” means that whenever you instruct Git to share a project’s directory, Git does not only share the latest file version. Instead, it distributes every version it has recorded for that project.
This "distributed" system is in sharp contrast to other version control systems. They only share whatever single version a user has explicitly checked out from the central/local database.
Okay, so “distributed” means distribute all — not just selected few — versions of a project’s files that Git has recorded. But what exactly is a version control system?
What is a Version Control System?
A Version Control System (VCS) refers to the method used to save a file's versions for future reference.
Intuitively, many people already version control their projects by renaming different versions of the same file in various ways like blogScript.js, blogScript_v2.js, blogScript_v3.js, blogScript_final.js, blogScript_definite_final.js, and so on. But this approach is error-prone and ineffective for team projects.
Also, tracking what changed, who changed it, and why it was changed is a tedious endeavor with this traditional approach. This illuminates the importance of a reliable and collaborative version control system like Git.
However, to get the best of Git, it is essential to understand how Git handles your files.
Files states in Git
In Git, there are three primary states (conditions) in which a file can be: modified state, staged state, or committed state.
Modified state
A file in the modified state is a revised — but uncommitted (unrecorded) — file.
In other words, files in the modified state are files you have modified but have not explicitly instructed Git to monitor.
Staged state
Files in the staged state are modified files that have been selected — in their current state (version) — and are being prepared to be saved (committed) into the .git repository during the next commit snapshot.
Once a file gets staged, it implies that you have explicitly authorized Git to monitor that file’s version.
Committed state
Files in the committed state are files successfully stored into the .git repository.
Thus, a committed file is a file in which you have recorded its staged version into the Git directory (folder).
Note: The state of a file determines the location where Git will place it.
File locations
There are three key places versions of a file may reside while version controlling with Git: the working directory, the staging area, or the Git directory.
Working directory
The working directory is a local folder for a project's files. This means that any folder created anywhere on a system is a working directory.
Note:
- Files in the modified state reside in the working directory.
- The working directory is different from the
.gitdirectory. That is, you create a working directory while Git creates a.gitdirectory. - Check out this comparison article for more differences between the two repositories.
Staging area
The staging area — technically called “index” in Git parlance — is a file, usually located in the .git directory, that stores information about files next-in-line to be committed into the .git directory.
Note:
- Files in the staged state reside in the staging area.
Git directory
The .git directory is the folder (also called “repository”) that Git creates inside the working directory you have instructed it to track.
Also, the .git folder is where Git stores the object databases and metadata of the file(s) you have instructed it to monitor.
Note:
- The
.gitdirectory is the life of Git — it is the item copied when you clone a repository from another computer (or from an online platform like GitHub). - Files in the committed state reside in the Git directory.
The basic Git workflow
Working with the Git Version Control System looks something like this:
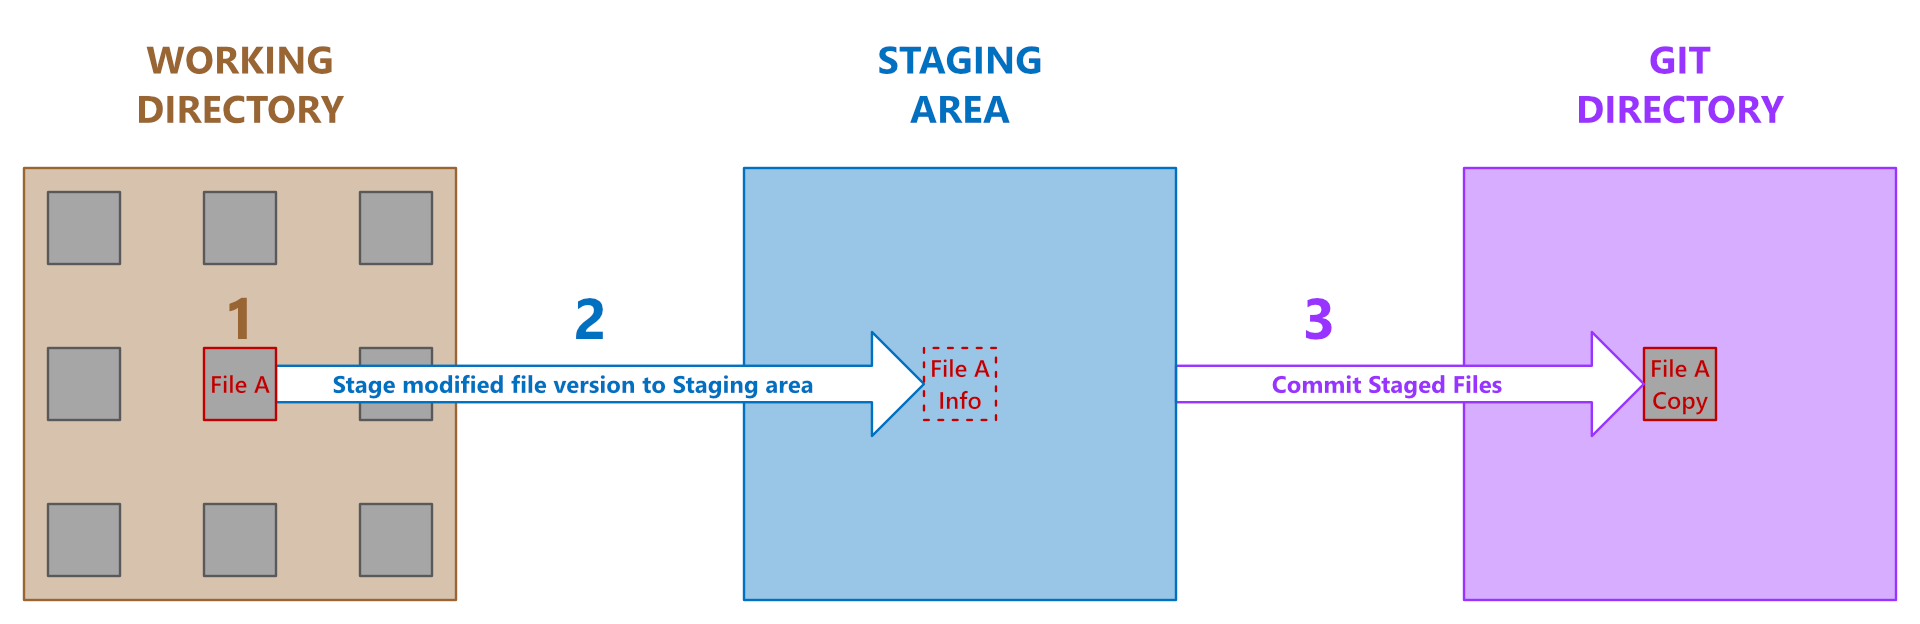
- Modify files in the working directory.
Note that any file you alter becomes a file in the modified state. - Selectively stage the files you want to commit to the
.gitdirectory.
Note that any file you stage (add) into the staging area becomes a file in the staged state.
Also, be aware that staged files are not yet in the.gitdatabase.
Staging means information about the staged file gets included in a file (called "index") in the.gitrepository. - Commit the file(s) you have staged into the .git directory. That is, permanently store a snapshot of the staged file(s) into the .git database.
Note that any file version you commit to the .git directory becomes a file in the committed state.
The gist thus far
The long and short of all the discussion thus far is that Git is a brilliant version control system for competent versioning, management, and distribution of files. Check out this simple guide to learn how to use Git efficiently.
But, hang on a sec, if Git helps to effectively manage and distribute different versions of a project's file, what is GitHub's purpose?
GitHub Demystified
GitHub is a web-based platform where users can host Git repositories. It helps you facilitate easy sharing and collaboration on projects with anyone at any time.
GitHub also encourages broader participation in open-source projects by providing a secure way to edit files in another user's repository.
To host (or share) a Git repository on GitHub, follow the steps below:
Step 1: Signup for a GitHub account
The first step to begin hosting on GitHub is to create a personal account. Visit the official registration page to sign up.
Step 2: Create a remote repository in GitHub
After signing up for an account, create a home (a repository) in GitHub for the Git repository you want to share.
Step 3: Connect the project’s Git directory to the remote repository
Once you've created a remote repository for your project, link the project’s .git directory — located locally on your system — with the remote repository on GitHub.
To connect to the remote repository, go inside the root directory of the project you want to share via your local terminal, and run:
git remote add origin https://github.com/yourusername/yourreponame.git
Note:
- Replace
yourusernamein the code above with your GitHub username.
Likewise, replaceyourreponamewith the name of the remote repository you want to connect to. - The command above implies that git should add the specified URL to the local project as a remote reference with which the local
.gitdirectory can interact. - The
originoption in the command above is the default name (a short name) Git gives to the server hosting your remote repository.
That is, instead of the server's URL, Git uses the short nameorigin. - It is not compulsory to stick with the server’s default name. If you prefer another name rather than
origin, simply substitute theoriginname in thegit remote addcommand above with any name you prefer. - Always remember that a server’s short name (for example,
origin) is nothing special! It only exists — locally — to help you easily reference the server’s URL. So feel to change it to a short name you can easily reference. - To rename any existing remote URL, use the
git remote renamecommand like so:
git remote rename theCurrentURLName yourNewURLName
- Whenever you clone (download) any remote repo, Git automatically names that repo’s URL
origin. However, you can specify a different name with thegit clone -o yourPreferredNamecommand. - To see the exact URL stored for nicknames like
origin, rungit remote -vcommand.
Step 4: Confirm the connection
Once you’ve connected your Git directory to the remote repository, check whether the connection was successful by running git remote -v on the command line.
Afterward, check the output to confirm that the displayed URL is the same as the remote URL you intend to connect to.
Note:
- See the “Connecting with SSH” article if you wish to connect using the SSH URL instead of the HTTPS URL.
- However, if you are not sure of the remote URL to use, check out the “Which remote URL should I use?” article.
- Do you wish to change your remote URL? Changing a remote's URL is an excellent guide.
Step 5: Push a local Git repo to the remote repo
After successfully connecting your local directory to the remote repository, you can then begin to push (upload) your local project upstream.
Whenever you are ready to share your project elsewhere, on any remote repo, simply instruct Git to push all your commits, branches, and files in your local .git directory to the remote repository.
The code syntax used to upload (push) a local Git directory to a remote repository is git push -u remoteName branchName.
That is, to push your local .git directory, and assuming the remote URL’s short name is “origin”, run:
git push -u origin master
Note:
- The command above implies that git should push your local master branch to the remote master branch located at the URL named origin.
- Technically, you can substitute the
originoption with the remote repository’s URL. Remember, theoriginoption is only a nickname of the URL you’ve registered into your local.gitdirectory. - The
-uflag (upstream/tracking reference flag) automatically links the.gitdirectory's local branch with the remote branch. This allows you to usegit pullwithout any arguments.
Step 6: Confirm the upload
Lastly, go back to your GitHub repository page to confirm that Git has successfully pushed your local Git directory to the remote repository.
Note:
- You may need to refresh the remote repository's page for the changes to reflect.
- GitHub also has a free optional facility to convert your remote repository into a functional website. Let see “how” below.
Publish your website with GitHub pages
After pushing your project to your remote repository, you can easily publish it on the web by following these steps:
Step 1: HTML File Name
Make sure that the name of the main HTML file of your project is index.html.
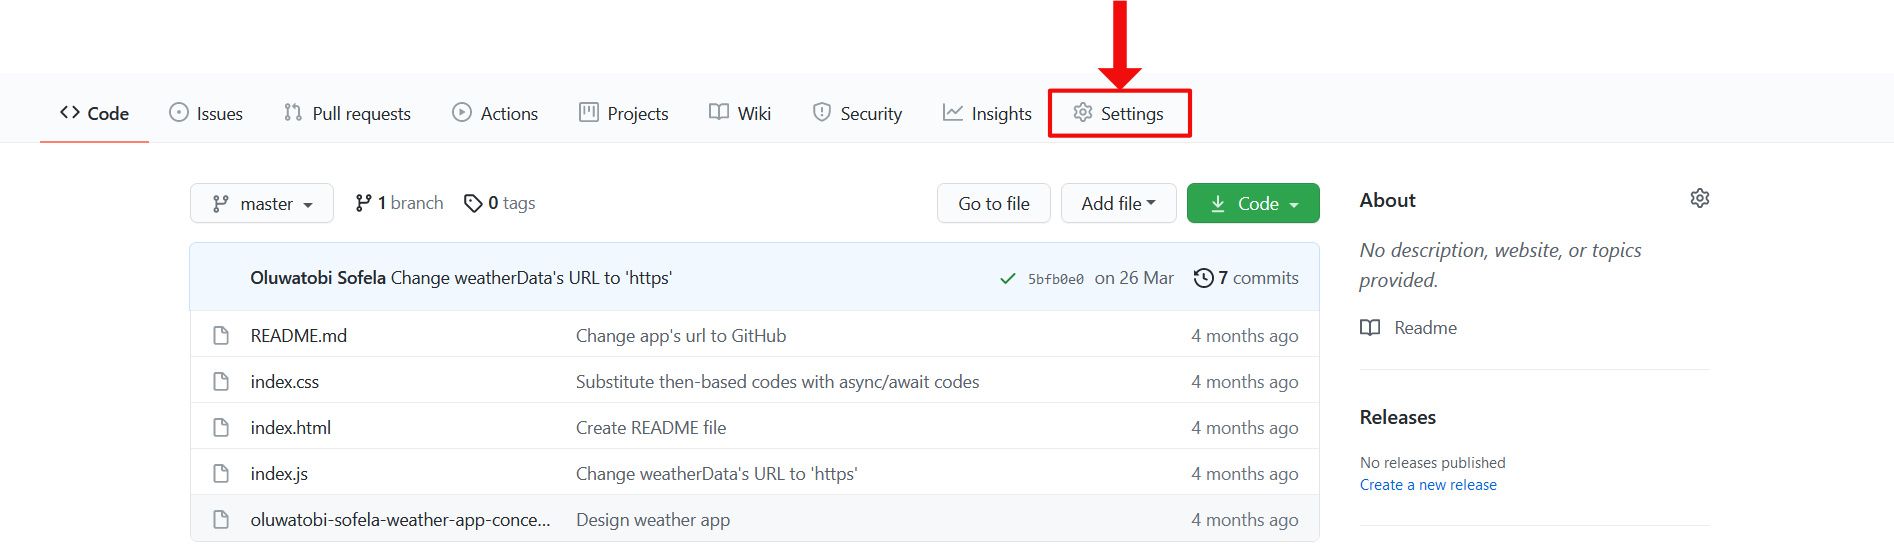
Step 2: Go to the Settings Tab
On GitHub’s website platform, go into the repository of the project you want to publish and click the repository’s settings tab.
Step 3: Go to the Pages Tab
Scroll down to the GitHub Pages section.
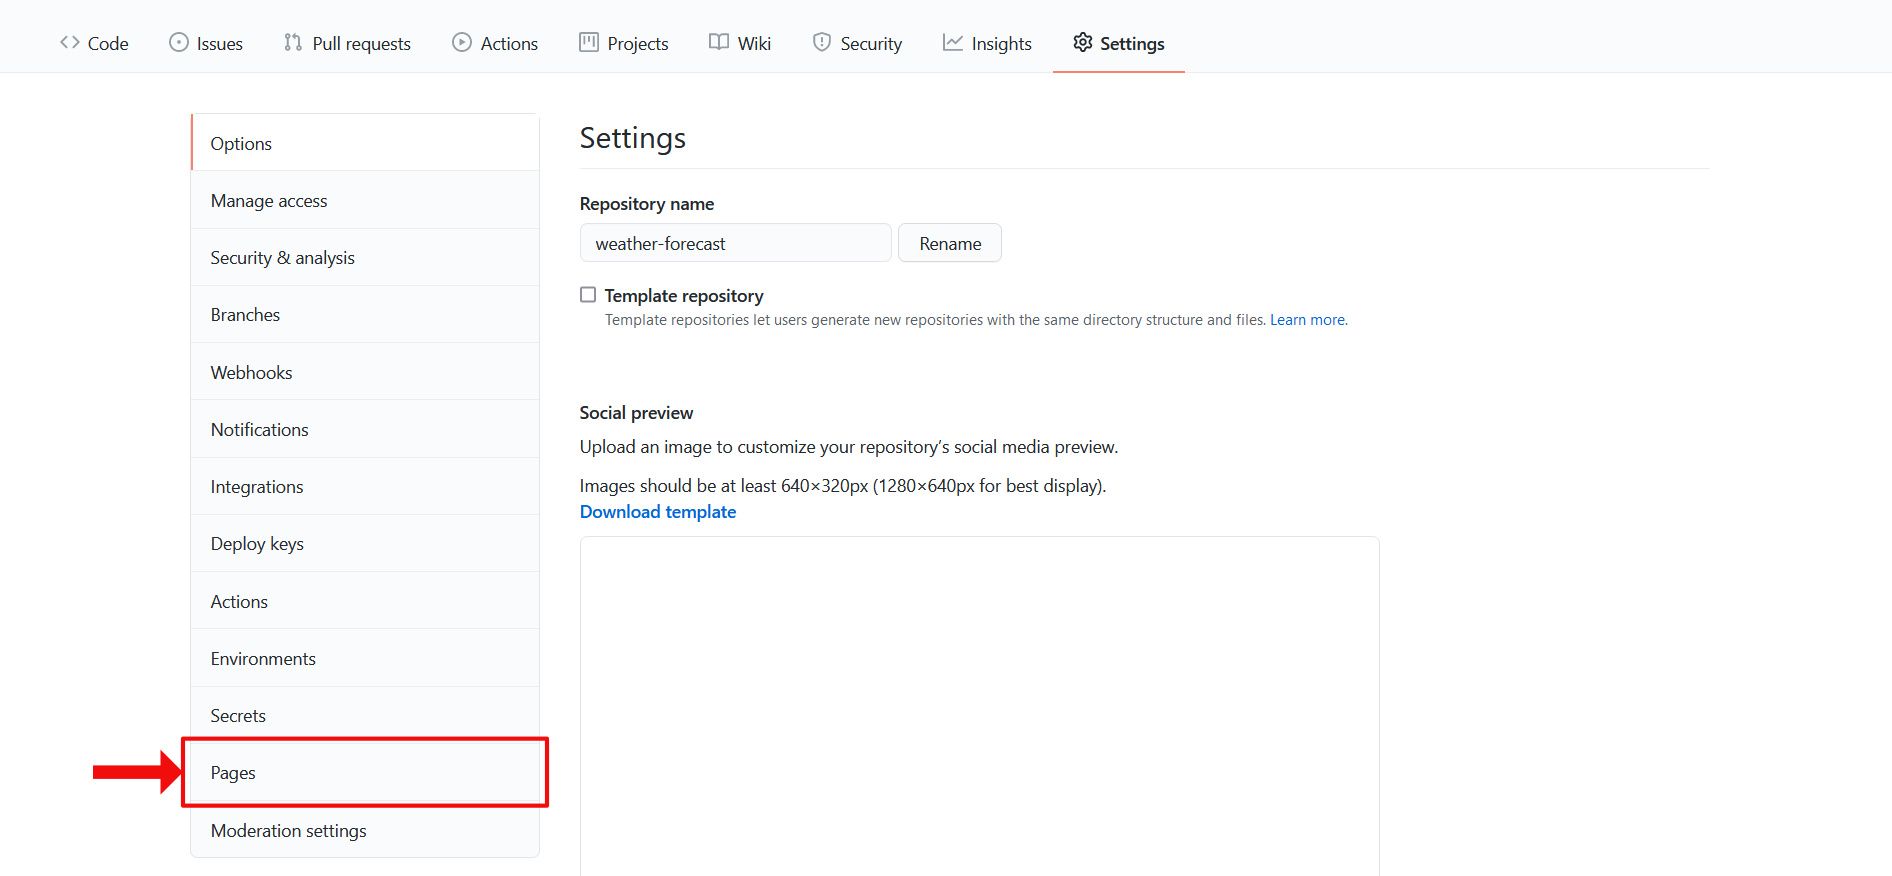
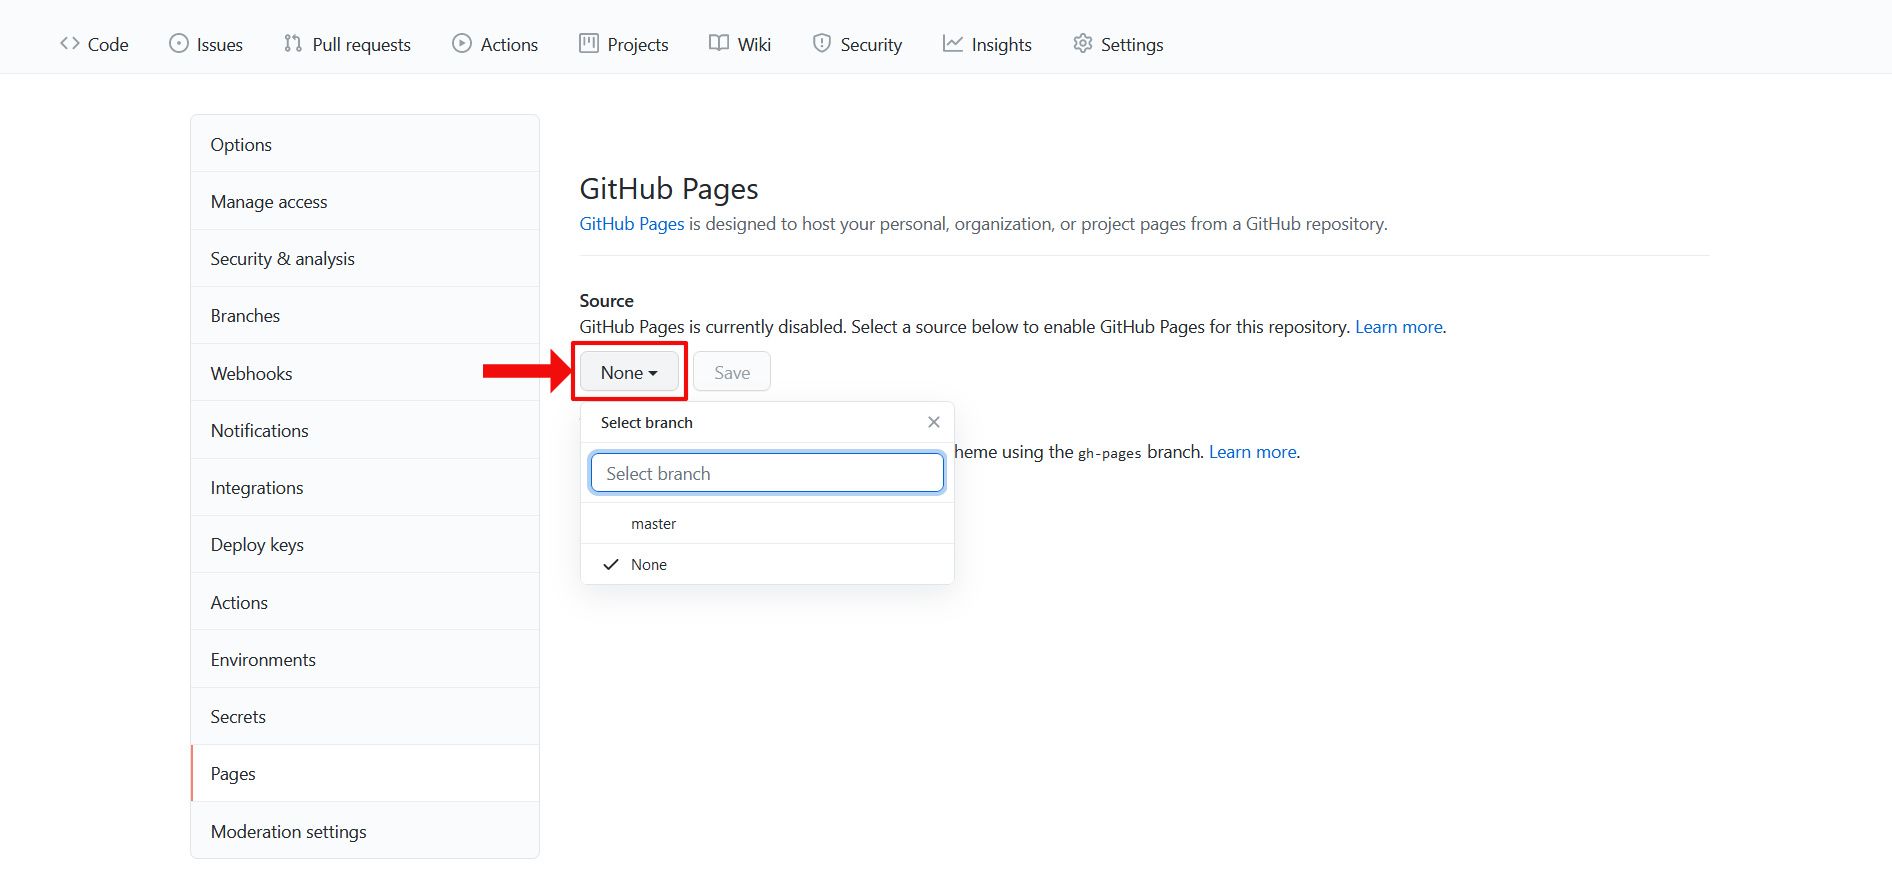
Step 4: Change the Source
There, change the Source branch from none to master.
Step 5: See Your Site Live!
Afterward, a notification saying, “Your site is published at https://your-username.github.io/your-github-repo-name/” will display.
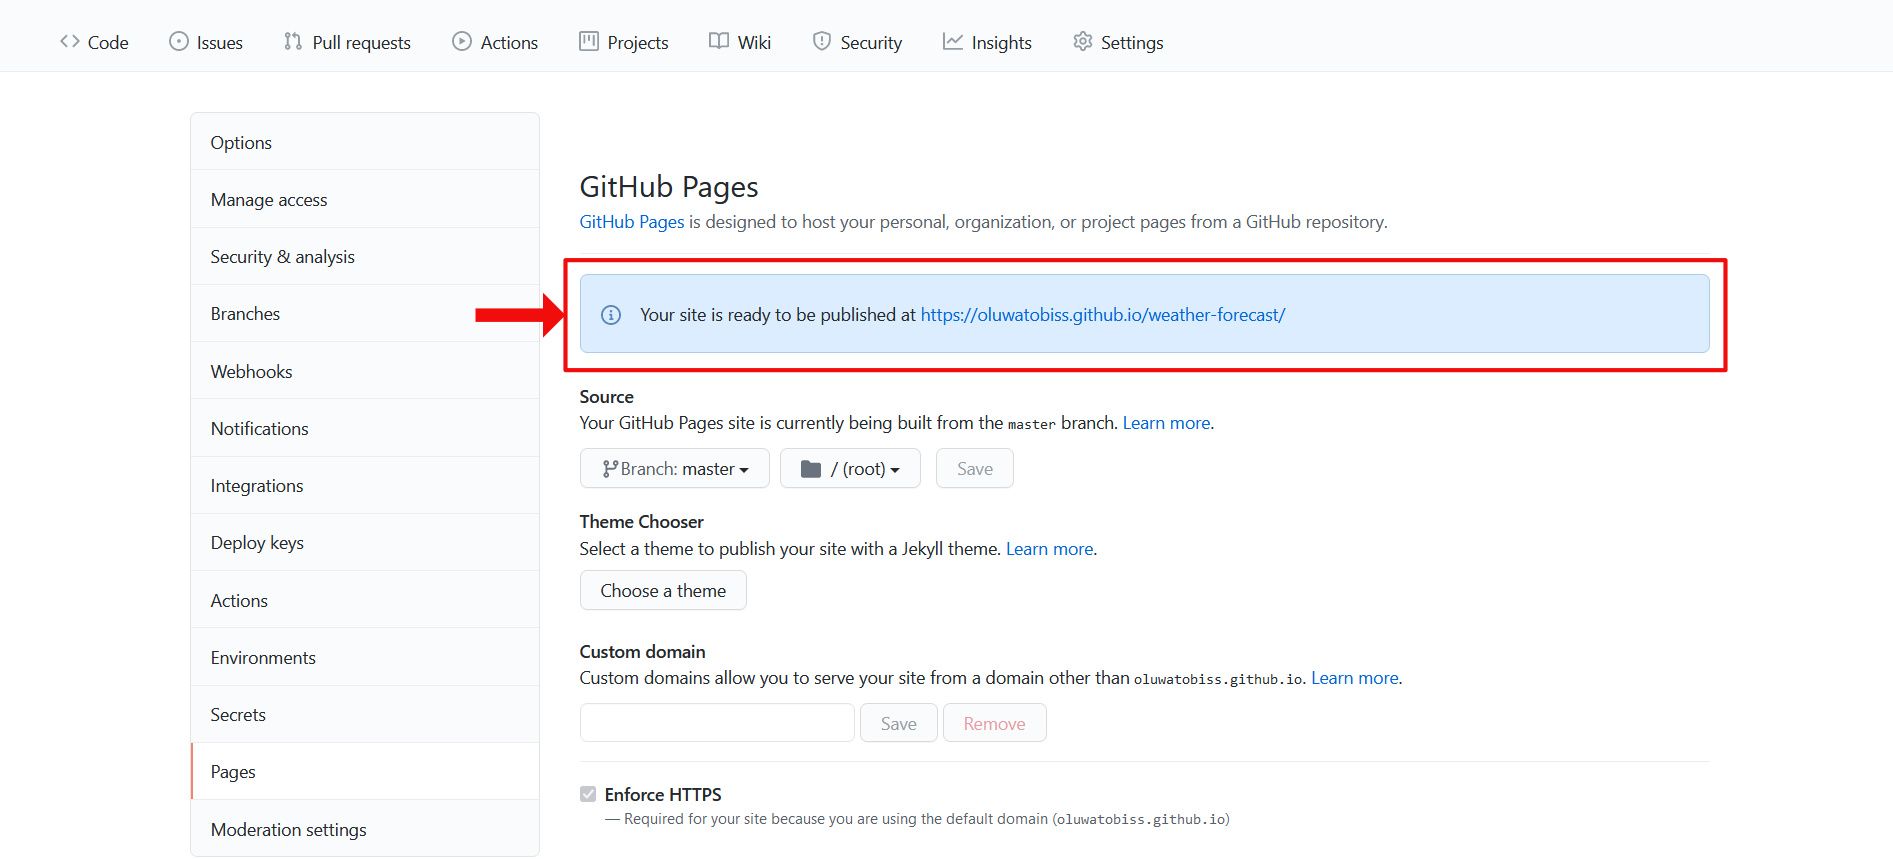
Now you can view — and publicize — your project at the specified URL.
This section has merely scratched the surface of publishing your project with GitHub. To learn more about GitHub pages, check out this “Working with GitHub Pages” documentation.
In short
GitHub is an online platform for hosting (or sharing) Git repositories. It helps you create an avenue to collaborate easily on projects with anyone, at any place, at any time.
Still in doubt?
Are you still perplexed about the fine line between Git and GitHub? Don’t worry — I have you covered. Below are five key differences between Git and GitHub.
Difference 1: Git vs. GitHub — Primary function
Git is a distributed version control system that records different versions of a file (or set of files). It lets users access, compare, update, and distribute any of the recorded version(s) at any time.
However, GitHub is mainly a hosting platform for hosting Git repositories online. It lets users keep their remote repository private or open for collaborative endeavors.
Difference 2: Git vs. GitHub — Operation platform
Users install and operate Git on their local machines. This means that most of Git's operations are achievable without the internet.
GitHub, however, is a web-based service that operates solely online. This means that you need the internet to do anything on GitHub.
Difference 3: Git vs. GitHub — Inventors
Linus Torvalds began the development of Git in April, 2005.
Chris Wanstrath, P. J. Hyett, Tom Preston-Werner, and Scott Chacon founded GitHub.com in February, 2008.
Difference 4: Git vs. GitHub — Maintainers
In July 2005, Linus Torvalds turned over Git's maintenance to Junio C. Hamano — who has been the chief maintainer since then.
And Microsoft acquired GitHub in October, 2018.
Difference 5: Git vs. GitHub — Competitors
Popular alternatives to Git are Mercurial, Team Foundation Version Control (TFVC), Perforce Helix Core, Apache Subversion, and IBM Rational ClearCase.
GitHub’s closest competitors are GitLab, Bitbucket, SourceForge, Cloud Source Repositories, and AWS CodeCommit.
All in all
Git and GitHub are two different entities that help you manage and host files. In other words, Git serves to control file versions while GitHub is a platform for hosting Git repositories.