
As developers we push regular code commits – and after a while, it's almost second nature to us.
But does this mean we're doing things right? Familiarity often leads to sloppiness and overlooking the basics.
In this article, we will explore
- How to write meaningful Git commit messages
- How to create efficient pull requests (PR)
- How to get really good at the code review process and some best practices to follow
Pre-Requisites:
I prefer to use VS Code as my code editor. I use this for my Git editor too. I find it easier to write commit messages within the same place as I code. It also gives me more space to write commit messages and descriptions.
If you haven't already done this, follow these steps to make VS Code your default git editor.
- Open VS Code and in the command palette search for
Shell Command: Install 'code' command to PATH
- Then run the following command in your terminal:
git config --global core.editor "code --wait"
Now when you run git commit or git -config --global -e it will open the Git editor within a file in VS Code.
Note: All given commands are to be run within the terminal (whether that be your terminal of choice, or the integrated terminal within VS Code).
How to Write Meaningful Commit Messages
When committing your code, it's helpful to write useful commit messages. Here are some tips and best practices to help you do so.
Use Imperative Commands
Prefix your commit messages with imperative commands such as: fix, refactor, add, and remove
This is because you should be able to suffix a commit message to the phrase
"If applied, this code will..."
and inform other developers what it will do, for example:
If applied, this code will fix issue with login button not showing
Keep It Brief
You're not writing a monologue, so keep it brief. As a general rule, a commit message should not exceed 50 characters.
Put yourself in the developer's or reviewer's shoes. Try and think about what you would want to know if you were looking at the Git log on this repo.
- What work did you complete?
- Why did you do it?
- What effect does it have on the code base?
Here's an example of a concise yet informative commit message:
fix issue with login button not showing
How to Keep Commit Messages Short but Helpful
Within your commits, you can include a commit description, allowing us to add even more detail / context as to what you did.
Add an empty line underneath the commit message, and begin writing a description on line 3. It looks like this:
fix issue with login buttton not showing

- update login form validation
- update login styling for showing the button
Now when other devs are reviewing Git logs, commits, or needing to revert code they have a better indication of what effect will take place, and whether it will cause any breaking changes.

Examples of Unhelpful Commit Messages
On the other hand, here are some examples of ineffective commit messages:
fixed bug– There is no reference to what bug has been fixed exactly, so it adds no value to the git history / logs. It will make reviewing previous commits extremely difficult, and painstaking. As a developer you would have to open each commit like this to understand what it's actually doing.refactored due to PR comments– This message gives us no information about what was changed. We would have to hunt down the pull request to gather any context around the changes made, or again open up the commit.fixing previous commit– Lack of context againmade tests pass– Which test file was updated? You should at least give the name or area of tests that have been fixed.
All of these are poor examples of commit messages due to their ambiguity, lack of information, and lack of context. They force team members to do more work in order to understand what's going on, which is not acceptable in any team.
How to Develop a Commit Strategy
You may think committing code is as straightforward as just committing and pushing the code. But there's a little more to it than that.
Let's talk about how you can develop a useful commit strategy to stay consistent and make useful commits.
Make small, specific commits
Smaller commits make it easier to revert code to a previous state if there's a problem. If your commit affects too many areas, reverting back could mean losing a lot of code.
It's also far easier for reviewers to understand what the code is doing if it's related to one purpose.
Let's see a real life example of how this would work. Firstly we need to add our related file changes. We can view which files have been changed within our branch by running git status
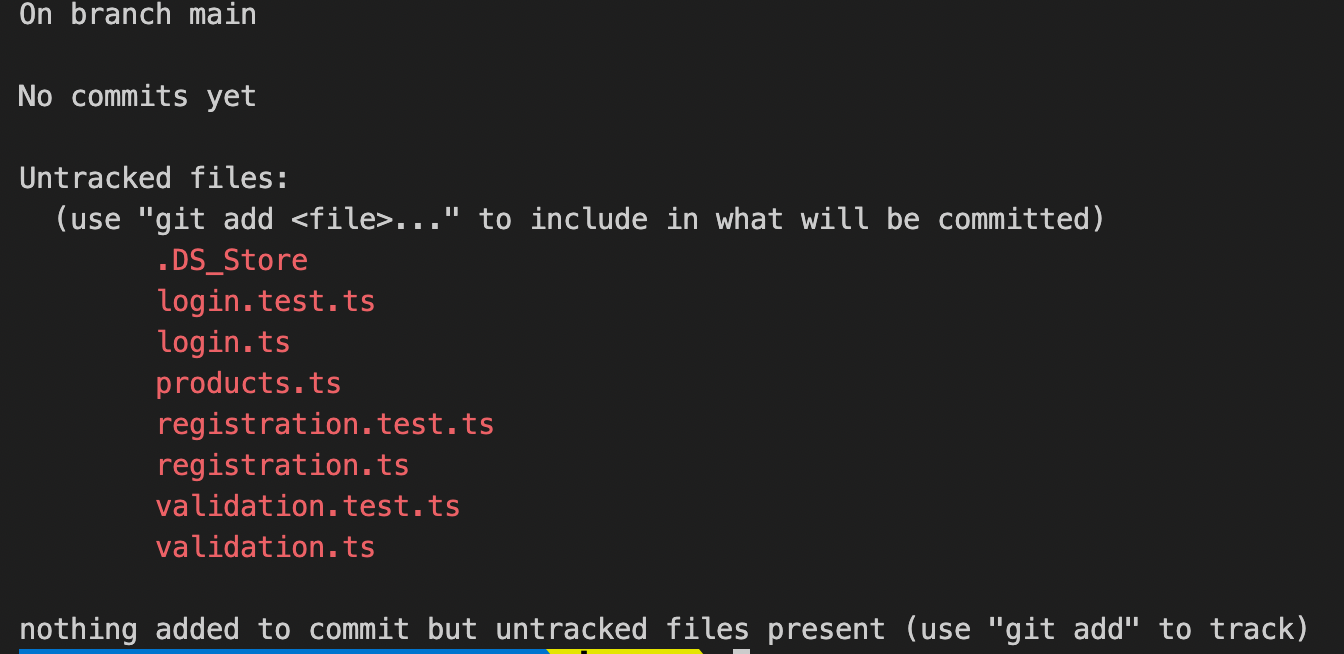 Example of output from git status
As you can see there are various files that have been changed / added to the project. However, they're all for different areas of the project. Following the golden rule of keeping commits small and relatable, let's take a look at how we can put that into practice.
Using the git add followed by the file names we can commit only the files which are related. We do this by using the git add command , plus the names of the files we wish to add one after another like so:
git add login.test.ts login.ts
If we check git status now, we'll see the two staged files:
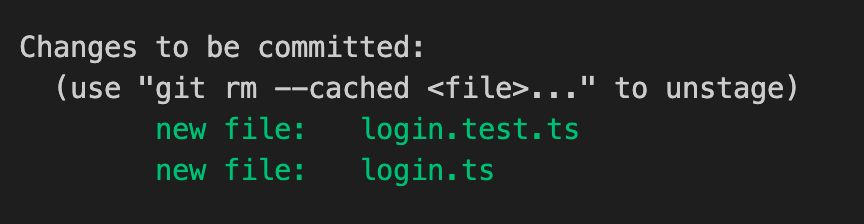 Example of Git status output after staging files
We have the files, now to create our commit. As always, we'll utilise git commit which will open the git editor within VS Code (as we set it up like this earlier). If you skipped this step, the commit will open in your preferred editor.
We'll add a commit message of the changes:
Fix issue with login buttton not showing
There you have it, a small related file commit. The commit message tells us exactly what we've done, where the issue resided, along with some small context of what the issue was.
Bad Example of a Commit
Since we've done it successfully, lets take a look at a bad example:
So imagine we've done all this work, and the developer has staged all the files at once, using the git add -A command which stages all changed/added files.
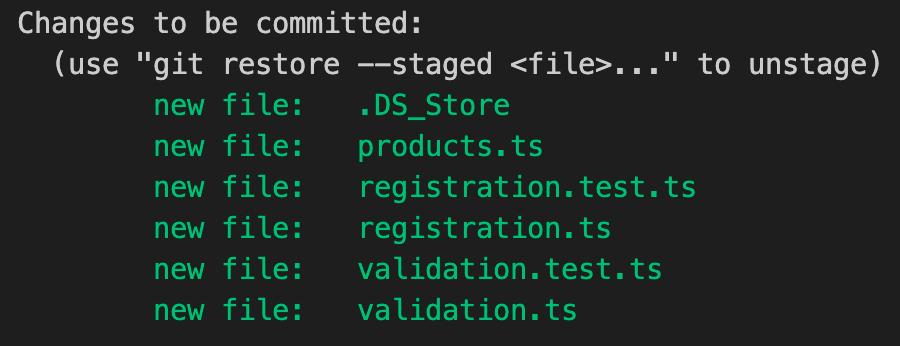 Example of multiple unrelated files staged for commit
They now create a commit message utilising the one liner Git command:
git commit -m 'Updated various areas such as validation, registration and products pages'
Why is this so bad?
- Firstly there's too much happening within this commit. Too many files mean that if we need to revert the validation changes, only we can't. We'd have to revert the whole commit losing the products and registration changes.
- The commit message is lengthy. We can remove unnecessary words like 'various areas such as'. It adds no value to the commit message, and takes up characters that could be used for more context.
- We're not using the imperative voice as mentioned earlier. We should change "Updated" to 'Update'.
If applied, this code will fix the submit button not showing on the login
Midway Recap
So at this point, we've learnt:
- How to formulate a useful commit message
- How to formulate an effective commit strategy to allow us to easily keep track of related changes, and a more maintainable code base.
- What makes a bad commit
How to Create Efficient Pull Requests
Decide when to push
Pushing is the act of getting your commits up to the server / remote origin ready to create a Pull Request (PR). I recommend pushing as soon as the current feature or bug is done.
Also, it's a good idea to keep your PR's small, containing only related commits. As an example if you had the following commits:
Add new product search componentAdd unit tests for product search componentAdd documentation for product search component
Because all these commits are related to the same component, it's recommended to pull them together into one PR.
Whereas, something like:
Fix bug within login screenRefactor registration page for performanceUpdate validation tests for login formUpdate login tests for forgotten passwordUpdate unit tests for product search component
Should not go in the same PR, as there's far too much going on. These commits should have been grouped into several PR's containing relevant commits at the time.
If this was the Git log for a branch, you would be unable to create a pull request with solely relatable files, due to the order in which the commits have been created, as you can't simply inform Git that you want commits 1,3 and 4 to go into this PR.
Keep it small
Remember – like your commits, keep your PR's small. Nobody wants to wade their way through a 50+ file pull request. All that'll happen then is that your review will suffer from the common "Looks good to me".
When you create a large PR, it translates to "I couldn't be bothered to look through all these files, but skimming through them it looks ok". With a smaller PR, on the other hand, it means exactly what it says.
Sometimes large pull requests are unavoidable, like when updating base functions and such. However, you should try to be aware of how you can limit the impact on other developers.
How to Get Your Branch Ready For Code Review
The exact process of creating a Pull Request will differ depending on which version control hosting platform you are using, but the concepts are the same.
First, you should check out the main branch from your repo. Then run a git pull, which will get all the latest code from main onto your local dev system.
Once you've done that, you can go back to your own branch using git checkout and the name of your branch , for example git checkout login-fixes.
Now we need to get the main branch code into ours. We can do this utilising the git merge command.
git merge main
If there were changes, that is there were files in the pull from main, you will need to create a "merge commit". That's just another commit to your own branch containing the merged changes.
Simply create another commit, with a message explaining you've merged from main like so:
git commit -m 'Merge main into login-fixes'
Push your changes back to the remote server using git
How to Create the Pull Request
The easiest way to do this is via the web interface on your preferred version control platform. In this example we'll be utilising GitHub.
Simply navigate to your repo, and then click the Pull Requests tab.
 Pull Requests Tab - GitHub
Select "New pull request"
 New Pull Request - Github

When you're creating a pull request, use a title which describes the PR like you did with your commit.
PR - Fix login button not showing.
It can be useful to provide the reviewers with some context as to why this PR was necessary, or any additional info within the PR description.
As you can see above, I've chosen to include what the fix was, potentially making the review smoother. I've also included some important information regarding that this PR should not be merged until another PR is merged.
When working for some companies, they may require you to add a ticket reference to the PR title too, but I've already discussed why I think this is not needed.
PR Labels
If you want to make it even clearer, you can utilise PR Labels. These are labels which can be applied to the PR to illustrate either the state of the PR, or simple information to others. You can find them on the right of the pull request page:

You can select from pre-defined labels, or add your own.
- Click on Labels
- Enter the label you wish to use. In our scenario we're going to add a label called
Do Not Merge. - Press enter once you have typed in the value, and you can configure the label's colour and name. Once saved you can now type it in again and it will show within the list.
- Select your new label and voilà!

Click Create pull request

There you have it, you have created your first pull request.
How to Review a PR – Best practices
What to look for when reviewing a PR
Always take a step back and think about the key elements of a good code review. Here are some points to consider:
- Does the code follow your team's coding guidelines?
- Does the code meet its objective / acceptance criteria?
- Is the code legible and is it easy to understand what it's doing without the need for heavy comments / documentation? (This one for me is one of the most important, as I'm a huge fan of descriptive function and variable names.)
- Does the code need any refactoring, considering security, performance or simply ease of reading?
- Does the code follow simple design patterns / principles, like the single responsibility, abstraction, encapsulation, and so on? If not, you can make suggestions on how this can be achieved or perhaps teach those not familiar with it what it means and the benefits.
- Are there any "magic numbers / strings" that would be better served as a constant or named variable?
Review PRs in a timely manner
While you shouldn't necessarily feel obligated to look at a PR immediately, don't leave the author hanging, either. This PR could be blocking future work, or it could be important (if this is the case, the author should make this clear).
Try and keep discussions and PR comments flowing. If it makes it easier, you can jump on a call (if remote) or pull up a chair in the office and go through the PR together. This might speed up the process, and reduce the back and forth waiting around.
All this being said, don't rush the code review. Be meticulous, and read each file and change carefully. I advise you to pull down the branch the changes are made on, allowing yourself to look over the entire project, and not just the lines changed.
Many times, if you're looking at just one or two line code changes, you won't know exactly what the code is supposed to be doing. But if you look at the whole file you can follow the flow.
If you're using VS Code and GitHub, you can utilise their own extension for viewing pull requests and viewing comments whilst checking out the PR branch all within VS Code itself.
We're all human here
Remember that we're all human, and people often make mistakes when coding and can simply overlook things.
Not everyone codes the same way you do either, so don't simply request changes just because they've done it differently to how you would have. It doesn't mean that they've done it wrong, nor does it mean your way is the best.
Describe changes clearly and word your comments carefully
A pull request is not an exam, it is also not an opportunity for you to harshly criticise someone's work. It's a learning opportunity, and a chance to ensure the best code makes it into the main branch. It's about code quality and whether the code meets the acceptance criteria.
Think about the language you use when making suggestions. A PR comment is the opposite to a git commit message. No longer do we use the imperative voice. Do not command them to make changes, but instead make softer suggestions using the subjunctive mood instead.
As you're critiquing work that someone has most likely put a lot of effort into, use phrases like:
It it were me, I'd change this if statement to a switch case statement as it's more readable.
or
Perhaps consider renaming this variable to a more intuitive name, such as {alternative} to make it more understandable from initial read what it's doing.
As above, try and add your reasoning as to why you're making the change request. It will make the request more impactful, and allow the author to reflect on whether it would be best to make the change, or perhaps spark a discussion to come to a compromise.
Offer suggestions for improvement
Most Git systems allow you to click on the line you wish to be changed and add a comment so it's much simpler to specify the exact line of code you want changed.
Hosting providers such as GitHub have a "suggestion" feature which allows you to add a code suggestion directly into the comment, which can instantly be accepted and committed from within the PR.
If this isn't available, be sure to make sure what you're requesting is clear and concise. Perhaps even rewrite, or write out your suggestion within the comment such as:
Perhaps look at changing this if / else statement to a ternary statement like so:
var backgroundColor = isError ? 'red' : 'blue'
This makes the suggestion clear, and even speeds up the process of re-writing (using copy and paste).
Don't be afraid to defend your code
Remember a PR is a discussion. It's a two way process, giving you the opportunity to defend your code and explain with more context what you were thinking.
Just because the code may not look perfect, there may be a reason. There may have been matters out of your control which you had to contend with, forcing your hand to writing it in a certain way.
Don't be afraid to offer counter arguments, but be ready with valid reasoning, if you truly believe in your solution.
Communicate that the PR is approved
Many people nowadays filter their GitHub or version control email notifications to a folder which rarely gets looked at due to the volume of updates on repos, commits, branches and such.
To speed up the process, and make it more fun for the author, simply drop them a message. Many companies now offer some form of instant messaging service, so why not use it?
Setup a specific channel on your IM platform for PR's. Post in the channel / chat room your PR link, and allow reviewers to update you on their progress by replying within threads. Add an emoji to make it more light hearted (as we all know PR's can be boring, so why not spruce them up a bit).
Conclusion
In this article we've learned:
- How to setup VS Code with Git integration
- How to write useful Git commit messages
- When to commit to make it easier for the team
- How to effectively code review a PR
- How to handle PRs in a manner that helps all your team.
I hope you've learned something new, thanks for reading my article
Feel free to connect with me on Twitter @gWeaths