

Many of us use git on a daily basis. But how many of us know what goes on under the hood?
For example, what happens when we use git commit? What is stored between commits? Is it just a diff between the current and previous commit? If so, how is the diff encoded? Or is an entire snapshot of the repo stored each time? What really happens when we use git init ?
Many people who use git don’t know the answers to the questions above. But does it really matter?
First, as professionals, we should strive to understand the tools we use, especially if we use them all the time — like git .
But even more acutely, I've found that understanding how git actually works is useful in many scenarios — whether it’s resolving merge conflicts, looking to conduct an interesting rebase, or even just when something goes slightly wrong.
You’ll benefit from this post if you’re experienced enough with git to feel comfortable with commands such as git pull ,git push ,git add or git commit.
Still, we will start with an overview to make sure we are on the same page regarding the mechanisms of git, and specifically, the terms used throughout this post.
I also uploaded a YouTube series covering this post — you are welcome to watch it here.
What to expect from this tutorial
We will get a rare understanding of what goes on under the hood of what we do almost daily.
We will start by covering objects — blobs, trees, and commits. We will then briefly discuss branches and how they are implemented. We will dive into the working directory, staging area and repository.
And we will make sure we understand how these terms relate to the git commands we know and use to create a new repository.
Next, will create a repository from scratch — without using git init, git add, or git commit. This will allow us to deepen our understanding of what is happening under the hood when we work with git.
We will also create new branches, switch branches, and create additional commits — all without using git branch or git checkout.
By the end of this post, you will feel like you understand **git**. Are you up for it? 😎
Git Objects — blob, tree and commit
It is very useful to think about git as maintaining a file system, and specifically — snapshots of that system in time.
A file system begins with a root directory (in UNIX-based systems, /), which usually contains other directories (for example, /usr or /bin). These directories contain other directories, and/or files (for example, /usr/1.txt).
In git, the contents of files are stored in objects called blobs, binary large objects.
The difference between blobs and files is that files also contain meta-data. For example, a file “remembers” when it was created, so if you move that file into another directory, its creation time remains the same.
Blobs, on the other hand, are just contents — binary streams of data. A blob doesn’t register its creation date, its name, or anything but its contents.
Every blob in git is identified by its SHA-1 hash. SHA-1 hashes consist of 20 bytes, usually represented by 40 characters in hexadecimal form. Throughout this post we will sometimes show just the first characters of that hash.

In git, the equivalent of a directory is a tree. A tree is basically a directory listing, referring to blobs as well as other trees.
Trees are identified by their SHA-1 hashes as well. Referring to these objects, either blobs or other trees, happens via the SHA-1 hash of the objects.

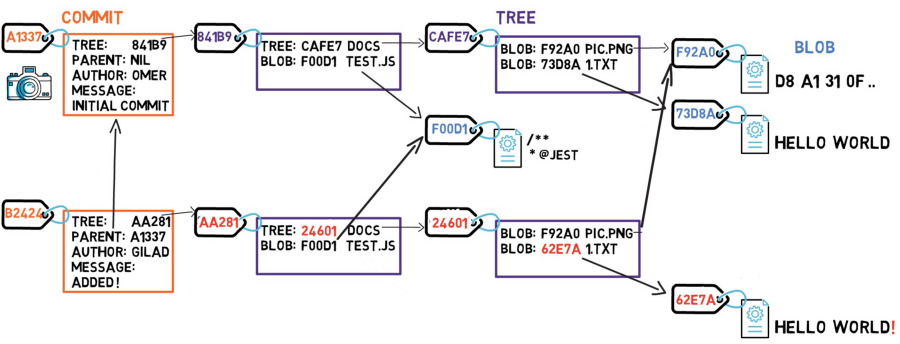
Note that the tree CAFE7 refers to the blob F92A0 as pic.png. In another tree, that same blob may have another name.

The diagram above is equivalent to a file system with a root directory that has one file at /test.js, and a directory named /docs with two files: /docs/pic.png and /docs/1.txt.
Now it’s time to take a snapshot of that file system — and store all the files that existed at that time, along with their contents.
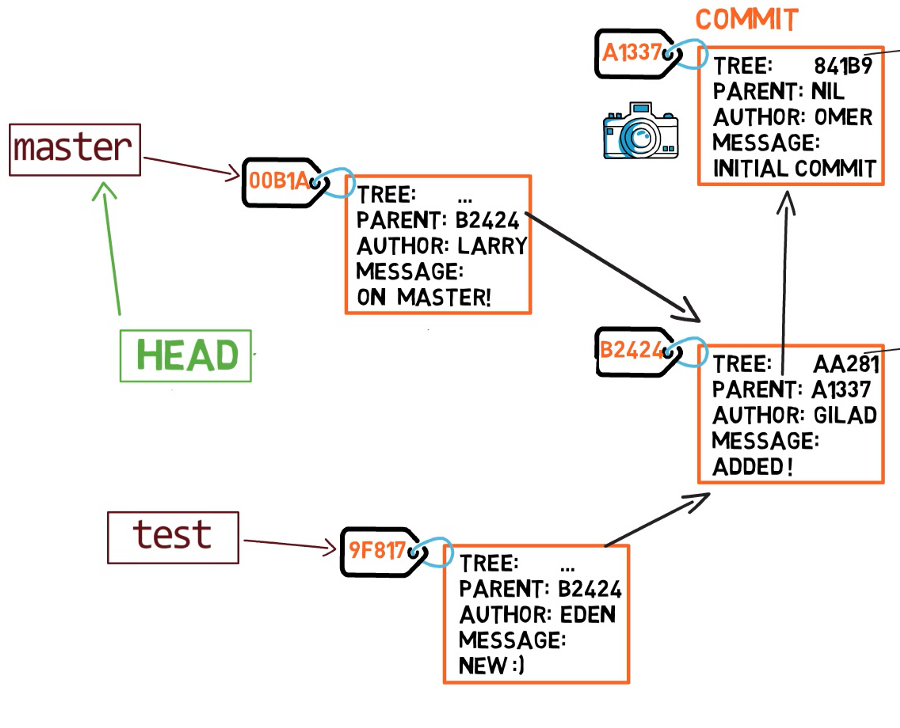
In git, a snapshot is a commit. A commit object includes a pointer to the main tree (the root directory), as well as other meta-data such as the committer, a commit message and the commit time.
In most cases, a commit also has one or more parent commits — the previous snapshot(s). Of course, commit objects are also identified by their SHA-1 hashes. These are the hashes we are used to seeing when we use git log.

Every commit holds the entire snapshot, not just diffs from the previous commit(s).
How can that work? Doesn’t that mean that we have to store a lot of data every commit?
Let’s examine what happens if we change the contents of a file. Say that we edit 1.txt, and add an exclamation mark — that is, we changed the content from HELLO WORLD, to HELLO WORLD!.
Well, this change would mean that we have a new blob, with a new SHA-1 hash. This makes sense, as sha1("HELLO WORLD") is different from sha1("HELLO WORLD!").

Since we have a new hash, then the tree’s listing should also change. After all, our tree no longer points to blob 73D8A, but rather blob 62E7A instead. As we change the tree’s contents, we also change its hash.
 The tree that points to the changed blob needs to change as well
And now, since the hash of that tree is different, we also need to change the parent tree — as the latter no longer points to tree CAFE7, but rather tree 24601. Consequently, the parent tree will also have a new hash.

Almost ready to create a new commit object, and it seems like we are going to store a lot of data — the entire file system, once more! But is that really necessary?
Actually, some objects, specifically blob objects, haven’t changed since the previous commit — blob F92A0 remained intact, and so did blob F00D1.
So this is the trick — as long as an object doesn’t change, we don’t store it again. In this case, we don’t need to store blob F92A0 and blob F00D1 once more. We only refer to them by their hash values. We can then create our commit object.
 Blobs that remained intact are referenced by their hash values
Since this commit is not the first commit, it has a parent — commit A1337.
So to recap, we introduced three git objects:
- blob — contents of a file.
- tree — a directory listing (of blobs and trees).
- commit — a snapshot of the working tree.
Let us consider the hashes of these objects for a bit. Let’s say I wrote the string git is awesome! and created a blob from it. You did the same on your system. Would we have the same hash?
The answer is — Yes. Since the blobs consist of the same data, they’ll have the same SHA-1 values.
What if I made a tree that references the blob of git is awesome!, and gave it a specific name and metadata, and you did exactly the same on your system. Would we have the same hash?
Again, yes. Since the trees objects are the same, they would have the same hash.
What if I created a commit of that tree with the commit message Hello, and you did the same on your system. Would we have the same hash?
In this case, the answer is — No. Even though our commit objects refer to the same tree, they have different commit details — time, committer etc.
Branches in Git
A branch is just a named reference to a commit.
We could always reference a commit by its SHA-1 hash, but humans usually prefer other forms to name objects. A branch is one way to reference a commit, but it’s really just that.
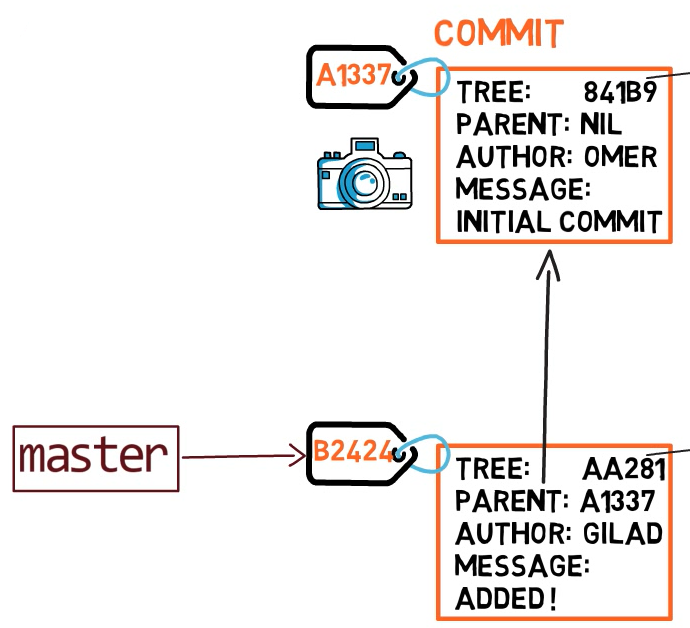
In most repositories, the main line of development is done in a branch called master. This is just a name, and it’s created when we use git init, making it is widely used. However, it’s by no means special, and we could use any other name we’d like.
Typically, the branch points to the latest commit in the line of development we are currently working on.
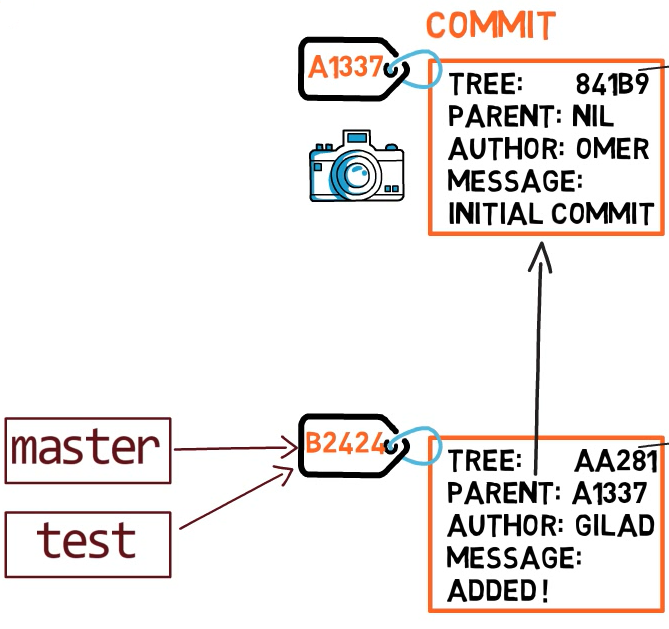
To create another branch, we usually use the git branch command. By doing that, we actually create another pointer. So if we create a branch called test, by using git branch test, we are actually creating another pointer that points to the same commit as the branch we are currently on.
 Using
Using git branch creates another pointer
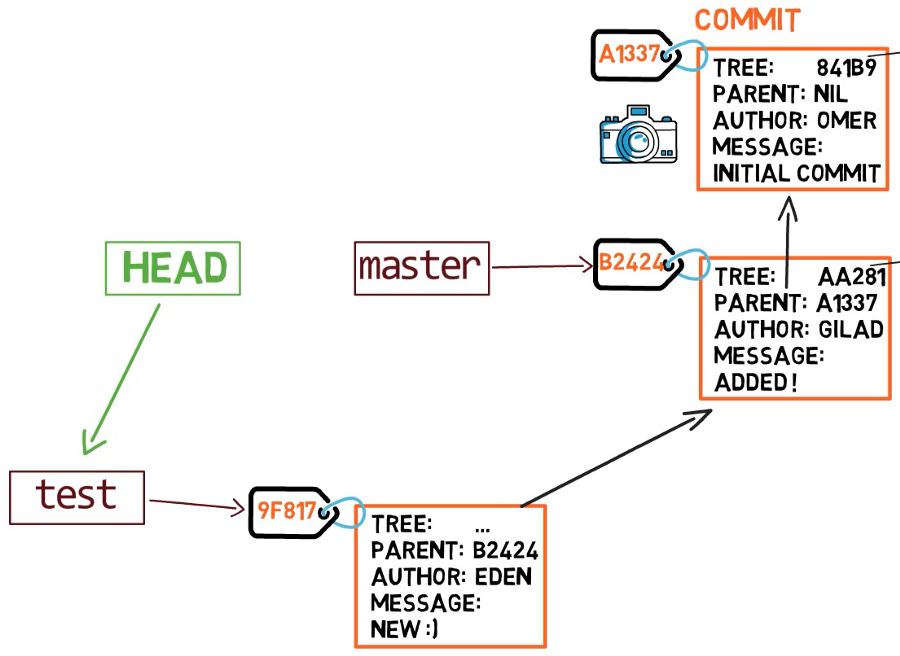
How does git know what branch we’re currently on? It keeps a special pointer called HEAD. Usually, HEAD points to a branch, which in turns points to a commit. In some cases, HEAD can also point to a commit directly, but we won’t focus on that.
 HEAD points to the branch we are currently on.
To switch the active branch to be test, we can use the command git checkout test. Now we can already guess what this command actually does — it just changes HEAD to point to test.

git checkout test changes where HEAD points
We could also use git checkout -b test before creating the test branch, which is the equivalent of running git branch test to create the branch, and then git checkout test to move HEAD to point to the new branch.
What happens if we make some changes and create a new commit using git commit? Which branch will the new commit be added to?
The answer is the test branch, as this is the active branch (since HEAD points to it). Afterwards, the test pointer will move to the newly added commit. Note that HEAD still points to test.
 Every time we use
 git commit, the branch pointer moves to the newly created commit.
So if we go back to master by git checkout master, we move HEAD to point to master again.

Now, if we create another commit, it will be added to the master branch (and its parent would be commit B2424).
How to Record Changes in Git
Usually, when we work on our source code we work from a working dir. A working dir(ectrory) (or working tree) is any directory on our file system which has a repository associated with it. It contains the folders and files of our project, and also a directory called .git that we will talk more about later.
After we make some changes, we want to record them in our repository. A repository (in short: repo) is a collection of commits, each of which is an archive of what the project’s working tree looked like at a past date, whether on our machine or someone else’s.
A repository also includes things other than our code files, such as HEAD, branches, and so on.
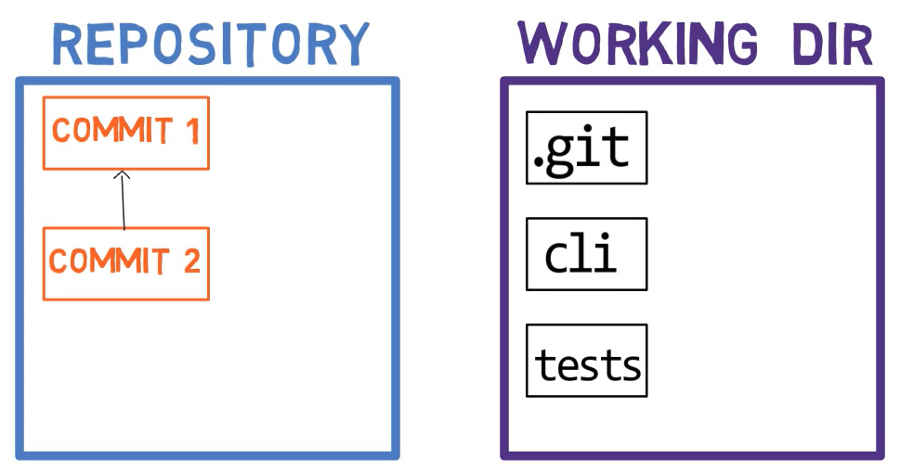
Unlike other, similar tools you may have used, git does not commit changes from the working tree directly into the repository. Instead, changes are first registered in something called the index, or the staging area.
Both of these terms refer to the same thing, and they are used often in git’s documentation. We will use these terms interchangeably throughout this post.
When we checkout a branch, git populates the index with all the file contents that were last checked out into our working directory and what they looked like when they were originally checked out. When we use git commit, the commit is created based on the state of the index.
The use of the index allows us to carefully prepare each commit. For example, we may have two files with changes since our last commit in our working dir. We may only add one of them to the index (using git add), and then use git commit to record this change only.

Files in our working directory can be in one of two states: tracked or untracked.
Tracked files are files that git knows about. They either were in the last snapshot (commit), or they are staged now (that is, they are in the staging area).
Untracked files are everything else — any files in our working directory that were not in our last snapshot (commit) and are not in our staging area.
How to Create a Repo — The Conventional Way
Let’s make sure that we understand how the terms we’ve introduced relate to the process of creating a repository. This is just a quick high-level view, before we dive much deeper into this process.
Note — most posts with shell commands show UNIX commands. I will provide commands for both Windows and UNIX, with screenshots from Windows, for the sake of variance. When the commands are exactly the same, I will provide them only once.
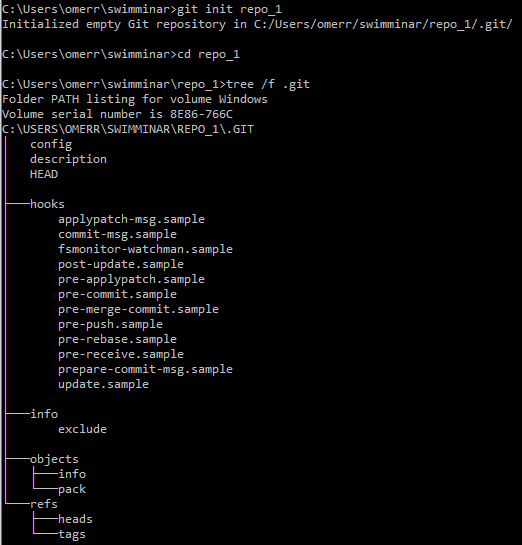
We will initialize a new repository using git init repo_1, and then change our directory to that of the repository using cd repo_1. By using tree /f .git we can see that running git init resulted in quite a few sub-directories inside .git. (The flag /f includes files in tree’s output).
Let's create a file inside the repo_1 directory:

On a Linux system:

This file is within our working directory. Yet, since we haven’t added it to the staging area, it is currently untracked. Let's verify using git status:
 The new file is untracked as we haven’t added it to the staging area, and it wasn’t included in a previous commit
We can now add this file to the staging area by using git add new_file.txt. We can verify that it has been staged by running git status:
 Adding the new file to the staging area
We can now create a commit using git commit:

Has something changed within .git directory? Let’s run tree /f .git to check:
 A lot of things have changed within
 .git
Apparently, quite a lot has changed. It's time to dive deeper into the structure of .git and understand what is going on under the hood when we run git init, git add or git commit.
Time to get hard core
So far we've covered some Git fundamentals, and now we’re ready to really Git going.
In order to deeply understand how git works, we will create a repository, but this time — we'll build it from scratch.
We won’t use git init, git add or git commit which will enable us to get a better hands-on understanding of the process.
How to Set Up .git
Let’s create a new directory, and run git status within it:

Alright, so git seems unhappy as we don’t have a .git folder. The natural thing to do would be to simply create that directory:

Apparently, creating a .git directory is just not enough. We need to add some content to that directory.
A git repository has two main components:
- A collection of objects — blobs, trees, and commits.
- A system of naming those objects — called references.
A repository may also contain other things, such as git hooks, but at the very least — it must include objects and references.
Let’s create a directory for the objects at .git\objects and a directory for the references (in short: refs) at .git\refs (on UNIX -based systems — .git/objects and .git/refs, respectively).

One type of reference is branches. Internally, git calls branches by the name heads. So we will create a directory for them — .git\refs\heads.

This still doesn’t change our git status:

How does git know where to start when looking for a commit in the repository? As I explained earlier, it looks for HEAD, which points to the current active branch (or commit, in some cases).
So, we need to create the HEAD, which is just a file residing at .git\HEAD. We can apply the following:
On Windows: > echo ref: refs/heads/master > .git\HEAD
On UNIX: $ echo "ref: refs/heads/master" > .git/HEAD
⭐ So we now know how HEAD is implemented — it’s simply a file, and its contents describe what it points to.
Following the command above, git status seems to change its mind:
 HEAD is just a file
Notice that git believes we are on a branch called master, even though we haven’t created this branch. As mentioned before, master is just a name. We could also make git believe we are on a branch called banana if we wanted to:
 🍌
🍌
We will switch back to master for the rest of this post, just to adhere to the normal convention.
Now that we have our .git directory ready, can we work our way to make a commit (again, without using git add or git commit).
Plumbing vs Porcelain Commands in Git
At this point, it would be helpful to make a distinction between two types of git commands: plumbing and porcelain. The application of the terms oddly comes from toilets (yeah, these — 🚽), traditionally made of porcelain, and the infrastructure of plumbing (pipes and drains).
We can say that the porcelain layer provides a user-friendly interface to the plumbing. Most people only deal with the porcelain. Yet, when things go (terribly) wrong, and someone wants to understand why, they would have to roll-up their sleeves to check the plumbing. (Note: these terms are not mine, they are used very widely in git).
git uses this terminology as an analogy to separate the low-level commands that users don’t usually need to use directly (“plumbing” commands) from the more user-friendly high level commands (“porcelain” commands).
So far, we have dealt with porcelain commands — git init, git add or git commit. Next, we transition to plumbing commands.
How to Create Objects in Git
Let's start with creating an object and writing it into the objects’ database of git, residing within .git\objects. We'll find the SHA-1 hash value of a blob by using our first plumbing command, git hash-object, in the following way:
On Windows:
> echo git is awesome | git hash-object --stdin
On UNIX:
$ echo "git is awesome" | git hash-object --stdin
By using --stdin we are instructing git hash-object to take its input from the standard input. This will provide us with the relevant hash value.
In order to actually write that blob into git’s object database, we can simply add the -w switch for git hash-object. Then, we can check the contents of the .git folder, and see that they have changed.
 Writing a blob to the objects’ database
We can now see that the hash of our blob is — 54f6...36. We can also see that a directory has been created under .git\objects, a directory named 54, and within it, a file by the name of f6...36.
So git actually takes the first two characters of the SHA-1 hash and uses them as the name of a directory. The remaining characters are used as the filename for the file that actually contains the blob.
Why is that so? Consider a fairly big repository, one that has 300,000 objects (blobs, trees, and commits) in its database. To look up a hash inside that list of 300,000 hashes can take a while. Thus, git simply divides that problem by 256.
To look up the hash above, git would first look for the directory named 54 inside the directory .git\objects, which may have up to 256 directories (00 through FF). Then, it will search that directory, narrowing down the search as it goes.
Back to our process of generating a commit. We have now created an object. What is the type of that object? We can use another plumbing command, git cat-file -t (-t stands for “type”), to check that out:

Not surprisingly, this object is a blob. We can also use git cat-file -p (-p stands for “pretty-print”) to see its contents:

This process of creating a blob usually happens when we add something to the staging area — that is, when we use git add.
Remember that git creates a blob of the entire file that is staged. Even if a single character is modified or added (as we added ! in our example before), the file has a new blob with a new hash.
Will there be any change to git status?

Apparently, no. Adding a blob object to git’s internal database doesn’t change the status, as git doesn’t know of any tracked or untracked files at this stage.
We need to track this file — add it to the staging area. To do that, we can use the plumbing command git update-index, like so: git update-index --add --cacheinfo 100644 <blob-hash> <filename>.
Note: (The cacheinfo is a 16-bit file mode as stored by git, following the layout of POSIX types and modes. This is not within the scope of this post).
Running the command above will result in a change to .git's contents:

Can you spot the change? A new file by the name of index was created. This is it — the famous index (or staging area), is basically a file that resides within .git\index.
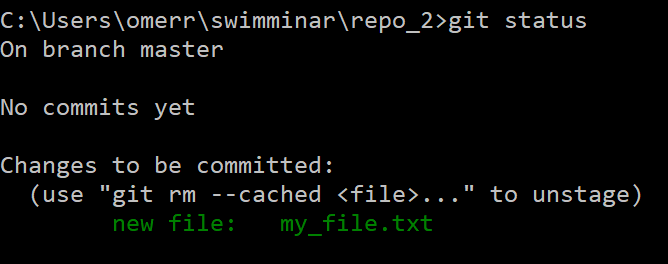
So now that our blob has been added to the index, we expect git status to look different, like this:

That’s interesting! Two things happened here.
First, we can see that new_file.txt appears in green, in the Changes to be committed area. That is so because the index now has new_file.txt, waiting to be committed.
Second, we can see that new_file.txt appears in red — because git believes the file my_file.txt has been deleted, and the fact that the file has been deleted is not staged.
This happens as we added the blob with the contents git is awesome to the objects’ database, and told the index that the file my_file.txt has the contents of that blob, but we never actually created that file.
We can easily solve this by taking the contents of the blob, and writing them to our file system, to a file called my_file.txt:

As a result, it will no longer appear in red by git status:
So now it’s time to create a commit object from our staging area. As explained above, a commit object has a reference to a tree, so we need to create a tree.
We can do this with the command git write-tree, which records the contents of the index in a tree object. Of course, we can use git cat-file -t to see that it’s indeed a tree:
 Creating a tree object of the index
And we can use git cat-file -p to see its contents:

Great, so we created a tree, and now we need to create a commit object that references this tree. To do that, we can use git commit-tree <tree-hash> -m <commit message>:

You should now feel comfortable with the commands used to check the created object’s type, and print its contents:
 Creating a commit object
Note that this commit doesn’t have a parent, because it’s the first commit. When we add another commit we will have to declare its parent — we will do so later.
The last hash that we got — 80e...8f – is a commit’s hash. We are actually very used to using these hashes — we look at them all the time. Note that this commit owns a tree object, with its own hash, which we rarely specify explicitly.
Will something change in git status?

Nope 🤔.
Why is that? Well, to know that our file has been committed, git needs to know about the latest commit. How does git do that? It goes to the HEAD:
 Looking at
 HEAD on Windows
 Looking at
 HEAD on UNIX
HEAD points to master, but what is master? We haven’t really created it yet.
As we explained earlier in this post, a branch is simply a named reference to a commit. And in this case, we would like master to refer to the commit with the hash 80e8ed4fb0bfc3e7ba88ec417ecf2f6e6324998f.
We can achieve this by simply creating a file at \refs\heads\master, with the contents of this hash, like so:

⭐ In sum, a branch is just a file inside .git\refs\heads, containing a hash of the commit it refers to.
Now, finally, git status and git log seem to appreciate our efforts:

We have successfully created a commit without using porcelain commands! How cool is that? 🎉
How to Work with Branches in Git — Under the Hood
Just as we’ve created a repository and a commit without using git init, git add or git commit, now we will create and switch between branches without using porcelain commands (git branch or git checkout).
It’s perfectly understandable if you are excited, I am too 🙂
Let’s start:
So far we only have one branch, named master. To create another one with the name test (as the equivalent of git branch test), we would need to simply create a file named test within .git\refs\heads, and the contents of that file would be the same commit’s hash as the master points to.

If we use git log, we can see that this is indeed the case — both master and test point to this commit:

Let’s also switch to our newly created branch (the equivalent of git checkout test). For that, we should change HEAD to point to our new branch:
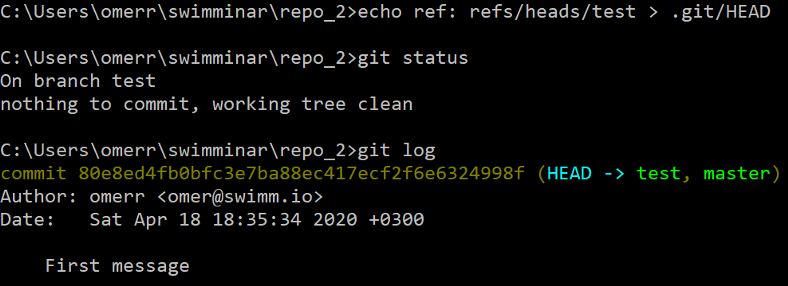 Switching to branch
 test by changing HEAD
As we can see, both git status and git log confirm that HEAD now points to test, which is, therefore, the active branch.
We can now use the commands we have already used to create another file and add it to the index:

Using the commands above, we have created a file named test.txt, with the content of Testing, created a corresponding blob, and added it to the index. We also created a tree representing the index.
It’s now time to create a commit referencing this tree. This time, we should also specify the parent of this commit — which would be the previous commit. We specify the parent using the -p switch of git commit-tree:

We have just created a commit, with a tree as well as a parent, as we can see:

Will git log show us the new commit?

As we can see, git log doesn’t show anything new. Why is that? 🤔 Remember that git log traces the branches to find relevant commits to show. It shows us now test and the commit it points to, and it also shows master which points to the same commit.
That’s right — we need to change test to point to our new commit. We can do that by simply changing the contents of .git\refs\heads\test:

It worked! 🎉🥂
git log goes to HEAD, which tells it to go to the branch test, which points to commit 465...5e, which links back to its parent commit 80e...8f.
Feel free to admire the beauty, we git you. 😊
Summary
This post introduced you to the internals of git. We started by covering the basic objects — blobs, trees, and commits.
We learned that a blob holds the contents of a file. A tree is a directory-listing, containing blobs and/or sub-trees. A commit is a snapshot of our working directory, with some meta-data such as the time or the commit message.
We then discussed branches and explained that they are nothing but a named reference to a commit.
We went on to describe the working directory, a directory that has a repository associated with it, the staging area (index) which holds the tree for the next commit, and the repository, which is a collection of commits.
We clarified how these terms relate to git commands we know by creating a new repository and committing a file using the well-known git init, git add, and git commit.
Then, we fearlessly deep-dived into git. We stopped using porcelain commands and switched to plumbing commands.
By using echo and low-level commands such as git hash-object, we were able to create a blob, add it to the index, create a tree of the index, and create a commit object pointing to that tree.
We were also able to create and switch between branches. Kudos to those of you who tried this on their own!👏
Hopefully, after following this post you feel you’ve deepened your understanding of what is happening under the hood when working with git.
Thanks for reading! If you enjoyed this article, you can read more on this topic on the swimm.io blog.
Omer Rosenbaum, Swimm’s Chief Technology Officer. Cyber training expert and Founder of Checkpoint Security Academy. Author of Computer Networks (in Hebrew).
Visit My YouTube Channel.
Additional References
A lot has been written and said about git. Specifically, I found these references to be useful: