
By Florian Marcu
Google sign-in is a great login feature to offer to your app's users. It makes it easier for them to create an account and sign in.
And what's even better, Firebase makes it extremely easy for developers to add support for Google sign-in. But setting up the React Native environment can create some challenges, which are fully covered in this tutorial.
React Native and Firebase SDK make the implementation of Google login pretty straightforward. Let's build a simple app that only has a single Google login button. Once the user successfully logs into Google, we are going to display the user info retrieved from their Google account as well as a logout button.
You can also add Facebook Login to your app if you're interested in providing even more login options to your users. You can check out this guide to Facebook Login in React Native with Firebase if you're looking to learn more on how to set up Facebook sign-in.
Why Use a Google Sign-in Button in Mobile Apps?
- Using Google or other third parties can make your authentication process seamless and friendly. Users don’t have to waste time in the registration process, which will improve your registration and retention rates tremendously.
- It's safe and secure.
- Users trust Google or Facebook more than an unknown site or app on the Internet.
- It provides a good user experience. As a user, we have little patience for any actions or work that we need to do, especially in a fairly unknown app that we are trying for the first time.
Without further ado, let's jump directly into the app development part of this tutorial.
Setting up the Firebase Project
Go to the Firebase Console and create a Firebase project:
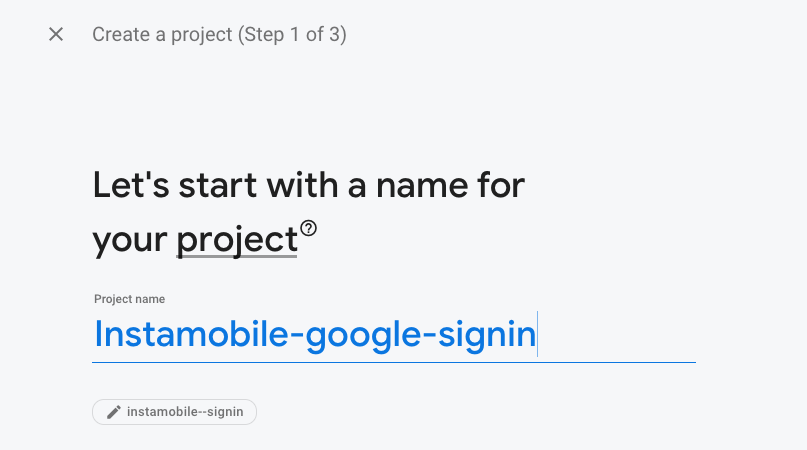 create new firebase project
Here, we will need to set up the Firebase project name and app identifier, so let's first create the React Native app.
Creating the React Native Project
First, we need to create a React Native project by using the following command:
react-native init instamobile-google-login-demo
Here, we have given the name of the project as instamobile-google-login-demo. Now, we need to install the react-native-google-signin package using the following command:
yarn add react-native-google-singin
The react-native-google-signin package is used to implement Google auth functions in the React Native app. Now, we need to import the necessary modules and components from the respective package as shown in the code snippet below:
import {
GoogleSignin,
GoogleSigninButton,
statusCodes,
} from 'react-native-google-signin';
Next, we need to create the states in order to handle the auth state and user info. For that we use the useState module as shown in the code snippet below:
const [loggedIn, setloggedIn] = useState(false);
const [userInfo, setuserInfo] = useState([]);
Now, we need to create a sign-in function to handle authentication as shown in the code snippet below:
_signIn = async () => {
  try {
    await GoogleSignin.hasPlayServices();
    const {accessToken, idToken} = await GoogleSignin.signIn();
    setloggedIn(true);
  } catch (error) {
    if (error.code === statusCodes.SIGN_IN_CANCELLED) {
      // user cancelled the login flow
      alert('Cancel');
    } else if (error.code === statusCodes.IN_PROGRESS) {
      alert('Signin in progress');
      // operation (f.e. sign in) is in progress already
    } else if (error.code === statusCodes.PLAY_SERVICES_NOT_AVAILABLE) {
      alert('PLAY_SERVICES_NOT_AVAILABLE');
      // play services not available or outdated
    } else {
      // some other error happened
    }
  }
};
Next, we need to initialize the setup of the Google login object by leveraging the useEffect function:
useEffect(() => {
   GoogleSignin.configure({
     scopes: ['email'], // what API you want to access on behalf of the user, default is email and profile
     webClientId:
       '418977770929-g9ou7r9eva1u78a3anassxxxxxxx.apps.googleusercontent.com', // client ID of type WEB for your server (needed to verify user ID and offline access)
     offlineAccess: true, // if you want to access Google API on behalf of the user FROM YOUR SERVER
   });
 }, []);
Lastly, we need a function that handles the logout action. For that, we are going to implement the signOut method as shown in the code snippet below:
signOut = async () => {
    try {
      await GoogleSignin.revokeAccess();
      await GoogleSignin.signOut();
      setloggedIn(false);
      setuserInfo([]);
    } catch (error) {
      console.error(error);
    }
  };
Now, we need to render the components on the screen as well. For that, we are going to make use of various components like View and Button:
return (
    <>
      <StatusBar barStyle="dark-content" />
      <SafeAreaView>
        <ScrollView
          contentInsetAdjustmentBehavior="automatic"
          style={styles.scrollView}>
          <Header />

          <View style={styles.body}>
            <View style={styles.sectionContainer}>
              <GoogleSigninButton
                style={{width: 192, height: 48}}
                size={GoogleSigninButton.Size.Wide}
                color={GoogleSigninButton.Color.Dark}
                onPress={this._signIn}
              />
            </View>
            <View style={styles.buttonContainer}>
              {!loggedIn && <Text>You are currently logged out</Text>}
              {loggedIn && (
                <Button
                  onPress={this.signOut}
                  title="LogOut"
                  color="red"></Button>
              )}
            </View>
          </View>
        </ScrollView>
      </SafeAreaView>
    </>
  );
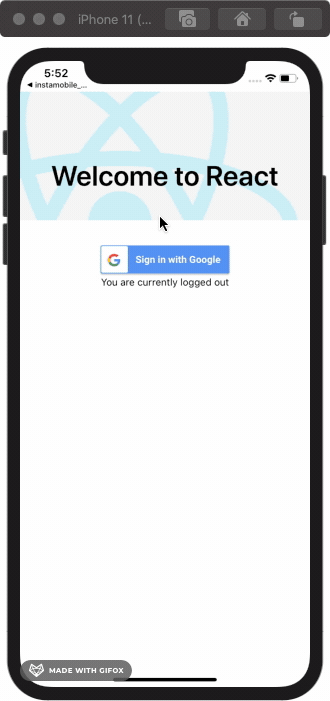
Now, if we run our project in the emulator we will get the following results:
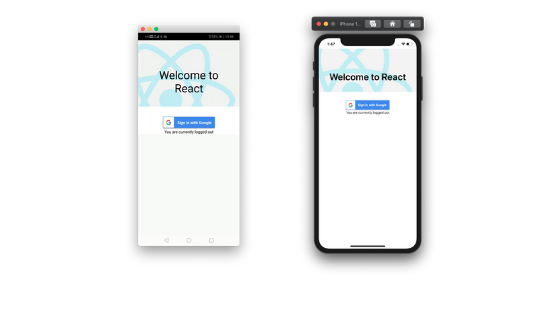 Login with Google React Native
Pretty sweet, right? We have completed the implementation (both UI and business logic) at the React Native level in our project.
As you can see, we have a "Sign in with Google" button that converts into a logout button once the login operation is successfully completed.
We are now going to set up the Google SignIn package and the Firebase app.
Configuring the iOS and Android Native Projects
There are a few set up steps we need to take before the project is fully working. They are mostly related to the actual native side of the app.
For iOS
Here, in VSCode (or any Terminal) just run cd ios && pod install. Then open the .xcworkspace file in Xcode (from the ios folder) and make sure the Pods are included:
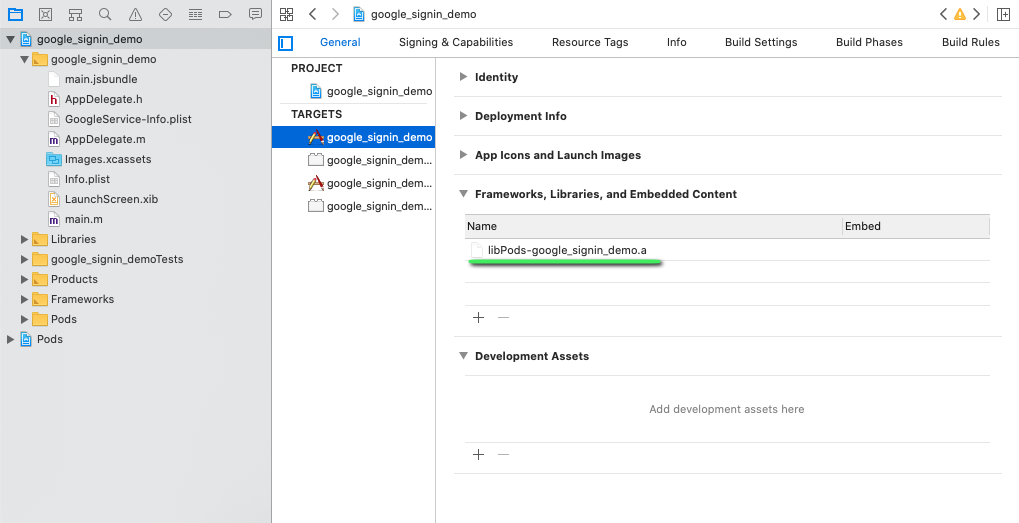 install google login lib in xcode
For Android
First, we need to link the native module.
In RN >= 0.60 you should not need to do anything thanks to auto-linking.
In RN < 0.60 run
react-native link **react-native-google-signin**.Update android/build.gradle with the following configuration:
buildscript {
    ext {
        buildToolsVersion = "27.0.3"
        minSdkVersion = 16
        compileSdkVersion = 27
        targetSdkVersion = 26
        supportLibVersion = "27.1.1"
        googlePlayServicesAuthVersion = "16.0.1" // <--- use this version or newer
    }
...
    dependencies {
        classpath 'com.android.tools.build:gradle:3.1.2' // <--- use this version or newer
        classpath 'com.google.gms:google-services:4.1.0' // <--- use this version or newer
    }
...
allprojects {
    repositories {
        mavenLocal()
        google() // <--- make sure this is included
        jcenter()
        maven {
            // All of React Native (JS, Obj-C sources, Android binaries) is installed from npm
            url "$rootDir/../node_modules/react-native/android"
        }
    }
}
- Update
android/app/build.gradlewith the following configuration:
...
dependencies {
    implementation fileTree(dir: "libs", include: ["*.jar"])
    implementation "com.android.support:appcompat-v7:23.0.1"
    implementation "com.facebook.react:react-native:+"
    implementation(project(":react-native-community_google-signin")) // <--- add this dependency
}
Check that react-native link linked the native module – but only if you used react-native link!
In android/settings.gradle we should have the following configurations:
...
include ':react-native-google-signin', ':app'
project(':react-native-google-signin').projectDir = new File(rootProject.projectDir, '../node_modules/@react-native-community/google-signin/android')
Next, in MainApplication.java , we should have the Google package added as in following code snippet:
import co.apptailor.googlesignin.RNGoogleSigninPackage;  // <--- import

public class MainApplication extends Application implements ReactApplication {

  ......

  @Override
    protected List<ReactPackage> getPackages() {
      return Arrays.<ReactPackage>asList(
          new MainReactPackage(),
          new RNGoogleSigninPackage() // <-- this needs to be in the list
      );
    }
  ......

}
Setting up Firebase
For iOS
Now, we need to get started on the Firebase configuration. In Firebase, we need to set up a Google cloud app. But when we set up the authentication method on Firebase this also creates an Google cloud app.
First, we need to create Firebase iOS app in order to obtain GoogleServiceinfo.plist as shown in the screenshot below:
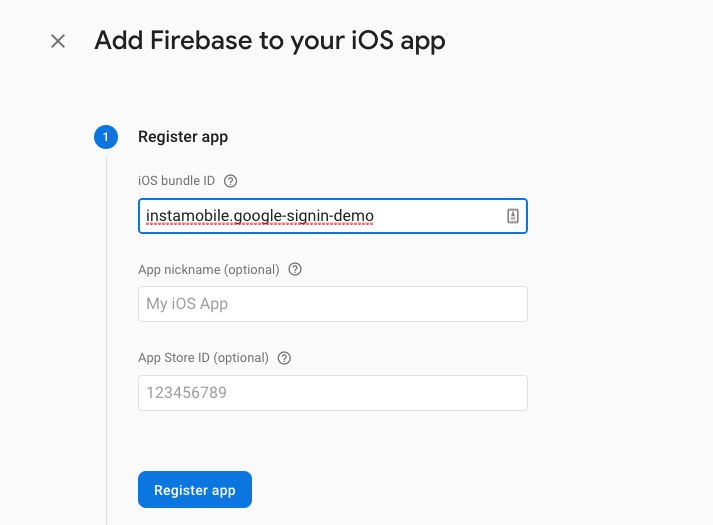 add new firebase app name
Next, we copy the GoogleService-info.plist file to the Xcode project as shown in the screenshot below:
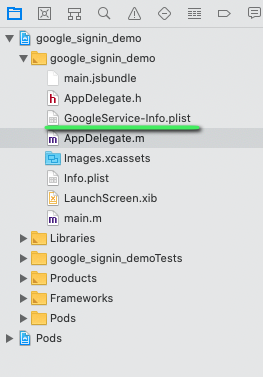 add google service plist to xcode
Now, we need to add the reversed client ID present in the GoogleService-info.plist file to the URL Types, as shown in the screenshot below:
 get reverse client id from xcode
Next step is to go to Info → URL Types then fill the URL Schemes as shown in the screenshot below:
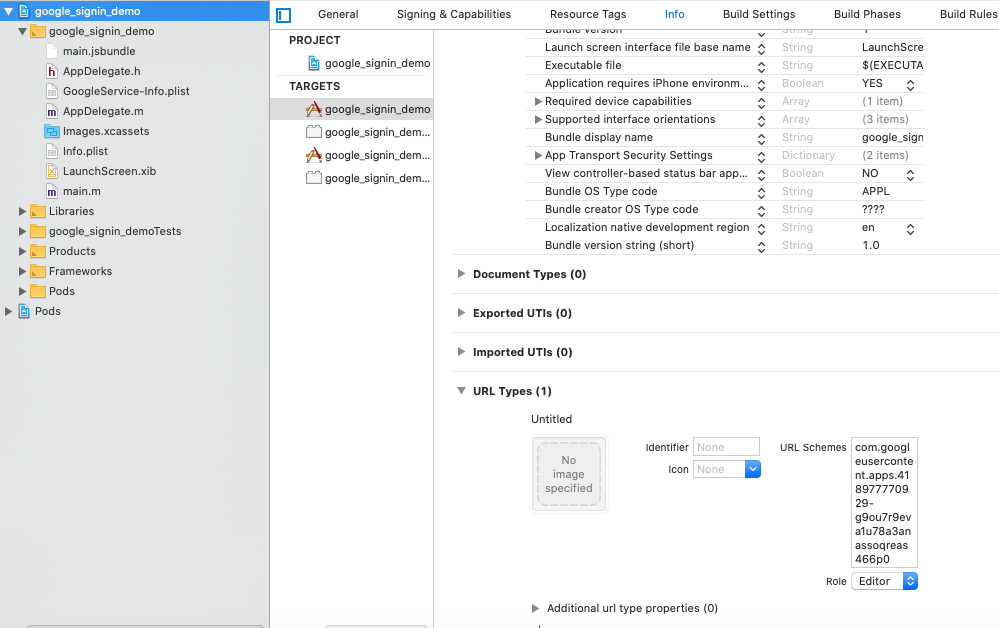 add url scheme to xcode
For Android
First, we need to create an Android app on Firebase. For that, we need a package name and certificate SHA-1 from our app. Then, we can register the Firebase app as shown below:
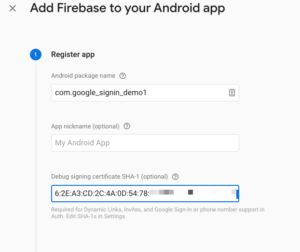 create new android firebase app
We can get the package name in MainApplication.java of our project as highlighted in the code snippet below:
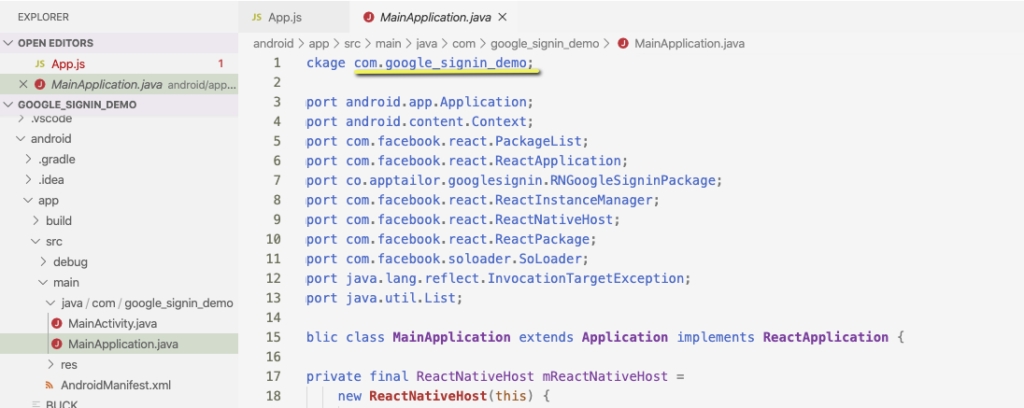 find out bundle name in android app
Next, we can get the SHA-1 key in the Keystore file. In the android/app directory, we can run the command:
cd android/app ;
keytool -exportcert -keystore debug.keystore -list -v
Then, the SHA-1 key will appear, as shown in the screenshot below:
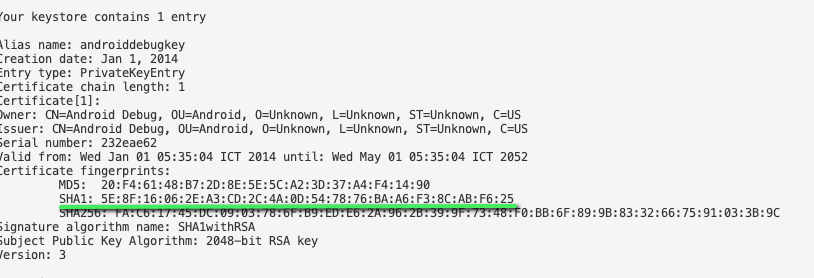 generate sha1 for register android app in firebase
After successfully creating the Firebase setup app, we need to download the google-services.json file and copy it to the directory, as shown in the screenshot below:
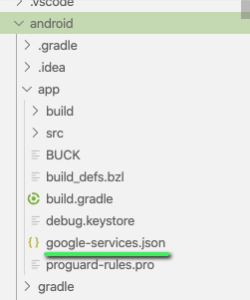 add google service json to android app folder
Now, the final step is to set up a Google sign-in component in Android.
Installing the React Native Firebase Package
In order to install react-native-firebase package version 6, we need to run the following command in our project command prompt:
# Using npm
npm install --save @react-native-firebase/app
# Using Yarn
yarn add @react-native-firebase/app
The @react-native-firebase/app module must be installed before using any other Firebase service.
For iOS
We already have GoogleService-Info.plist added to Xcode. What is left is to allow Firebase on iOS to use the credentials. The Firebase iOS SDK must be configured during the bootstrap phase of your application.
To do this, we need to open our /ios/{projectName}/AppDelegate.m file, and add the following:
At the top of the file, we need to import the Firebase SDK:
#import <Firebase.h>
Within your existing didFinishLaunchingWithOptions method, we need to add the following to the top of the method:
- (BOOL)application:(UIApplication *)application didFinishLaunchingWithOptions:(NSDictionary *)launchOptions {
  // Add me --- \/
  if ([FIRApp defaultApp] == nil) {
    [FIRApp configure];
  }
  // Add me --- /\
  // ...
}
Finally, we need to run the following command to finalize the installation of the CocoaPods package:
cd ios ; pod install
That's it. Now we have completed the installation of the main Firebase package on iOS
For Android
We need to configure Firebase with Android credentials. To allow Firebase on Android to use the credentials, the google-services plugin must be enabled on the project. This requires modification to two files in the Android directory.
First, add the google-services plugin as a dependency inside your android/build.gradle file:
buildscript {
  dependencies {
    // ... other dependencies
    classpath 'com.google.gms:google-services:4.2.0'
    // Add me --- /\
  }
}
Lastly, execute the plugin by adding the following to the very bottom of your /android/app/build.gradle file:

apply plugin: 'com.google.gms.google-services'
React Native Firebase Authentication Module
After the installation completes, we need to set up the parent Firebase package. Next, we need to install the child module for authentication. For that, we need to open a terminal and run the following command:
yarn add @react-native-firebase/auth
For iOS
We just need to install the pods again in the command prompt:
cd ios/ && pod install
For Android
You can follow the instructions on the official document which is only required if you are using React Native <= 0.59 or need to manually integrate the library.
Activating Google Sign-in on Firebase
We need to go to the Firebase console. Then, in the Authentication section, we need to click on Google as shown in the screenshot below:
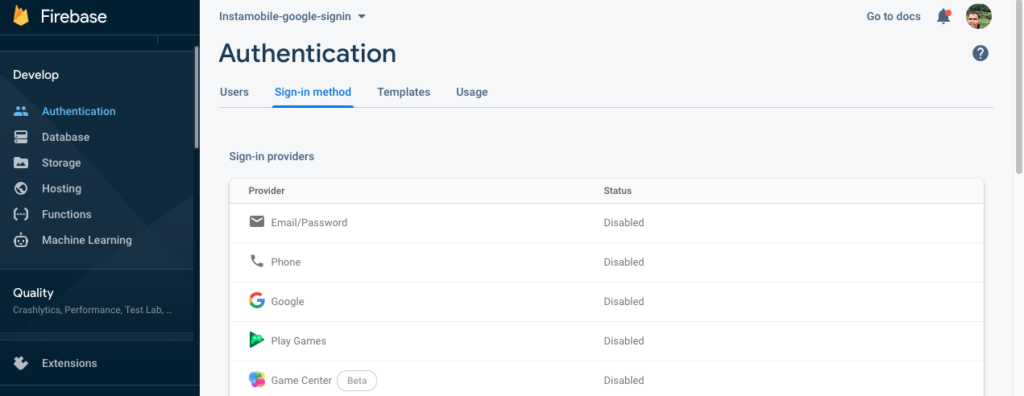 authentication method in firebase
Next, we need to enable the setup with the following configuration and save the configuration as shown in the screenshot below:
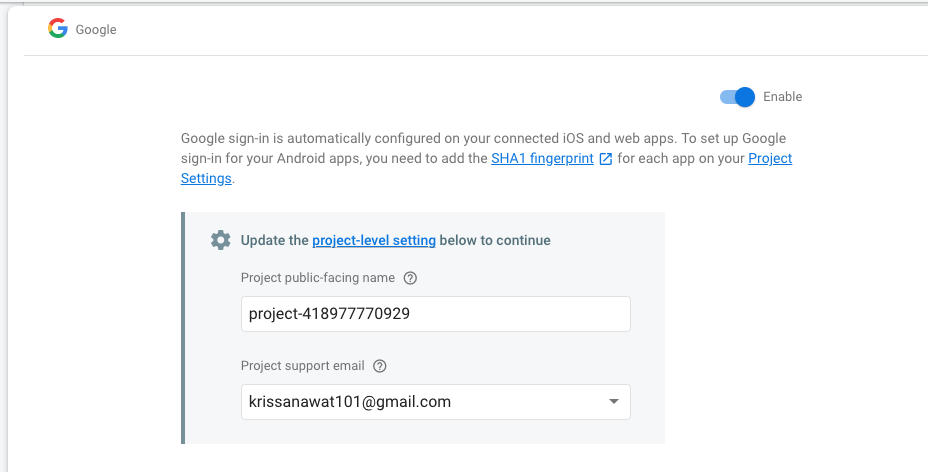 activate project support email
In App.js, we need to import auth from the Firebase package as shown in the code snippet below:
import auth from '@react-native-firebase/auth';
Next, we need to integrate authentication config to the sign-in function. After a successful login, we store the accessToken and idToken to Firebase. Now, we can try to login with Google on our demo React Native app.
_signIn = async () => {
    try {
      await GoogleSignin.hasPlayServices();
      const {accessToken, idToken} = await GoogleSignin.signIn();
      setloggedIn(true);
      const credential = auth.GoogleAuthProvider.credential(
        idToken,
        accessToken,
      );
      await auth().signInWithCredential(credential);
    } catch (error) {
Now we have successfully completed the integration of Google Sign-in in our React Native app:
 result of google login with react native
We can see new data that is added to the Firebase Console:
 firebase authentication console
Tracking User Status
In order to check the user’s login status, we use Firebase Auth. For that, we need to add the onAuthStateChanged method to useEffect in order for it to run in every componentDidMount event call.
Also, we need to pass a callback to the function named onAuthStateChanged as an argument as shown in the code snippet below:
useEffect(() => {
    .............
    const subscriber = auth().onAuthStateChanged(onAuthStateChanged);
    return subscriber; // unsubscribe on unmount
  }, []);
In the function onAuthStateChanged, we handle local state data as shown in the code snippet below:
function onAuthStateChanged(user) {
    setUser(user);
    console.log(user);
    if (user) setloggedIn(true);
  }
Now, we need to store the user data for the state. Then, try to display the user’s data after a successful login. For that, we need to use the following piece of code:
{!user && <Text>You are currently logged out</Text>}
{user && (
  <View>
    <Text>Welcome {user.displayName}</Text>
    <Button
      onPress={this.signOut}
      title="LogOut"
      color="red"></Button>
  </View>
)}
We will get the following result in our simulator:
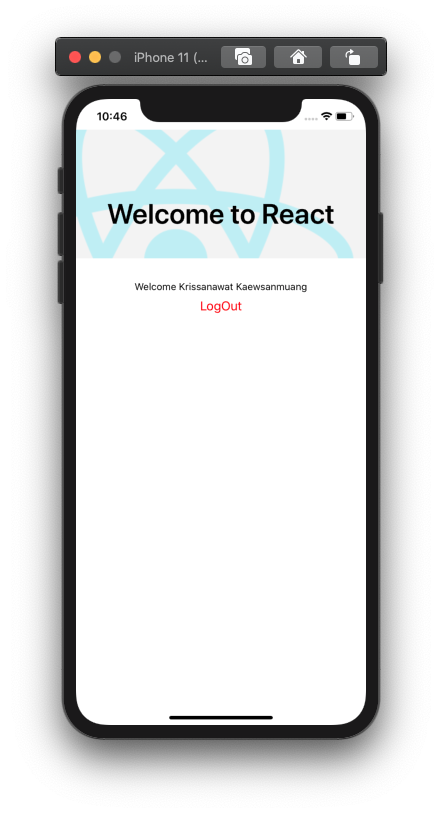 logout firebase auth
Firebase Sign Out
For signing out, we need to remove all the user’s credentials and revoke the Google sign-in token.
First, we need to wait for the GoogleSignin module to revoke the access and sign out. Then, we call the signOut method of Firebase auth in order to successfully logout.
The overall code implementation is provided in the code snippet below:
signOut = async () => {
    try {
      await GoogleSignin.revokeAccess();
      await GoogleSignin.signOut();
      auth()
        .signOut()
        .then(() => alert('Your are signed out!'));
      setloggedIn(false);
      // setuserInfo([]);
    } catch (error) {
      console.error(error);
    }
  };
As a result, we can now perform logout operations as shown in the code snippet below:
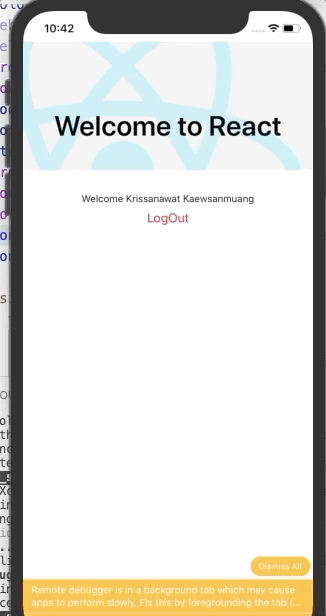 firebase react native logout
Conclusion
In this tutorial, we learned how to set up Google Login, along with storing an access token, by leveraging Firebase into our React Native project.
First, we created the React Native project with all the necessary components and function configurations. Then, we learned how to configure the Google Sign In and Firebase for both Android and iOS platforms. Finally, we set up the Firebase in React Native app using a Firebase package and displayed the user data along with sign out button.
You can download the complete source code of this tutorial from Github.
The best part is that Firebase & Google Auth are supported across all the mobile development languages, such as Flutter, Swift or Kotlin. The configuration steps and the architectural approach is exactly the same.
Next Steps
Now that you have learned about setting up Firebase Google Login in React Native apps, here are some other topics you can look into:
- How to Build a React Native App with Firebase Backend
- Firebase & React Native — Push notifications | Firebase storage
- More Authentication Methods in React Native & Firebase — Google Login | Facebook login | Phone SMS OTP Auth
If you liked this React Native tutorial, please give me a star on the Github repo and share this with your community. You can check out even more free React Native projects on Instamobile. Cheers!