

The first time I tried to get a Bluetooth keyboard to connect to my laptop, it felt like the devices were having a private argument I wasn’t invited to. One second: “Pairing successful.” The next: “Connection failed.” No explanation, no apology. If you’ve ever wondered what on earth is happening behind that spinning wheel, you’re not alone. Underneath that little “Pair” button is a whole ritual called LE Secure Pairing, and it’s way more interesting than you’d expect.
TL;DR
Bluetooth LE secure pairing is a short ceremony where two strangers become trusted partners. First they trade capabilities, then they prove they share the same secret without saying it out loud, and finally they hand each other the long-term keys they’ll reuse next time. The Security Manager calls the shots, L2CAP keeps the traffic in tidy lanes, and AES-CMAC quietly stamps each step with proof. Methods like Just Works, Passkey Entry, Numeric Comparison, and Out-of-Band are chosen based on what the devices can actually do, not what we wish they could. If you want to see the whole dance, open a capture: the packets line up like dialogue — request, response, confirm, random, check, keys — and suddenly pairing stops feeling like magic and starts feeling inevitable.
In This Guide, You’ll Learn
You’ll get a plain-spoken tour of pairing versus bonding, then walk phase by phase through how LE devices negotiate features, create a shared secret, and distribute the right keys for fast, secure reconnects. You’ll meet the Security Manager and the L2CAP layer, see why different pairing methods appear in different situations, and understand the small cryptographic helpers (f4, f5, f6, f7, g2, h6, h7) that sit on top of AES-CMAC. We’ll finish with a Wireshark walkthrough so you can map each on-paper step to real packets on the wire.
Table of Contents
Pairing vs Bonding
Here’s a distinction that tripped me up when I was new: pairing vs. bonding. They sound like the same thing, right? But they’re not. Pairing is like a first date — it’s that initial, slightly awkward exchange where both devices say, “Here’s who I am, here’s a secret we can share, let’s try this out.” Once the evening’s over, maybe you never see each other again.
Bonding, though, is when you decide to save each other’s numbers. The devices store the keys they exchanged during pairing so the next time they meet, they don’t need to start from scratch. It’s the difference between reintroducing yourself at every party versus walking straight in and saying, “Hey, same drink as last time?”
The Security Manager (SM)
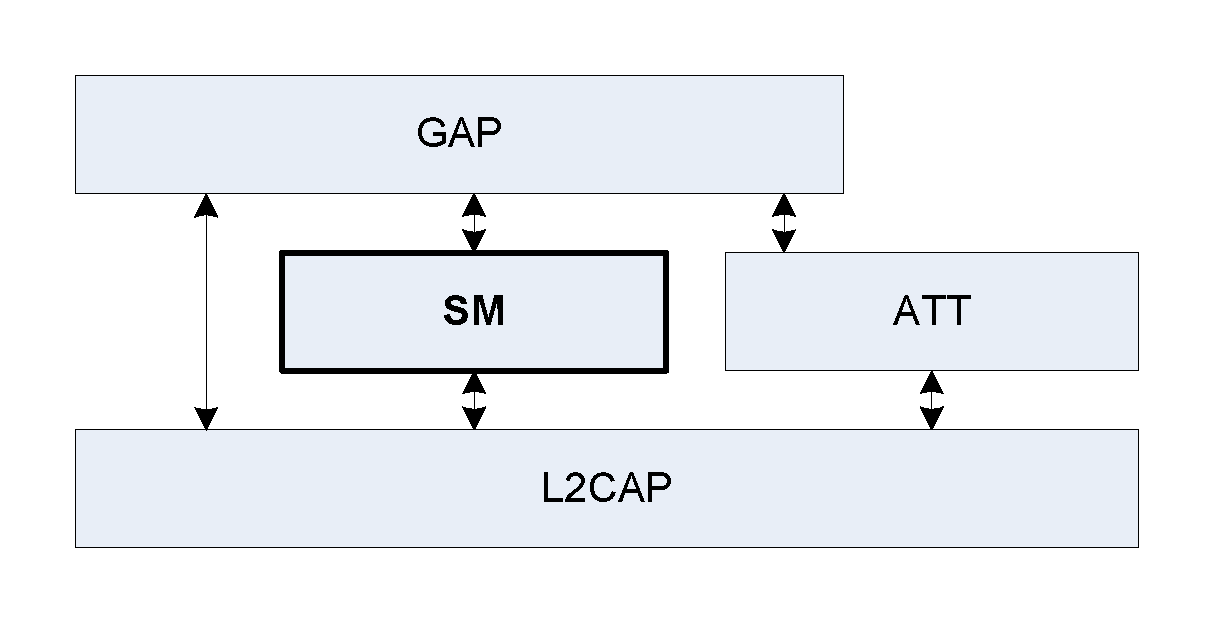
All pairing and bonding in BLE is handled by a protocol called the Security Manager (SM).
What is the Security Manager?
If Bluetooth pairing is a play, the Security Manager is both the director and the script supervisor. Nothing happens on stage without its approval. Its job is to decide how two devices will agree to trust each other, and to make sure they follow the rules without skipping any steps.
So what does that actually mean? The Security Manager is a protocol built into the Bluetooth stack whose entire focus is handling authentication, authorization, and key distribution. When two devices first bump into each other, the Security Manager takes over and asks a bunch of questions:
Does this device require authentication, or is it fine with a casual handshake?
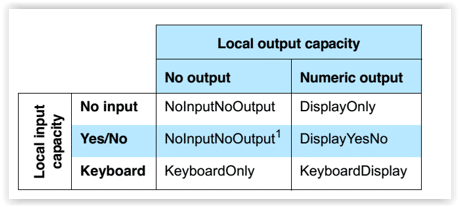
Does the device have a display or a keyboard, which could allow more secure methods like passkey entry?
Does the user care about protecting against man-in-the-middle attacks, or is it okay to keep things simple?
Based on the answers, it chooses the right pairing method. If both devices are limited — say, a fitness tracker with no buttons and a smartphone — then Just Works might be the only option. If at least one device has input and output capabilities, the SM can crank things up to Numeric Comparison or Passkey Entry, which are safer.
But the Security Manager doesn’t stop at picking a method. It also manages the keys themselves. Once the devices agree on a pairing flow, the SM oversees the generation of temporary keys that eventually lead to a Long Term Key (LTK). This key becomes the backbone of encryption for all future communication. Without the SM orchestrating this, you’d basically be tossing your secrets into the air and hoping nobody caught them.
One underrated role of the SM is making sure devices don’t over-promise. For example, a gadget might say “I can support Passkey Entry” — but if it doesn’t actually have a usable input mechanism, the Security Manager will catch that mismatch and adjust accordingly. It’s like the adult in the room making sure the kids aren’t bluffing.
Here’s the part I find fascinating: the SM is invisible to us as users. We never see a popup that says, “Hey, by the way, the Security Manager just picked Numeric Comparison because your laptop has a screen.” It all happens in the background, so when we click “Pair,” the only feedback we get is success or failure. That invisibility is by design — the protocol is meant to remove friction. But it also means that when something does go wrong, it feels like magic suddenly failing.
If you zoom out, the Security Manager is really about balance. Too much friction — asking you to type codes all the time — and users would abandon Bluetooth in frustration. Too little friction, and security falls apart. The SM walks that tightrope, quietly mediating between convenience and safety, making judgment calls on behalf of both the user and the device.
And honestly, it’s not perfect. Sometimes it makes compromises that security purists would frown upon (Just Works being the obvious example). Other times, it enforces methods that feel clunky to an everyday user. But that’s the trade-off baked into the system: it’s not trying to give you military-grade secrecy every time, it’s trying to make everyday Bluetooth use both practical and secure enough.
L2CAP Layer and Channels
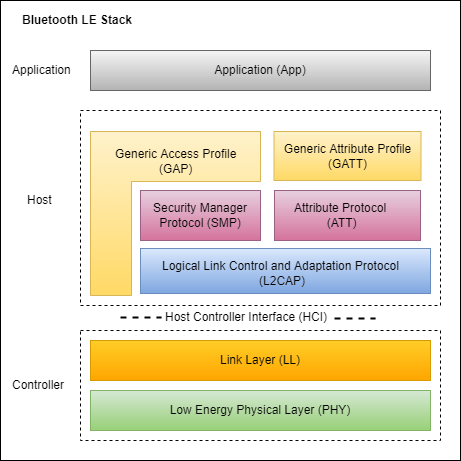
When people talk about Bluetooth, they usually focus on the shiny surface stuff — earbuds, wearables, car stereos. But underneath all that is a plumbing system that quietly keeps everything moving in the right direction: L2CAP, or Logical Link Control and Adaptation Protocol. It sounds intimidating, but once you picture what it’s doing, it becomes almost elegant.
Think of Bluetooth communication like a bustling highway. You’ve got trucks hauling big loads (audio data), motorcycles zipping between lanes (small control messages), and maybe even a bus carrying passengers (multiple apps using the same connection). Without lanes, that highway would be a mess — collisions everywhere, traffic jams, honking chaos. L2CAP is what paints the lanes on the road and directs the traffic so each type of message knows exactly where to go.
Every channel in L2CAP is like a dedicated lane. Some are used for the Attribute Protocol (ATT), which handles things like reading and writing characteristics from a Bluetooth device. Others carry security messages — the stuff we just talked about in pairing and the Security Manager. Still others are reserved for higher-level protocols like audio or video. By giving each type of traffic its own space, L2CAP makes sure your music stream doesn’t get tangled up with a firmware update or a battery status ping.
Here’s a neat detail: L2CAP isn’t just a traffic cop, it’s also a translator. Not all Bluetooth devices are created equal — some are tiny sensors sending a few bytes, others are audio monsters blasting megabits per second. L2CAP adapts data from the higher layers into a form that the lower-level radio link can handle. It chops, reassembles, and queues packets so they fit the constraints of the physical connection. It’s like a shipping company that can handle everything from postcards to shipping containers, making sure they all fit on the same delivery truck.
And here’s where it gets interesting for newbies: you never “see” L2CAP directly. There’s no “L2CAP app” on your phone. But every time you connect your smartwatch and stream a podcast at the same time, L2CAP is in the background keeping both conversations alive without either one crashing the party. Without it, Bluetooth would feel like trying to talk to five people at once in a crowded room with no rules. With it, everyone gets their turn, and somehow it all just works.
The protocol even allows for something called CoC (Credit-Based Flow Control Channels), which is a fancy way of saying devices can open up dynamic, app-specific lanes as needed. It’s like the highway magically adding an extra lane during rush hour. That’s why modern Bluetooth can support things like custom data channels for apps while still handling core services smoothly.
When I first dug into L2CAP, it felt like one of those acronyms engineers throw around to sound smart. But once I realized it was the reason my Bluetooth mouse and headphones could coexist on the same laptop without tripping over each other, it clicked. It’s not glamorous, but it’s the quiet infrastructure that makes all the flashy Bluetooth experiences possible.
Pairing Methods
If you’ve ever paired two Bluetooth devices and wondered why sometimes you’re asked to type a code, other times you just tap “OK,” and once in a while you have to hold your breath while both screens flash the same number — that’s not randomness. Those are different pairing methods, and each one has its own personality.
Just Works
This is the laziest (and most common) of them all. As the name suggests, it just works. No codes, no confirmations, no drama. Two devices exchange a handshake and boom — they’re connected.
It feels smooth, but here’s the catch: there’s no protection against someone sneaking in between that handshake. It’s the equivalent of leaving your apartment door unlocked because “hey, who’s really going to walk in?” Fine for casual gadgets, risky if you care about security.
Passkey Entry
Passkey Entry is stricter. One device shows a six-digit number, and you type it into the other. It’s like checking someone’s ID before letting them into the party.
Annoying if you’re in a hurry, but way safer because an attacker would have to guess the six-digit code in real time, which isn’t happening. If you’ve ever paired an old Bluetooth keyboard or a smart TV, you’ve probably typed one of these codes.
Numeric Comparison
Numeric Comparison feels like the modern cousin of Passkey Entry. Instead of typing anything, both devices show you the same six-digit number and ask, “Do we match?” You glance at both screens, nod, and tap yes.
It’s quicker, more user-friendly, and still blocks impostors. Imagine meeting a friend at a crowded train station and both of you are wearing the same silly hat you agreed on earlier — it’s instant confirmation you’ve found the right person.
Out-of-Band (OOB)
And then there’s Out-of-Band, the James Bond of pairing methods. Instead of shouting secrets across the Bluetooth link where anyone could be listening, the devices use another channel — NFC is the popular one. You tap your phone to a speaker, the secret key zips across in a private lane, and then the devices switch to Bluetooth already knowing they can trust each other.
It’s elegant, secure, and kind of magical the first time you see it. The downside is that not every device has an extra radio like NFC built in, so you don’t encounter OOB as often as you might like.
What’s fascinating is how the method gets chosen. You don’t pick it manually most of the time — the Security Manager decides based on the capabilities of the devices. A fitness tracker with no screen can’t do Numeric Comparison, so it falls back to Just Works. A laptop and a smartphone, on the other hand, can easily show matching numbers. It’s like two people figuring out the best way to communicate: “You don’t speak French? Okay, let’s go with English.”
Each method has trade-offs. Just Works is smooth but weak. Passkey Entry is secure but clunky. Numeric Comparison hits a sweet spot. Out-of-Band is secure and seamless but requires extra hardware. None of them are perfect, but together they cover the spectrum of devices we actually use. And honestly, that’s the genius of Bluetooth pairing — it bends just enough to fit the situation, even if it means occasionally frustrating us with one more six-digit code to type in.
Terminologies Explained
Before we dive into the pairing phases, let’s unpack some of the terms you’ll see. These concepts form the building blocks of Bluetooth LE security.
AES (Advanced Encryption Standard)

AES is the workhorse cipher under the hood. You feed it data plus a secret key and it scrambles the bits into something unreadable. Only someone holding the same key can turn that noise back into meaning. In BLE, AES is the lock on the door that everything else relies on.
CMAC (Cipher-based Message Authentication Code)
CMAC is how Bluetooth signs its messages. Picture sealing an envelope with a wax stamp that only you own; if the stamp’s wrong, you know the letter was tampered with. CMAC doesn’t encrypt the message — it proves it hasn’t been altered and really came from who you think it did.
AES-CMAC
This is simply CMAC built from AES. Bluetooth reuses this one solid primitive to confirm values, derive keys, and check that both devices computed the same secrets without blurting those secrets out loud. It’s a clever Swiss-army knife rather than a drawer full of tools.
Private Key
Each device generates a huge random number and keeps it to itself. That’s the private key — never shared, never shown. It’s the ingredient that lets your device participate in the key exchange without giving attackers anything useful. Lose it, and you lose your identity.
Public Key
From the private key, a device derives a partner key it can share safely. That public key is broadcast during pairing so the other side can do the same math on its end. Anyone can see a public key; no one can use it to impersonate you without your private one.
ECDH (Elliptic Curve Diffie-Hellman)

ECDH is the trick both devices use to arrive at the same secret without ever sending that secret over the air. Imagine you and a friend mixing your own paint colors into the same base — everyone sees the final color, but no one can reverse it to figure out your exact mix. That shared result becomes the foundation for the rest of pairing.
Nonce
A nonce is a random number used once and then thrown away. Each pairing run gets fresh nonces so old recordings can’t be replayed to fool a device. It keeps today’s conversation from being mistaken for yesterday’s.
LTK (Long Term Key)
Once the dance is done, the LTK is the key both sides keep for future connections. It’s the reason your earbuds reconnect instantly without renegotiating from scratch. Think of it as the “see you next time” secret that jumps you to a secure state right away.
IRK (Identity Resolving Key)
To protect your privacy, many BLE devices rotate their Bluetooth address. The IRK is how your phone still recognizes “its” device behind those changing masks. Outsiders see randomness; your bonded peer can quietly map the new address back to you.
CSRK (Connection Signature Resolving Key)
Sometimes a tiny sensor wants to send authenticated data without spinning up full link encryption. CSRK makes that possible by letting devices sign individual packets so the receiver can verify “yep, that really came from you.” It’s lightweight authenticity for chatty, low-power gadgets.
The Three Phases of LE Secure Pairing
Pairing in Bluetooth LE isn’t a single handshake. It’s staged, and the official diagrams that engineers use to describe it show two vertical lifelines (the devices) with arrows bouncing back and forth. At first glance those diagrams look like a mess of cryptographic terms, but they’re really just telling the story of how two strangers become trusted partners.
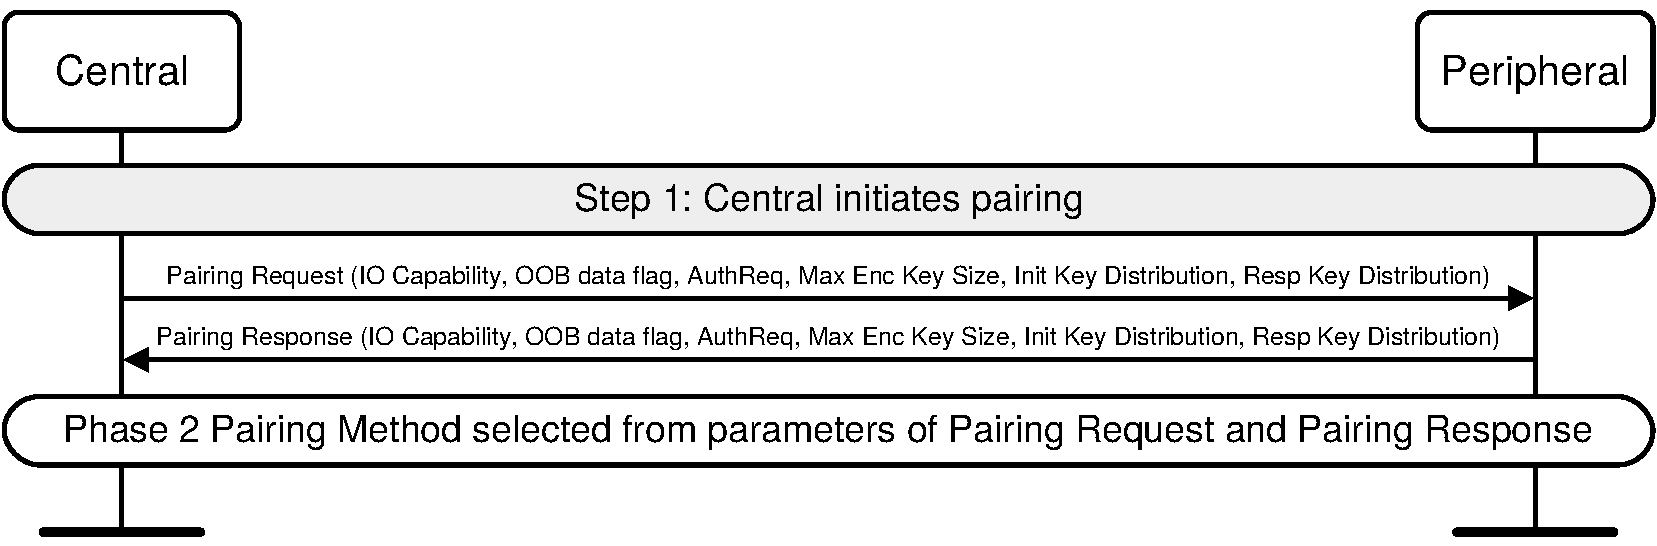
Phase 1: Feature Exchange
In the diagrams, this part starts with arrows labeled “Pairing Request” and “Pairing Response.” One device introduces itself by sending details: “I have a screen,” “I don’t have a keyboard,” “I’d like man-in-the-middle protection,” “I’m capable of distributing these keys.” The other device responds with its own profile.
When you follow these arrows, you’re basically watching the devices negotiate the ground rules. Out of this exchange comes the choice of pairing method: Just Works, Numeric Comparison, Passkey, or Out-of-Band. It also decides what keys will be passed later — things like the IRK, CSRK, or LTK.
Visually, this section of the diagram looks calm: a couple of arrows crossing between the devices with small notes about capabilities. It’s the “who are you and what can you do?” stage.
Phase 2: Key Generation
This is where the arrows in the diagrams suddenly multiply — public keys, confirm values, random values. It’s the heart of pairing, where the two devices move from introductions to proving they can actually trust each other.
Public Key Exchange
Each device generates an elliptic curve key pair (a private and public key). They send their public halves across the link, and from this point onward, each side can compute the same hidden secret: the Diffie–Hellman Key (DHKey). This secret never travels over the air, which is the whole point — both devices derive it independently, yet it matches on both sides.

Confirm and Random Values
Before they reveal anything, each device generates a random nonce and then computes a confirm value (basically a cryptographic checksum) using that nonce plus the DHKey. They swap confirm values first. Only afterward do they reveal the random nonces. Once the nonces are revealed, each device recalculates the confirm value and checks it against what was sent earlier. If they match, it proves that neither side is bluffing and both really derived the same secret.

Key Derivation Functions
At this stage, both devices have enough material — the DHKey, the random nonces, and some identity information like addresses — to run through a series of AES-based functions (often labeled f5, f6, etc. in the official descriptions). These functions churn out usable keys for encryption, identity, and signing. Depending on whether you’re in legacy mode or secure connections mode, you’ll end up with either a Short Term Key (STK) or directly a Long Term Key (LTK).
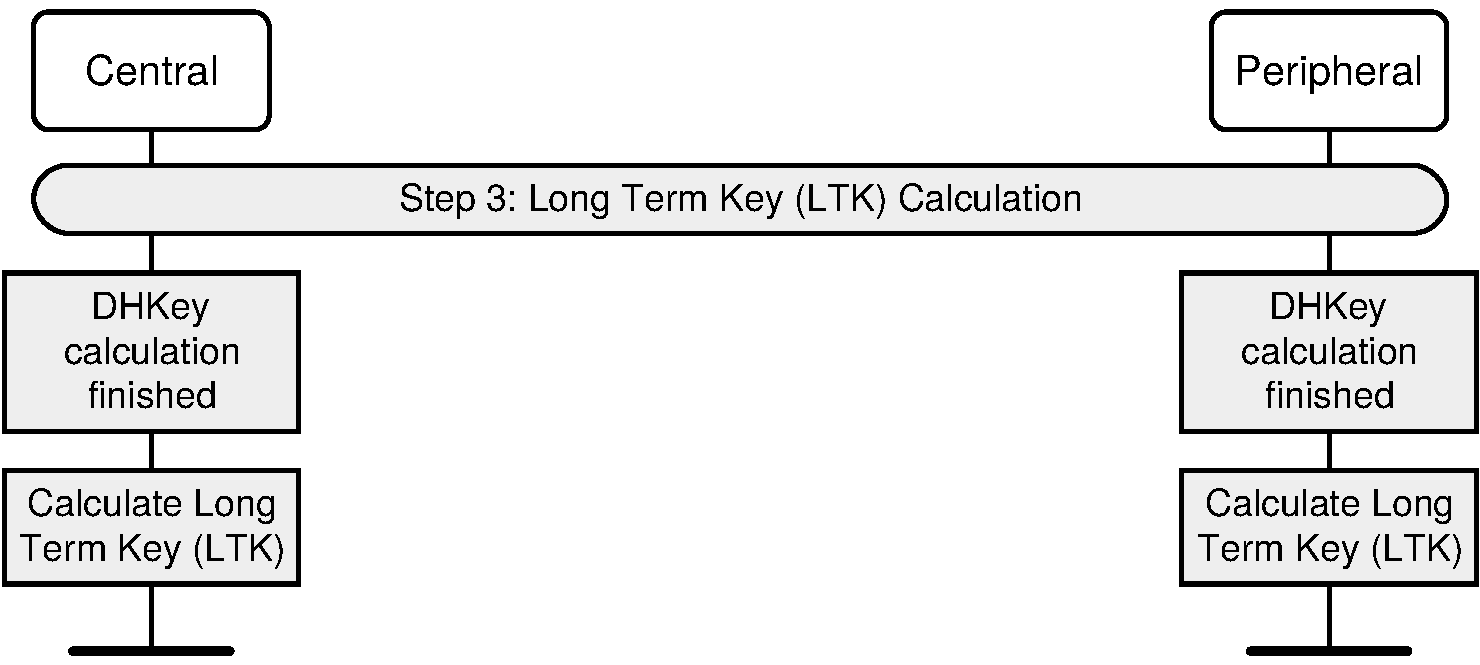
DHKey Checks
Here’s the extra safety net. In secure connections, after the DHKey is calculated, both devices perform what’s called a DHKey check. This involves running the derived DHKey, the random nonces, and some identity data through another cryptographic function. Each side sends the result to the other. When a device receives its peer’s DHKey check, it recalculates what it expects that value should be. If the two match, it’s proof that both parties not only did the math correctly but also didn’t get tampered with in the middle.
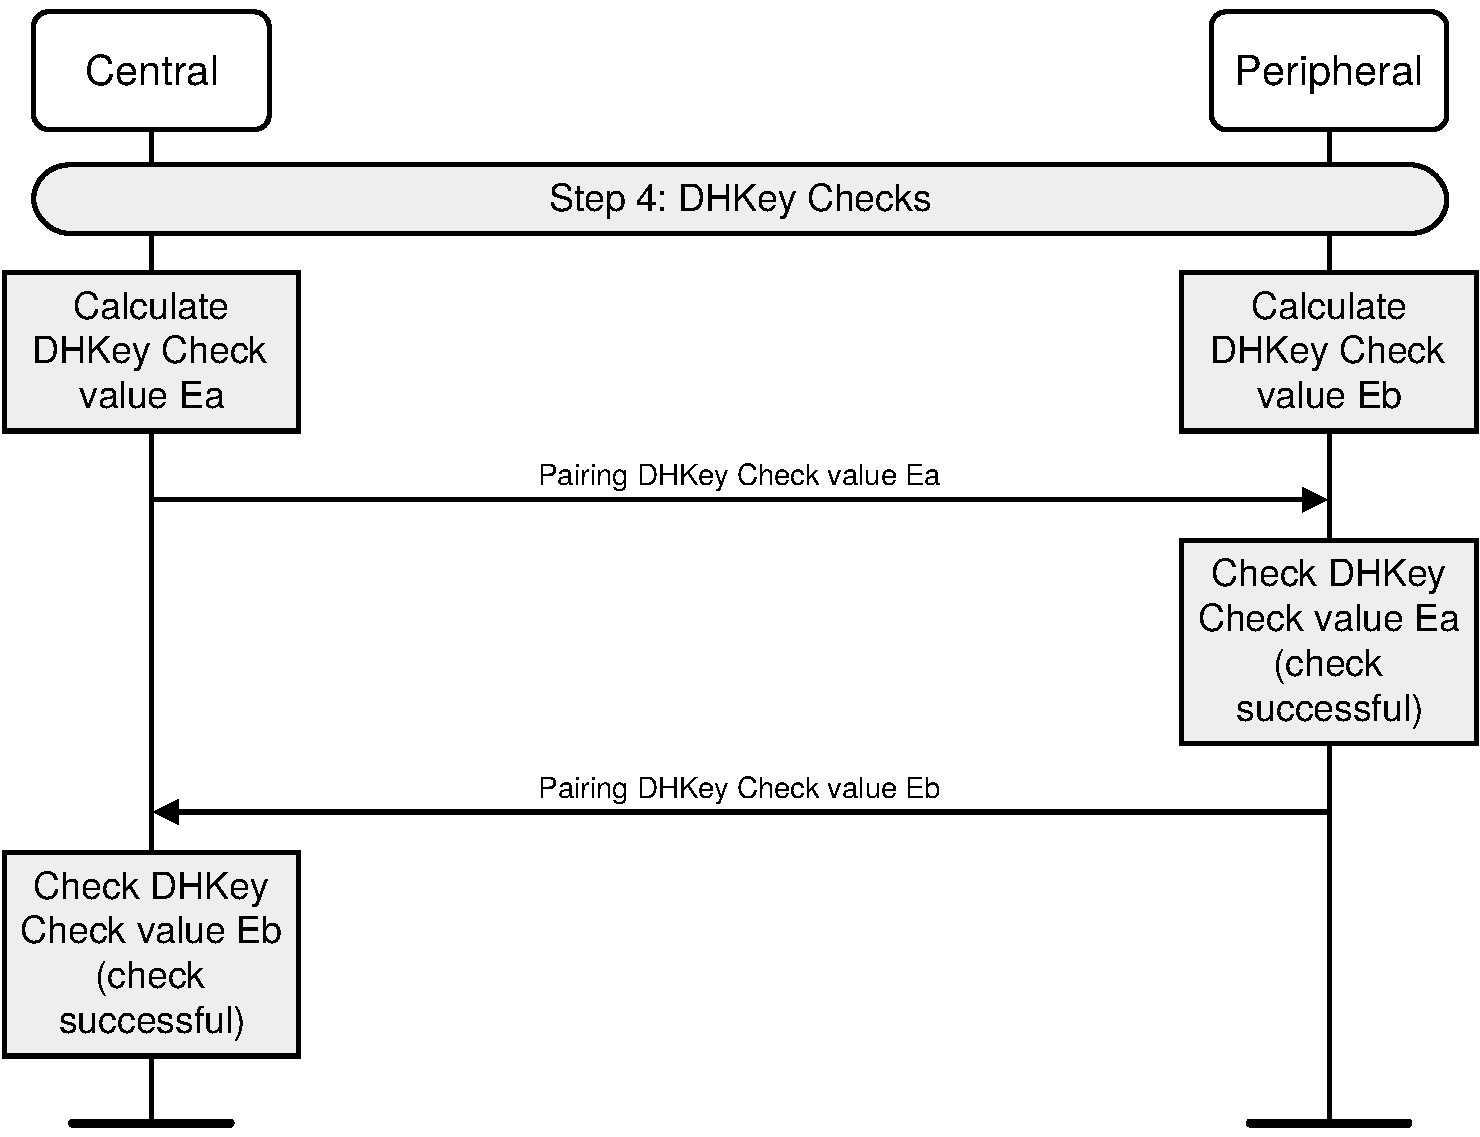
On the diagrams, you’ll usually see this as arrows labeled “DHKey Check” going both directions, after the random value exchange. Without this step, an attacker might be able to trick one side into thinking they had a valid secret. With the DHKey check in place, the devices lock in certainty: either we both have the same shared key, or the pairing fails immediately.
So Phase 2 isn’t just one step. It’s a carefully choreographed dance: exchange public keys, prove the math with confirm/random values, derive usable keys, and then double-check everything with DHKey checks. Only after all of that do the devices feel confident enough to move into encryption and Phase 3.
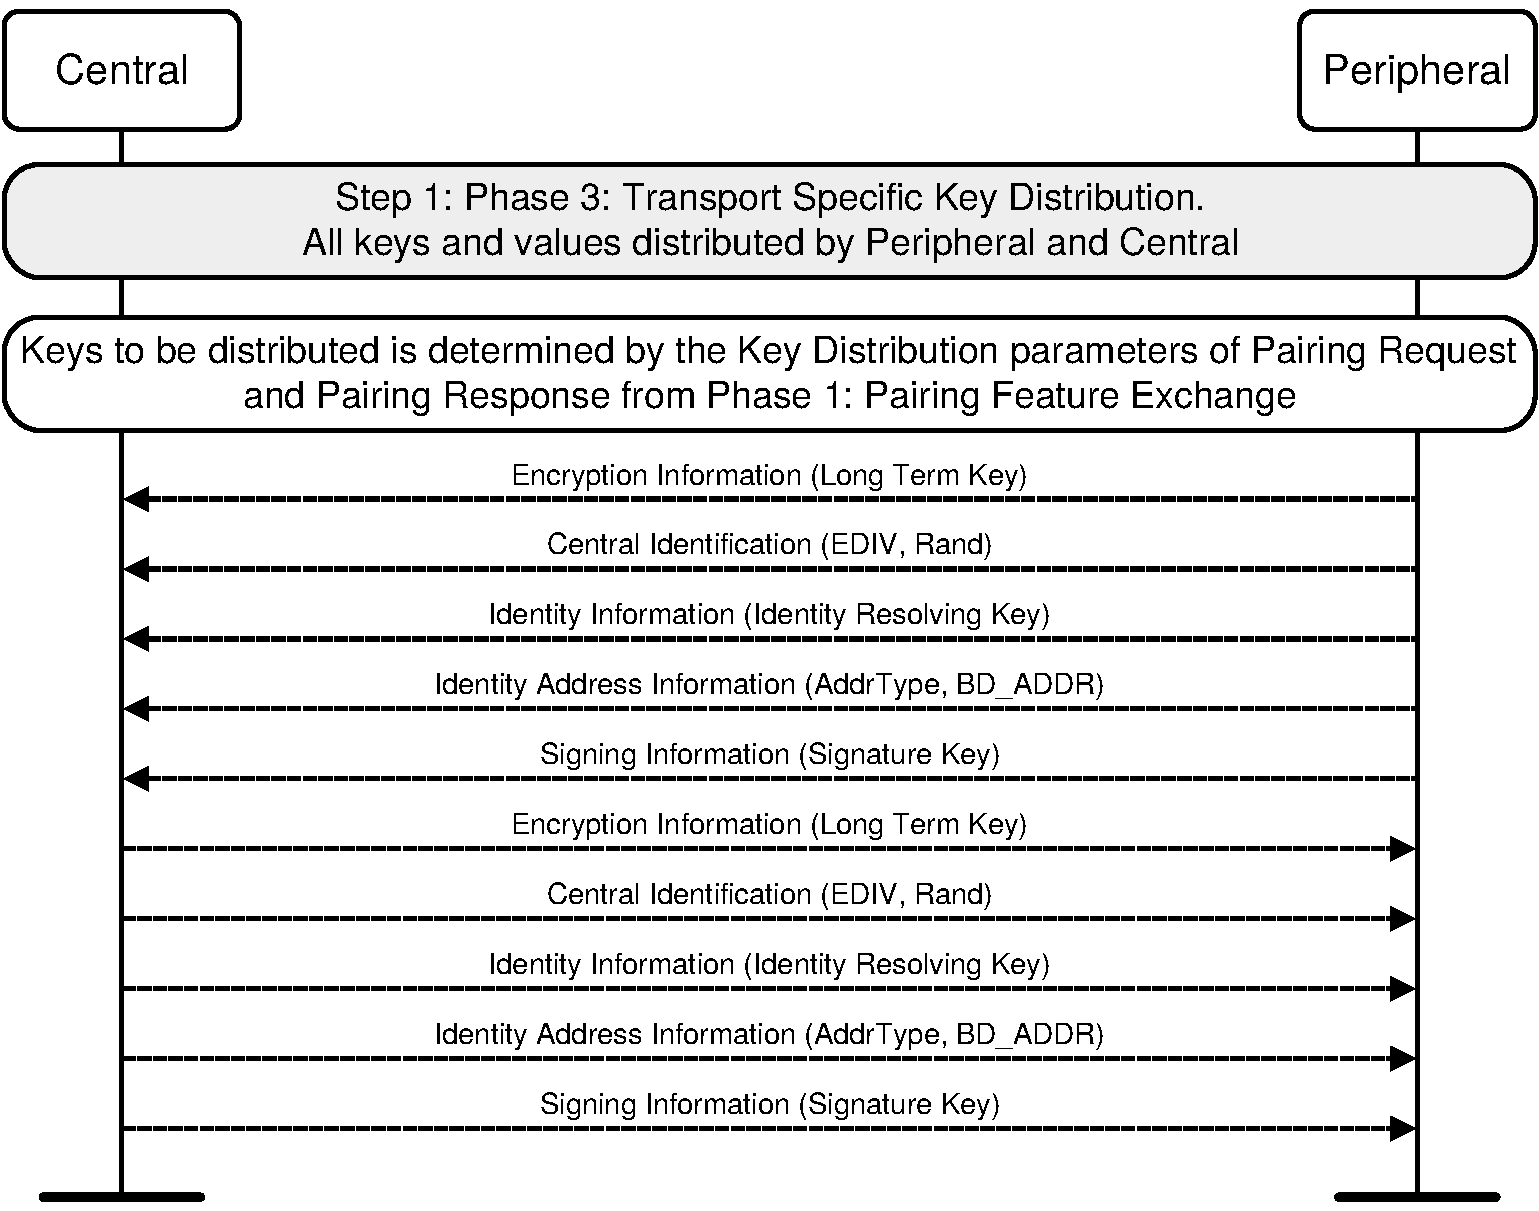
Phase 3: Key Distribution
Once the channel is encrypted, the diagrams show a new set of arrows with labels like “LTK,” “IRK,” and “CSRK.” This is when the devices trade the long-term credentials that will allow them to reconnect without starting over.
The LTK makes it possible to resume encrypted communication instantly next time.
The IRK lets a peer recognize a device even if its Bluetooth address changes for privacy.
The CSRK allows devices to sign individual messages so the other side can be sure they’re authentic.
In the diagrams, this part always comes after a marker for “Start Encryption.” That’s important — nothing sensitive moves until the channel is already locked down. From there, one or both devices hand over keys, depending on what they agreed to share back in Phase 1.
Think of this like handing your trusted friend not just your house key, but also the code to your garage and maybe your mailbox. Each credential unlocks a different part of your relationship, and because they’re exchanged securely, nobody else can copy them.
Cryptographic Functions
Bluetooth LE Secure Connections relies on a handful of small cryptographic building blocks. In the official flow diagrams you’ll often see labels like f4 or f6 attached to arrows or boxes. These aren’t random names — they’re the specific AES-based functions defined for pairing. Let’s go through them one by one.
| Function | Purpose | Stage Used |
| f4 | Confirms public keys | Phase 2 |
| f5 | Derives MacKey + LTK | Phase 2 |
| f6 | Authentication check | Phase 2 |
| g2 | Numeric comparison value | Phase 2 |
| h6 | Legacy key derivation (STK) | Legacy fallback |
| h7 | IRK derivation | Phase 3 |
f4: Public Key Confirmation
// f4: confirm public key exchange
void f4(uint8_t *U, uint8_t *V, uint8_t *X, uint8_t Z, uint8_t *output) {
    uint8_t M[65];
    concat(M, U, V, X, Z);
    aes_cmac(U, M, sizeof(M), output);
}
When you look at the f4 function, it takes in four inputs: a key U, another key V, a random value X, and a small constant Z. U and V are the 256-bit elliptic curve public keys that both devices have exchanged earlier in the pairing process. X is a freshly generated random number, unique to this session, and Z is just a one-byte discriminator to avoid collisions between different uses of the same function. The body of f4 builds a message from these values and then runs it through AES-CMAC using one of the public keys as the CMAC key. The output is a confirm value. That confirm value gets sent across before the random X is revealed. Later, when X is sent, the peer can recompute f4 with U, V, X, and Z to check the confirm matches, proving the sender didn’t change its random midway.
f5: Deriving MacKey + LTK
void f5(uint8_t *W, uint8_t *N1, uint8_t *N2,
        uint8_t *A1, uint8_t *A2,
        uint8_t *MacKey, uint8_t *LTK) {
    uint8_t salt[16] = {0x6C,0x88,0x83,0xE6,0x93,0x04,0x4E,0xBF,
                        0x8C,0xD3,0x16,0xF0,0x2A,0xE0,0x8E,0xD3};
    uint8_t T[16];
    aes_cmac(salt, W, 32, T);

    aes_cmac(T, build_msg("btle", N1, N2, A1, A2, 0), 53, MacKey);
    aes_cmac(T, build_msg("btle", N1, N2, A1, A2, 1), 53, LTK);
}
The f5 function takes the raw Diffie–Hellman key W, the two nonces N1 and N2, and the two device addresses A1 and A2. W is the big shared secret that both devices derived from their private key and the other device’s public key, but on its own it’s not structured enough to use directly. N1 and N2 are the random values chosen by each device during the pairing run, ensuring freshness. A1 and A2 are the 48-bit Bluetooth addresses of the initiator and responder, included so the derived keys are tied to these particular devices and not reusable elsewhere. The f5 routine first derives a temporary key from W and a fixed salt, then uses AES-CMAC to combine the nonces and addresses. The outputs are two values: MacKey, which will be used to authenticate DHKey checks, and the Long Term Key, which will later encrypt the link.
f6: Authentication Check
void f6(uint8_t *MacKey,
        uint8_t *N1, uint8_t *N2,
        uint8_t *R, uint8_t *IOcap,
        uint8_t *A1, uint8_t *A2,
        uint8_t *output) {
    uint8_t M[128];
    concat(M, N1, N2, R, IOcap, A1, A2);
    aes_cmac(MacKey, M, sizeof(M), output);
}
The f6 function accepts the MacKey along with N1, N2, A1, A2, and an input called r, which can be either the six-digit passkey in Passkey Entry or a zero value in Numeric Comparison. It also uses IOcap, which encodes what kind of input and output each device has. Together, these inputs capture the session randomness, the device identities, and the human-level confirmation values. The AES-CMAC calculation over these parameters yields an authentication value. This value is what each side sends as a DHKey check. If both sides compute the same value, it means the pairing inputs and the shared key match, and nobody meddled in between.
g2: Numeric Comparison
uint32_t g2(uint8_t *U, uint8_t *V,
            uint8_t *X, uint8_t *Y) {
    uint8_t M[128];
    concat(M, U, V, Y, X);
    uint8_t out[16];
    aes_cmac(X, M, sizeof(M), out);

    return (out[0] | (out[1] << 8) | (out[2] << 16)) % 1000000;
}
The g2 function uses the public keys U and V again, plus the nonces X and Y from both devices. Its role is to produce the six-digit number that humans compare during Numeric Comparison pairing. It runs AES-CMAC over these inputs, then reduces the output to a number between 000000 and 999999. Each device computes the same number independently, and the user just verifies that the two screens show the same thing. The parameters are carefully chosen: U and V prove the devices are the same ones that exchanged keys, while X and Y provide session-specific freshness.
h6: Legacy Key Derivation
void h6(uint8_t *W, const char *keyID, uint8_t *output) {
    aes_cmac(W, keyID, 4, output);
}
The h6 function takes in a key W and a short identifier string. W can be a legacy Link Key or another pre-existing secret, and the identifier string tells h6 what the new key is for. The function simply runs AES-CMAC of the identifier using W as the key. The result is a derived key ready for use in secure connections, effectively adapting an old key to a new role.
h7: IRK Derivation
void h7(uint8_t *Salt, uint8_t *W, uint8_t *output) {
    aes_cmac(Salt, W, 16, output);
}
The h7 function is similar, but instead of an identifier string it uses a salt. It takes W, often the DHKey, and runs AES-CMAC with the salt as the message. The output is a new key, commonly the IRK that allows one device to resolve another’s changing addresses. Using a salt makes sure this key is different from others derived from the same W, preventing accidental reuse.
AES-CMAC: The Workhorse Behind Secure Pairing
At the center of all these cryptographic helper functions lies AES-CMAC. It’s the Swiss-army knife that Bluetooth LE secure pairing uses again and again to prove honesty, derive new keys, and generate authentication values. Whenever you see f4, f5, f6, g2, h6, or h7 in code, they’re really just clever wrappers around AES-CMAC with slightly different inputs.
Pseudocode for AES-CMAC
#include <stdint.h>
#include <string.h>
#include "aes.h"   // AES-128 encryption routine

#define BLOCK_SIZE 16

// Left shift helper
void leftshift(uint8_t *input, uint8_t *output) {
    uint8_t carry = 0;
    for (int i = BLOCK_SIZE-1; i >= 0; i--) {
        uint8_t val = input[i];
        output[i] = (val << 1) | carry;
        carry = (val & 0x80) ? 1 : 0;
    }
}

// XOR helper
void xor128(uint8_t *a, uint8_t *b, uint8_t *out) {
    for (int i = 0; i < BLOCK_SIZE; i++) out[i] = a[i] ^ b[i];
}

// AES-CMAC implementation
void aes_cmac(uint8_t *key, uint8_t *msg, size_t len, uint8_t *mac) {
    uint8_t L[BLOCK_SIZE], K1[BLOCK_SIZE], K2[BLOCK_SIZE];
    uint8_t zero[BLOCK_SIZE] = {0};

    // Step 1: AES encrypt 0 with key
    aes_encrypt_block(key, zero, L);

    // Step 2: Generate subkeys
    leftshift(L, K1);
    if (L[0] & 0x80) K1[BLOCK_SIZE-1] ^= 0x87; // Rb constant
    leftshift(K1, K2);
    if (K1[0] & 0x80) K2[BLOCK_SIZE-1] ^= 0x87;

    // Step 3: Split message into blocks
    size_t n = (len + BLOCK_SIZE - 1) / BLOCK_SIZE;
    uint8_t last_block[BLOCK_SIZE];
    bool complete = (len % BLOCK_SIZE == 0);

    // Prepare last block
    if (complete && n > 0) {
        xor128(&msg[(n-1)*BLOCK_SIZE], K1, last_block);
    } else {
        memset(last_block, 0, BLOCK_SIZE);
        memcpy(last_block, &msg[(n-1)*BLOCK_SIZE], len % BLOCK_SIZE);
        last_block[len % BLOCK_SIZE] = 0x80; // padding
        xor128(last_block, K2, last_block);
    }

    // Step 4: CBC-MAC over all blocks
    uint8_t X[BLOCK_SIZE] = {0};
    uint8_t Y[BLOCK_SIZE];
    for (int i = 0; i < n-1; i++) {
        xor128(X, &msg[i*BLOCK_SIZE], Y);
        aes_encrypt_block(key, Y, X);
    }

    // Step 5: Process last block
    xor128(X, last_block, Y);
    aes_encrypt_block(key, Y, mac);
}
The algorithm itself takes two things: a key and a message. The key is usually something meaningful in the session, like a public key, the shared Diffie–Hellman secret, or a previously derived MacKey. The message is built by concatenating session parameters such as random nonces, device addresses, or role identifiers. The point is always the same: combine these values into a short tag that proves both sides had the same inputs without exposing the inputs themselves.
The process begins by running AES once on an all-zero block using the provided key. The output, called L, is used to generate two special subkeys, K1 and K2. This step is subtle but important. Not every message is the same length, and the last block might be perfectly full or it might need padding. By preparing two subkeys in advance, AES-CMAC knows exactly how to treat the final block. If the last block is complete, K1 is XOR’d in. If it’s incomplete, the block gets padded with a single 0x80 byte followed by zeros, then XOR’d with K2. This trick guarantees that a padded message never collides with a non-padded one.
Once the message is divided into 16-byte chunks, the algorithm moves into a rhythm. It takes the first block, XORs it with an initial state (all zeros at the start), then encrypts that with AES under the key. The result becomes the new state. The next block is XOR’d with that state and encrypted again. This chaining continues until the last block, which is treated with K1 or K2 depending on whether padding was needed. After the final encryption, the state that drops out is the CMAC tag.
The parameters in the code make sense when you map them to this flow. The “key” parameter is the AES key chosen for this round, which might be the public key in f4, the DHKey in f5, or MacKey in f6. The “message” parameter is whatever inputs are relevant at that stage — sometimes a concatenation of nonces and addresses, sometimes a short identifier string, sometimes both public keys plus a random value. Together they capture the identity of this particular session and purpose. The output of AES-CMAC is always a 128-bit value, but functions like g2 reduce it down to six digits for human readability.
From the outside it looks like black-box cryptography, but in practice AES-CMAC is just a disciplined way of folding together a key and a message until you end up with a unique tag. Both devices run the exact same steps with the exact same inputs, so they’ll produce the same tag if and only if they really shared the same starting secrets. That’s why it works so well as the foundation: it’s deterministic, tamper-resistant, and versatile enough to serve as the confirm value generator, the key derivation function, the numeric comparison helper, and the adapter for legacy keys.
So when you see a pairing diagram filled with arrows labeled Confirm, Random, DHKey Check, or IRK distribution, behind the scenes most of those arrows were born from AES-CMAC. It’s the quiet workhorse that takes a jumble of public keys, random numbers, and addresses and presses them into a compact proof of trust. Without AES-CMAC, the whole secure pairing flow wouldn’t hold together.
Wireshark Example: Seeing It in Action
If you capture a BLE connection with Wireshark (or using Android/iOS HCI snoop logs), you’ll see these Security Manager Protocol (SMP) messages traveling over the L2CAP channel 0x0006. Let’s walk through a real trace and connect each packet to the pairing phases and cryptographic functions.
1. Pairing Request
> SMP Pairing Request
    IO Capability: DisplayYes
    OOB data: Not present
    AuthenticationReq: Bonding, MITM
    Max Encryption Key Size: 16
    Initiator Key Distribution: LTK, IRK
The trace usually starts with a frame labeled Pairing Request. This is the moment when one device introduces itself formally. Inside the packet you can see its IO capabilities, like whether it has a display or keyboard, if it supports Out-of-Band data, and whether it requires stronger protection against man-in-the-middle attacks. It also advertises what keys it’s willing to distribute later, such as the LTK, IRK, or CSRK. Just from this single frame you can already tell a lot about what the device can do and which pairing methods are even possible.
2. Pairing Response
< SMP Pairing Response
    IO Capability: KeyboardOnly
    OOB data: Not present
    AuthenticationReq: Bonding, MITM
    Max Encryption Key Size: 16
    Responder Key Distribution: LTK
Not long after, the peer sends a Pairing Response. This packet mirrors the first one, containing its own IO capabilities, security requirements, and intended key distribution. By looking at the Request and Response together, you can figure out which pairing method will be selected. For instance, if one side has no display and the other has no keyboard, the devices will fall back to Just Works. If both can show numbers, Numeric Comparison becomes an option. This exchange is the negotiation step that locks in what the rest of the flow will look like.
3. Pairing Confirm (uses f4)
> SMP Pairing Confirm
    Confirm Value: 0x9f3c2a5e...
Next, you’ll see Pairing Confirm packets traveling across the link. These are the confirm values generated by the f4 function. They’re only 16 bytes long, and on their own they look like random data. But behind the scenes, they tie together the device’s public key and its random number in a way that the peer can later verify. At this stage, neither device reveals its random yet — the confirm is like sealing an answer in an envelope and passing it across the table.
4. Pairing Random
> SMP Pairing Random
    Random Value: 0x82b14e6d...
Following the confirms are the Pairing Random packets. Each device now reveals the random number it used earlier. When one side receives the other’s random, it plugs it back into f4 along with the known public keys. If the result matches the confirm value that was already sent, the check passes. If not, pairing fails right here. Watching this in Wireshark is satisfying, because you can see the pairs of Confirm and Random packets line up neatly in sequence.
5. Public Key Exchange
> SMP Pairing Public Key
    X: 0x04A1F...
    Y: 0x7B9D2...
Now you’ll see Pairing Public Key frames in both directions. Each device sends its elliptic-curve public key, which Wireshark shows as two 256-bit coordinates. These values look like large blobs of hex, but they’re the ingredients each side needs to compute the same Diffie–Hellman secret locally. You may notice retransmissions if the link is noisy, but once both keys are exchanged, the devices have everything required to move into the confirm and random steps. In secure connections this exchange is mandatory; in older, legacy flows you won’t see these packets.
6. DHKey Check (uses f6)
> SMP DHKey Check
    Check Value: 0xF12C...
If secure connections are being used, the next step in the trace is the DHKey Check. These messages come from the f6 function, which combines the Diffie–Hellman secret, the random values, and the device identities. Each side computes a DHKey Check and sends it over. The other side recomputes the same function and makes sure the values match. This step guarantees that both parties not only derived the same shared secret but also that nothing was tampered with. In Wireshark, you’ll see two DHKey Check frames exchanged back-to-back.
7. Encryption Information
> HCI LE Start Encryption
    Rand: 0x123456...
    EDIV: 0x5678
    LTK:  0x89abcdef...
Once the checks succeed, encryption starts and you’ll see Encryption Information followed by Master Identification in legacy-style bonding. The first carries the long-term encryption material, and the second includes the values needed for future fast reconnects. At this point, packet contents are encrypted in the capture unless you’ve provided keys to Wireshark.
8. Identity Information and Identity Address Information
If identity exchange was agreed earlier, these messages appear next. Identity Information carries the key used to resolve private addresses later, and Identity Address Information provides the device’s identity address. Together they allow a peer to recognize the device even when its Bluetooth address rotates for privacy.
9. Signing Information
Some captures end with Signing Information. This delivers the key used to sign data packets so a device can prove authorship without turning on full link encryption every time, which is handy for very low-power sensors. This packet wraps up key distribution and completes the pairing story you can observe in the trace.
Conclusion
If you’ve made it this far, you can probably feel the rhythm of pairing now. It isn’t a black box anymore; it’s a small ceremony. First the introductions, then the secret handshake, then the quiet exchange of spare keys for next time. The Security Manager keeps the script, L2CAP keeps everyone in their lanes, and AES-CMAC does the heavy lifting in the wings while the audience just sees a neat little tap on “Pair.”
What looks like random hex in a capture is really a series of promises. A confirm that says “I’m not bluffing.” A random that proves it. A DHKey check that nails the landing. The keys that follow are less like passwords and more like friendships: saved once, reused without fuss, strong enough to survive a reboot or a week in airplane mode.
And the human part matters too. Just Works is convenient until it isn’t. Numeric Comparison feels almost playful, but it shuts the door on impostors. Out-of-Band is the quiet nod in a crowded room. Choosing a method isn’t about trivia; it’s about the kind of trust your devices need in the context they live in.
So the next time a pairing prompt pops up, don’t just click through. Imagine the two devices leaning in, comparing notes, running the math, and—only if it all adds up—deciding to remember each other. That tiny six-digit number, that single button press, is just the surface of a much bigger idea: confidence, earned quickly.
Further Reading