
By Charlie Jeppsson
I recently launched my first native mobile app built with React Native. As it happens, it was also the first app I’ve built for a client as a freelancing developer. Here’s the bumpy ride, all the way from react-native init to app store release.
Table of contents
- Why freelance?
- Why React Native?
- App specs
- Learning from the best
- Dev environment
- Navigation
- Splash screen
- State management
- Sessions
- Lists
- Images
- Time
- Custom fonts and icons
- CI/CD and monitoring
- Adding support for Android
- Because Apple
- Summary
Why freelance?
Last May, I stumbled upon this exciting freelance opportunity. At the time, I was working as a full stack web developer for a Stockholm-based startup. It was my first dev job, and I’d landed it barely a year earlier (which you can read more about in this article).
Summer was approaching rapidly, and the otherwise fairly high work pace was getting slower by the day. During one week, when the product team’s rotating tech support duty was mine, I was feeling a bit bored and frustrated with some of the bugs I was assigned to.
It was in this gloomy mood that my dad reached out to me about his intentions to build a mobile app for his company’s customers. Although he knew my job kept me busy and didn’t expect a full-time commitment, he asked if I wanted to be a part of the project in a more advisory type of role. Somewhat intellectually starved I said yes. Although it wasn’t my original intention, this advisory role eventually resulted in me taking on the development of the app as lead developer.
Now, you might be asking yourself — why would one even attempt to get into the mobile app space after just shy of a year of professional web development experience? Wouldn’t it make more sense to keep specializing in that area while adding some years of experience to your resume?
Absolutely it would. But, being the hopeless generalist that I am, I committed several years ago to making career decisions not based on career strategy, but rather on what makes me happy. In other words: my resume is already a trainwreck that could probably not get more scattered and incoherent.
Of course, career strategy and work life happiness aren’t necessarily mutually exclusive. In fact, I was very happy with my former job and employer. I just happened to find another project that I felt even more passionately about.
So what was it that made this particular project that exciting? Even more exciting than working on a hyper-growth product used by thousands of companies in a team with some of the most awesome people I’ve met? In three words: freedom, challenge and self-development.
Why React Native?
When I joined the project, my client had already received a few offers from some local digital agencies. Before I was even considering building the app on my own, I was asked to review them as a friendly favor. And I was just amazed by the low quality of the propositions.
One of them had sent some design sketches that were really sloppy and not at all in line with the brand presented on the client’s website. Another agency proposed a ridiculous price with some even more ridiculous recurring fees. And a third didn’t even seem to have done any pitch prep work whatsoever. And they all shared one thing: that they wanted to build the app with the hybrid framework Cordova.
And that wasn’t all. Although Cordova is completely free and open-source, one of them had even tried to hide the fact that this was the technology they used. Instead, they promoted their “own” internal mobile app platform — seemingly just some thin layer around Cordova — to justify a lock-in giving them exclusive app maintenance rights and making an eventual future handover complicated and expensive. Low-quality propositions.
Now, I don’t hold any grudge against hybrid frameworks. I use apps built with them all the time. Gmail, Slack, Atom and Figma to name a few. But at the time, I’d been hearing about React Native for quite some time. How it allowed building cross-platform mobile apps using Javascript — that weren’t hybrid!
What now? Had iOS and Android somehow stealthily been sneaking in support for writing native apps in Javascript? Because last I checked, iOS apps had to be built with Objective-C or Swift, and Android apps with Java or Kotlin.

Of course not. So how could React Native apps be called actual native apps? Short answer: APIs. It took me longer to get this than I dare to admit, but the way React Native apps can run natively on your smart phone is not by running Javascript, and not by compiling your Javascript to native code, but by making requests to APIs that render native components in Objective-C on iPhone and in Java on Android.
If you want to know more about React Native’s fundamentals I’d really recommend this super-pedagogical Quora answer, this React Conf talk by the amazing Parashuram N and the original unveiling of RN to the world.
Although I didn’t know this secret behind React Native’s magic trick at the time, I knew that it was in fact running native code — which was also my main argument for not going with any of the Cordova solutions suggested by the agencies. I reckoned that if they wanted a mobile app, they should build a native app. And if they wanted an HTML/CSS/JS app, their money would be better spent simply improving the mobile experience of their web app.
When I shared this with the client, they asked me if I knew someone who could build such an app. I told them I didn’t. They asked me if I could do it. I told them I couldn’t. Still, the seed had been planted, and I just couldn’t keep myself from dabbling around with React Native based on their app specs.
And before I knew it, a foundation for their app was already in place. So somehow, just a few weeks after that conversation we’d agreed that I would build the app for them.
App specs
Before we dive into the more techy details, a brief description of what type of app we’re dealing with here seems to be in place.
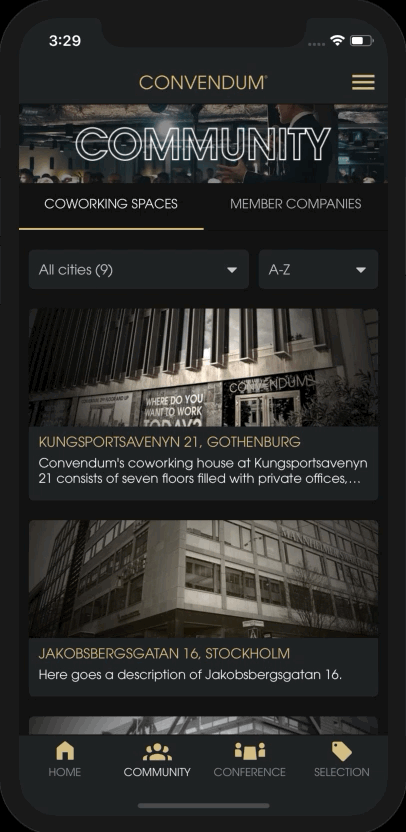
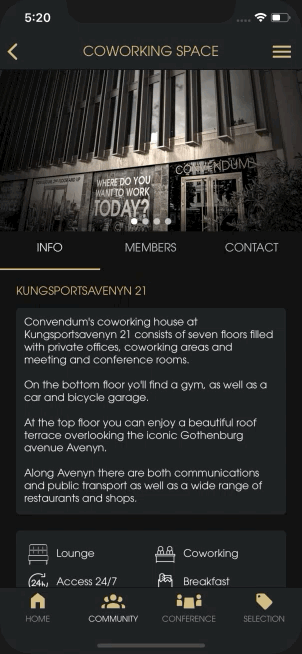
The client is a Stockholm-based company that operates coworking spaces. In other words, workspace hotels for companies. They currently have some 10 active spaces where about 400 companies with about 1,400 employees rent office space. These tenants are the target group of the app.
 The lounge at one of the client’s coworking spaces
After some discussions back and forth with the project manager, a few app specs crystallized:
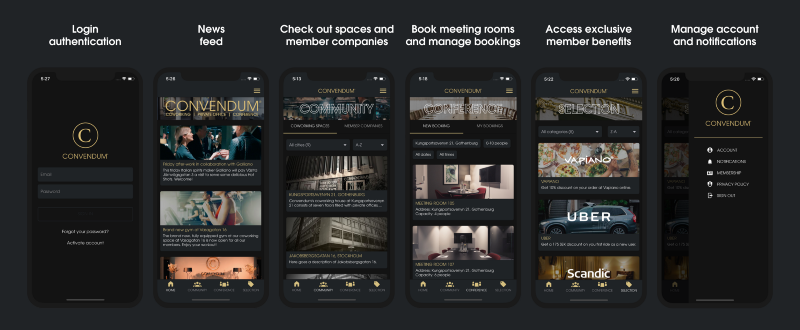
- Login/logout authentication and password resetting. Note: all user accounts are created by admins, so sign-ups are not possible in the app. Hence, if you decide to download the app, you will basically not be able to do anything with it ?
- Viewing and editing of a user profile, including name, email, password and avatar image.
- Push notifications.
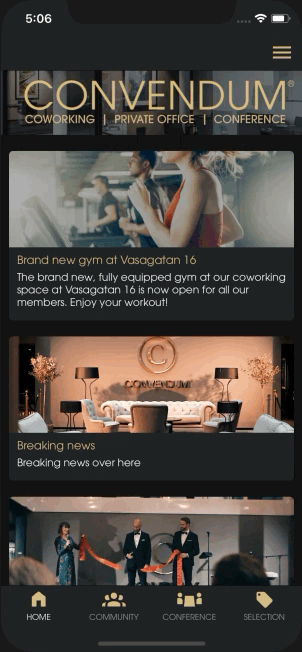
- A Home destination where users can read about recent events around the company in general and their home coworking space in particular.
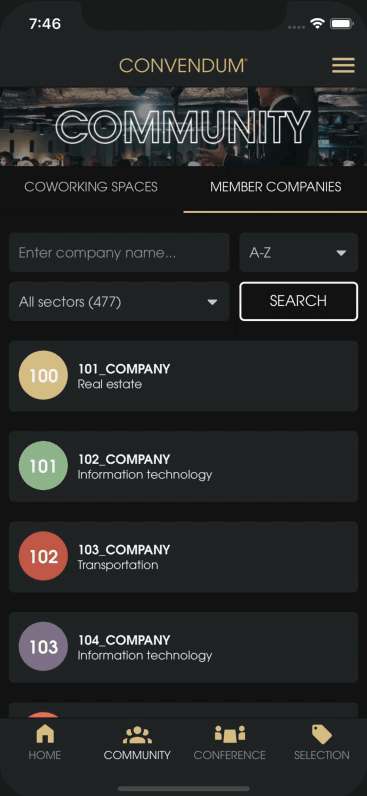
- A Community destination where users can browse through the different coworking spaces, get in touch with each space’s site manager and see other resident companies.
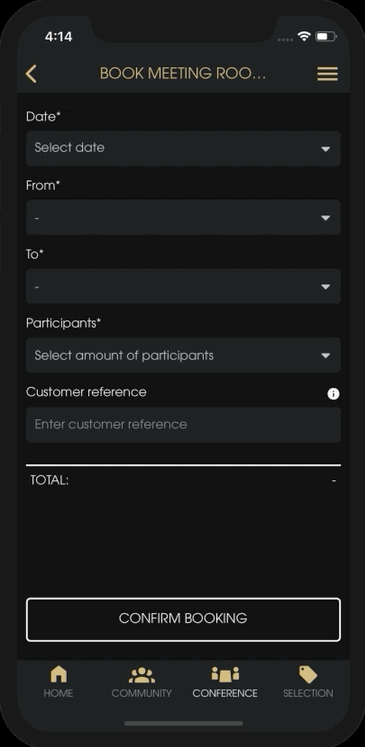
- A Conference destination where users can book meeting rooms and manage their bookings.
- A Selection destination where users can access exclusive member discounts and offers.
- First build the iOS version, then add support for Android.
- A backend admin web app to manage the content of the RN app. Although I will focus on the frontend stuff in this text, it might be relevant to know that it was built on Ruby on Rails, Postgres and Heroku.
As you can tell, it’s a pretty slim set of features. Which is exactly what you want for your first app with a new technology. If you want to know how the end result turned out (and whether the rest of this text is worth your time or not), here’s an overview of the 1.0 version:
You’re still here? Great, then let’s move on.
Learning from the best
So imagine you’ve promised a friend to build them a house. But you have no idea how to build a house. Barely even where to start. What’s the first thing you’d do?
You find yourself a carpenter.
So that’s what I tried to do. And did I hit the jackpot. After just a few hours of researching the React Native learning resources out there, I found a 13-part video course from Harvard on Youtube (completely free). Each lecture deep-diving into its own topic for between 90–120 minutes each. So about 23 hours of high quality material in total.
Immediately, I started consuming the video lectures as if possessed. And after just a few weeks of coding along during nights and weekends, I’d finished the course and set myself up with a pretty decent app base.
In hindsight it’s without a doubt one of the best learning resources I’ve found, all categories. The packed and always relevant curriculum absolutely played a big part, but the teacher Jordan Hayashi was definitely the big win here. I’d describe his teaching style as fast, hyper-practical and straight to the point. No time wasted on bad jokes and distracting personal anecdotes. Unlike yours truly…
Anyhow, somehow each lecture always seemed to compress an amount of information that would take most other teachers at least twice the time. In other words, a style very similar to Harvard CS50 teacher David J Malan.
So if you’re looking for a starting point for your first RN app, this would be my #1 recommendation. One caveat though: in the course, Jordan uses the Expo toolchain, which is a great tool for most simple apps as it does a lot of the nitty gritty work for you. But if you, like me, are building the foundation for what might become a quite big and complex app sooner rather than later, where you value total configuration freedom, react-native init might be a more appropriate solution.
The second best learning resource I had access to was actually my colleagues. By a lucky coincidence, we were just getting started with a React Native project at the company where I worked until just a few months ago. Although I wasn’t on the project myself, I learned a ton from just talking to the guys on the project and reviewing their PRs.
Now that we’ve got all the contextual things sorted out, we can finally move on to the more technical stuff!?
Dev environment
After getting the app foundation set up using react-native init, one of the first challenges was to get comfortable with a new development environment.
If you’re coming from the average web development environment, many things will stay the same. For me that included keeping Atom as my text editor, iTerm as my terminal and GitUp as my git interface (to the groaning Vim users out there: haters gonna hate). But other than that React Native required a few additions to my usual work flow.
Getting cozy with the iOS simulator, for instance. While running “react-native run-ios” from your command line sounds deceptively simple, in the beginning it was rarely enough to get the simulator up and running. As new npm packages were added to the project almost daily (and later on also quite a few native CocoaPod modules), I had to get more familiar then I’d preferred with the painful ritual of clearing watchman, removing the haste cache, deleting the node_modules directory, reinstalling all the node modules again and resetting the Metro Bundler cache. The following command will do all this for you:
watchman watch-del-all && rm -rf tmp/haste-map-react-native-packager && rm -rf node_modules && yarn && npm start --reset-cache
9 times out of 10 that dance would be enough to get the simulator going again. And sometimes it required delving deep into various GitHub issues and Stackoverflow threads.
The root of some other pains was that I for a long time thought that opening Xcode was required to achieve certain things. And believe me, you want to spend as little time as possible in that horror house of an IDE (more on that later).
Like telling the simulator to run a certain iPhone version. If someone would have told me that the line below did exactly that for me, straight from the command line, I would probably have been a slightly happier person during those first months.
react-native run-ios --simulator=’iPhone X’
Another example would be the 3 stage rocket required when going from Release mode (for deploying the app to App Store or some CI destination like Visual Studio App Center or Firebase) to Debug mode (dev mode). Perhaps obvious to many, these changes could also be made directly from your text editor of choice. Anyhow, just two small things that had a surprisingly big impact on my work flow when working in dev mode.
Lastly, it took some time to get used to constantly having to jump between different macOS apps to do things I would normally do in Chrome when working with web apps.
To inspect my Javascript console logs and HTML/CSS output for style debugging, I turned to React Native Debugger. And to keep track of app state, actions dispatched and API requests/responses I used Reactotron. While I found both these apps immensely useful, I couldn’t help but miss my corresponding Ember.js workflow, where I could do all of these things in the same place that my app was actually running (with the help of the Ember Inspector Chrome plugin).
Navigation
Navigation/routing has apparently been a pretty hard problem to solve in React Native. Four years in, there’s plenty of different solutions out there, but still no obvious consensus on which one is the best. I decided to go with react-navigation, but mostly due to that being the solution used in both the Harvard course and in the project my colleagues worked on.
However, if I would have taken the time to do some proper research, I might have made the following findings:
- The react-navigation repo has ~15 000 stars and 86 open issues. It’s fully Javascript-based and also has the most thorough documentation of all the navigation solutions I’ve seen.
- The react-native-navigation repo has ~10 000 stars and 162 open issues. Also worth taking into account is that it is not fully Javascript-based (i.e. requires editing native files).
- The react-router repo has ~35 000 stars and 36 open issues. However, these figures are not really comparable to the others since the repo includes routing packages for React.js as well.
- The native-navigation repo has ~3 000 stars and 55 open issues. However, the fact that this solution is still in beta, not fully Javascript-based and maintained by Airbnb should be seriously considered before investing a lot of time into it (Airbnb decided to sunset React Native).
Considering the above, I would probably still have chosen react-navigation, since I would not have had the time to test them all, as for instance Kurtis Kemple at MLS did. Lastly, as he explains in his talk, picking a navigation solution is not really a question about which one is the best as much as a question about which one best suits your particular needs.
After working with react-navigation for about 9 months, I have to say I don’t really have much to complain about. Seeing as my main point of reference was the router.js library used in Ember.js, it was an entirely new routing experience.
Getting to know react-navigation’s three main types of navigators was the easy part (StackNavigator, TabNavigator and DrawerNavigator). The hard part was understanding how the navigators should be nested with one another to get the intended user flow.
For instance, that my DrawerNavigator was supposed to be at the navigation root (one step above my main TabNavigation) was not at all obvious to me. If this is hard to picture, here’s the DrawerNavigator in action (much smoother in reality than in the gif):
 react-navigation’s DrawerNavigator in action
As you can see, I wanted a sidebar that could be opened with a swipe of the thumb from anywhere in the app.
Seeing as a sidebar is more of a secondary component in an app compared to the main bottom tab bar, my first intuition here was that the DrawerNavigator should be placed underneath or in parallel with the central BottomTabNavigator position in the route tree (see image below).
However, after banging my head against the wall trying to force-squeeze the sidebar in there, I found that the react-navigation way would actually be to put the DrawerNavigator one step above the BottomTabNavigator, i.e. at the root of the route tree. Hopefully this heads up will save someone out there the fair amount of hours I spent in the docs and GitHub issue threads to get to this insight.
Here’s another illustration with the DrawerNavigator at the root:
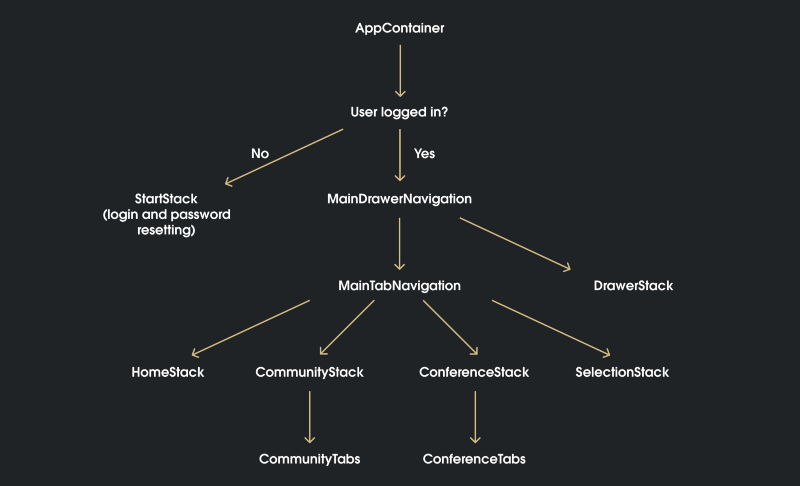 The app’s 1.0 version’s final navigation tree
One question you might ask yourself is: why both a StackNavigator and a TabNavigator for both Community and Conference? Why not just skip the stack layer and go straight to the tabs?
Well, because I wanted a header on top of each of the two TabNavigators. These guys:

Again, my intuition and the react-navigation way of doing things diverged. Seeing as the createMaterialTopTabNavigator must be a pretty standard navigation component, I figured it should have a simple built-in header config in it’s navigationOptions. Turns out it doesn’t, which is why I was forced to use a StackNavigator in between, thus adding another layer of complexity to the infrastructure for a purely superficial purpose.
This flaw in react-navigation also caused me some more serious problems. Namely, getting the header images to collapse/disappear when a user scrolls down in any of the two FlatLists. Since the headers of Home and Selection are rendered within the same StackNavigator as their lists, here this could easily be solved by simply letting the header scroll up together with the rest of the list.
But with Community and Conference — since the headers are rendered in StackNavigators, and the lists in TabNavigators one step beneath them in the tree — I found no way to apply the same solution to them. Hence I’m left with this painful asymmetry:
 Scrolling in TabNavigator vs StackNavigator
Now this may not appear as an issue on the iPhone X running in the simulator above, but on smaller screens that header might take up some 20% of valuable screen area. If anyone has an idea how to get around this, I’m all ears!
The same TabNavigator issue also caused a problem in the Community destination. As demonstrated below, I wanted to put another TabNavigator inside the Coworking Spaces tab, to get the three top tabs Info, Members and Contact visible on the right side of the gif.
However, since TabNavigator made it really hard to put an image slideshow on top of it without adding a ton of complexity causing all sorts of other navigation headaches (mainly related to navigation params), I had to resort to a JS package called react-native-swiper to deal with those three tabs instead. And I would actually have been totally fine with that, if it wasn’t for the quite unsmooth slide animations of the tab underlines. Anyway, I deemed it a fair price to avoid the alternative navigation headaches.
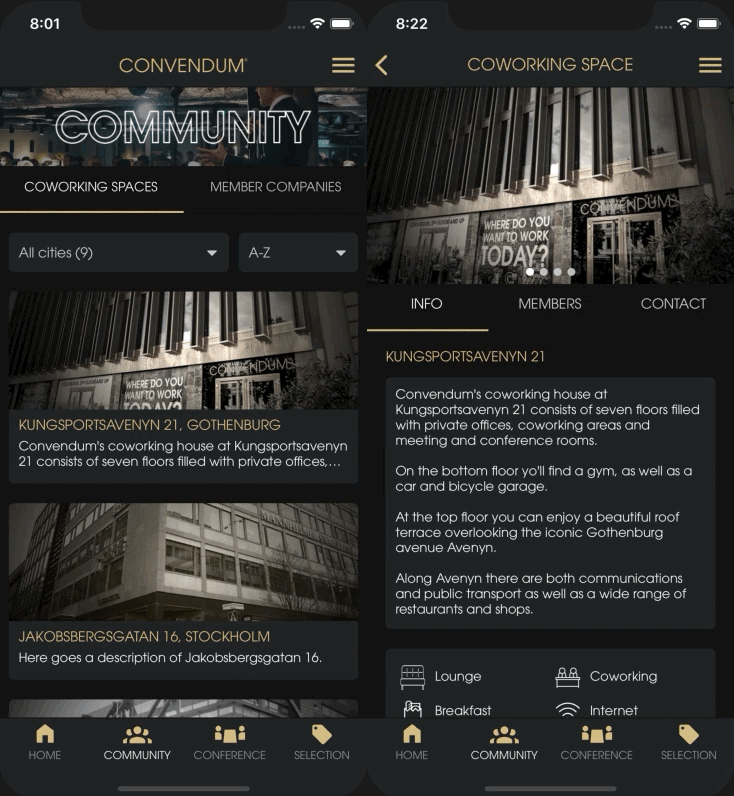 react-navigation TabNavigator vs react-native-swiper (notice the different animations of the golden underscore when swiping)
To sum up my experience with navigation in React Native:
- There are plenty of well-documented solutions out there, of which I found react-navigation to best suit my needs.
- React-navigation made it really easy to get started without knowing much about how purely native navigation works.
- React-navigation has a few non-intuitive dimensions (for a web developer), but none that can’t be conquered with some clunky work-arounds.
Splash screen
When running a new react-native init app on your simulator, reloading the app over and over again every time you make a change, you will quickly become aware of the need for a pretty launch screen (also called splash screen).
And since there’s already a really great guide for how to achieve this, I will not waste any of our time repeating the author’s words. I only ran into one problem here that the guide did not cover:

It’s pretty much an iOS edge case, but still something that will likely bother the few users exposed to it. I discovered it first when I was working someplace where I could not access the wifi, and thus was sharing the 4G from my phone with my laptop. As iPhone users will know, the status bar on the device will turn blue and get an increased height while internet sharing. And it totally broke my splash screen image when running on device. The same problem appeared when in-call.
So after a while of digging around in the react-native-splash-screen repo and not finding anything helpful, I decided to work around the problem by hiding the status bar completely while the splash screen was visible.
It’s super easy, all you need to do is add a UIStatusBarHidden key with the boolean value of true to your info.plist file, and then set the React Native StatusBar component’s “hidden” prop to false after SplashScreen.hide() has been called.
State management
“Convention over configuration” is a mantra I feel like I’ve been hearing every single day for the past two years. Not least at my former employer. Not very surprisingly, since we used Ruby on Rails on the server side and Ember.js one the client side — two frameworks basically synonymous with that saying. I thought I knew what those words meant, but the process of learning how to handle state in React Native gave them a whole new meaning.
Although I’d played around with the “configuration over convention” React library for the web in a few very simple demo apps, I’d never built anything big enough to justify bringing in a state container like Redux or MobX. Instead, most of my JS state management experience came from Ember Data (Ember’s built-in state management and data persistence library).
Since Redux was the go-to solution I’d heard people talk about for years on podcasts, blogs and in videos (including Jordan in the RN Youtube course), I never really considered any of it’s contenders. I just wanted to set up the best possible state management infrastructure with the least possible effort.
In Ember you are basically given 90% of this infrastructure for free. Little did I know that I would have to accept the opposite ratio in my current project. Not only won’t React provide you with anything useful to handle global state, but Redux — the most popular solution on the market — is so light-weight that you’ll basically have to pull 90% of the weight yourself the get an equal state solution.
Now that the slightly younger me got that out of his system, the hard part was actually just getting a hang of this new functional and immutable work flow. Once I’d accepted the surprising amount of new complexity needed to simply fetch or post some data from/to my server, it all boiled down to 7 pretty straightforward steps:
- Add the three SOME_ACTION_REQUEST, SOME_ACTION_FAILED, SOME_ACTION_SUCCEEDED to your constants file.
- Add the action creator to your actions file.
- Handle the three actions in the appropriate reducer, and if necessary add a new reducer and include that reducer in your root reducer.
- Add workers to the appropriate saga, and if necessary add a new saga and include that saga in your root saga (I’m using redux-saga for async actions).
- Add function to handle any eventual API request.
- Map the necessary state to props in the appropriate React components.
- Dispatch the SOME_ACTION_REQUEST action from the appropriate React components.
Redux and redux-saga surely have so much more to offer, but as far as I’m currently concerned, the above 7 steps are essentially what Redux is for me.
Sessions
So we’ve got our React Native dev environment set up, a navigation tree mapped out, and a state management infrastructure in place. What would be a good next step? Well, for me the natural choice was user authentication, thus getting into sessions.
If you’re coming to React Native from a web background, dealing with sessions will not require much brain compute power. If you’re in any way familiar with the concept of LocalStorage, you simply need to replace it with AsyncStorage: an abstraction layer that will let you persist key-value pairs across sessions. In other words perfect for storing an authentication token generated from your server when a user logs in.
Lists
Overall, my impression is that lists is a fairly well-solved problem in React Native. Basically, you have three options at hand: If you’re dealing with a static list whose data doesn’t change, ScrollView will likely suffice. If you’re dealing with a list that’s bigger and dynamic, FlatList is what you want. And if you want a bigger and dynamic list that’s also divided into different sections, SectionList is your answer.
I exclusively used FlatList for my dynamic lists. And while I intuitively like it and its massive set of configuration options, I experienced a few quite painful situations. Below I’ll go through them one by one.
Pull to refresh
FlatList has a prop called refreshControl, to which you can pass a component you want to use for refreshing the list content, triggered when the user pulls downward from the top of the list. Lucky for us, React Native has a component just for that purpose — RefreshControl . All very intuitive and easy to set up.
 RefreshControl in action
However, I ran into a weird situation, where the refreshControl prop and/or the RefreshControl component seemed to be the ones to blame. Some background:
So in my lists I want users to be able to a) scroll up at the top to refresh the list, triggering a function I named handleRefresh() and b) scroll down to load more items into the list, aka. “infinite scrolling” (more on that further down). Pretty standard stuff.
However, after a while I started getting these situations where the refresh spinner would just freeze and keep spinning forever, not displaying the new items fetched from the server. After quite some time of researching, I found the reason for my problem in this GitHub issue response.
The problem was that both the refreshControl and onEndReached (for infinite scrolling) props were making use of the same boolean prop: “fetching”. And for some weird reason, when this fetching prop would change from false to true and then back to true again, within a time interval of less than 250ms, RefreshControl would break and the loading spinner freeze.
So to try this theory out, I tried adding a setTimeout(), setting a minimum time interval of 350ms between changing the value of the fetching boolean. And it fixed the problem. But since using setTimeout felt a bit too hacky for my taste, I ultimately landed on the solution of simply using two different props for the handleRefresh() and handleLoadMore() functions: “refreshing” and “loadingMore”. Not sure how common this problem is, but hopefully my workaround can save someone some time and frustration.
Note that the official documentation recommends using onRefresh and refreshing instead of the refreshControl prop. The reason I went with refreshControl was that I didn’t see any other way to be able to customize the style of the spinner.
Infinity scrolling
As mentioned above, I also wanted to give my users the feeling as if the list was completely seamless. Meaning not having to press any “Load more” button at the bottom to load more items, and not having to get some blocking loading spinner or loading placeholders covering also the already loaded list item’s while fetching more items.
 Infinity scrolling with FlatList (notice how the threshold value of 2 triggers onEndReached when we’re 2 screen height’s worth of list items from the bottom)
For this purpose, onEndReached had basically everything I needed. I had two problems while implementing it though.
The first was wrapping my head around the onEndReachedThreshold prop, which will tell your FlatList when to trigger the function passed to onEndReached. After some trial and error, my explanation would be this:
If you have 100 items loaded into your list and the screen fits 10 items at a time, a onEndReachedThreshold value of 1 would mean that the onEndReached function will be called when you scroll past the 90th item in your list. If the value is 2, the function will be called already when you’re within 2 screen heights from the end, i.e. at the 80th item, and so on.
The second problem I ran into with infinite scrolling was what I can only assume is a FlatList bug. Namely, that every single time I scrolled down passed the threshold, my handleLoadMore() function passed to the onEndReached prop would be called repeatedly, often more than 10 times in a row.
Coincidentally, once again the solution could be found in making use of the loadingMore prop, adding an if statement in the handleLoadMore() function making sure the fetch action was only dispatched if !loadingMore. Naturally, you’d also want to check in that same if statement that you’re not on the last page in your server pagination.
Loading placeholders
Something that wouldn’t necessarily have any effect on the user experience, but most definitely would have made me happier as a developer, would be the presence of a ListLoadingComponent prop in FlatList, just like there’s a ListHeaderComponent, a ListEmptyComponent and a ListFooterComponent.
Since there is not, I was forced to rely on clumsy if statements to handle the placeholder rendering in plenty of render() functions.
Scroll to top
The final list topic I’d like to touch upon is scrolling to the top of the list with the press of a button. In my app, I currently have these buttons in the headers, but another common location for them is in the bottom tab buttons.
To achieve this I used the FlatList scrollToOffset method, which is simple enough to understand from the docs. However, a crucial detail which I could not find in the docs was that you also need to make use of the ref prop in the FlatList component, like so:
<FlatList ref={(ref) => { this.newsListRef = ref; }} .../>
What this does is basically giving your FlatList an identifier, so that it can be called from a function elsewhere. So in my case it allowed me to call the ScrollToOffset function from my handleScrollToTop() function, and for instance pass it as a parameter to my react-navigation navigation object, allowing it to be called from any route the param is passed to.
componentDidMount() { this.props.navigation.setParams({ scrollToTop: this.handleScrollToTop, });}
handleScrollToTop = () => { this.newsListRef.ScrollToOffset({ x: 0, y: 0, animated: true, });};
Note that after upgrading to react-navigation 3, the ref thingy was no longer needed since the createBottomTabNavigator buttons will now handle scroll to top by default.
Images
Images, I’ve come to learn, runs the biggest risk of becoming the one thing that makes your mobile app suck. Naturally, efficient image handling is important also on the web, but since phones will run on 4G (or 3G, god forbid) to a much larger extent, a lower average download speed must be assumed, which in turn could make your app seem slow.
Images will also likely take up a bigger share of the phone screen compared to the computer screen, why they should also be given a higher priority from a cosmetic perspective. So although it might not be the most fun part of it all, investing some time into it will probably be worth it.
My app turned out to be quite heavy on image content. It totals 7 lists with list items with image props that are not only displayed in the actual list items, but also on each item’s own “details” (the screen a user get’s redirected to when pressing a list item).
Uploading images
On the user account edit screen, the app would also allow users to upload an avatar image. For this I used the react-native-image-picker library, along with Cloudinary and Carrierwave on my Rails backend.
At first I put all the uploading logic on the client side, using Cloudinary’s Node API and the react-native-fetch-blob module. But after a while, since I wanted a bit more flexibility in my uploading logic and didn’t want to put too much complex logic on the React Native side, I moved it all to the Rails backend.
However, I ran into some troubles while trying to post the images to my server using react-native-fetch-blob. Hence, the additional complexity and the at the time very uncertain maintenance status of the repo made me choose the built-in JS FormData API instead. Note however that the no longer maintained react-native-fetch-blob repo has since been moved to rn-fetch-blob, where it is being actively maintained.
Displaying images
Truth is, the standard React Native Image tag, with its style, source and resizeMode props will take you a long way. If you don’t care about caching, displaying multiple images or some other fancy special case you probably won’t need to bring in other dependencies.
However, I found two cases where I actually found it worth the effort of adding to my list of dependencies. The first was the circular avatar-formatted images shown in some of the list cards and the user profile screens. For that, the react-native-elements Avatar came in handy.
 Forked react-native-slideshow in action
However, this component does nothing that you can’t achieve yourself with some extra styling to the default Image component. So unless you’ve already brought in the library for some other purposes, I wouldn’t recommend adding this dependency for the single purpose of avatar-formatting.
The other case where I decided to outsource was when displaying multiple images in a slideshow (see gif). For this I used the react-native-slideshow library, which did exactly what I wanted.
But beware, since it’s poorly maintained I’d strongly recommend forking it and trimming the code a bit rather than use as is from your node_modules.
Loading placeholders
So with 7 infinite scroll lists displaying images, the user is bound to do some waiting while all this data is being fetched from the server. As we all know, waiting is probably the single most frustrating experience in modern technology. So naturally we want to make it as endurable as possible.
Enter placeholders.
I’m not really sure why, but any time I wait for some content to load, I get a billion times more frustrated if all I get is a loading spinner (or even worse — nothing at all), than if I see some shiny, dynamic placeholders á Facebook news feed style. So that’s what I was going for.
Thankfully, I wasn’t the first one to have that idea in React Native. It didn’t take much research before I could confidently settle on two libraries: react-native-loading-placeholder (for the actual placeholders) and react-native-linear-gradient (for the shiny animations). I was really happy with the result, even if I may have taken it a bit too far with the one to the right…
 Loading placeholders with react-native-loading-placeholder and react-native-linear-gradient
Caching
Yes, caching is a thing also in the native world. Strangely enough though, there’s still no built-in support for it in the default RN Image tag. Instead, you’ll have use the CachedImage tag from this great lib: react-native-cached-image.
Basically, all you need to do is install the npm package and exchange all the default Image tags you want to cache with CachedImage. You can then check your Reactotron timeline to confirm that the images are actually being stored.
Compared to the minimal effort required to set up image caching, the payoff is huge. Seeing my Cloudinary bandwidth drop from a hefty 95% of the free monthly quota to about 4% was sooo satisfying.
Pro tip: add the prop activityIndicatorProps={{ animating: false }} and roll your own loading placeholder rather than the standard loading spinner while loading images.
Time
Time picker
React Native actually has a cross-platform Picker component. However, due to it’s very configurable nature (and my impatience), I looked around for a JS library that had already done some of the work for me. Luckily, I found react-native-picker-select, which emulates the native interfaces for iOS and Android for my almost exactly my purposes.
Since it’s basically just a single Javascript file using built-in React Native components (and some lodash, which was already a dependency of mine), I decided to simply steal the code — with some small adjustments— and put it in my own picker component. From then on, I use it not only for my time pickers for all input lists except for the date picker.
Date picker
I decided to go with Wix’s react-native-calendars library for a few reasons:
- I don’t like the native iOS date picker, since it gives a poor overview of month and year. Maybe I’ve just been broken by web development, but that’s my opinion.
- React Native currently requires two separate implementations for the two platforms; DatePickerIOS and DatePickerAndroid, which would have required plenty of code duplication doing the same thing.
- I wanted the picker to have more personality and reflect the client company’s brand rather than Apple’s and Google’s.
Hate it or love it, this was the result:
 react-native-calendars and react-native-picker-select in action
Time zones
Time zones. So simple in theory, yet so hard in reality.
Towards the end of the project, I was integrating the app’s backend with a third-party SaaS that the client use for their room bookings. I’d just had the pleasure of getting intimate with the good old SOAP protocol to set up the necessary API requests for the Conference section of the app. And when I finally had all the pieces in place, I started noticing some strange time behaviors on the React Native side.
The client company had made it explicit that they didn’t want users to be able to make new bookings on today’s date after 5pm that day, for reasons. But due to the Javascript Date object’s strict UTC time zone default, generating this max value for the time picker proved to be pretty tricky. In fact, so tricky that the logic bloated my component with too much complexity for my taste. Please let there be a library for this, I thought to myself.
My prayers were answered by moment-js, which not only was totally compatible with React Native, but also had a specific time zone module that generated the perfect boolean for me in a single line:
const timeSthlmAfterFive = moment().isAfter(moment.tz('17:00:00', 'HH:mm:ss', 'Europe/Stockholm'), 'second');
Custom fonts and icons
Custom fonts and icons — two tiny details with huge impact on the UI and branding of your app. Coming from a web background, I expected this to be a headache in proportion with the file conversion and font-face css file assembly dance I was used to.
But the work of other people before me made this a lot more painless than I’d expected. Following this tutorial, it took me about 10 minutes to import the client company’s custom fonts. And the vast icon library of react-native-vector-icons, together with some custom imports, has so far provided me with all I need in terms of icons.
Continuous integration, deployment and monitoring
Moving on to CI/CD — the livelihood of devops people, and the #1 configuration nightmare of all lone-ranging developers looking to make a quick buck.
Since I was (and still am) the only one working on this app, it might seem a bit overkill for some. Since there’s no code collaboration, all new deployments will come from the same computer, and I could just as easily build and test the app locally before pushing to the GitHub repo and submitting a new release to the app stores. However, for a few simple reasons I still considered a CI solution necessary:
- The client company is about to establish an in-house team of developers. And when they do, they’ll want the infrastructure to make it as easy as possible to add new people to the team.
- Although running your tests locally only takes a single line on the command line, it’s always desirable to automate everything that can be automated.
So I was determined to implement a CI solution. But up until this point, I had assumed that this would be isolated to building and testing, and that I would have to find separate solutions for e.g. error reporting, analytics and push notifications. Not to mention continuous deployments, which didn’t even seem to exists in the world of native.
And then I found Visual Studio App Center. This Chain React 2017 talk by Parashuram N (again) completely blew my mind. What he presented seemed to include all the different devops services I’d considered adding one by one, in one single solution: building, testing, diagnostics (error reporting), analytics, push notifications AND continuous deployment with Codepush. Not to mention distribution to the app stores and beta testers. And best of all, it would enable managing all these things for both my iOS and Android app in the same place. And the best of the best of all, it would likely be free until the app grew bigger, about a year or so later.
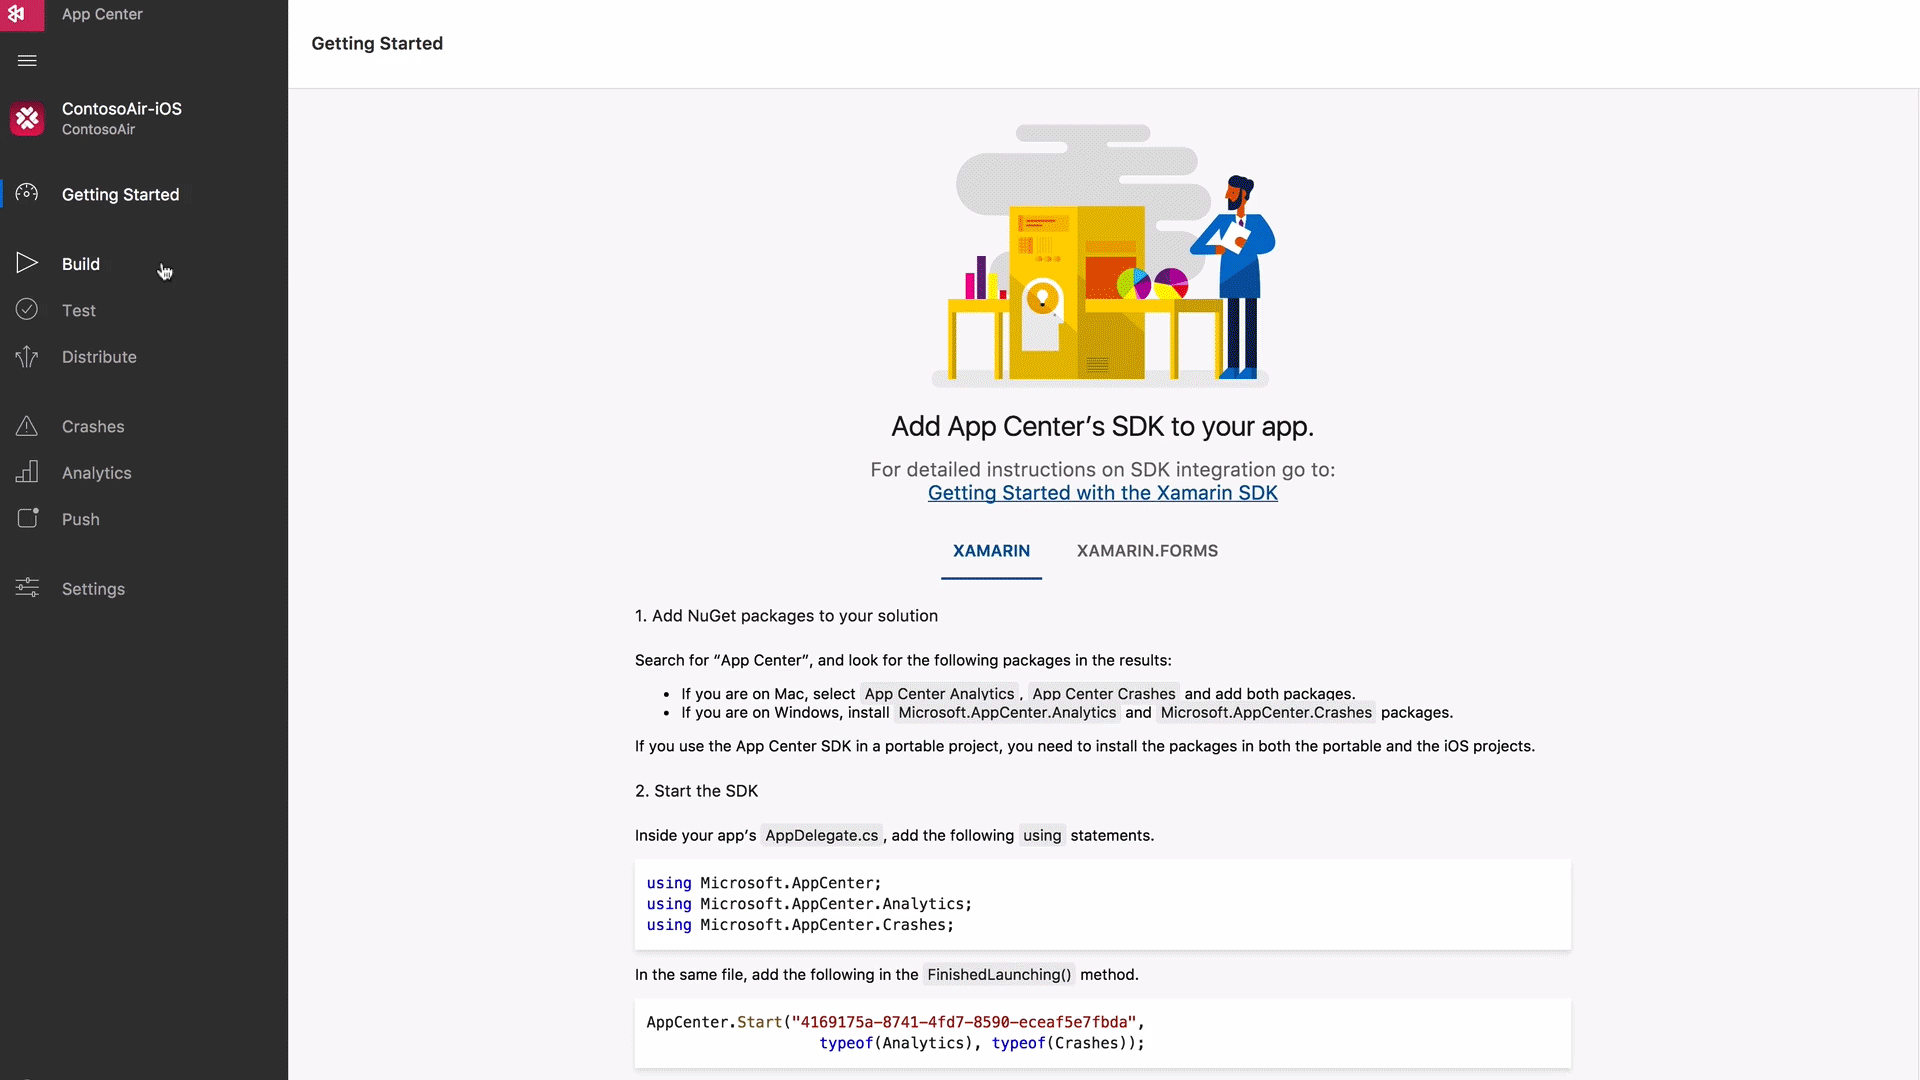 _VSAC preview borrowed from: [https://blogs.msdn.microsoft.com/vsappcenter/introducing-visual-studio-app-center/](https://blogs.msdn.microsoft.com/vsappcenter/introducing-visual-studio-app-center/" rel="noopener" target="blank" title=")
“This is too good to be true”, I thought to myself with teary eyes, panting from excitement. It was just so beautiful. So seamless. So developer-friendly (API-first). And yet with such a user-friendly UI, to the extent that also non-technical employees at my client could make sense of it (some of it).
How could all this be possible, you ask? Well, turns out Microsoft has been on a shopping spree lately. To assemble the goodie bag that VSAC is, they acquired a bunch of existing independent solutions like Codepush (continuous RN deployments) and HockeyApp (test distribution and crash reporting), as well as built and extended existing Microsoft products. The famous “developers, developers, developers, developers” ethos signed Steve Balmer really seems to run truer than ever in the company’s bloodstream.
So, had I heard enough to make an informed bet on this fairly new technology, discarding competing services like Fastlane, BuddyBuild and Firebase? Well, if it was truly as good as Parashuram claimed, it would save me weeks of installations and configurations, and probably countless hours of future maintenance of all the scattered services required to put together a similar result. Either way, it was definitely worth a shot.
And about a week later the app was all set up with all of the VSAC features. Except for a few child diseases, the docs together with the support chat supplied me with all the answers I needed.
One such problem was the fact that they did not yet support integrating with Apple Developer accounts using two-factor authentication (which Apple started enforcing just in time for me to get my account set up…). This was incredibly frustrating to me at the time, but just a few weeks after I’d reported it, they added official support for it.
If you find my praise of VSAC a bit one-sided, and would like to hear the opinion of someone with a big app perspective, I’d recommend this more skeptical CI/CD review.
Adding support for Android
With all the iOS groundwork in place, I found adding support for Android very painless. After setting up the Android Studio dev environment and getting the app running on an Android emulator, most of the issues could be solved with the React Native Platform module. For platform-specific styling, it offers the Platform.select() method. And for all other platform-specific code Platform.OS will do the trick.
Also, getting the app submitted and approved on the Google Play Store was SO much easier than for App Store. Why?
Because Apple
Evidently, approaching React Native as a web developer is bound to cause a few headaches. But for me, the worst headache by far was the development process imposed by Apple. I honestly can’t recall ever having experienced that many bottlenecks and schedule postponements caused by one single source. Technical project or otherwise.
 TL;DR
TL;DR
Mainly, I’d say the inexplicably high degree of bureaucracy is to blame. If there’s one thing you can count on when developing your first iOS app, it’s that you’ll make a ton of new friends along the way.
The guys and gals at the Apple Support, for instance. You might have to convince them that the company behind your app actually exists. You might also make a few friends at Dun & Bradstreet, their company identification partner. And while you’re at it, you might even make some friends over at your local governmental company registry, in order to update your company address to a format that Apple supports (they don’t support companies registered on a post office box, which is a very common practice at least here in Scandinavia).
And then you might get to spend even more time with the Apple Support people, since they still won’t be able to approve your Apple Developer registration seeing as you’re just a consultant, and not an actual employee of your client company. The whole process might take more than a month. But who cares when you’re making new friends, right?
And the fun doesn’t end there.
You’ve got your Apple Developer company account all set up. You’ve finished the 1.0 version of your app. Now you’re dying to get it out into the wild.
Well, you can’t just yet. First, you‘re up for some digital paperwork. You’ll have to generate a provisioning profile, an iOS certificate, an identifier, a .p12 Apple push notification certificate and the good old dSym file. And once you’ve generated, configured and uploaded all those files to the right places, you can start the actual app review process.
According to themselves, 50% of all apps are approved/rejected within 24 hours, and 90% within 48 hours. But prepare for the worst, since rejection is apparently just a normal part of life as an Apple Developer.
Luckily, my app only got rejected one time. It was due to “Metadata Rejected” reasons. And I would totally have been okay with that if I’d simply forgotten to fill in some required information. But seeing as the missing meta data apparently was 5 very specific questions (non of them included in the App Store Review Guidelines), it honestly just made me sad.
Sad to live in a world where just two companies are gatekeeping the entire native mobile app distribution pipeline. Sad that at least one of them cares so little about the customer that they allow themselves to arbitrarily take up other people’s time, causing months of expensive app launch delays. And so so happy that the same does not apply for the web (yet).
Evidently, developing my first React Native app for iOS included layers upon layers of bureaucratic screening processes. If there’s an equivalent of a dementor in the world of mobile development, this is most definitely it. It will literally suck the soul along with any eventual developer happiness right out of your body.
There. Rant over. That felt good.
Summary
As noted earlier, this project was started in the early summer. As such, the slower summer work pace at my job made it possible to juggle the two for a few months. But eventually the Oct/Nov deadline would just be coming at me way too fast, and I would realize I’d have to make a choice whether to stay in the job or finish the app on time. After a few weeks of contemplation, I chose the latter.
Although it was a really tough decision, in hindsight I think it was the right one. The freedom, challenge and self-development I was looking for were most definitely found, and then some.
Regarding the freedom, the loose leash of the client has basically allowed me to work from anywhere I want, anytime I want. Which has had a positive impact on many aspects of my life. It’s enabled me to get my 8 hours of sleep more or less every night. It’s enabled me to find a more consistent workout routine. It’s enabled me to find more time for the people I care about. And working while traveling.
On the negative side though, this freedom has also often made the process quite lonely. Even when working among people in cafés and coworking spaces, the absence of actual teammates to share the ups and downs with has been crystal clear.
In terms of challenge and self-development, I find the project taught me in just 6–7 months what probably would have taken me at least a few years in any normal job. It’s basically made me a better developer in every area, including:
- That it’s opened up a door to not only one, but two new digital platforms (iOS and Android), translating to a 3x increase in the platforms of my developer tool belt.
- A deepened Javascript knowledge. Many concepts I took for granted in the convention-driven confines of Ember.js needed to be retaught.
- With little experience in plain React.js prior to this, I now feel that I have most of the puzzle pieces in place for building bigger React apps targeting the DOM. Which would mean a 2x increase in the JS frameworks/libraries of my developer tool belt.
- An introduction to functional programming and the immutability philosophy associated to state management with Redux.
- Massive devops and project management insights.
- Better repo investigation skills when trying to work out technologies with poor documentation.
- Better UI/UX design skills.
- Best of all, a stronger confidence that I can independently teach myself any technology I want, and find ways around any obstacles that may appear in that pursuit.
Since I don’t have any experience neither from any other mobile native JS tools like Flutter or NativeScript, nor from Objective-C, Swift, Java or Kotlin, I will not attempt to make any claim whether React Native is better or worse than the competition.
But what I can say is that as a web developer, React Native made the transition to mobile a very stimulating, developing and an overall smooth experience. Admittedly, the technology is young and far from perfect. But I for one would not hesitate to use it again.
Thanks for reading! As always, if you have any questions or feedback, you’re welcome to reach out to me in the comments, at charlie.jeppsson1[at]gmail[dot] com or on LinkedIn. And if you’re an experienced Rails/React developer and interested in working in a Stockholm-based coworking startup, Convendum is hiring!