By Erica Pisani
Adding an SSL certificate and custom Namecheap domain to a GitLab Pages site can be a bit more challenging than it seems.
Crucial pieces of the setup information live in sometimes dense documentation across different sites. It can be hard to tell if you’ve set things up correctly given that you have to wait hours to confirm your changes have propagated.
Even when you know something is wrong, you can’t always tell what. This makes debugging the problem frustrating and challenging to fix.
This guide aims to make the process a bit more straightforward and less frustrating. It assumes that you’ve:
- Already set up your project on GitLab Pages and are able to access it by entering
<your-username>.gitlab.io/<your-project-name> in your browser - Have purchased a custom domain name along with an SSL certificate through Namecheap
Step 1: Activate the SSL certificate
In Namecheap, go to the ‘Product List’ > ‘SSL Certificates’ page. You should see a list of SSL certificates that you have purchased, but have not yet activated. Click ‘Activate’ on the SSL certificate that you wish to activate for your site.
Step 2: Generate the SSL certificate request
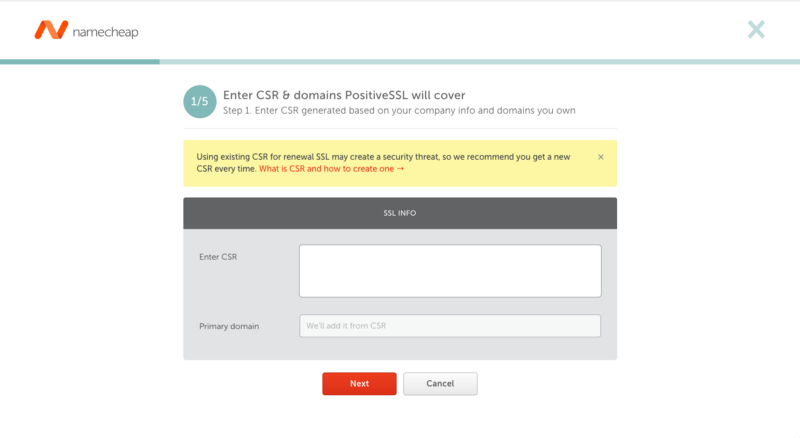
You should have been brought to a page that looks like the following:
In order to generate a CSR, you’ll need to run the following command in your terminal: openssl req -new -newkey rsa:2048 -nodes -keyout <your-domain-name>.key -out <your-domain-name>.csr.
A private key will be generated as a result of that command. DO NOT LOSE THIS KEY. You will need it later on when you go to install your certificate on GitLab. Should you lose it, you will have to submit another CSR request.
You can read the nitty-gritty details here about generating a CSR if you wish, but the TL;DR is:
- It’s strongly encouraged that you fill out all the required fields. Your CSR could be rejected during activation of you do not. If you are filling this CSR out for a personal or hobby site, you can enter
NAfor the ‘Organization’ and ‘Organization Unit’ fields. - If the certificate is being issued for a specific subdomain, you need to specify the subdomain in the ‘Common Name’ field. Example:
subdomain.ssl-certificate-host.com - If the certificate is meant to be a wildcard certificate, the domain should start with an asterisk. Example:
*.ssl-certificate-host.com
For the purposes of this guide, the assumption will be made that you are getting the certificate for something like <example-domain>.com .
Once you’ve run the command, you should have a .csr and .key file in your working directory. Open the .csr file, and copy the contents in it. It should have the header ----- BEGIN CERTIFICATE REQUEST -----.
Paste the contents of the file into the Enter CSR field. The page will automatically fill out the domain field on the form based on the information in the CSR.
Once you click ‘Next’, you should see the following page:
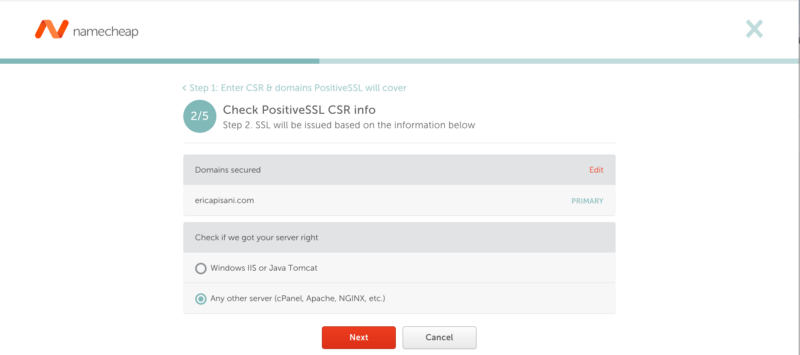
Check that the information is correct, and then click ‘Next’ again to go to the ‘Confirm you own the domain’ step.
Step 3: Confirm you own the domain
There are a few different options that are available to you in order to do this:
- HTTP-based
- DNS-based
I personally have had issues validating through email, so for the purposes of this guide, select ‘DNS-based’. This requires you to set up a CNAME value in your domain’s DNS settings, which we will cover later on in this guide.
For now, click ‘Next’ after selecting ‘DNS-based’, but if you change your mind about this form of validation later on, it’s possible to change it.
Step 4: Specify who will receive the SSL file
Confirm that the email in the field is correct. This is the email that will receive the certificate once it’s been activated.
Step 5: Review and Submit
Confirm the information shown is correct, and then click ‘Submit’.
Step 6: Set up the CNAME record for validating ownership of the domain
Once you submit the form, you will be redirected to a page showing the SSL certificate details with a helpful notification window that looks like the following:

Click on the link for the DNS-based DCV method. You’ll be brought to a page that shows information that you entered earlier, such as:
- The domain name
- The type of web server that will have the certificate installed (should be Apache, Nginx, cPanel, or other)
- DCV Methods In Use
Access the dropdown options for the ‘Edit Methods’ button to the right of ‘DCV Methods in Use’ in order to access and click the ‘Get Record’ option.
A popover will appear showing the CNAME record you need to set up in order to confirm ownership of the domain. Copy these values to an empty text file as you’ll need to go to the ‘Advanced DNS’ page for your domain. This is accessible through ‘Dashboard’ or ‘Domain List’ > ‘Manage’ (besides your domain in the list) > ‘Advanced DNS’.
Under the ‘Host Records’ section:
- Click ‘Add New Record’
- Select ‘CNAME Record’.
- Paste the values that you copied earlier from the ‘Get Record’ popover into the corresponding fields.
Before you save those values though, there’s a bit of a ‘gotcha’.
As Namecheap points out in their documentation, they “add the domain name automatically to the values submitted during record creation”. This means that the domain name that appears in the ‘host’ value is a duplicated value. Remove <your-custom-domain>.com at the end of the ‘host’ value and you’ll be good to go.
After you save that record, it’ll take a bit of time before the certificate is issued. Once you receive the certificate in your email, proceed to step 8. If you haven’t already though, let’s set up the additional records needed in order to send people to <your-username>.gitlab.io/<your-project> when they enter <your-custom-domain>.com.
Step 7: Set up your host records in Namecheap
As outlined in GitLab’s docs, you’ll also need to prove on GitLab’s end of things that you own the custom domain that you want to serve your GitLab Pages site on.
As mentioned earlier, this guide assumes that you are just looking to use example.com (or www.example.com), so you’ll want to add the following host records:
- Type
A Record, Host@, Value35.185.44.232(this is the current GitLab Pages IP at the time of writing) - Type
CNAME Record, Hostwww, Valueexample.com(this ensures that people who enter the 'www’ subdomain (i.e:www.example.com) still reach your site) - Note: You won’t be able to enter this one until you’ve added the domain through the ‘New Pages Domain’ flow outlined in Step 8. Type
TXT Record, Host@, Valuegitlab-pages-verification-code=11112222aaaabbbb
Step 8: Install the certificate in GitLab
Head on over to the ‘Pages’ page of your GitLab project that you’re trying to set up (under ‘Settings’ > ‘Pages’ in the sidebar).
To add your custom domain that GitLab serves your Pages site on, click on the ‘New Domain’ button on the top right. You should see something like the following:
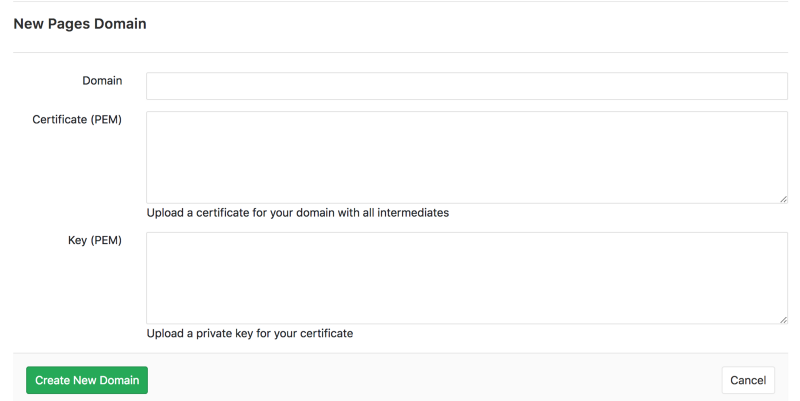
Enter your custom domain (example.com) in the domain field, and then the next part is where it gets interesting.
If you try just to enter your certificate (example_com.crt) and your private key (generated when you initially sent the certificate request) in the fields, you’ll likely get a ‘Certificate is missing intermediates’ error.
This is because GitLab is using something like NGINX to receive requests on it’s Pages IP before routing the request to the correct site. Namecheap, in their documentation, calls out that “it is required to combine your certificate with CA certificates in a single file”.
What this means for you is that you need to combine the text found in your example_com.crt and example_com.ca-bundle files in the ‘certificate field’. In the end you should have something like:
Add the private key to the last field, and you’re done. It will take time for the changes to propagate. If you check back in a few hours, you should see an indication beside your address in the URL bar showing that your connection to your site is now secure.
Resources/References
- https://about.gitlab.com/features/pages/
- https://docs.gitlab.com/ee/user/project/pages/getting_started_part_three.html#dns-txt-record
- https://www.namecheap.com/support/knowledgebase/article.aspx/9474/69/how-do-i-create-a-pem-file-from-the-certificates-i-received-from-you
- https://www.namecheap.com/support/knowledgebase/article.aspx/9637/68/how-can-i-complete-the-domain-control-validation-dcv-for-my-SSL-certificate#dns
- https://stackoverflow.com/a/49124195/2719852