By Chris Aquino
“When should I use React?” My students at DigitalCrafts have been asking me this question a lot lately.
We’re three months into the bootcamp and two days into React. Several students have commented that React has a weird mix that combines the familiar with the foreign.
And naturally so. It looks like a bizarre mix of JavaScript and HTML, while having the one-way rendering sensibilities of Express and Handlebars.
My favorite go-to answer is dashboards. React is great for creating panels that independently update information. It is the kind of UIs that is a nightmare to build using jQuery.
Then they ask, “Ok, like what?”
And then I show them…PitMaster.
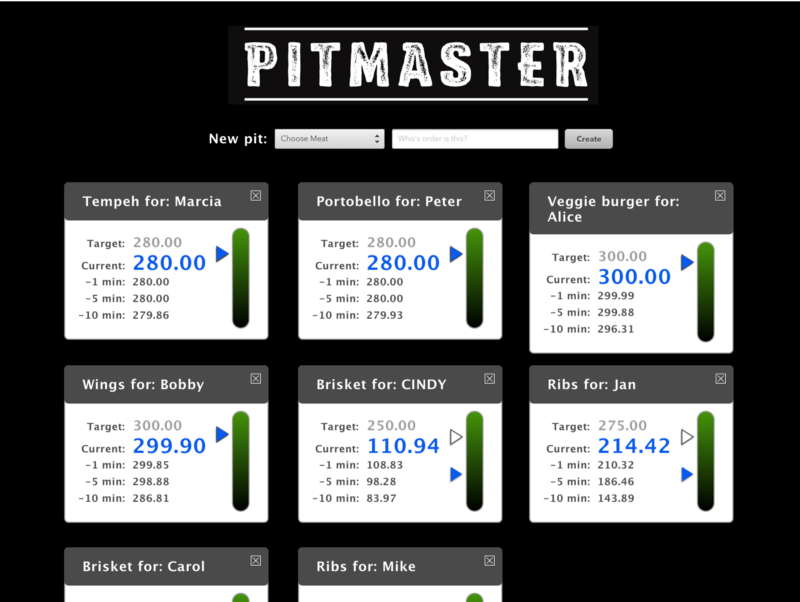 PitMaster! Look at it in all its majesty.
First, a confession: I have an unnatural love for barbecue. If I’m not eating barbecue, I’m making a barbecue. (In the Southern United States, barbecue is a noun, not a verb. It is the process of exposing meat to low-temperature smoke for hours.)
Last Thanksgiving, in anticipation of being extremely lazy, I built a device that monitors the progress of turkey cooking in a smoker. The results were displayed in real time on a web page. Granted, a turkey does not take long to cook when compared to other kinds of meat. And I am really not that lazy, but I had a grander vision in mind.
Picture this: you’re 12 hours into an 18-hour smoke, and you’d really rather not get off the couch to check the temperature yet again. Besides, you shouldn’t open the smoker during the cook, thereby causing a massive temperature fluctuation.
The details of the hardware could fill another blog post, but here is a rough sketch of it.
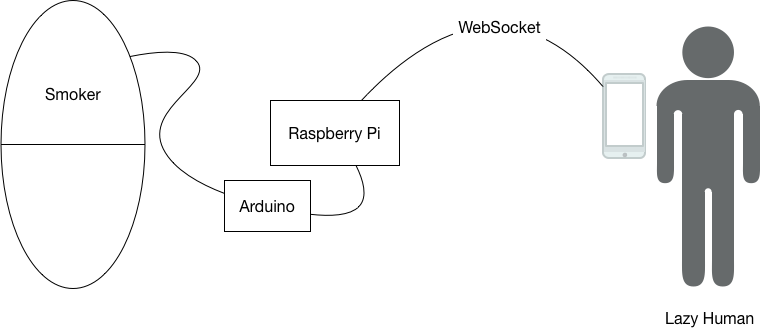
Poke a food-safe, high-temperature thermal resistor (thermistor) into the food just before you place it into the smoker. A thermistor is a piece of hardware that changes its electrical conductivity as its temperature changes. A long wire runs from the thermistor to an Arduino.
The Arduino runs a program that converts the analog reading from the thermistor to a digital value. A Raspberry Pi polls the Arduino for this value every few 100 milliseconds, logs it to a file, and then pushes it to any client connected via WebSocket.
It may sound fancy, but here’s what the contraption actually looks like.
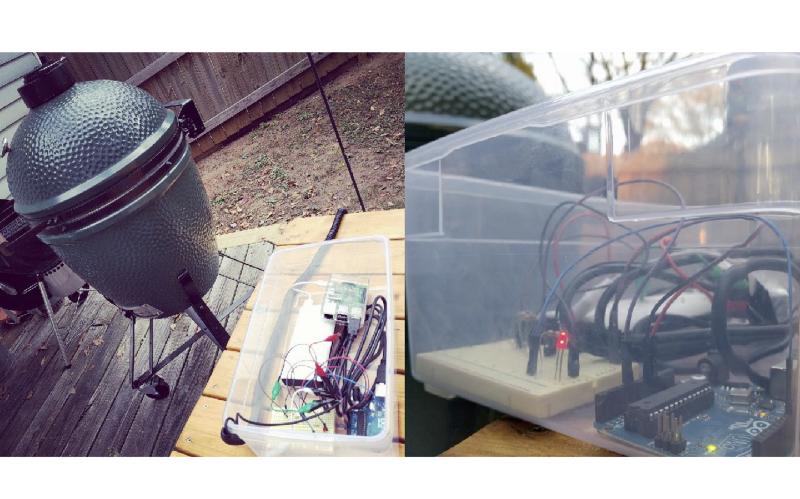 See the red light-emitting diode (LED)? My wife dubbed the contraption “Roxanne.”
Originally, the UI for displaying the current temperature was, to put it plainly, really ugly. It was precisely what you’d see in a “Hello World” tutorial, consisting of a single unstyled h1 in all its Times New Roman glory.
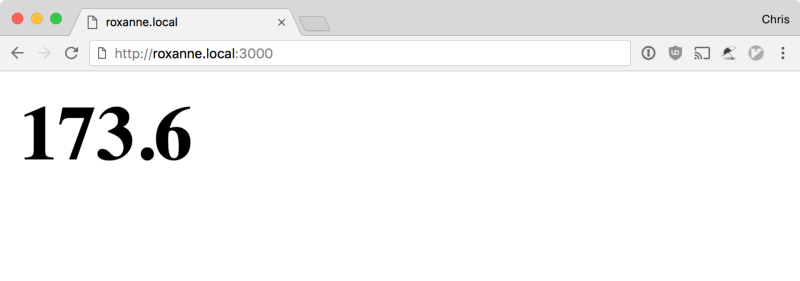 This design is not likely to win any blue ribbons.
So I built PitMaster , a dashboard that monitors the progress of smokers. You can grab a copy of the code here.
In this post, I'll go over some key concepts that eluded me when I started learning React.
Overview
Despite all the buzz about “functional, declarative UIs” and “diffing the Virtual DOM,” I focus on these three guidelines when building with React:
- Data in, UI out
- Build your components bottom-up, and pass data top-down
- Make your components as dumb as possible, but no dumber
With these in mind, let’s look at the UI.
Sketching out PitMaster
Here is a basic wireframe of the PitMaster UI:
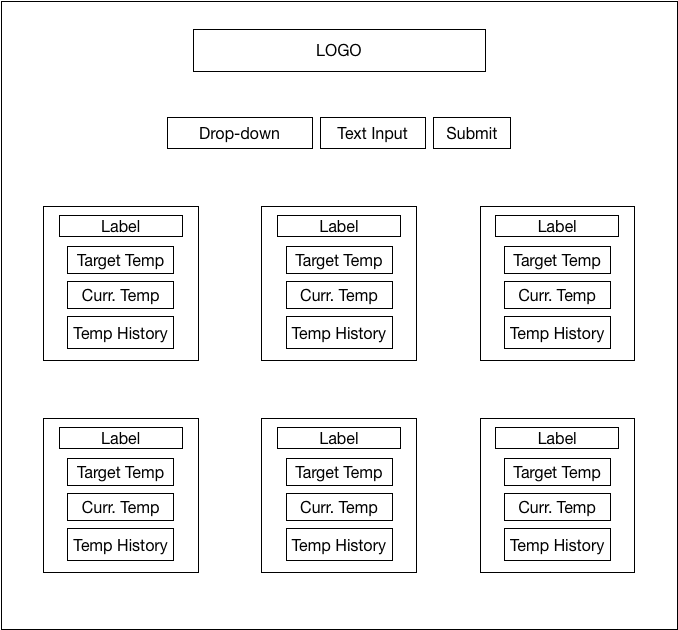
As recommended in the excellent Thinking in React page, the best way to start is by doing a visual breakdown of your UI.
PitMaster is an application split into two parts: a form that can be used to add orders and a panel that displays the current status of each order.

The form can be broken down into three parts:
- Drop-down with the different types of foods
- Text input to enter the name of the person who is ordering the food
- Submit button to submit the form

The panel only holds an individual “monitor” for a food order. These appear to be more complex, but they don’t do much other than display text and numbers. We’ll start with these, as they demonstrate the most fundamental idea in React: transforming data into an UI.

Using functions to transform data into UI components
React lends itself perfectly to atomic design principles. This has nothing to do with nuclear physics and everything to do with a recent movement in UI design. In atomic design, you start by designing the smallest visual components and then composing them into larger and larger ones. This gives you the opportunity to reuse components in other parts of your UI. In the end, it’s less work and creates consistency across your entire UI.
In PitMaster, you can see that the temperature Readout is the smallest, so I’ll start there. Another good candidate is the NameLabel, but the Readout is reused more often.
Building the Readout component
A Component in React is something that accepts data and returns a description of the UI that displays that data. Functions are exactly the right tool for the job. The Readout component will be no more than a function that accepts text, numbers as arguments, and returns a <span> with those values inside.
Here is the simplest version of that:
There are two things to note about this.
First, any data that is passed to a component is bundled up in an object called props. Therefore, label and value must be accessed as properties of the props object.
Second, you aren’t actually creating DOM elements, you’re creating React elements, which are descriptions of DOM elements. This is going to feel very different if you are used to building UIs with jQuery, where you are either creating DOM elements or referencing existing DOM elements. The reasons for this will become more apparent soon.
The description React.createElement('span', null, props.label, props.value) means that the type of DOM element is a span .
We are passing no props to it, and nested inside span are the values props.label and props.value.
Values that are nested inside of a React element are referred to as children.
Arrow functions and destructuring
There is an alternative syntax for functions that is used heavily in many React codebases. ES6 arrow functions are the same as anonymous functions, but with shorter syntax. (Because programmers hate pressing more keys than they need to!)
In the next snippet of code, an arrow function value is assigned to the variable Readout, which is declared using const, not var.
A const is a variable that cannot be reassigned.
But wait, there’s more!
We can use ES6 destructuring syntax to pull specific values out of the props argument and assign them to local variables, all in one step.
React requires that your components return a single element. With arrow functions, if the body only has a single statement and it’s a return statement, then you can omit the curly braces and the return keyword. The value to the right of the arrow is implicitly returned.
Because the return value can get long, you'll see code that looks like this, where parentheses have been added around the implicit return value:
It’s the same thing, but it lets the programmer do what they will with whitespace.
JSX or “Why is there HTML in my JavaScript?”
There’s another abstraction to add. Maybe we’ll need to put span inside of a div for styling purposes:
To do that, we have to write the following code in JavaScript:
As you can imagine, as we try to describe more complex DOM structures, the nested React.createElement calls can quickly get out of hand. Thankfully, React lets you use an optional syntax for React.createElement that looks a lot like HTML. Here's that component rewritten using that syntax:
This syntax is JSX, which is XML embedded in our JavaScript. Before the browser runs the JavaScript, the XML gets transformed into nested React.createElement function calls. Also, the curly braces, along with any JavaScript variables or expressions inside the curly braces, are evaluated and the resulting values are substituted in.
The advantage here is that anyone familiar with HTML can glance at the JSX and know what DOM elements will be produced.
Custom components
What’s handy about React.createElement is that you aren't limited to describing HTML elements. Once you create a component like Readout, you can use it with React.createElement or with JSX.
Here's the full code listing for the component that displays three recent temperatures from three different time intervals (1 minute, 5 minutes, and 10 minutes).
You can mix your custom components in with the native HTML ones. Remember, your Readout components produce elements that are a span inside of a div.
And to pass arguments, for example props,to a custom component, you can use syntax that looks like HTML attributes:
If you look at Monitor.js, you can see that it is a combination of Readout, TemperatureHistory, NameLabel, and HTML components:
By now, it should be clear that components are nothing more than shorthand for nested calls to React.createElement. Each component receives data (props) from its parent and passes data to its children. All of the data that is displayed in a React app was originally passed to the root, top-most element.
But the question then becomes, what is the result of all these function calls?
Demystifying the Virtual DOM
The answer is that all these nested React.createElement calls result in a large JavaScript object, also known as an element tree. Here is the element tree that is produced from <TemperatureHistory valueArray=[154, 132, 126] />:
React uses the element tree to create actual DOM elements and render them to the page. This is what is meant by the term Virtual DOM. The element tree serves as a blueprint for the DOM, and React can refer to this as it needs to update the page.
Updating the DOM
Alright, some time passes and the barbecue progresses towards delicious goodness. As the temperature readings change, so does the UI. Let’s say that only the first value of the temperature history has changed (from 154 to 156):
<TemperatureHistory valueArray=[156, 132, 126] />
When the data changes, the new values are passed to the root component, and the data cascades down the component tree. This results in a new element tree.
This is the resulting element tree:
React then does something very clever. It compares this new element tree to the previous one. It then determines the minimal number of places in the DOM that it has to update. It literally figures out the difference between the two trees in order to do the least amount of work to ensure that the DOM reflects the most recent version of the data. (You should be freaking out right now because that’s really amazing.)
The next question is if everything in the element tree is a static value, how and where do we keep up with the application data?
A good example of a component that needs to keep up with application data is the FoodChooserForm. As the user enters information into the form, the data in the form changes, and this technically causes the form elements to re-render. But we need to make sure that anything the user has entered so far is retained.
Adding class components
Up till now, we have only looked at components that are functions. More specifically, these are known as stateless functional components. Most of your components will be of this variety. There is another kind of component that has a few additional capabilities. To create them, we’ll need to use the ES6 class syntax.
Here isFoodChooserForm, showing everything except the element tree it produces.
Classes in JavaScript are really just syntactic sugar for functions and prototypes. In general, classes are used to create specialized versions of existing types of objects. When used with React, they primarily create components that can hold on to the state of the application data between re-renders. FoodChooserForm is an example of a stateful class component.
It inherits from React.Component and invokes super(props) in its constructor. Also, notice that it initializes the instance variable this.state. The state variable is where a class component stores its application data. It has two other methods _updateOrderName and _updateFoodChoice. Each of these methods calls this.setState, which is a method provided by React.Component. This is the method that class components must use to make changes to the value of this.state. You pass it an object with the key/value pairs to update. React takes care of the rest.
Here is the full component code. It includes the definition of the render method, which is equivalent to the return value of a stateless functional component.
The methods _updateOrderName, _updateFoodChoice, and _handleSubmit are all prefixed with an underscore. This is a common convention that distinguishes private methods from inherited methods. These private methods are passed as props to the event handlers of the components listed in the render method. Those components will receive these functions and blindly call them when those events are triggered, thus causing a change to the FoodChooserform's state.
This is how most of your components can be “dumb” while a select few can be in charge of maintaining the state. Your dumb components know just enough to call these functions and pass to them the right information. In this case, FoodChooser calls _updateFoodChoice whenever something is selected from its drop-down menu, and NameLabel calls _updateOrderName as the user types in the text field. FoodChooserForm receives the most current value for the food choice and the order name, and saves it via this.setState.
FoodChooserForm also invokes a function that it was passed as props. In the constructor (where it receives all of its props), it saves a reference to props.submitHandler as the instance variable this.submitHandler. In the render method, it passes a reference to its _handleSubmit method to the form component.
When the form's submit event is triggered, _handleSubmit is called and the event information is passed to it. FoodChooserForm prevents the form from submitting (which would cause the page to reload). Then, it calls the submitHandler, passing it the current value of this.state. Finally, it resets value of its state, effectively resetting the form by blanking out the rendered values.
And where does that new food order information now go? All the way to the top.
The PitMaster component
PitMaster maintains a list of all food orders as part of its state, which it passes to the MonitorPanel. It provides FoodChooserForm with a list of food choices and a callback function to use whenever a new order has been placed. Its render method is refreshingly brief:
It has private methods for adding and removing orders, as well as updating the list of temperatures. All other behaviours have been tucked away in other components.
Conclusion
Learning React is no easy task, but it is easier once you see how the common patterns relate to JavaScript fundamentals. Functions transform your data into your UI. Small components should be composed into larger ones, and only a few of them should manage state. Stick to those guidelines and you’re well on your way to mastering React.
My DigitalCrafts students are breathing a little easier as they bravely tackle yet another new topic in web development. They know that they can still use jQuery for smaller jobs, build a back-end with Postgres and Express for a server-rendered website, or make use of React for component-based single page apps. Most importantly, they’re able to take those fundamentals they have put many hours into, and apply them to whatever shiny new thing comes next.
Now, I wonder what they’ll ask me when we take on Redux next week…