
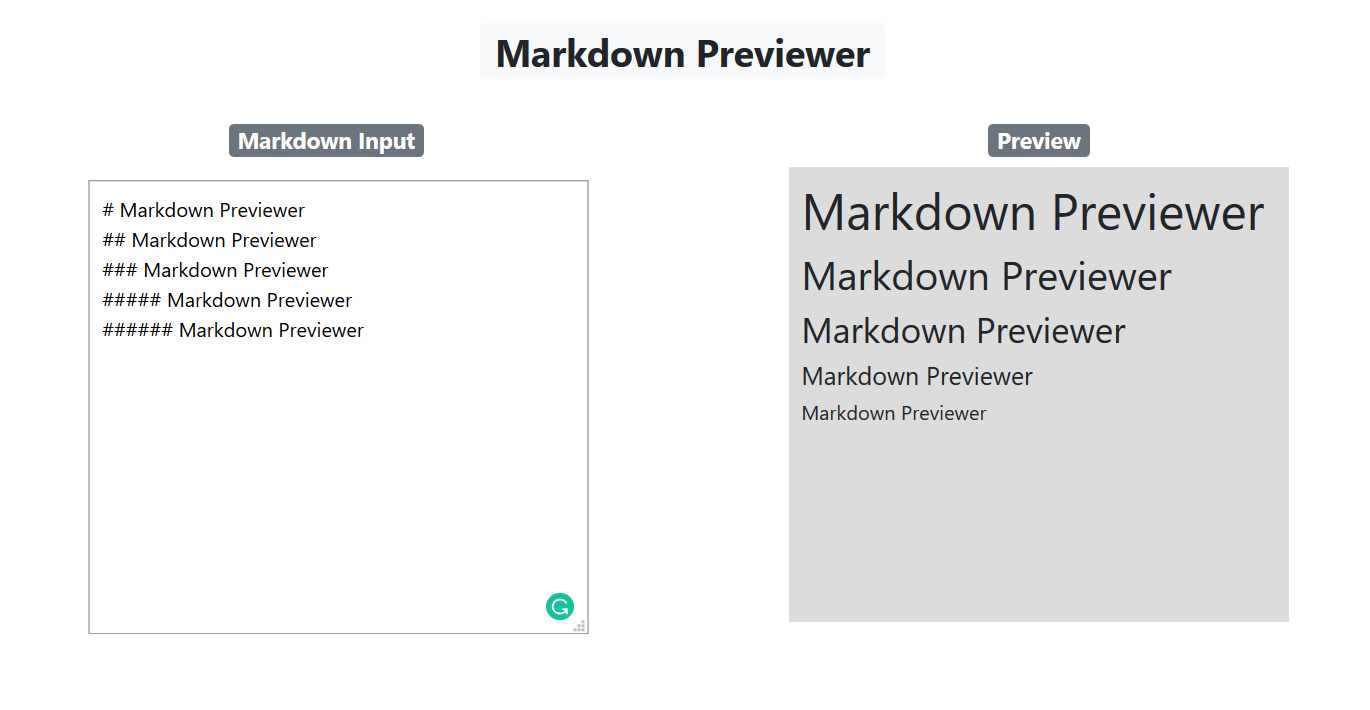
Building actual projects is a great way to learn React and solidify some of its basic principles. So in this post we will be building a simple Markdown Previewer like what you see in the image above. This will be a simple react app which will contain a textarea for Markdown input and a preview tab where the converted text will appear.
If you want to jump right into the code, check out the GitHub Repo here: https://github.com/lelouchB/markdown-previewer/tree/master
And here's a link to the deployed version :https://markdown-previewer.lelouch-b.now.sh/.
Now let's get started.
Prerequisites
- Knowledge of HTML, CSS, Javascript and Bootstrap.
- Basic knowledge of React.
- Node and NPM installed on your local dev machine.
- Any code editor of your choice.
If you feel like your progress is hindered because you don't know enough about these subjects, check out https://www.freecodecamp.org/learn. There are some awesome modules there that will get you started in no time.
Setup
We will build this app with the help of npx create-react-app . Create React App is an officially supported way to create single-page React applications. It offers a modern build setup with no configuration.
In your project directory run the following command in the terminal:
npx create-react-app markdown-previewer
cd markdown-previewer
npm start
Then open http://localhost:3000/ to see your app. It will look like this:
 http://localhost:3000/
Now, let's see the Project Structure here:
markdown-previewer
├── README.md
├── node_modules
├── package.json
├── .gitignore
├── public
│   ├── favicon.ico
│   ├── index.html
│   ├── logo192.png
│   ├── logo512.png
│   ├── manifest.json
│   └── robots.txt
└── src
    ├── App.css
    ├── App.js
    ├── App.test.js
    ├── index.css
    ├── index.js
    ├── logo.svg
    └── serviceWorker.js
No configuration or complicated folder structures – only the files you need to build your app.
Now, before we proceed further, let's clean up these files:
- Delete
index.cssandApp.css. - Since we have deleted
index.cssandApp.css, removeimport './index.css';andimport './App.css';fromindex.jsandApp.jsrespectively. - Delete
logo.svgand removeimport logo from './logo.svg';inApp.js. - Inside
App.jsremove the functionApp(). We will export a class component rather than a functional component. So, changeApp.jsto look like this:
import React from 'react';

export default class App extends React.Component{
render(){
  return (
    <div className="App">

    </div>
  );}
}
Head over to http://localhost:3000 and it will be blank now.
Design
But one more thing before we get into it… It’s always a good idea to have a plan of what you are going to build before you start typing. Especially when you're building a user interface with React.
We want to have some idea of what the interface will look like so we can know what components we need to build and what data each component will be responsible for handling.
So to begin, I have drawn a quick sketch of what the markdown-previewer app will look like. I have also labeled all of the components we will need to create:
 Design
So it looks like we will need to build three primary components:
- Title and SubHeading— This will simply display our headings and subheadings.
- Markdown Input TextArea — This is the input texarea where the markdown we want to preview will be written.
- Markdown Preview — This is a container with a greyish background where the output will display.
A few things to note:
- We will have an ‘App’ component that contains everything. This is small project so it is easy to maintain all the components in a single file. But as the size of your project increases (for example, while building an e-Commerce platform), you would have to seperate components into different files and folders by their types.
- Since this article is not about CSS and designing, I will use the React-Bootstrap library and Inline Styles. Any discussion about them will be kept short.
Inline Styles in React
When using inline styles, it means that instead of making separate CSS files, components are styled by passing the CSS properties as an Object. For example:
var divStyle = {
  color: 'white',
  backgroundImage: 'url(' + imgUrl + ')',
  WebkitTransition: 'all', // note the capital 'W' here
  msTransition: 'all' // 'ms' is the only lowercase vendor prefix
};

ReactDOM.render(<div style={divStyle}>Hello World!</div>, document.getElementById("root");
Style keys are camelCased in order to be consistent with accessing the properties on DOM nodes from JS (e.g. node.style.backgroundImage). Vendor prefixes other than ms should begin with a capital letter. This is why WebkitTransition has an uppercase "W".
The style object is then passed in the DOM component using {} . We can use run Javascript code inside our return method using {}.
Code
Okay it’s time to start writing code! If at any time you get stuck, feel free to refer to the finished app here: https://github.com/lelouchB/markdown-previewer/tree/master and https://markdown-previewer.lelouch-b.now.sh/
Installing Dependencies
Let's start by installing our project dependencies. Inside the project directory, run the following commands:
npm install react-bootstrap bootstrap
npm install marked
Now, let's discuss them:
- The first command installs React-Bootstrap and Bootstrap which we will use to style our project.
- The second command installs Marked.js, which is a low-level markdown compiler for parsing markdown without caching or blocking for long periods of time. This will run the actual logic behind converting the markdown.
Before we start using React-Bootstrap inside our project, we will have to add the minified bootstrap CSS file to our index.js:
import '../node_modules/bootstrap/dist/css/bootstrap.min.css';
With this the dependencies have been installed and are ready to be used.
Headings

Our first task will be to add a heading to our React app and center align it. For that we will use Badge, a component of the React-Bootstrap library. Here are the steps to do that:
- Import Badge to
App.js. InsideApp.jsadd the following:
import Badge from "react-bootstrap/Badge";
- In
App.jsinside return and under thedivwith theclassName="App", add anotherdivwith theclassName="container".
import React from "react";
import Badge from "react-bootstrap/Badge";

export default class App extends React.Component {
  render() {
    return (
      <div className="App">
        <div className="container">

        </div>
      </div>
    );
  }
}
- Next inside div with the
className="container", we will add the heading as follows:
 <h1>
 <Badge className="text-align-center" variant="light">
 Markdown Previewer
</Badge>
 </h1>
- You can now see a heading at http://localhost:3000, but it is not centered. To center the heading we will use bootstrap and enclose the above code block inside two divs.
<div className="row mt-4">
  <div className="col text-center">
    <h1>
     <Badge className="text-align-center" variant="light">
        Markdown Previewer
     </Badge>
    </h1>
  </div>
</div>
With this we have added a heading to our app.
Sub Headings
If you look at the design we're discussing above, you'll see that the next step will be to add two columns with the subheadings Markdown Input and Preview. One will contain the Input TextArea and the other the Preview.
- First we will have to create two columns placed side by side inside our app. We will do so using bootstrap. Inside the div container, add the following:
<div className="row mt-4">
  <div className="col-md-6">
    <h2>Lorem Ipsum</h2>
  </div>

  <div className="col-md-6">
    <h2>Lorem Ipsum</h2>
  </div>
</div>;
I have used Lorem Ipsum for now, and will remove it in the next step. Columns are created using bootstrap classes, and the first div with className="row mt-4" creates a row. The m indicates margin. The t indicates top. The other two divs with className="col-md-6" create two columns.
The app will now look something like this.

- The next step will be to add headings to these columns and center align them. This can be done by adding a div with the className="col text-center" inside that Badge, to both the divs with the
className="col-md-6".
<div className="col text-center">
  <h1>
    <Badge className="text-align-center" variant="light">
    // Actual Sub Heading: This code block will be same for both columns
    </Badge>
  </h1>
</div>
- Your
App.jswill now look like this:

TextArea
Next we're going to add a TextArea in our app. We will use the simple HTML <textarea> tag to do so.
- Add another div with the
classname="mark-input"and addtextareawithclassName="input"inside it.
<div className="mark-input">
  <textarea className="input"> </textarea>
</div>;
- Let's customize TextArea a bit. As discussed above, we will be using Inline Styles, so for that let's fist initailize an Object. All the variables will be declared inside the
render()function but outside ofreturn. For example,
render(){
 var variableOne = "Lorem Ipsum"
 var variableTwo = "Lorem Ipsum"

  return(
   // Code
   )
}
- Here is the
inputStyleobject:
 var inputStyle = {
      width: "400px",
      height: "50vh",
      marginLeft: "auto",
      marginRight: "auto",
      padding:"10px"
    };
- Let's add the
inputStyleobject to ourtextarea:
<div className="mark-input" style={inputStyle}>
<textarea
  className="input"
  style={inputStyle}></textarea>
With this we have added TextArea to our App and it will look like this:

Preview
To separate our preview from the rest of the app and to enclose it inside a container, we will follow the above process. We'll create a div inside the second columns and add a style object to it, like this:
  var outputStyle = {
      width: "400px",
      height: "50vh",
      backgroundColor: "#DCDCDC",
      marginLeft: "auto",
      marginRight: "auto",
      padding:"10px"
    };
Add the object to the div :
<div className="col-md-6">
  <div className="col text-center">
    <h4>
      <Badge className="text-align-center" variant="secondary">
        Preview
      </Badge>
    </h4>
  </div>
  <div style={outputStyle}>
  </div>
</div>
Here is how the app will look now:

We now have completed the look of our app, but it is missing its functionality, so let's add that. The process from here can be divided into three steps:
- Taking input from TextArea.
- Passing the input to the Marked.js library and displaying the processed data to the Preview column.
Taking Input from TextArea
We will use the state object.
State
In React, “state” is an object that represents the parts of the app that can change. Each component can maintain its own state, which lives in an object called this.state. The state object is where you store property values that belong to the component.
Simply put, if you’d like your app to do anything – if you want interactivity, adding and deleting things, logging in and out – that will involve state.
Here the value of our textarea is changing, and our state will change with it. We'll add the state object inside our class App, above the render() function.
It is best practice to initialize state inside constructor. It can work without constructor also but you should avoid that. Here is how we will initialize it with the property markdown , initially having an empty string:
export default class App extends React.Component {
constructor(props){
    super(props)
    this.state = {
      markdown: "",
    };
  }
  render(){
  // method and other code
  }
  }
In this project or in any other react projects, always initialize state inside constructor(props) and below super(props).
Typically, in React, constructors are only used for two purposes:
- Initializing local state by assigning an object to
this.state. - Binding event handler methods to an instance.
Keep in mind that Constructor is the only place where you should assign this.state directly. In all other methods, you need to use this.setState() instead.
State changes are asynchronous. For better perceived performance, React may delay it, and then update several components in a single pass. React does not guarantee that the state changes are applied immediately.
As discussed above we cannot change state directly. Instead we have to use this.setState() so let's create a method that does that and is called every time the value of textarea is changed.
  updateMarkdown(markdown) {
    this.setState({ markdown });
  }
This method is created inside the class component but above the render() function.
But we will first set the value of textarea to the markdown property in state.
<textarea className="input" style={inputStyle} value={this.state.markdown}></textarea>
Now we can add updateMarkdown() to onChange() event inside <textarea> and call it this.updateMarkdown().
<textarea
  className="input"
  style={inputStyle}
  value={this.state.markdown}
  onChange={(e) => {
    this.updateMarkdown(e.target.value);
  }}
></textarea>;
Next we can check to see if state is assigning properly by passing a Javascript code and console.log() our state.
<textarea
  className="input"
  style={inputStyle}
  value={this.state.markdown}
  onChange={(e) => {
    this.updateMarkdown(e.target.value);
  }}
>
  {console.log(this.state.markdown)}
</textarea>;
Now open your console and try writing inside textarea, and hopefully you will see the same being added to the console.
 Check
Check
With this we have successfully assigned the input of textarea to our state markdown property. Here is how your App.js will look now:
Marked.js
Marked.js is the brains behind the conversion of markdown and is very simple to use.
Importing marked, add the following just below where you imported Badge from react-bootstrap/Badge
let marked = require("marked");
To use the Marked.js library, we just have to pass the string to be converted inside the marked() function. We already have the data dynamically stored inside the state object, so it will be done like this:
marked(this.state.markdown)
Now, the next step is to actually display the converted data on the webpage. To do that we will use dangerouslySetInnerHTML, which is an attribute under DOM Elements in React. According to the official documentation:
_dangerouslySetInnerHTML_is React’s replacement for using_innerHTML_in the browser DOM.
This means that if in React you have to set the HTML programmatically or from an external source, you will have to use dangerouslySetInnerHTML instead of traditional innerHTML in Javascript.
In simple words using **dangerouslySetInnerHTML** you can set HTML directly from React.
While using dangerouslySetInnerHTML , you will have to pass an object with a __html key. (Note the key consists of two underscores.)
Here is how we will do that:
<div
style={outputStyle}
dangerouslySetInnerHTML={{ __html: marked(this.state.markdown) }}
>
</div>
With this we have completed our project and now you will see your Markdown Previewer in action.
Here is the complete App.js
We did it! ?
Congrats on building this React Mardown Previewer.
What next?
So, what is the future of this project? You are the future. Make your own version of Markdown Previewer, add different designs, layouts, custom functionalities. For example you could add a Reset Button to clear the textarea – it's all up to your imagination. I hope you had fun coding along.
What other projects or tutorials would you like to see ? Reach out to me on Twitter, and I'll make more tutorials! If you're inspired to add features yourself, please do share and tag me – I'd love to hear about them :)