
By Victor Eke
Documentation is a crucial aspect of software development. But developers often neglect it because it can be a hassle to maintain. This is why it's important to use tools that help simplify this process.
In this tutorial, you'll learn how to build a complete docs site quickly by utilizing a modern tool called VitePress.
What is VitePress?
VitePress is a simple and performant static site generator built on top of Vite that lets you create docs in a matter of minutes. It is powered by Vuejs and Vite with built-in customizable components.
VitePress powers some popular documentation sites like Vuejs, Vitest, faker.js, and Vite itself.
Prerequisites
To follow along with this tutorial, you need to have a basic understanding of the following:
- Markdown syntax
- Basic understanding of NPM and Vite
Here's a screenshot of what you'll build by the end of this tutorial:
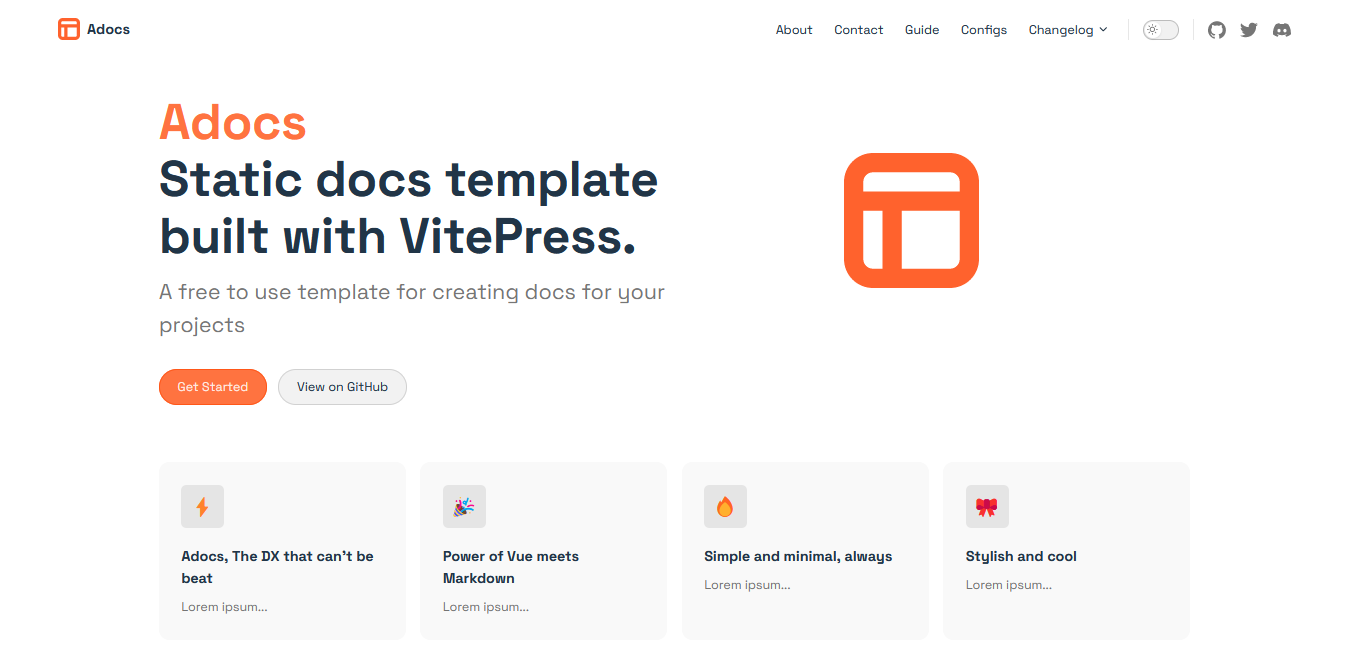
Want to play around with it? Check out the live demo. Also, the source code for this can be found on GitHub.
Step 1: Create a New Project
If you already have a folder created, you can skip this step and go on to the next one. If not, use the following command to create a project folder and move into the folder.
mkdir project-name
cd project-name
Next you need to initialize the project with your preferred package manager. I'll be using NPM for the rest of this guide.
npm init
// or use this command if you want to skip all the questions
npm init -y
If you used the first command, you'll be prompted with certain questions, so just complete them as appropriate.
After a successful operation, you should have a package.json file in your root directory. This is where the VitePress dev dependency will be installed.
Step 2: Install VitePress
The next step is to add VitePress and Vue as dev dependencies to your project, like this:
npm install --dev vitepress vue
You've successfully installed VitePress and Vue and added them as dev dependencies. Now you can start creating creating your respective doc files.
But before you do that, I believe it's essential to explain how VitePress works.
How Does VitePress Vork?
VitePress makes use of Markdown .md files for its markup which is automatically converted into static HTML. In other for this to work, a special folder called docs gets created in the root directory.
This folder behaves similarly to the pages folder in NextJS, where any .js file created in the directory is automatically treated as a web page. In this case a file called index.md will be the treated as index.html and serve as the root of your docs template.
Now that you understand how that works, you can create your respective doc files.
Step 3: Create the Respective Doc Files
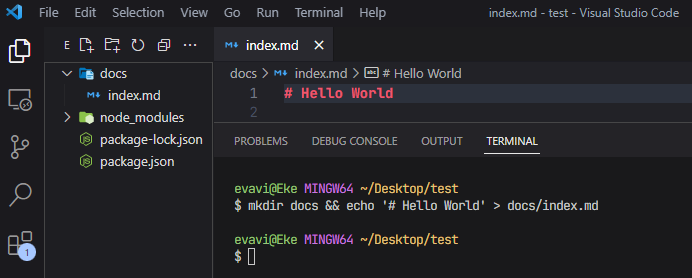
You can create the docs folder and the index.md file manually, or you can do it with the terminal like a hacker.
mkdir docs && echo '# Hello VitePress' > docs/index.md
This command simply creates a folder called docs and adds an index.md file containing a h1 element that says "Hello World".
With this, you can boot up your dev environment to see what has been created so far.
Step 4: Boot Up Your Dev Environment
In order to run your docs locally, you need to add the following scripts inside the package.json file. Simply copy the code below and replace the "script" object with it:
// package.json
"scripts": {
    "docs:dev": "vitepress dev docs",
    "docs:build": "vitepress build docs",
    "docs:serve": "vitepress serve docs"
  },
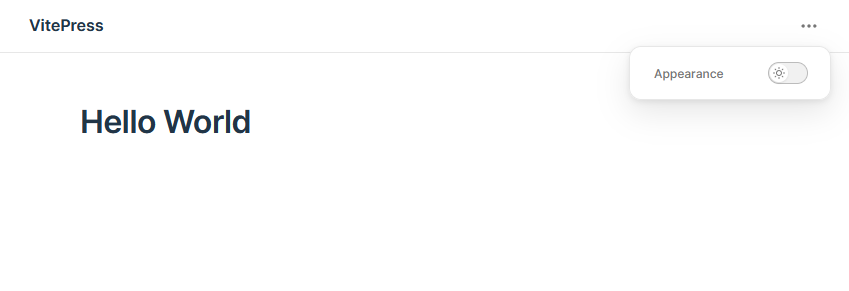
Finally, the documentation site can be served on a local server by running the command below:
npm run docs:dev
This will start a hot-reloading development server at http://localhost:5173, and you can visit it to see your docs site.
Here's the output:
All you had to do was add the markup and VitePress handled the appearance from its template engine. In the next session, you'll learn how you can customize the docs to fit your needs.
How to Customize Your Docs with VitePress
First create a .vitepress folder inside the docs directory you created earlier on. This is where all VitePress-specific files will be placed.
Inside this new directory, you need a config.js file. Again, you can use the terminal command like so:
mkdir .vitepress && touch .vitepress/config.js
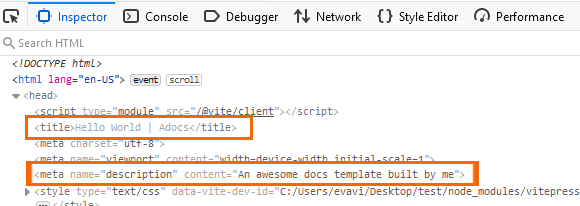
To test this config file, you can start by changing the meta title and description of your docs site. Copy this markup and paste into the config.js file:
// .vitepress/config.js
export default {
  title: 'Adocs',
  description: 'An awesome docs template built by me'
}
If you check the dev tools, you should see the changes in the meta title and description.
How to Update the Title and Logo
In order to change the logo title and add an image, copy the markup below and paste it into a new object called themeConfig inside the same config.js file. This will overwrite the current title and add a logo to your docs site.
// config.js
export default {
  themeConfig: {
    logo: "/logo.svg",
    siteTitle: "Adocs",
  },
};
For the image source, you can pass in an image URL or specify the path to a local image. To do it locally, make sure you place the image within the public directory.
Here's the output:
![]()
Note that files in the public directory are served at the root path. So instead of ../public/logo.svg, just use /logo.svg.
How to Customize the Navbar
Customizing the Navbar is a pretty straightforward process as well. Inside your themeConfig file, paste the markup below. Here we have an object that contains two properties: the anchor text text, and the path link defines the URL path.
// .vitepress/config.js
{
  // ...
   nav: [
    { text: "About", link: "/about" },
    { text: "Contact", link: "/contact" },
    { text: "Guide", link: "/guide" },
    { text: "Configs", link: "/configs" },
    { text: "Changelog", link: "https://github.com/..." },
  ],
  // ...
}
Essentially navigating to localhost:5173/about should take you to an about page (though we haven't created that yet).
Here's the output:

Navigation links can also be dropdown menus, too. To add one, simply replace any of the links property with the items object which contains an array of links.
// .vitepress/config.js
{
  text: "Changelog",
  items: [
   { text: "v0.0.1", link: "/item-1" },
   { text: "v0.0.2", link: "/item-2" },
   { text: "v0.0.3", link: "/item-3" },
  ],
},
Now the changelog will become a dropdown menu with the respective links you pass inside.
Here's the output:

How to Add Social Icons
Navigation menus usually have social icons that visitors can use to visit your social platforms. To add them, define a new object called socialLinks inside themeConfig and simply pass in the social icon and the link you want it to navigate to.
// .vitepress/config.js
socialLinks: [
  { icon: "github", link: "https://github.com/Evavic44/adocs" },
  { icon: "twitter", link: "https://twitter.com/victorekea" },
  { icon: "discord", link: "..." },
]
By default, only 8 icons (Discord, Facebook, GitHub, Instagram, LinkedIn, Slack, Twitter, and YouTube) are provided. If you want to add a custom icon, use the SVG property to define an svg image. You can get free icons from icones.js.org.
For example, here's a snippet of the apple icon.
{
  icon: {
    svg: '<svg role="img" width="26.01" height="32" viewBox="0 0 256 315"><path d="M213.803 167.03c.442 47.58 41.74 63.413 42.197 63.615c-.35 1.116-6.599 22.563-21.757 44.716c-13.104 19.153-26.705 38.235-48.13 38.63c-21.05.388-27.82-12.483-51.888-12.483c-24.061 0-31.582 12.088-51.51 12.871c-20.68.783-36.428-20.71-49.64-39.793c-27-39.033-47.633-110.3-19.928-158.406c13.763-23.89 38.36-39.017 65.056-39.405c20.307-.387 39.475 13.662 51.889 13.662c12.406 0 35.699-16.895 60.186-14.414c10.25.427 39.026 4.14 57.503 31.186c-1.49.923-34.335 20.044-33.978 59.822M174.24 50.199c10.98-13.29 18.369-31.79 16.353-50.199c-15.826.636-34.962 10.546-46.314 23.828c-10.173 11.763-19.082 30.589-16.678 48.633c17.64 1.365 35.66-8.964 46.64-22.262"/></svg>',
    },
  link: "https://www.apple.com/",
},
For custom SVG icons, make sure you add the role="img" property to the svg tag, as this allows the string convert it properly.
Here's the output:
![]()
How to Add a Sidebar
VitePress also comes with built-in components like sidebar menus. To add a sidebar, create an object called sidebar and inside it, add nested objects that take in three values: the nested title, collapsible functionality (default is set to true), and the nested links.
// .vitepress/config.js
sidebar: [
    {
      text: "Section A",
      collapsible: true,
      items: [
        { text: "Introduction", link: "/introduction" },
        { text: "Getting Started", link: "/getting-started" },
      ],
    },
    {
      text: "Section B",
      collapsible: false,
      items: [
        { text: "Introduction", link: "/introduction" },
        { text: "Getting Started", link: "/getting-started" },
      ],
    },
    {
      text: "Section C",
      collapsible: true,
      items: [
        { text: "Introduction", link: "/introduction" },
        { text: "Getting Started", link: "/getting-started" },
      ],
    },
  ],
By adding collapsible: "true" to the sidebar object, it shows a toggle button to hide/show each section. You can create as many sections as you want.
Here's the output:
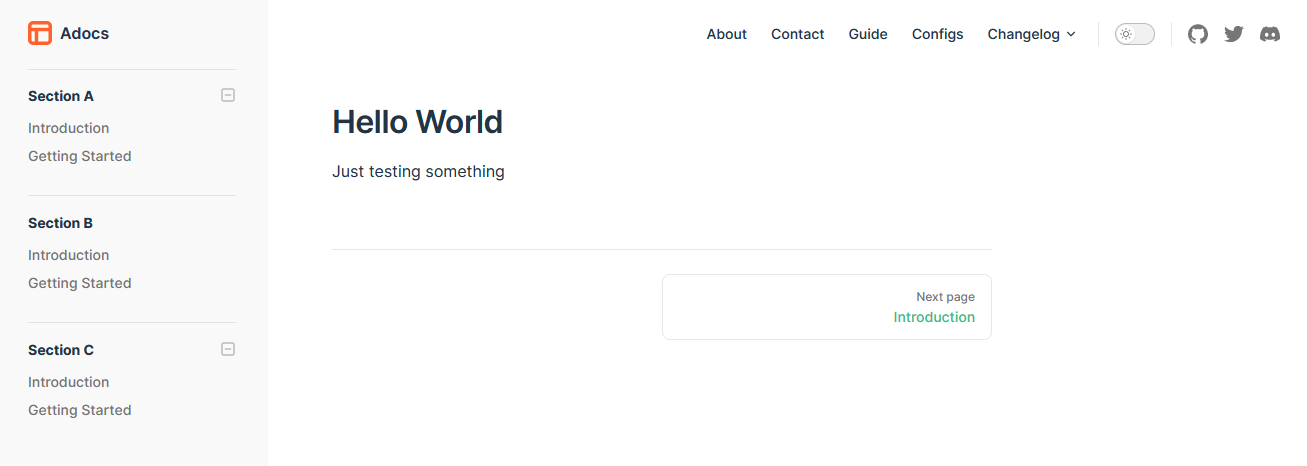
You can see section B is not collapsible, and we have that nice next page button on the bottom of the page.
How to Set Up Page Routing
As explained earlier, VitePress automatically converts every .md file inside the root of the docs directory to static HTML that can be accessed in the address bar. For instance the index.md is converted to index.html, and about.md, about.html and so on.
Since you've created your nav links and pointed them to their respective URLs, you can access these pages easily by creating them.
docs/
├── .vitepress/
│   └── config.js
├── public/
│   └── logo.svg
├── about.md
├── contact.md
├── guide.md
├── configs.md
└── get-started.md
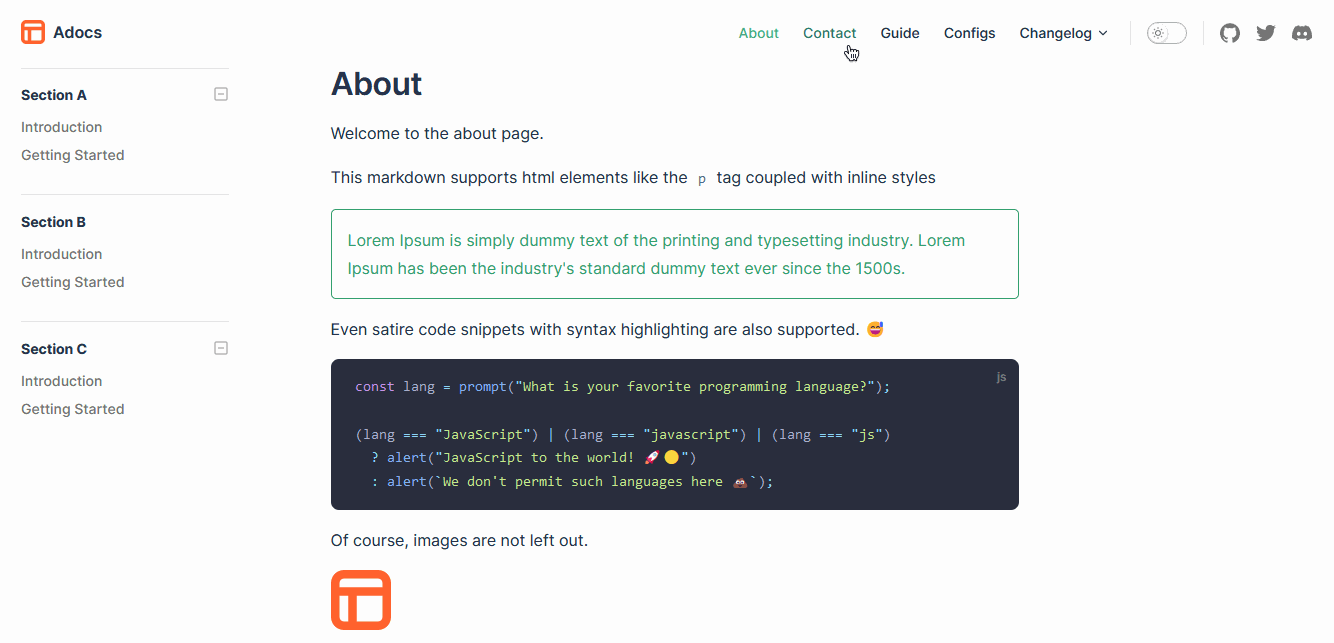
Create these files inside your docs folder and add a simple markup inside them just to see how this works. This page is basic markdown so all your markdown syntax like links, code blocks, headings, and so on works here.
Just for testing purposes, copy this markdown content and paste it inside any of the .md files you just created:
# About

Welcome to the about page.

This markdown supports html elements like the `p` tag coupled with inline styles

<p style="color: #ff7340; border: 1px solid rgba(255, 135, 23, 0.25); border-radius:5px; padding: 1rem;">Lorem Ipsum is simply dummy text of the printing and typesetting industry. Lorem Ipsum has been the industry's standard dummy text ever since the 1500s.</p>

Even satire code snippets with syntax highlighting are also supported. 😅

```js
const lang = prompt("What is your favorite programming language?");

(lang === "JavaScript") | (lang === "javascript") | (lang === "js")
  ? alert("JavaScript to the world! 🚀🟡")
  : alert(`We don't permit such languages here 💩`);
Of course, images are not left out.
![]()
Here's the output:
Great! You've set-up the docs, added a navigation menu with a dropdown feature, added a sidebar, and customized the links to navigate to different pages. Next up, let's work on the home page.
## How to Customize the Homepage
Just like every other component, VitePress provides us with markup for building the homepage. I've broken it down into three parts: Hero, features, and footer section.
### The Hero Section
First, we'll start with the hero section. Replace the Hello World text in the `index.md` page with the following markup:
```yml
# docs/index.md
---
layout: home
hero:
name: Adocs
text: Static docs template built with VitePress.
image:
src: /logo-big.svg
alt: Adocs logo
tagline: A free to use template for creating docs for your projects
actions:
- theme: brand
text: Get Started
link: /get-started
- theme: alt
text: View on GitHub
link: https://github.com/evavic44/adocs-template
---
The Features Section
Additionally, you can add a features section after the hero section. Simply paste the code below under the hero objects:
# /docs/index.md
---
link: https://github.com/evavic44/adocs-template

features:
  - icon: ⚡️
    title: Adocs, The DX that can't be beat
    details: Lorem ipsum...
  - icon: 🎉
    title: Power of Vue meets Markdown
    details: Lorem ipsum...
  - icon: 🔥
    title: Simple and minimal, always
    details: Lorem ipsum...
  - icon: 🎀
    title: Stylish and cool
    details: Lorem ipsum...
---
Here's the output:

The Footer Section
You can add a footer message on the bottom of the page, but this will only show up in the home page.
According to the VitePress docs:
Note that the footer will not be displayed when the SideBar is visible.
To add the footer component, go to the config.js file and paste the markup inside the themeConfig object:
// .vitepress/config.js
 footer: {
   message: "Released under the MIT License.",
   copyright: "Copyright © 2022-present Adocs",
 },
Here's the output:

Aside from the markup, you can also customize the components using custom CSS to change things like fonts family, colors, layout, ETC.
How to Add Custom CSS
The default theme CSS is customized by overriding root level CSS variables. If you want, you can check out the full list of CSS variables that are customizable.
To do get started, create a .vitepress/theme directory, and inside this theme folder, add an index.js and custom.css file. If you've been following along, you can use the terminal command below to do this quickly:
mkdir docs/.vitepress/theme && touch docs/.vitepress/theme/index.js && touch docs/.vitepress/theme/custom.css
If you run into any issues with the terminal command, just create the files manually and move on to the next step.
Here's an overview of the folder structure:
docs/
├── .vitepress/
│   ├── config.js
│   └── theme/
│       ├── index.js
│       └── custom.css
├── public/
│   └── logo.svg
├── about.md
├── contact.md
├── guide.md
├── configs.md
└── get-started.md
After creating these files, inside the .vitepress/theme/index.js file, paste the import commands:
// .vitepress/theme/index.js
import DefaultTheme from "vitepress/theme";
import "./custom.css";

export default DefaultTheme;
Color Theme
The colors are controlled by the CSS variables. You can simply replace them with any colors you want.
Note that this color has a provision for both light and dark mode. So make sure you change them accordingly.
Here's an example of my custom colors:
/* .vitepress/theme/custom.css */

:root {
  --vp-c-brand: rgb(255, 115, 64);
  --vp-c-brand-light: rgb(255, 87, 25);
  --vp-c-brand-lighter: rgb(255, 115, 64);
  --vp-c-brand-dark: #FF622D;
  --vp-c-brand-darker: rgb(226, 60, 0);

  --vp-c-sponsor: #fd1d7c;
}
If you don't see the effects immediately, try stopping the server and starting it again.
Aside from the color themes, you can also override other things like font family, typography, layout, breakpoints, and so on.
How to Use Custom Fonts
You can import Google fonts inside the CSS file to override the default font family.
@import url(https://fonts.googleapis.com/css?family=Space+Mono:regular,italic,700,700italic);
@import url(https://fonts.googleapis.com/css?family=Space+Grotesk:regular,italic,700,700italic);

:root {
  --vp-c-brand: #ff7340;
  --vp-c-brand-light: #ff5719;
  --vp-c-brand-lighter: #ff7340;
  --vp-c-brand-lighter: rgba(255, 135, 23, 0.25);
  --vp-c-brand-dark: #ff622d;
  --vp-c-brand-darker: #e23c00;

  --vp-c-sponsor: #fd1d7c;

  /* Typography */
  --vp-font-family-base: "Space Grotesk", "Inter var experimental", "Inter var",
    -apple-system, BlinkMacSystemFont, "Segoe UI", Roboto, Oxygen, Ubuntu,
    Cantarell, "Fira Sans", "Droid Sans", "Helvetica Neue", sans-serif;

  /* Code Snippet font */
  --vp-font-family-mono: "Space Mono", Menlo, Monaco, Consolas, "Courier New",
    monospace;
}
With the --vp-font-family-base variable you can change the main font and --vp-font-family-mono, the font for code snippets.
Here's the output:

You've successfully customized the theme and changed the font family using CSS. Though there's more you can do in regards to styling, but at this point, I hope it's clear how you can customize your docs with CSS.
Let's discuss hosting in the next section.
How to Host Your Doc Site
You can publish or host your docs site when you're done to different platforms like Netlify, Vercel, AWS Amplify, and so on.
First, run the build command:
npm run docs:build
This should create a new dist folder that contains all the static files of your docs.
In deciding on what hosting service to use, you can pick any of the options I mentioned earlier but we'll be using Vercel in this guide. Also, feel free to look at other alternatives of your choice.
If you don't have a Vercel account, follow this guide to create one and configure your Git provider before you move on to the next step.
Assuming you've successfully set-up your account and uploaded your docs site to Vercel, navigate to the project > settings > build and deploy settings, and paste the following commands to their respective fields:
- Build command:
npm run docs:build - Output directory:
docs/.vitepress/dist
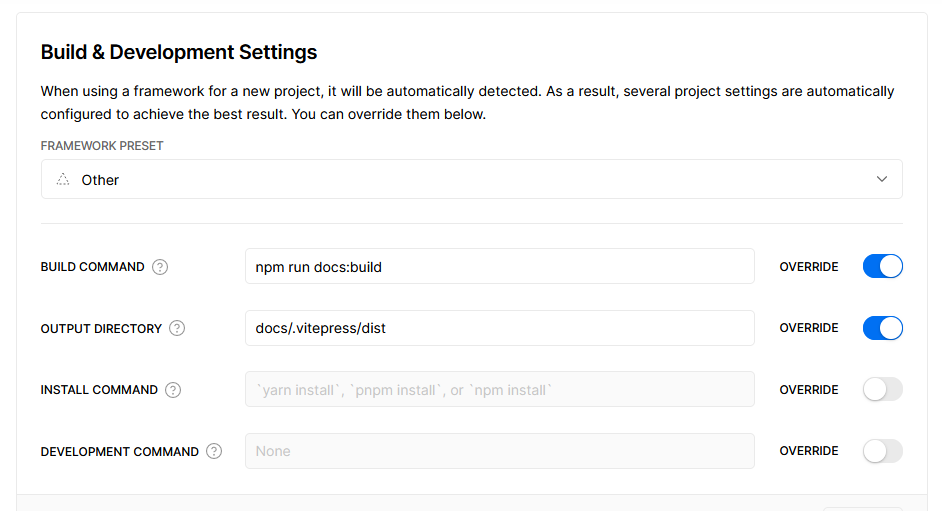
After editing the settings, save them and deploy your site!
Conclusion
In this tutorial, you've set-up a full-fledged documentation site and customized it using CSS and VitePress built-in components.
Just keep in mind that this tutorial only covers a fragment of what is possible with VitePress. To learn more, check out the VitePress docs.
Additional Reading
Here are a few things not covered in this article that I think is also worth looking into:
Resources
If you are an open source fan like myself or you enjoy hearing about such cool projects, do follow me on my socials so you don't miss my next post. Cheers. 🍷