By Aswin M Prabhu
If you are into front-end development, I bet you know what react is. It has become the most popular front-end framework and does not appear to be slowing down. Firebase is a back-end service created by Google that enables developers to rapidly iterate on their applications without worrying about run of the mill stuff like authentication, database, storage.

Firebase has two database options, both of which have awesome real-time capabilities. For example, you can subscribe to changes in a document stored in firebase cloud firestore with the following JavaScript snippet.
db.collection("cities").doc("SF")
    .onSnapshot(function(doc) {
        console.log("Current data: ", doc.data());
    });
The callback provided to the onSnapshot() function fires every time the document changes. Local writes from your app will fire it immediately with a feature called latency compensation.
React Hooks are an upcoming react feature that let you use state and other react features without writing a class. They’re currently in react v16.7.0-alpha. Building this app is a great way to explore the future of react with react hooks.
The final product will be an IRC like global chatroom app where we first ask the user to enter a nickname. Simple.
Scaffolding
A new react app can easily be created with the official create-react-app cli tool with the following terminal commands (react hooks need react and react-dom v16.7.0-alpha).
npm i -g create-react-app
create-react-app react-firebase-chatroom
cd react-firebase-chatroom
npm i -S react@16.7.0-alpha.2 react-dom@16.7.0-alpha.2
The firebase setup is pretty straight forward as well. Create a new project from the firebase console. Setup the firebase real-time database in test mode. Initialize the local project with firebase-tools command. Choose the realtime-database and hosting as the enabled features. Select build as the public directory. Every other option can be left as is.
npm i -g firebase-tools
firebase-tools init
npm i -S firebase
It might need you to login before you can initialize the repository.
The database structure will look like the following.
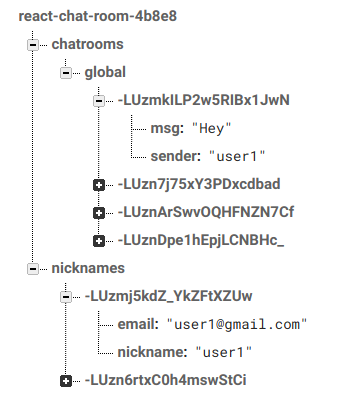 Database structure
Building the app using good old class based components
React hooks are still an experimental feature and the API might change in the future. So let us first look at how the app can be build with class based components. I went with only the App component because the application logic was simple enough.
The user will be prompted to join with a nickname and an email if the joined variable is false . It is initially set to false in the constructor .
constructor() {
    super();
    this.state = {
      joined: false,
      nickname: "",
      email: "",
      msg: "",
      messages: {},
    };
    this.chatRoom = db.ref().child('chatrooms').child('global');
    this.handleNewMessages = snap => {
      console.log(snap.val());
      if (snap.val()) this.setState({ messages: snap.val() });
    };
  }

  componentDidMount() {
    this.chatRoom.on('value', this.handleNewMessages);
  }

  componentWillUnmount() {
    this.chatRoom.off('value', this.handleNewMessages);
  }
All the messages are initially fetched from firebase in the componentDidMount life cycle method. The on method on a db ref takes an event type and a callback as arguments. Every time a user sends a new message and updates the database, the handleNewMessages function receives a snapshot of the updated data and updates the state with the new messages. We can unsubscribe from the database updates in the componentWillUnmount life cycle method using the off method on the db ref.
A message can be sent by appending the message to the chatroom ref on the database. The push method of the ref generates a unique id for the new entry and appends it to the existing data.
this.chatRoom.push({
  sender: this.state.nickname,
  msg: this.state.msg,
});
The messages are rendered by looping over the messages object.
{Object.keys(this.state.messages).map(message => {
  if(this.state.messages[message]["sender"] === this.state.nickname)
    // render the user's messages
  else
    // render messages from other users
})}
The final App component will look like this.
class App extends Component {
  constructor() {
    super();
    this.state = {
      joined: false,
      nickname: "",
      email: "",
      msg: "",
      messages: {},
    };
    this.chatRoom = db.ref().child('chatrooms').child('global');
    this.handleNewMessages = snap => {
      console.log(snap.val());
      // if not null then update state
      if (snap.val()) this.setState({ messages: snap.val() });
    };
  }

  componentDidMount() {
    // subscribe
    this.chatRoom.on('value', this.handleNewMessages);
  }
  componentWillUnmount() {
    // unsubscribe
    this.chatRoom.off('value', this.handleNewMessages);
  }
  handleNameChange = e => this.setState({ nickname: e.target.value });
  handleEmailChange = e => this.setState({ email: e.target.value });
  handleClick = e => {
    // register the nickname
    db.ref().child('nicknames').push({
      nickname: this.state.nickname,
      email: this.state.email,
    });
    this.setState({ joined: true });
  };

  handleMsgChange = e => this.setState({ msg: e.target.value });
  handleKeyDown = e => {
    if (e.key === "Enter") {
      // send the msg
      this.chatRoom.push({
        sender: this.state.nickname,
        msg: this.state.msg,
      });
      // clear the field
      this.setState({ msg: "" });
    }
  };
  render() {
    return (
      <div className="App">
        {!this.state.joined ? (
          <div className="joinForm">
            <input placeholder="Nickname" value={this.state.nickname} onChange={this.handleNameChange} /><br />
            <input placeholder="Email" value={this.state.email} onChange={this.handleEmailChange} /><br />
            <button onClick={this.handleClick}>Join</button>
          </div>
        ) : (
            <div className="chat">
              <div className="messages">
                {Object.keys(this.state.messages).map(message => {
                  // Check if the msg is from the user
                  if (this.state.messages[message]["sender"] === this.state.nickname)
                    return (
                      <div className="message">
                        <span id="me">{this.state.messages[message]["sender"]} :</span><br />
                        {this.state.messages[message]["msg"]}
                      </div>
                    );
                  else
                    return (
                      <div className="message">
                        <span id="sender">{this.state.messages[message]["sender"]} :</span><br />
                        {this.state.messages[message]["msg"]}
                      </div>
                    );
                })}
              </div>
              <input placeholder="msg" onChange={this.handleMsgChange} onKeyDown={this.handleKeyDown} value={this.state.msg} /><br />
            </div>
          )}
      </div>
    );
  }
}
Find the gist here.
Migrating to react hooks
The simplest hook is the useState hook. It takes the initial state and returns the state variable and a function that lets you update it. This function acts as a replacement for this.setState . For example the nickname state logic can be modified as follows.
const [nickname, setNickname] = useState("");
const handleNameChange = e => setNickname(e.target.value);
.
.
.
// during render
<input placeholder="Nickname" value={nickname} onChange={handleNameChange} />
The next challenge is to find a place for the logic inside the life cycle methods. This is where the useEffect hook comes in. This is where we perform logic that has side effects. It can be thought of as a combination of all the life cycle methods. useEffect can also optionally return a function that is used to clean up (like unsubscribe to an event).
useEffect(() => {
  const handleNewMessages = snap => {
    if (snap.val()) setMessages(snap.val());
  }
  chatRoom.on('value', handleNewMessages);
  return () => {
    chatRoom.off('value', handleNewMessages);
  };
});
Subscription and unsubscription were related pieces of logic that were split into different life cycle methods. Now they are put together in a single hook. Using different useEffect hooks for different side effects enables separation of concerns.
By default, useEffect runs both after the first render and after every update.
One of the major advantages of using hooks is that stateful logic can be reused between components. For example, imagine you want to reuse email input handling and validating logic in multiple components. A custom hook can achieve this as shown below. A custom hook is a function that can call other hooks and starts with “use”. Starting with “use” is not a rule but a very important convention.
function useEmail(defaultEmail) {
  const [email, setEmail] = useState(defaultEmail);
  const [isValidEmail, setValidEmail] = useState(defaultEmail);

  function validateEmail(email) {
    const re = /^(([^<>()\[\]\\.,;:\s@"]+(\.[^<>()\[\]\\.,;:\s@"]+)*)|(".+"))@((\[[0-9]{1,3}\.[0-9]{1,3}\.[0-9]{1,3}\.[0-9]{1,3}\])|(([a-zA-Z\-0-9]+\.)+[a-zA-Z]{2,}))$/;
    return re.test(String(email).toLowerCase());
  }

function handleEmailChange(e) {
    if (validateEmail(e.target.value)) {
      setValidEmail(true);
    }
    setEmail(e.target.value);
  }
  return {
    email,
    handleEmailChange,
    isValidEmail
  };
}
And in your components you can use the custom hook as shown below.
// in your components
const { email, handleEmailChange, isValidEmail } = useEmail("")
.
.
.
<input value={email} value={email} onChange={handleEmailChange} />
// show error message based on isValidEmail
Custom hooks also make it easier to unit test a piece of logic independent of the components that use the hook.
The final App component looks as follows.
function App() {
  const [nickname, setNickname] = useState("");
  const [email, setEmail] = useState("");
  const [joined, setJoined] = useState(false);
  const [msg, setMsg] = useState("");
  const [messages, setMessages] = useState({});

  const chatRoom = db.ref().child('chatrooms').child('global');

  useEffect(() => {
    const handleNewMessages = snap => {
      if (snap.val()) setMessages(snap.val());
    }
    chatRoom.on('value', handleNewMessages);
    return () => {
      chatRoom.off('value', handleNewMessages);
    };
  });

  const handleNameChange = e => setNickname(e.target.value);
  const handleEmailChange = e => setEmail(e.target.value);
  const handleClick = e => {
    db.ref().child('nicknames').push({
      nickname,
      email,
    });
    setJoined(true);
  };

  const handleMsgChange = e => setMsg(e.target.value);
  const handleKeyDown = e => {
    if (e.key === "Enter") {
      chatRoom.push({
        sender: nickname,
        msg,
      });
      setMsg("");
    }
  };

  return (
    <div className="App">
      {!joined ? (
        <div className="joinForm">
          <input placeholder="Nickname" value={nickname} onChange={handleNameChange} /><br />
          <input placeholder="Email" value={email} onChange={handleEmailChange} /><br />
          <button onClick={handleClick}>Join</button>
        </div>
      ) : (
          <div className="chat">
            <div className="messages">
              {Object.keys(messages).map(message => {
                if (messages[message]["sender"] === nickname)
                  return (
                    <div className="message">
                      <span id="me">{messages[message]["sender"]} :</span><br />
                      {messages[message]["msg"]}
                    </div>
                  );
                else
                  return (
                    <div className="message">
                      <span id="sender">{messages[message]["sender"]} :</span><br />
                      {messages[message]["msg"]}
                    </div>
                  );
              })}
            </div>
            <input placeholder="msg" onChange={handleMsgChange} onKeyDown={handleKeyDown} value={msg} /><br />
          </div>
        )}
    </div>
  );
}
Find the gist here.
There’s more to read on hooks
- Motivation behind hooks
- Golden rules of hooks
- Hooks API Reference
- Making sense of hooks by Dan Abramov
Find the final app with bare minimum styling.
Thanks for reading and happy hacking!