
By Neo Ighodaro
Nowadays, many applications offer in-app chat and messenger features to their users. The in-app messenger can be useful for things like live support chatting or in-app messaging with other application users.
In this article, we are going to explore how to use Pusher Chatkit (which is in beta at the time of writing this article) and SlackTextViewController to create a chat application.
? SlackTextViewController is a drop-in UIViewController subclass with a growing text input view and other useful messaging features. It is meant to be a replacement for UITableViewController and UICollectionViewController.
A basic understanding of Swift and Node.js is needed to follow this tutorial.
Here is a screen recording of our application in action:
Requirements
To follow along with the tutorial, you will need the requirements listed below:
- Xcode 7 or higher.
- Knowledge of Swift and Xcode interface builder.
- Cocoapods installed on your machine.
- Node.js and NPM installed on your machine.
- Basic knowledge of JavaScript (Node.js and Express).
- A Pusher Chatkit application. Create one here.
Assuming you have all the requirements, let’s get started.
Creating our Chatkit Application
Go to the Chatkit page, create an account, and create a Chatkit application from the dashboard.

Follow the “Getting Started” wizard until the end so it helps you create a new user account and a new chat room.
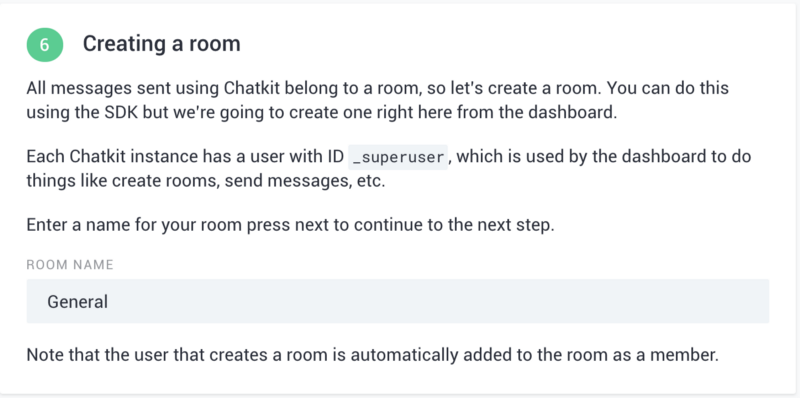
In that same screen, after you have completed the “Get Started” wizard, click on “Keys” to get your application’s Instance Locator and Key. You will need these values to make requests to the Chatkit API.
That’s all! Now let’s create a backend that will help our application communicate with the Chatkit API.
Creating a Node.js backend for Pusher Chatkit
Before we create our iOS application, let’s create a Node.js backend for the application. The application will talk to the backend to do things like retrieve the token required to make requests.
Open your terminal, and in there create a new directory where the web application will reside. In this web application, we will define some routes that will contain logic for making requests to the Chatkit API.
Run the command below to create the directory that will contain our web application:
$ mkdir ChattrBackend
Create a new package.json file in the root of the directory and paste the contents below:
{
  "main": "index.js",
  "dependencies": {
    "body-parser": "^1.17.2",
    "express": "^4.15.3",
    "pusher-chatkit-server": "^0.5.0"
  }
}
Now open terminal and run the command below to start installing the dependencies:
$ npm install
When the installation is complete, create a new index.js file and paste the content below:
// Pull in the libraries
const express    = require('express');
const bodyParser = require('body-parser');
const app        = express();
const Chatkit    = require('pusher-chatkit-server');
const chatkit    = new Chatkit.default(require('./config.js'))

// Express Middlewares
app.use(bodyParser.json());
app.use(bodyParser.urlencoded({ extended: false }));

// --------------------------------------------------------
// Creates a new user using the Chatkit API
// --------------------------------------------------------
app.post('/users', (req, res) => {
  let username = req.body.username;
  chatkit.createUser(username, username)
    .then(r => res.json({username}))
    .catch(e => res.json({error: e.error_description, type: e.error_type}))
})

// --------------------------------------------------------
// Generate a token and return it
// --------------------------------------------------------
app.post('/auth', (req, res) => {
  let resp = chatkit.authenticate({grant_type: req.body.grant_type}, req.query.user_id)
  res.json(resp)
});

// --------------------------------------------------------
// Index
// --------------------------------------------------------
app.get('/', (req, res) => {
  res.json("It works!");
});

// --------------------------------------------------------
// Handle 404 errors
// --------------------------------------------------------
app.use((req, res, next) => {
  let err = new Error('Not Found');
  err.status = 404;
  next(err);
});

// --------------------------------------------------------
// Serve application
// --------------------------------------------------------
app.listen(4000, function(){
  console.log('App listening on port 4000!')
});
In the code above, we have a sample Express application. The application has two main routes. The /users route creates a new user using the Chatkit API. The created user can then request a token using the /auth route. Tokens are used to validate the identity of a user making a request to the Chatkit API.
Finally, let’s create a config.js file in the same root directory. This is where we will define the Chatkit keys. Paste the contents below into the file:
module.exports = {
  instanceLocator: "PUSHER_CHATKIT_INSTANCE_LOCATOR",
  key: "PUSHER_CHATKIT_KEY",
}
Remember to replace *PUSHER_CHATKIT_*``_INSTANCE_LOCATOR_and_PUSHER_CHATKIT_KEY_ with the actual values for your Chatkit application. You can find the values in the “Keys” section of the Chatkit dashboard.
Now we are done creating the Node.js application. Run the command below to start the Node.js application:
$ node index.js
? You may want to keep the terminal window open and launch another terminal window to keep the Node.js server running.
Creating our iOS application
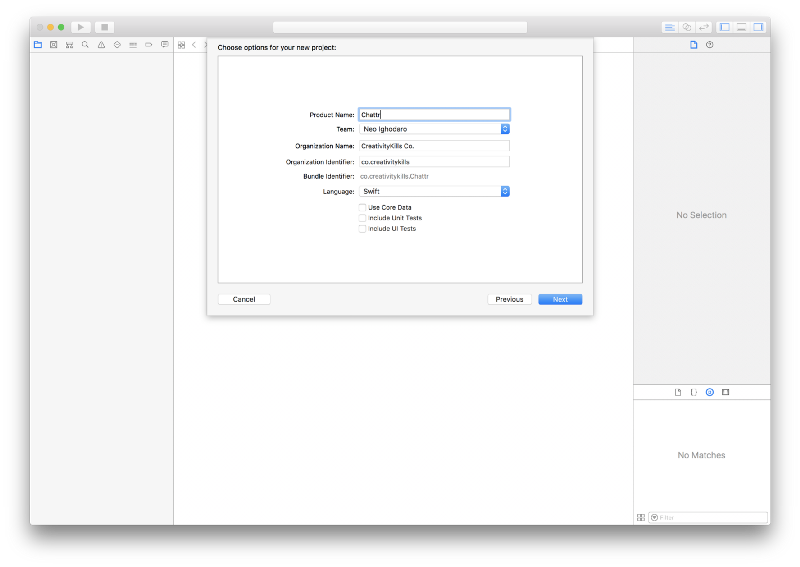
Launch Xcode and create a “Single View App” project.
Installing our Cocoapods packages
When you have created the application, close Xcode and launch a new terminal window. cd to the root of the directory of your mobile application. Run the command below to initialize Cocoapods on the project:
$ pod init
This will create a new Podfile. In this file, we can define our Cocoapods dependencies. Open the file and paste the following:
platform :ios, '10.0'

target 'Chattr' do
  use_frameworks!

  pod 'PusherChatkit', '~> 0.4.0'
  pod 'Alamofire', '~> 4.5.1'
  pod 'SlackTextViewController', git: 'https://github.com/slackhq/SlackTextViewController.git', branch: 'master'
end
Now run pod install to install the dependencies.
⚠️
SlackTextViewControllerhas a bug in iOS 11 where the text view does not respond to clicks. Although it’s been fixed in version1.9.6, that version was not available to Cocoapods at the time of writing this article, so we had to pull the master in the Podfile.
When the installation is complete, open the new .xcworkspace file that was generated by Cocoapods in the root of your project. This will launch Xcode.
Configuring our iOS application
In Xcode, open the AppDelegate.swift file and replace the contents of the file with the following code:
import UIKit

struct AppConstants {
    static let ENDPOINT    = "http://localhost:4000"
    static let INSTANCE_LOCATOR = "PUSHER_CHATKIT_INSTANCE_LOCATOR"
}

@UIApplicationMain
class AppDelegate: UIResponder, UIApplicationDelegate {

    var window: UIWindow?

    func application(_ application: UIApplication, didFinishLaunchingWithOptions launchOptions: [UIApplicationLaunchOptionsKey: Any]?) -> Bool {
        window?.backgroundColor = UIColor.white
        return true
    }
}
In the AppConstants struct we have defined the ENDPOINT and INSTANCE_LOCATOR. The ENDPOINT is the URL to the remote web server where your Node.js application resides. The INSTANCE_LOCATOR contains the instance locator provided for your Chatkit application in the Pusher Chatkit dashboard.
Now let’s focus on creating the storyboard and other parts.
Creating our application’s storyboard and controllers
Open the Main.storyboard file and, in there, we will create the application’s interface. We will have four scenes on our storyboard. These will look something like the screenshot below:
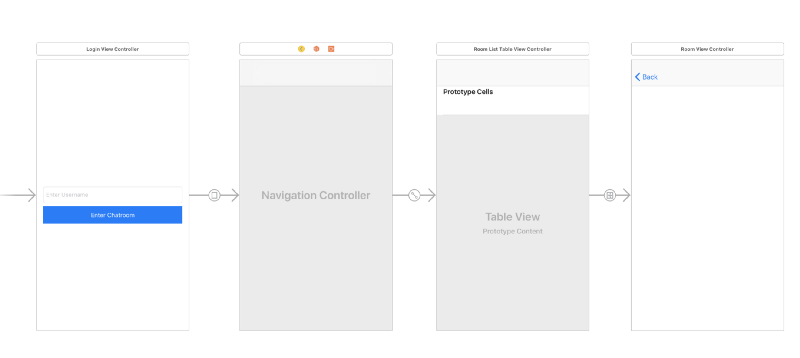
In the first View Controller scene, let’s create a LoginViewController and link it to the View Controller scene in the storyboard. Create the new View Controller and paste in the code below:
import UIKit
import Alamofire

class LoginViewController: UIViewController {
    var username: String!
    @IBOutlet weak var loginButton: UIButton!
    @IBOutlet weak var textField: UITextField!
}

extension LoginViewController {
    // MARK: Initialize
    override func viewDidLoad() {
        super.viewDidLoad()

        self.loginButton.isEnabled = false

        self.loginButton.addTarget(self, action: #selector(loginButtonPressed), for: .touchUpInside)
        self.textField.addTarget(self, action: #selector(typingUsername), for: .editingChanged)
    }

    // MARK: Navigation
    override func prepare(for segue: UIStoryboardSegue, sender: Any?) -> Void {
        if segue.identifier == "loginSegue" {
            let ctrl = segue.destination as! UINavigationController
            let actualCtrl = ctrl.viewControllers.first as! RoomListTableViewController
            actualCtrl.username = self.username
        }
    }

    // MARK: Helpers
    @objc func typingUsername(_ sender: UITextField) {
        self.loginButton.isEnabled = sender.text!.characters.count >= 3
    }

    @objc func loginButtonPressed(_ sender: Any) {
        let payload: Parameters = ["username": self.textField.text!]

        self.loginButton.isEnabled = false

        Alamofire.request(AppConstants.ENDPOINT + "/users", method: .post, parameters: payload).validate().responseJSON { (response) in
            switch response.result {
            case .success(_):
                self.username = self.textField.text!
                self.performSegue(withIdentifier: "loginSegue", sender: self)
            case .failure(let error):
                print(error)
            }
        }
    }
}
In the code above, we have defined two @IBOutlets that we will connect to the View Controller scene in the storyboard. In the prepare method, we prepare for the navigation to the RoomListTableViewController by setting the username property in that class. In the loginButtonPressed handler, we fire a request to the Node.js application we created earlier to create the new user.
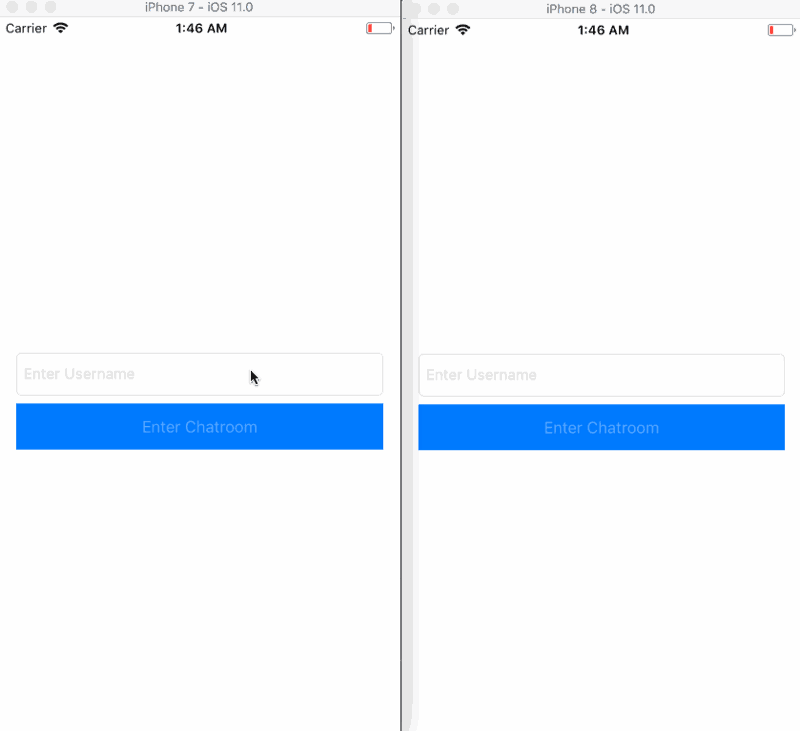
Open the storyboard and link the first scene to the LoginViewController class. Add a UIButton and a UITextField to the view controller scene. Now connect the UITextField to the textField property as a referencing outlet. Also connect the UIButton to the loginButton property as a referencing outlet.
Next, add a Navigation Controller to the storyboard. Create a manual segue between the View Controller and the Navigation Controller and set the ID of this segue to loginSegue.
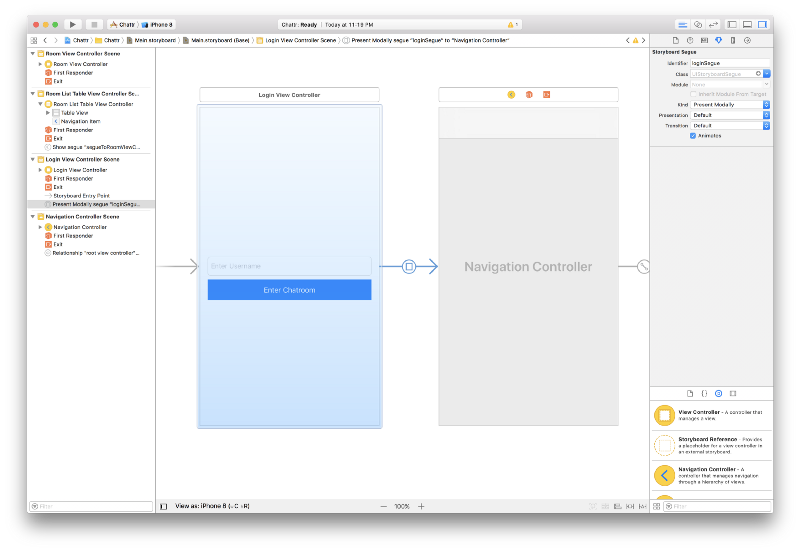
Next, create a new controller called RoomListTableViewController. In the Main.storyboard file, set this new class as the custom class for the TableViewController attached to the Navigation Controller. Now in the RoomListTableViewController class, replace the contents with the following code:
import UIKit
import PusherChatkit

class RoomListTableViewController: UITableViewController {
    var username: String!
    var selectedRoom: PCRoom?
    var currentUser: PCCurrentUser!
    var availableRooms = [PCRoom]()
    var activityIndicator = UIActivityIndicatorView()
}

// MARK: - Initialize -
extension RoomListTableViewController: PCChatManagerDelegate {
    override func viewDidLoad() -> Void {
        super.viewDidLoad()
        self.setNavigationItemTitle()
        self.initActivityIndicator()
        self.initPusherChatkit()
    }

    private func setNavigationItemTitle() -> Void {
        self.navigationItem.title = "Rooms"
    }

    private func initActivityIndicator() -> Void {
        self.activityIndicator = UIActivityIndicatorView(frame: CGRect(x: 0, y: 0, width: 40, height: 40))
        self.activityIndicator.activityIndicatorViewStyle = UIActivityIndicatorViewStyle.gray
        self.activityIndicator.center = self.view.center
        self.view.addSubview(self.activityIndicator)
        self.activityIndicator.startAnimating()
    }

    private func initPusherChatkit() -> Void {
        self.initPusherChatManager { [weak self] (currentUser) in
            guard let strongSelf = self else { return }
            strongSelf.currentUser = currentUser
            strongSelf.activityIndicator.stopAnimating()
            strongSelf.tableView.reloadData()
        }
    }

    private func initPusherChatManager(completion: @escaping (_ success: PCCurrentUser) -> Void) -> Void {
        let chatManager = ChatManager(
            instanceId: AppConstants.INSTANCE_LOCATOR,
            tokenProvider: PCTokenProvider(url: AppConstants.ENDPOINT + "/auth", userId: username)
        )
        chatManager.connect(delegate: self) { (user, error) in
            guard error == nil else { return }
            guard let user = user else { return }
            // Get a list of all rooms. Attempt to join the room.
            user.getAllRooms { rooms, error in
                guard error == nil else { return }
                self.availableRooms = rooms!
                rooms!.forEach { room in
                    user.joinRoom(room) { room, error in
                        guard error == nil else { return }
                    }
                }
                DispatchQueue.main.async {
                    self.tableView.reloadData()
                }
            }
            DispatchQueue.main.async {
                completion(user)
            }
        }
    }
}

// MARK: - UITableViewController Overrides -
extension RoomListTableViewController {
    override func tableView(_ tableView: UITableView, numberOfRowsInSection section: Int) -> Int {
        return self.availableRooms.count
    }

    override func tableView(_ tableView: UITableView, cellForRowAt indexPath: IndexPath) -> UITableViewCell {
        let roomTitle = self.availableRooms[indexPath.row].name
        let cell = tableView.dequeueReusableCell(withIdentifier: "RoomCell", for: indexPath)
        cell.textLabel?.text = "\(roomTitle)"
        return cell
    }

    override func tableView(_ tableView: UITableView, didSelectRowAt indexPath: IndexPath) {
        self.selectedRoom = self.availableRooms[indexPath.row]
        self.performSegue(withIdentifier: "segueToRoomViewController", sender: self)
    }
}

// MARK: - Navigation -
extension RoomListTableViewController {
    override func prepare(for segue: UIStoryboardSegue, sender: Any?) -> Void {
        if segue.identifier == "segueToRoomViewController" {
            let roomViewController = segue.destination as! RoomViewController
            roomViewController.room = self.selectedRoom
            roomViewController.currentUser = self.currentUser
        }
    }
}
This class is meant to show all the available chat rooms that users can connect to and chat on. Let’s see what some parts of the class do.
The first extension contains the initializers. In the viewDidLoad method, we set up the controller title, activity indicator, and Pusher Chatkit.
In the initPusherChatManager, we initialize a tokenProvider which fetches a token from our Node.js endpoint. We then create a chatManager with our Chatkit application’s instance locator and the tokenProvider, and connect to Chatkit.
In the second extension, we override some table view controller methods. We do this so we can display the channel names in rows. In the last method of the second extension on line 100, we call the method performSegue(withIdentifier: "segueToRoomViewController", sender: self) which will navigate the page to a new View Controller.
The last extension has the prepare method. This prepares the View Controller we are navigating to before we get there. Now, let’s create the View Controller and the segue needed to access it.
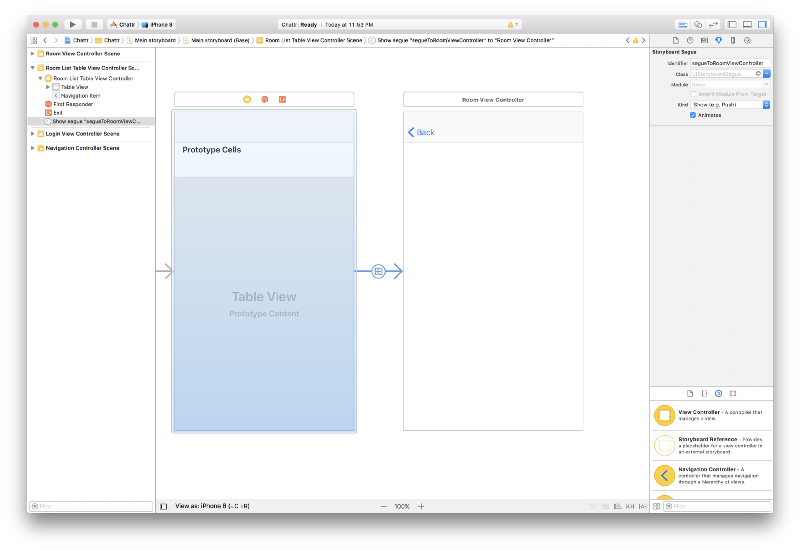
For our last storyboard scene, create a RoomViewController class. In the Main.storyboard file, drag in a final View Controller to the board.
Set the custom class of the new view controller to RoomViewController. Also, create a manual segue from the table view controller to it and name the segue segueToRoomViewController:
Open the RoomViewController class and replace the contents with the following:
import UIKit
import PusherChatkit
import SlackTextViewController

class RoomViewController: SLKTextViewController, PCRoomDelegate {
    var room: PCRoom!
    var messages = [Message]()
    var currentUser: PCCurrentUser!
    override var tableView: UITableView {
        get { return super.tableView! }
    }
}

// MARK: - Initialize -
extension RoomViewController {
    override func viewDidLoad() {
        super.viewDidLoad()
        self.subscribeToRoom()
        self.setNavigationItemTitle()
        self.configureSlackTableViewController()
    }

    private func subscribeToRoom() -> Void {
        self.currentUser.subscribeToRoom(room: self.room, roomDelegate: self)
    }

    private func setNavigationItemTitle() -> Void {
        self.navigationItem.title = self.room.name
    }

    private func configureSlackTableViewController() -> Void {
        self.bounces = true
        self.isInverted = true
        self.shakeToClearEnabled = true
        self.isKeyboardPanningEnabled = true
        self.textInputbar.maxCharCount = 256
        self.tableView.separatorStyle = .none
        self.textInputbar.counterStyle = .split
        self.textInputbar.counterPosition = .top
        self.textInputbar.autoHideRightButton = true
        self.textView.placeholder = "Enter Message...";
        self.shouldScrollToBottomAfterKeyboardShows = false
        self.textInputbar.editorTitle.textColor = UIColor.darkGray
        self.textInputbar.editorRightButton.tintColor = UIColor(red: 0/255, green: 122/255, blue: 255/255, alpha: 1)
        self.tableView.register(MessageCell.classForCoder(), forCellReuseIdentifier: MessageCell.MessengerCellIdentifier)
        self.autoCompletionView.register(MessageCell.classForCoder(), forCellReuseIdentifier: MessageCell.AutoCompletionCellIdentifier)
    }
}

// MARK: - UITableViewController Overrides -
extension RoomViewController {
    override class func tableViewStyle(for decoder: NSCoder) -> UITableViewStyle {
        return .plain
    }

    override func numberOfSections(in tableView: UITableView) -> Int {
        return 1
    }

    override func tableView(_ tableView: UITableView, numberOfRowsInSection section: Int) -> Int {
        if tableView == self.tableView {
            return self.messages.count
        }
        return 0
    }

    override func tableView(_ tableView: UITableView, cellForRowAt indexPath: IndexPath) -> UITableViewCell {
        return self.messageCellForRowAtIndexPath(indexPath)
    }

    override func tableView(_ tableView: UITableView, heightForRowAt indexPath: IndexPath) -> CGFloat {
        if tableView == self.tableView {
            let message = self.messages[(indexPath as NSIndexPath).row]
            if message.text.characters.count == 0 {
                return 0
            }
            let paragraphStyle = NSMutableParagraphStyle()
            paragraphStyle.lineBreakMode = .byWordWrapping
            paragraphStyle.alignment = .left
            let pointSize = MessageCell.defaultFontSize()
            let attributes = [
                NSAttributedStringKey.font: UIFont.systemFont(ofSize: pointSize),
                NSAttributedStringKey.paragraphStyle: paragraphStyle
            ]
            var width = tableView.frame.width - MessageCell.kMessageTableViewCellAvatarHeight
            width -= 25.0
            let titleBounds = (message.username as NSString!).boundingRect(
                with: CGSize(width: width, height: CGFloat.greatestFiniteMagnitude),
                options: .usesLineFragmentOrigin,
                attributes: attributes,
                context: nil
            )
            let bodyBounds = (message.text as NSString!).boundingRect(
                with: CGSize(width: width, height: CGFloat.greatestFiniteMagnitude),
                options: .usesLineFragmentOrigin,
                attributes: attributes,
                context: nil
            )
            var height = titleBounds.height
            height += bodyBounds.height
            height += 40
            if height < MessageCell.kMessageTableViewCellMinimumHeight {
                height = MessageCell.kMessageTableViewCellMinimumHeight
            }
            return height
        }
        return MessageCell.kMessageTableViewCellMinimumHeight
    }
}

// MARK: - Overrides -
extension RoomViewController {
    override func keyForTextCaching() -> String? {
        return Bundle.main.bundleIdentifier
    }

    override func didPressRightButton(_ sender: Any!) {
        self.textView.refreshFirstResponder()
        self.sendMessage(textView.text)
        super.didPressRightButton(sender)
    }
}

// MARK: - Delegate Methods -
extension RoomViewController {
    public func newMessage(message: PCMessage) {
        let msg = self.PCMessageToMessage(message)
        let indexPath = IndexPath(row: 0, section: 0)
        let rowAnimation: UITableViewRowAnimation = self.isInverted ? .bottom : .top
        let scrollPosition: UITableViewScrollPosition = self.isInverted ? .bottom : .top
        DispatchQueue.main.async {
            self.tableView.beginUpdates()
            self.messages.insert(msg, at: 0)
            self.tableView.insertRows(at: [indexPath], with: rowAnimation)
            self.tableView.endUpdates()
            self.tableView.scrollToRow(at: indexPath, at: scrollPosition, animated: true)
            self.tableView.reloadRows(at: [indexPath], with: .automatic)
            self.tableView.reloadData()
        }
    }
}

// MARK: - Helpers -
extension RoomViewController {
    private func PCMessageToMessage(_ message: PCMessage) -> Message {
        return Message(id: message.id, username: message.sender.displayName, text: message.text)
    }

    private func sendMessage(_ message: String) -> Void {
        guard let room = self.room else { return }
        self.currentUser?.addMessage(text: message, to: room, completionHandler: { (messsage, error) in
            guard error == nil else { return }
        })
    }

    private func messageCellForRowAtIndexPath(_ indexPath: IndexPath) -> MessageCell {
        let cell = self.tableView.dequeueReusableCell(withIdentifier: MessageCell.MessengerCellIdentifier) as! MessageCell
        let message = self.messages[(indexPath as NSIndexPath).row]
        cell.bodyLabel().text = message.text
        cell.titleLabel().text = message.username
        cell.usedForMessage = true
        cell.indexPath = indexPath
        cell.transform = self.tableView.transform
        return cell
    }
}
The class above extends SlackTableViewController which automatically gives it access to some cool features of that controller. In the code above, we broke the class into 5 extensions. Let’s take each extension and explain a little about what is going on in them.
In the first extension, we subscribe to the room, set the room name as the page title, and configure the SlackTableViewController. In the configureSlackTableViewController method, we simply customise parts of our SlackTableViewController.
In the second extension, we override the table view controller methods. We also set the number of sections, the number of rows, and set the Message to be shown on each row. And finally we also calculate the dynamic height of each cell, depending on the characters the message has.
In the third extension, we have the didPressRightButton function which is called anytime the user presses send to send a message.
In the fourth extension, we have the functions available from the PCRoomDelegate. In the newMessage function we send the message to Chatkit and then we reload the table to display the newly added data.
In the fifth and final extension, we define functions that are meant to be helpers. The PCMessageToMessage method converts a PCMessage to our own Message struct (we will define this later). The sendMessage method sends the message to the Chatkit API. Finally, we have the messageCellForRowAtIndexPath method. This method simply gets the message attached to a particular row using the indexPath.
Now create a new class called MessageCell. This will be the View class where we will customise everything about how a single chat cell will look. In the file, replace the contents with the one below:
import UIKit
import SlackTextViewController

struct Message {
    var id: Int!
    var username: String!
    var text: String!
}

class MessageCell: UITableViewCell {
    static let kMessageTableViewCellMinimumHeight: CGFloat = 50.0;
    static let kMessageTableViewCellAvatarHeight: CGFloat = 30.0;
    static let MessengerCellIdentifier: String = "MessengerCell";
    static let AutoCompletionCellIdentifier: String = "AutoCompletionCell";
    var _titleLabel: UILabel?
    var _bodyLabel: UILabel?
    var _thumbnailView: UIImageView?
    var indexPath: IndexPath?
    var usedForMessage: Bool?
    required init?(coder aDecoder: NSCoder) {
        fatalError("init(coder:) has not been implemented")
    }

    override init(style: UITableViewCellStyle, reuseIdentifier: String?) {
        super.init(style: style, reuseIdentifier: reuseIdentifier)
        self.selectionStyle = .none
        self.backgroundColor = UIColor.white
        configureSubviews()
    }

    func configureSubviews() {
        contentView.addSubview(thumbnailView())
        contentView.addSubview(titleLabel())
        contentView.addSubview(bodyLabel())
        let views: [String:Any] = [
            "thumbnailView": thumbnailView(),
            "titleLabel": titleLabel(),
            "bodyLabel": bodyLabel()
        ]

        let metrics = [
            "tumbSize": MessageCell.kMessageTableViewCellAvatarHeight,
            "padding": 15,
            "right": 10,
            "left": 5
        ]
        contentView.addConstraints(NSLayoutConstraint.constraints(
            withVisualFormat: "H:|-left-[thumbnailView(tumbSize)]-right-[titleLabel(>=0)]-right-|",
            options: [],
            metrics: metrics,
            views: views
        ))
        contentView.addConstraints(NSLayoutConstraint.constraints(
            withVisualFormat: "H:|-left-[thumbnailView(tumbSize)]-right-[bodyLabel(>=0)]-right-|",
            options: [],
            metrics: metrics,
            views: views
        ))
        contentView.addConstraints(NSLayoutConstraint.constraints(
            withVisualFormat: "V:|-right-[thumbnailView(tumbSize)]-(>=0)-|",
            options: [],
            metrics: metrics,
            views: views
        ))
        if (reuseIdentifier == MessageCell.MessengerCellIdentifier) {
            contentView.addConstraints(NSLayoutConstraint.constraints(
                withVisualFormat: "V:|-right-[titleLabel(20)]-left-[bodyLabel(>=0@999)]-left-|",
                options: [],
                metrics: metrics,
                views: views
            ))
        }
        else {
            contentView.addConstraints(NSLayoutConstraint.constraints(
                withVisualFormat: "V:|[titleLabel]|",
                options: [],
                metrics: metrics,
                views: views
            ))
        }
    }

    // MARK: Getters
    override func prepareForReuse() {
        super.prepareForReuse()
        selectionStyle = .none
        let pointSize: CGFloat = MessageCell.defaultFontSize()
        titleLabel().font = UIFont.boldSystemFont(ofSize: pointSize)
        bodyLabel().font = UIFont.systemFont(ofSize: pointSize)
        titleLabel().text = ""
        bodyLabel().text = ""
    }

    func titleLabel() -> UILabel {
        if _titleLabel == nil {
            _titleLabel = UILabel()
            _titleLabel?.translatesAutoresizingMaskIntoConstraints = false
            _titleLabel?.backgroundColor = UIColor.clear
            _titleLabel?.isUserInteractionEnabled = false
            _titleLabel?.numberOfLines = 0
            _titleLabel?.textColor = UIColor.gray
            _titleLabel?.font = UIFont.boldSystemFont(ofSize: MessageCell.defaultFontSize())
        }
        return _titleLabel!
    }

    func bodyLabel() -> UILabel {
        if _bodyLabel == nil {
            _bodyLabel = UILabel()
            _bodyLabel?.translatesAutoresizingMaskIntoConstraints = false
            _bodyLabel?.backgroundColor = UIColor.clear
            _bodyLabel?.isUserInteractionEnabled = false
            _bodyLabel?.numberOfLines = 0
            _bodyLabel?.textColor = UIColor.darkGray
            _bodyLabel?.font = UIFont.systemFont(ofSize: MessageCell.defaultFontSize())
        }
        return _bodyLabel!
    }

    func thumbnailView() -> UIImageView {
        if _thumbnailView == nil {
            _thumbnailView = UIImageView()
            _thumbnailView?.translatesAutoresizingMaskIntoConstraints = false
            _thumbnailView?.isUserInteractionEnabled = false
            _thumbnailView?.backgroundColor = UIColor(white: 0.9, alpha: 1.0)
            _thumbnailView?.layer.cornerRadius = MessageCell.kMessageTableViewCellAvatarHeight / 2.0
            _thumbnailView?.layer.masksToBounds = true
        }
        return _thumbnailView!
    }

    class func defaultFontSize() -> CGFloat {
        var pointSize: CGFloat = 16.0
        let contentSizeCategory: String = String(describing: UIApplication.shared.preferredContentSizeCategory)
        pointSize += SLKPointSizeDifferenceForCategory(contentSizeCategory)
        return pointSize
    }
}
In the code above, we create a class that extends UITableViewCell. This class is going to be used by SlackTextViewController as the class for each message row. It was registered in the RoomsViewController when configuring the SlackTextViewController.
Testing Our Pusher Chatkit Application
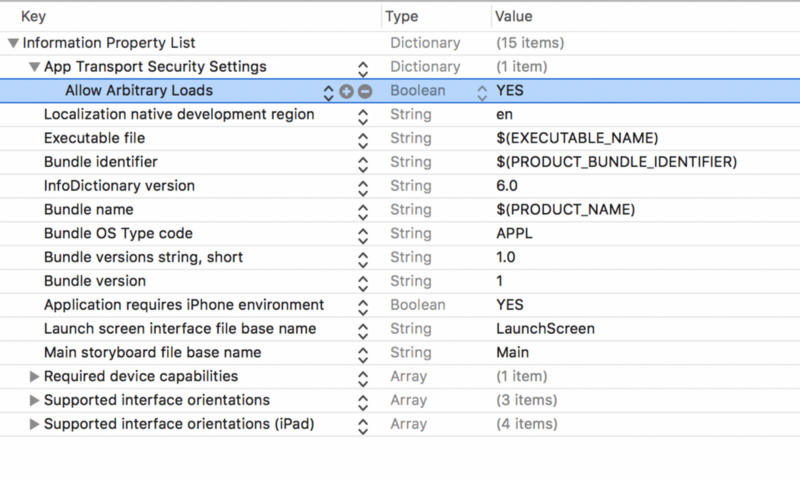
To instruct your iOS app connect to your local Node.js server, you will need to make some changes. In the info.plist file, add the keys as seen below:
With this change, you can build and run your application and it will talk directly with your local web application. Now you can run your application.

Conclusion
In this tutorial, we were able to create a simple chat application using SlackTextViewController and the power of the Pusher Chatkit SDK. Hopefully, you have learned a thing or two on how you can integrate Pusher Chatkit into existing technologies and how it can power messaging in your application.
This post was first published to Pusher.