

In this tutorial, you'll build a production-ready voice agent architecture: a browser client that streams audio over WebRTC (Web Real-Time Communication), a backend that mints short-lived session tokens, an agent runtime that orchestrates speech and tools safely, and generates post-call artifacts for downstream workflows.
This article is intentionally vendor-neutral. You can implement these patterns using any AI voice platform that supports WebRTC (directly or via an SFU, selective forwarding unit) and server-side token minting. The goal is to help you ship a voice agent architecture that is secure, observable, and operable in production.
Disclosure: This article reflects my personal views and experience. It does not represent the views of my employer or any vendor mentioned.
Table of Contents
What You'll Build
By the end, you'll have:
A web client that streams microphone audio and plays agent audio.
A backend token endpoint that keeps credentials server-side.
A safe coordination channel between the agent and the application.
Structured messages between the application and the agent.
A production checklist for security, reliability, observability, and cost control.
Prerequisites
You should be comfortable with:
JavaScript or TypeScript
Node.js 18+ (so
fetchworks server-side) and an HTTP framework (Express in examples)Browser microphone permissions
Basic WebRTC concepts (high level is fine)
TL;DR
A production-ready voice agent needs:
A server-side token service (no secrets in the browser)
A real-time media plane (WebRTC) for low-latency audio
A data channel for structured messages between your app and the agent
Tool guardrails (allowlists, confirmations, timeouts, audit logs)
Post-call processing (summary, actions, CRM (Customer Relationship Management), tickets)
Observability-first implementation (state transitions + metrics)
How to Avoid Common Production Failures in Voice Agents
If you've operated distributed systems, you've seen most failures happen at boundaries:
timeouts and partial connectivity
retries that amplify load
unclear ownership between components
missing observability
“helpful automation” that becomes unsafe
Voice agents amplify those risks because:
Latency is User Experience: A slow agent feels broken. Conversational UX is less forgiving than web UX.
Audio + UI + Tools is a Distributed System: You coordinate browser audio capture, WebRTC transport, STT (speech-to-text), model reasoning, tool calls, TTS (text-to-speech), and playback buffering. Each stage has different clocks and failure modes.
Security Boundaries are Non-negotiable: A leaked API key is catastrophic. A tool misfire can trigger real-world side effects.
Debuggability determines whether you can ship: If you don't log state transitions and capture post-call artifacts, you can't operate or improve the system safely.
How to Design a Latency Budget for a Real-Time Voice Agent

Conversations have a “feel.” That feel is mostly latency.
A practical guideline:
Under ~200ms feels instant
300–500ms feels responsive
Over ~700ms feels broken
Your end-to-end latency is the sum of mic capture, network RTT (round-trip time), STT, reasoning, tool execution, TTS, and playback buffering. Budget for it explicitly or you’ll ship a technically correct system that users perceive as unintelligent.
How to Design a Production Voice Agent Architecture (Vendor-Neutral)
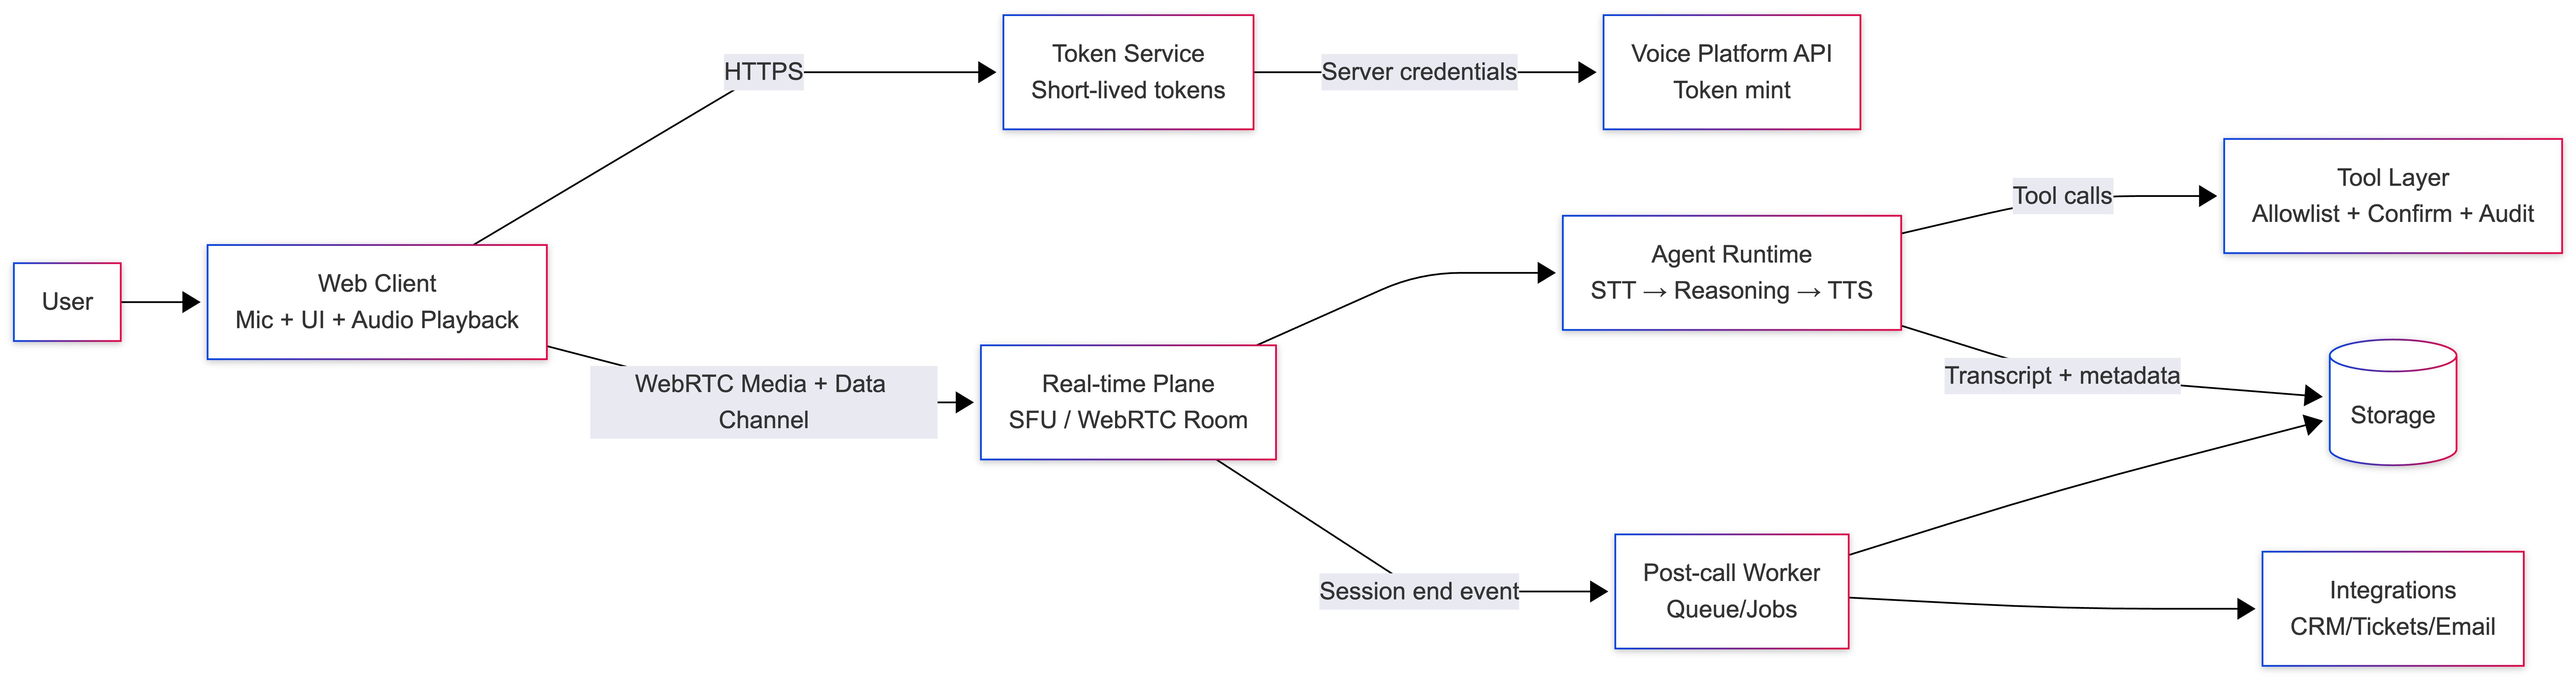
A scalable voice agent architecture typically has these layers:
Web client: mic capture, audio playback, UI state
Token service: short-lived session tokens (secrets stay server-side)
Real-time plane: WebRTC media + a data channel
Agent runtime: STT → reasoning → TTS, plus tool orchestration
Tool layer: external actions behind safety controls
Post-call processor: summary + structured outputs after the session ends
This separation makes failure domains and trust boundaries explicit.
Step 0: Set Up the Project
Create a new project directory:
mkdir voice-agent-app
cd voice-agent-app
npm init -y
npm pkg set type=module
npm pkg set scripts.start="node server.js"
Install dependencies:
npm install express dotenv
Create this folder structure:
voice-agent-app/
├── server.js
├── .env
└── public/
    ├── index.html
    └── client.js
Add a .env file:
VOICE_PLATFORM_URL=https://your-provider.example
VOICE_PLATFORM_API_KEY=your_api_key_here
Now you’re ready to implement each part of the system.
Step 1: Keep Credentials Server-side
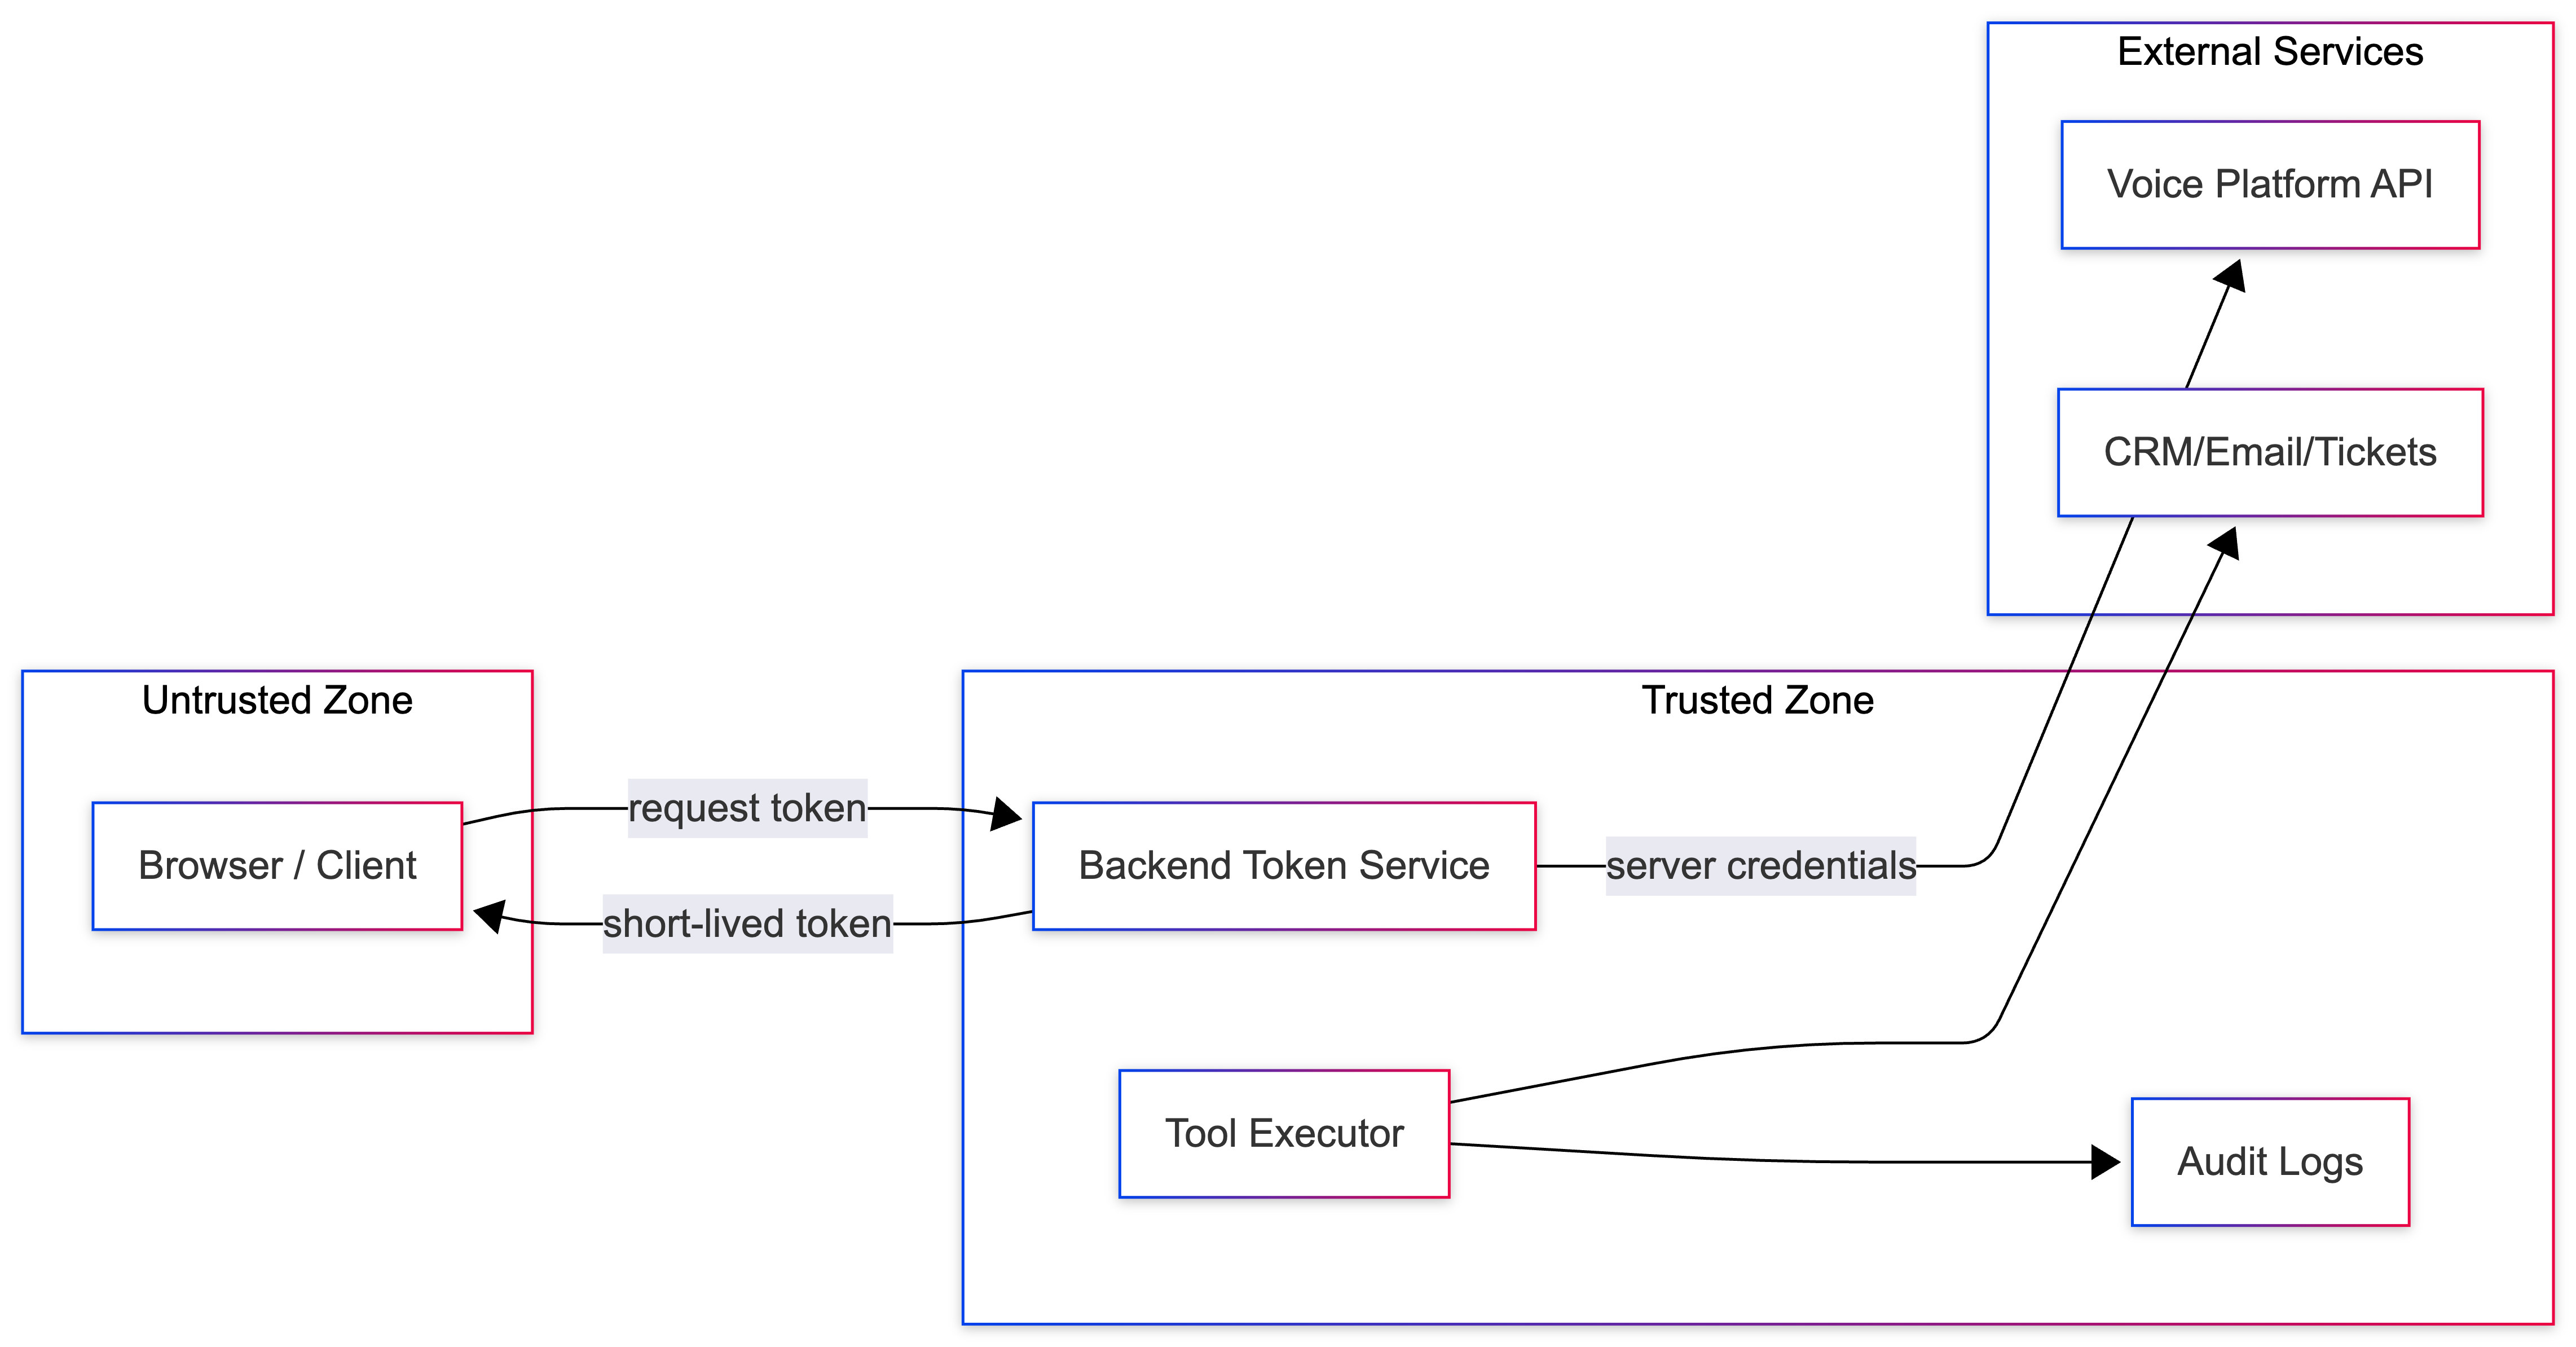
Treat every API key like production credentials:
store it in environment variables or a secrets manager
rotate it if exposed
never embed it in browser or mobile apps
avoid logging secrets (log only a short suffix if necessary)
Even if a vendor supports CORS, the browser is not a safe place for long-lived credentials.
Step 2: Build a Backend Token Endpoint
Your backend should:
authenticate the user
mint a short-lived session token using your platform API
return only what the client needs (URL + token + expiry)
Create server.js (Node.js + Express)
import express from "express";
import dotenv from "dotenv";
import path from "path";
import { fileURLToPath } from "url";

dotenv.config();

const app = express();
app.use(express.json());

// Serve the web client from /public
const __filename = fileURLToPath(import.meta.url);
const __dirname = path.dirname(__filename);
app.use(express.static(path.join(__dirname, "public")));

const VOICE_PLATFORM_URL = process.env.VOICE_PLATFORM_URL;
const VOICE_PLATFORM_API_KEY = process.env.VOICE_PLATFORM_API_KEY;

app.post("/api/voice-token", async (req, res) => {
  res.setHeader("Cache-Control", "no-store");

  try {
    if (!VOICE_PLATFORM_URL || !VOICE_PLATFORM_API_KEY) {
      return res.status(500).json({
        error: "Missing VOICE_PLATFORM_URL or VOICE_PLATFORM_API_KEY in .env",
      });
    }

    // TODO: Authenticate the caller before minting tokens.

    const r = await fetch(`${VOICE_PLATFORM_URL}/api/v1/token`, {
      method: "POST",
      headers: {
        "X-API-Key": VOICE_PLATFORM_API_KEY,
        "Content-Type": "application/json",
      },
      body: JSON.stringify({ participant_name: "Web User" }),
    });

    if (!r.ok) {
      const detail = await r.text().catch(() => "");
      return res.status(r.status).json({ error: "Token request failed", detail });
    }

    const data = await r.json();

    res.json({
      rtc_url: data.rtc_url || data.livekit_url,
      token: data.token,
      expires_in: data.expires_in,
    });
  } catch (err) {
    res.status(500).json({ error: "Failed to mint token" });
  }
});

app.listen(3000, () => console.log("Open http://localhost:3000"));
Run the server
npm start
Then open: http://localhost:3000
How this code works
You load credentials from environment variables so secrets never enter the browser.
The
/api/voice-tokenendpoint calls the voice platform’s token API.You return only the
rtc_url,token, and expiration time.The browser never sees the API key.
If the provider returns an error, you forward a structured error response.
Production Notes
rate-limit /api/voice-token (cost + abuse control)
instrument token mint latency and error rate
keep TTL short and handle refresh/reconnect
return minimal fields
Step 3: Connect from the Web Client (WebRTC + SFU)
In this step, you'll build a minimal web UI that:
Requests a short-lived token from your backend
Connects to a real-time WebRTC room (often via an SFU)
Plays the agent's audio track
Captures and publishes microphone audio
Create public/index.html
<!doctype html>
<html>
  <head>
    <meta charset="UTF-8" />
    <meta name="viewport" content="width=device-width,initial-scale=1" />
    <title>Voice Agent Demo</title>
  </head>
  <body>
    <h1>Voice Agent Demo</h1>

    <button id="startBtn">Start Call</button>
    <button id="endBtn" disabled>End Call</button>

    <p id="status">Idle</p>

    <script type="module" src="/client.js"></script>
  </body>
</html>
Create public/client.js
Note: This uses a LiveKit-style client SDK to demonstrate the pattern. If you're using a different provider, swap this import and the connect/publish calls for your provider's WebRTC client.
import { Room, RoomEvent, Track } from "https://unpkg.com/livekit-client@2.10.1/dist/livekit-client.esm.mjs";

const startBtn = document.getElementById("startBtn");
const endBtn = document.getElementById("endBtn");
const statusEl = document.getElementById("status");

let room = null;
let intentionallyDisconnected = false;
let audioEls = [];

function setStatus(text) {
  statusEl.textContent = text;
}

function detachAllAudio() {
  for (const el of audioEls) {
    try { el.pause?.(); } catch {}
    el.remove();
  }
  audioEls = [];
}

async function mintToken() {
  const res = await fetch("/api/voice-token", {
    method: "POST",
    headers: { "Content-Type": "application/json" },
    body: JSON.stringify({ participant_name: "Web User" }),
    cache: "no-store",
  });

  if (!res.ok) {
    const detail = await res.text().catch(() => "");
    throw new Error(`Token request failed: ${detail || res.status}`);
  }

  const { rtc_url, token } = await res.json();
  if (!rtc_url || !token) throw new Error("Token response missing rtc_url or token");
  return { rtc_url, token };
}

function wireRoomEvents(r) {
  // 1) Play the agent audio track when subscribed
  r.on(RoomEvent.TrackSubscribed, (track) => {
    if (track.kind !== Track.Kind.Audio) return;

    const el = track.attach();
    audioEls.push(el);
    document.body.appendChild(el);

    // Autoplay restrictions vary by browser/device.
    el.play?.().catch(() => {
      setStatus("Connected (audio may be blocked — click the page to enable)");
    });
  });

  // 2) Reconnect on disconnect (token expiry often shows up this way)
  r.on(RoomEvent.Disconnected, async () => {
    if (intentionallyDisconnected) return;
    setStatus("Disconnected (reconnecting...)");
    await attemptReconnect();
  });
}

async function connectOnce() {
  const { rtc_url, token } = await mintToken();

  const r = new Room();
  wireRoomEvents(r);

  await r.connect(rtc_url, token);

  // Mic permission + publish mic
  try {
    await r.localParticipant.setMicrophoneEnabled(true);
  } catch {
    try { r.disconnect(); } catch {}
    throw new Error("Microphone access denied. Allow mic permission and try again.");
  }

  return r;
}

async function startCall() {
  if (room) return;

  intentionallyDisconnected = false;
  setStatus("Connecting...");

  room = await connectOnce();

  setStatus("Connected");
  startBtn.disabled = true;
  endBtn.disabled = false;
}

async function stopCall() {
  intentionallyDisconnected = true;

  try {
    await room?.localParticipant?.setMicrophoneEnabled(false);
  } catch {}

  try {
    room?.disconnect();
  } catch {}

  room = null;
  detachAllAudio();

  setStatus("Disconnected");
  startBtn.disabled = false;
  endBtn.disabled = true;
}

async function attemptReconnect() {
  // Simplified exponential backoff reconnect.
  // In production, add jitter, max attempts, and better error classification.
  const delaysMs = [250, 500, 1000, 2000];

  for (const delay of delaysMs) {
    if (intentionallyDisconnected) return;

    try {
      // Tear down current state before reconnecting
      try { room?.disconnect(); } catch {}
      room = null;
      detachAllAudio();

      await new Promise((r) => setTimeout(r, delay));

      room = await connectOnce();
      setStatus("Reconnected");
      startBtn.disabled = true;
      endBtn.disabled = false;
      return;
    } catch {
      // keep retrying
    }
  }

  setStatus("Disconnected (reconnect failed)");
  startBtn.disabled = false;
  endBtn.disabled = true;
}

startBtn.addEventListener("click", async () => {
  try {
    await startCall();
  } catch (err) {
    setStatus(err?.message || "Connection failed");
    startBtn.disabled = false;
    endBtn.disabled = true;
    room = null;
    detachAllAudio();
  }
});

endBtn.addEventListener("click", async () => {
  await stopCall();
});
How this Step works (and why these details matter)
The Start button gives you a user gesture so browsers are more likely to allow audio playback.
Mic permission is handled explicitly: if the user denies access, you show a clear error and avoid a half-connected session.
Disconnect cleanup removes audio elements so you don't leak resources across retries.
The reconnect loop demonstrates the production pattern: if a disconnect happens (often due to token expiry or network churn), the client re-mints a token and reconnects.
In the next step, you'll add a structured data-channel handler to safely process agent-suggested “client actions”.
Handle These Explicitly
Autoplay Restriction Example
Add this to index.html:
<button id="startBtn">Start Call</button>
<button id="endBtn" disabled>End Call</button>
<div id="status"></div>
In client.js:
const startBtn = document.getElementById("startBtn");
const endBtn = document.getElementById("endBtn");
const statusEl = document.getElementById("status");

let room;

startBtn.addEventListener("click", async () => {
  try {
    room = await connectVoice();
    statusEl.textContent = "Connected";
    startBtn.disabled = true;
    endBtn.disabled = false;
  } catch (err) {
    statusEl.textContent = "Connection failed";
  }
});
Microphone denial
try {
  await navigator.mediaDevices.getUserMedia({ audio: true });
} catch (err) {
  statusEl.textContent = "Microphone access denied";
  throw err;
}
Disconnect cleanup
endBtn.addEventListener("click", () => {
  if (room) {
    room.disconnect();
    statusEl.textContent = "Disconnected";
    startBtn.disabled = false;
    endBtn.disabled = true;
  }
});
Token refresh (simplified)
room.on(RoomEvent.Disconnected, async () => {
  const res = await fetch("/api/voice-token");
  const { rtc_url, token } = await res.json();
  await room.connect(rtc_url, token);
});
Step 4: Add Client Actions (Agent Suggests, App Executes)
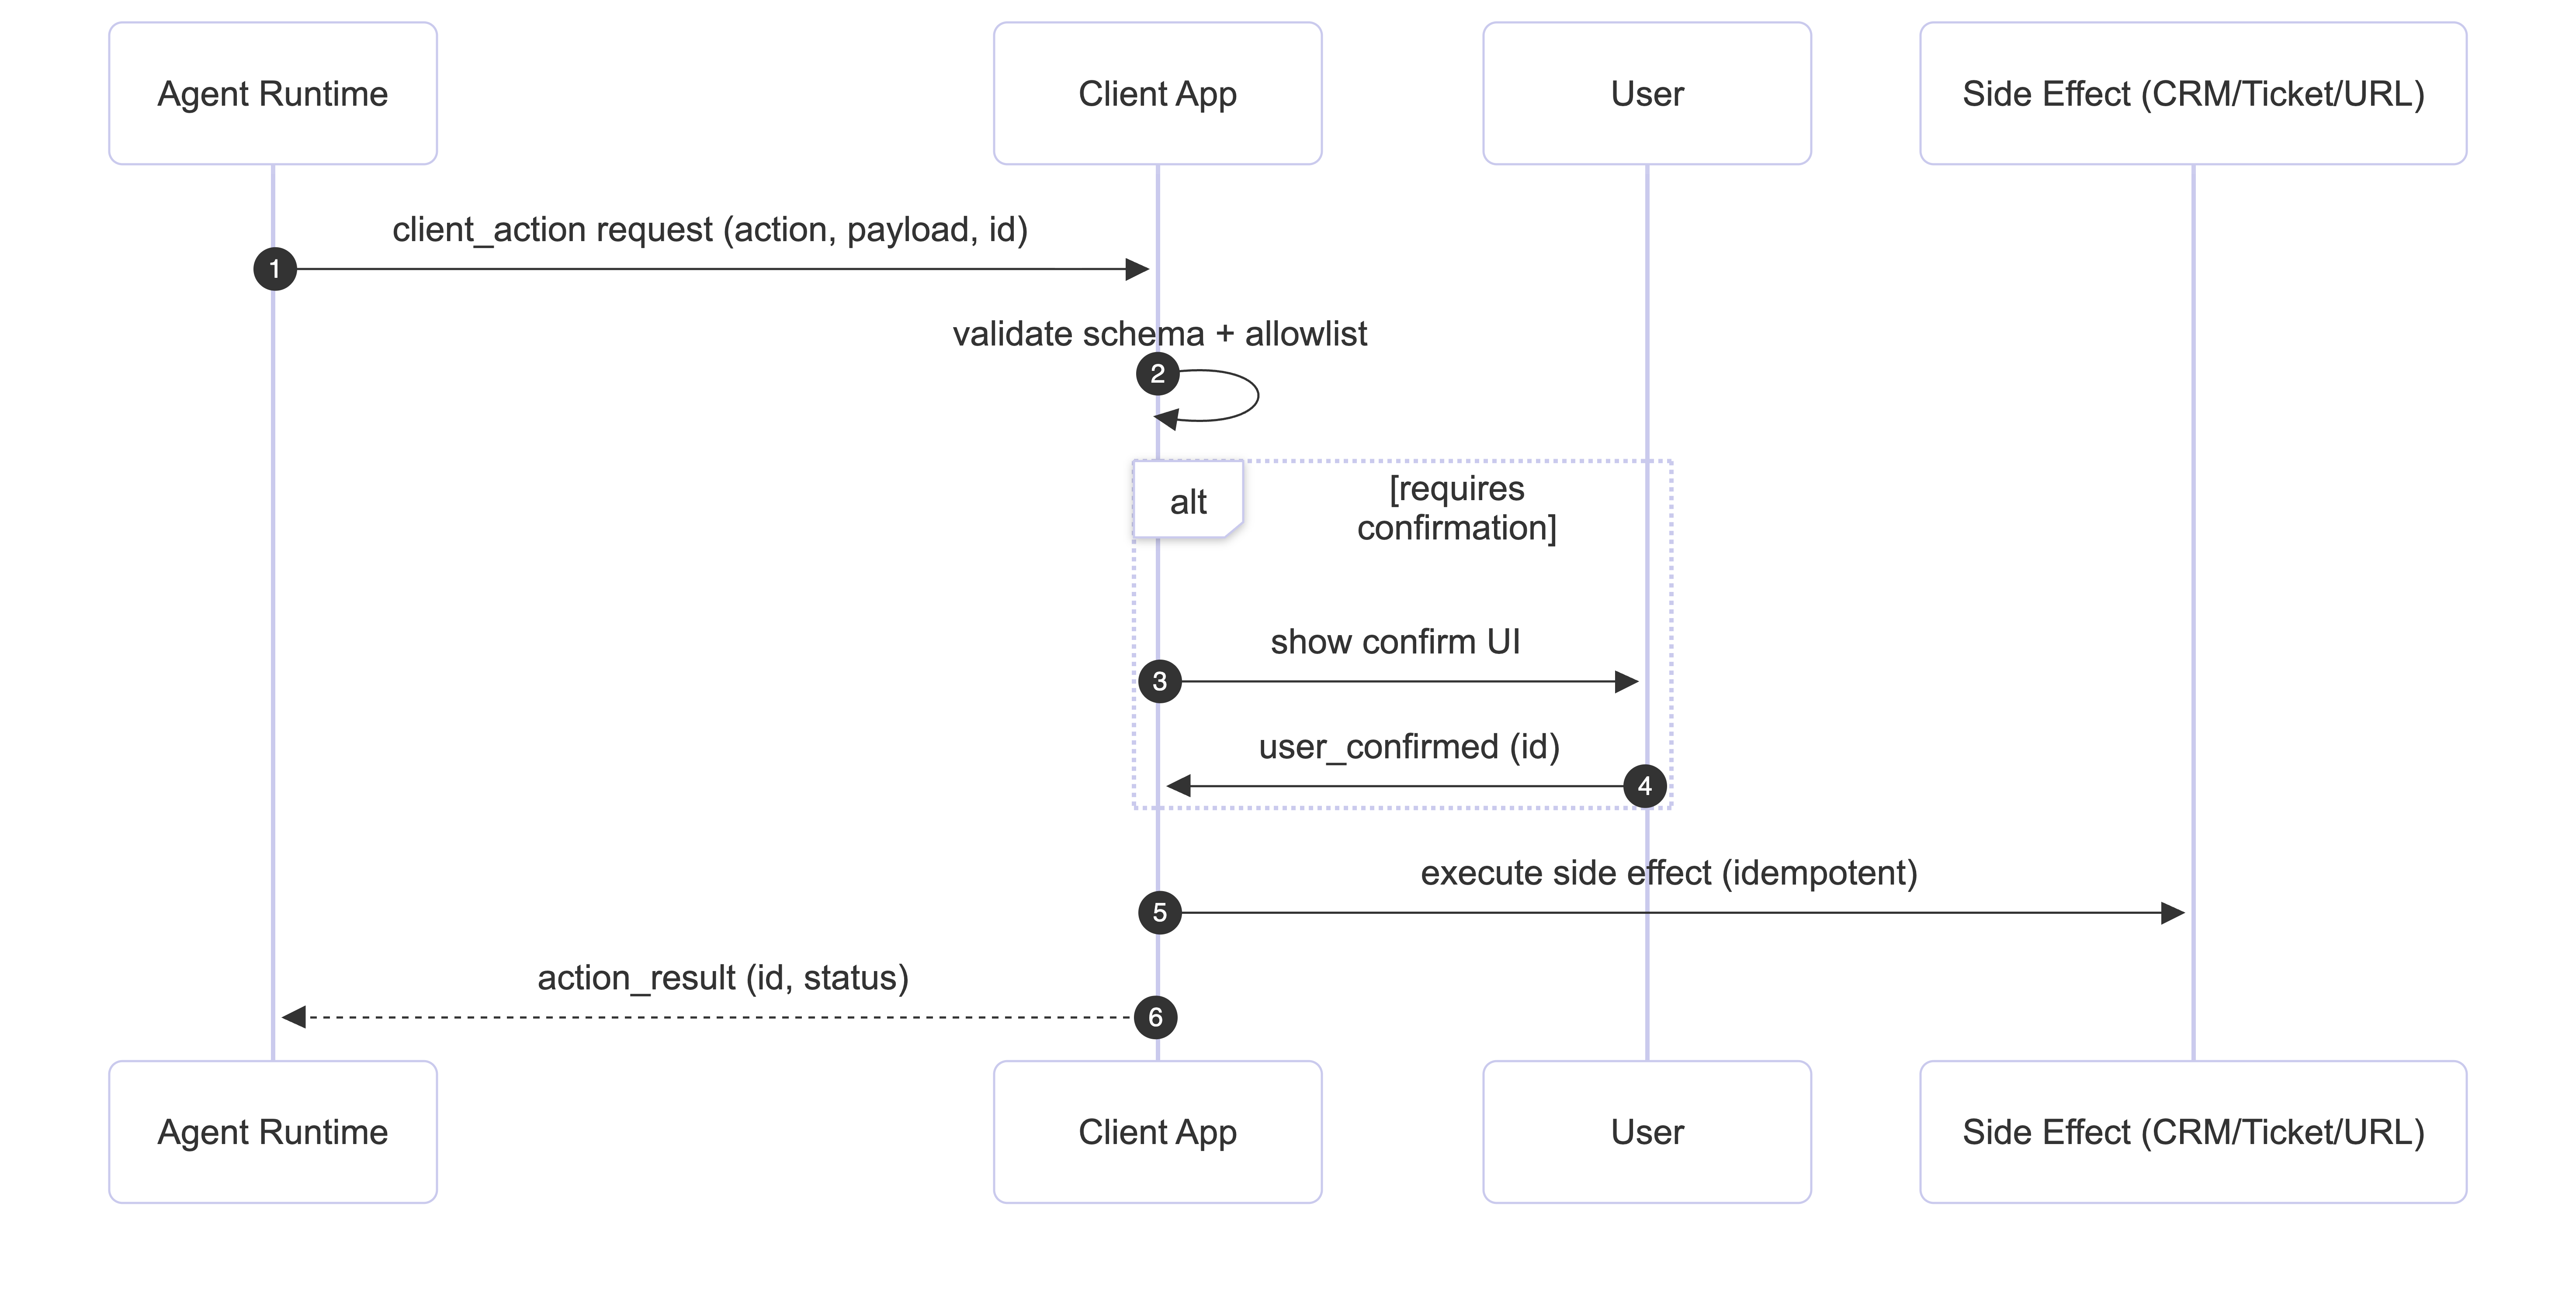
A production voice agent often needs to:
open a runbook/dashboard URL
show a checklist in the UI
request confirmation for an irreversible action
receive structured context (account, region, incident ID)
The key safety rule:
The agent suggests actions. The application validates and executes them.
Use structured messages over the data channel:
{
  "type": "client_action",
  "action": "open_url",
  "payload": { "url": "https://internal.example.com/runbook" },
  "id": "action_123"
}
Add guardrails:
allowlist permitted actions
validate payload shape
confirmation gates for irreversible actions
idempotency via id
audit logs for every request and outcome
This boundary limits damage from hallucinations or prompt injection.
// Guardrails: allowlist + validation + idempotency + confirmation

const ALLOWED_ACTIONS = new Set(["open_url", "request_confirm"]);
const EXECUTED_ACTION_IDS = new Set();
const ALLOWED_HOSTS = new Set(["internal.example.com"]);

function parseClientAction(text) {
  let msg;
  try {
    msg = JSON.parse(text);
  } catch {
    return null;
  }

  if (msg?.type !== "client_action") return null;
  if (typeof msg.id !== "string") return null;
  if (!ALLOWED_ACTIONS.has(msg.action)) return null;

  return msg;
}

async function handleClientAction(msg, room) {
  if (EXECUTED_ACTION_IDS.has(msg.id)) return; // idempotency
  EXECUTED_ACTION_IDS.add(msg.id);

  console.log("[client_action]", msg); // audit log (demo)

  if (msg.action === "open_url") {
    const url = msg.payload?.url;
    if (typeof url !== "string") return;

    const u = new URL(url);
    if (!ALLOWED_HOSTS.has(u.host)) {
      console.warn("Blocked navigation to:", u.host);
      return;
    }

    window.open(url, "_blank", "noopener,noreferrer");
    return;
  }

  if (msg.action === "request_confirm") {
    const prompt = msg.payload?.prompt || "Confirm this action?";
    const ok = window.confirm(prompt);

    // Send confirmation back to agent/app
    room.localParticipant.publishData(
  new TextEncoder().encode(
    JSON.stringify({ type: "user_confirmed", id: msg.id, ok })
  ),
  { topic: "client_events", reliable: true }
);
  }
}
room.on(RoomEvent.DataReceived, (payload, participant, kind, topic) => {
  if (topic !== "client_actions") return;

  const text = new TextDecoder().decode(payload);
  const msg = parseClientAction(text);
  if (!msg) return;

  handleClientAction(msg, room);
});
Step 5: Add Tool Integrations Safely
Tools turn a voice agent into automation. Regardless of vendor, enforce these rules:
timeouts on every tool call
circuit breakers for flaky dependencies
audit logs (inputs, outputs, duration, trace IDs)
explicit confirmation for destructive actions
credentials stored server-side (never in prompts or clients)
If tools fail, degrade gracefully (“I can’t access that system right now, here’s the manual fallback.”). Silence reads as failure.
Create a server-side tool runner (example)
Paste this into server.js:
const TOOL_ALLOWLIST = {
  get_status: { destructive: false },
  create_ticket: { destructive: true },
};

let failures = 0;
let circuitOpenUntil = 0;

function circuitOpen() {
  return Date.now() < circuitOpenUntil;
}

async function withTimeout(promise, ms) {
  return Promise.race([
    promise,
    new Promise((_, reject) => setTimeout(() => reject(new Error("timeout")), ms)),
  ]);
}

async function runToolSafely(tool, args) {
  if (circuitOpen()) throw new Error("circuit_open");

  try {
    const result = await withTimeout(Promise.resolve({ ok: true, tool, args }), 2000);
    failures = 0;
    return result;
  } catch (err) {
    failures++;
    if (failures >= 3) circuitOpenUntil = Date.now() + 10_000;
    throw err;
  }
}

app.post("/api/tools/run", async (req, res) => {
  const { tool, args, user_confirmed } = req.body || {};

  if (!TOOL_ALLOWLIST[tool]) return res.status(400).json({ error: "Tool not allowed" });

  if (TOOL_ALLOWLIST[tool].destructive && user_confirmed !== true) {
    return res.status(400).json({ error: "Confirmation required" });
  }

  try {
    const started = Date.now();
    const result = await runToolSafely(tool, args);
    console.log("[tool_call]", { tool, ms: Date.now() - started }); // audit log
    res.json({ ok: true, result });
  } catch (err) {
    console.log("[tool_error]", { tool, err: String(err) });
    res.status(500).json({ ok: false, error: "Tool call failed" });
  }
});
Step 6: Add post-call processing (where durable value appears)

After a call ends, generate structured artifacts:
summary
action items
follow-up email draft
CRM entry or ticket creation
A production pattern:
store transcript + metadata
enqueue a background job (queue/worker)
produce outputs as JSON + a human-readable report
apply integrations with retries + idempotency
store a “call report” for audits and incident reviews
Create a post-call webhook endpoint (example)
Paste into server.js:
app.post("/webhooks/call-ended", async (req, res) => {
  const payload = req.body;

  console.log("[call_ended]", {
    call_id: payload.call_id,
    ended_at: payload.ended_at,
  });

  setImmediate(() => processPostCall(payload));
  res.json({ ok: true });
});

function processPostCall(payload) {
  const transcript = payload.transcript || [];
  const summary = transcript.slice(0, 3).map(t => `- \({t.speaker}: \){t.text}`).join("\n");

  const report = {
    call_id: payload.call_id,
    summary,
    action_items: payload.action_items || [],
    created_at: new Date().toISOString(),
  };

  console.log("[call_report]", report);
}
Test it locally
curl -X POST http://localhost:3000/webhooks/call-ended \
  -H "Content-Type: application/json" \
  -d '{
    "call_id": "call_123",
    "ended_at": "2026-02-26T00:10:00Z",
    "transcript": [
      {"speaker": "user", "text": "I need help resetting my password."},
      {"speaker": "agent", "text": "Sure — I can help with that."}
    ],
    "action_items": ["Send password reset link", "Verify account email"]
  }'
Production readiness checklist
Security
no API keys in the browser
strict allowlist for client actions
confirmation gates for destructive actions
schema validation on all inbound messages
audit logging for actions and tool calls
Reliability
reconnect strategy for expired tokens
timeouts + circuit breakers for tools
graceful degradation when dependencies fail
idempotent side effects
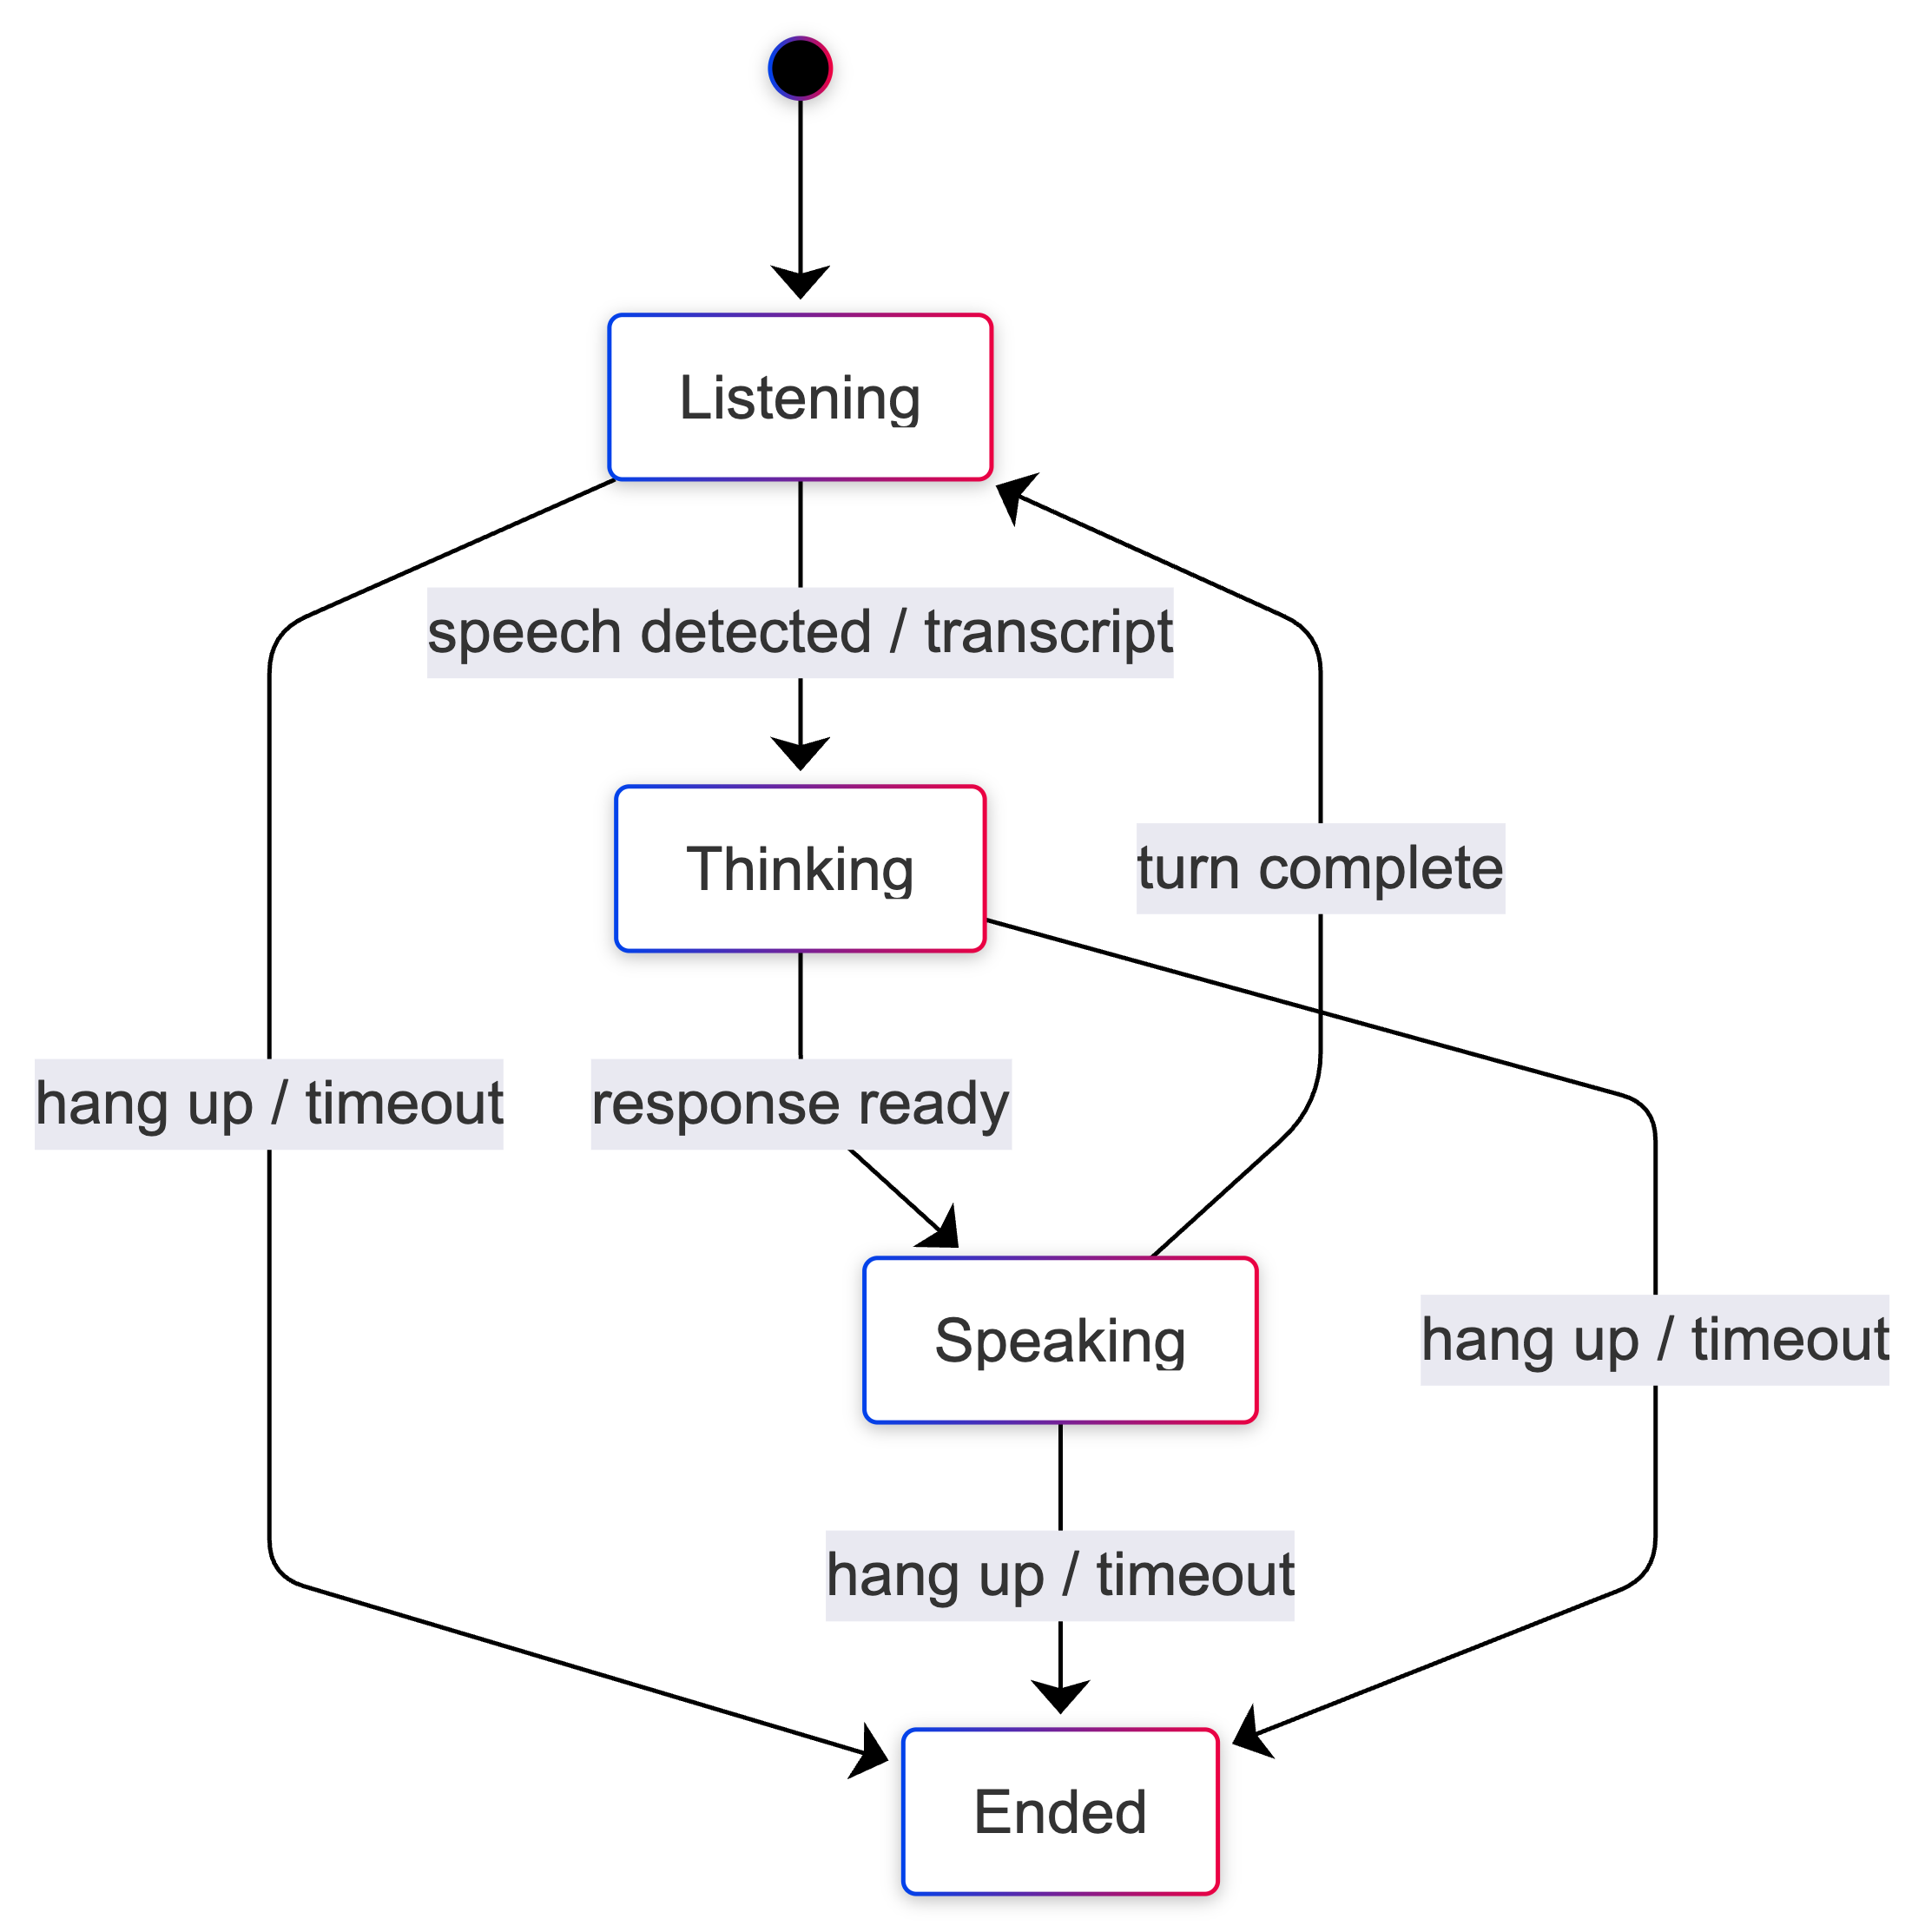
Observability
Log state transitions (for example):
listening → thinking → speaking → ended
Track:
connect failure rate
end-to-end latency (STT + reasoning + TTS)
tool error rate
reconnect frequency
Cost control
rate-limit token minting and sessions
cap max call duration
bound context growth (summarize or truncate)
track per-call usage drivers (STT/TTS minutes, tool calls)
Optional resources
How to Try a Managed Voice Platform Quickly
If you want a managed provider to test quickly, you can sign up for a Vocal Bridge account and implement these steps using their token minting + real-time session APIs.
But the core production voice agent architecture in this article is vendor-agnostic. You can replace any component (SFU, STT/TTS, agent runtime, tool layer) as long as you preserve the boundaries: secure token service, real-time media, safe tool execution, and strong observability.
Watch a full demo and explore a complete reference repo
If you'd like to see these patterns working together in a realistic scenario (incident triage), here are two optional resources:
- Demo video: Voice-First Incident Triage (end-to-end run)
This is a hackathon run-through showing client actions, decision boundaries for irreversible actions, and a structured post-call summary.
- GitHub repo (architecture + design + working code): https://github.com/natarajsundar/voice-first-incident-triage
These links are optional, you can follow the tutorial end-to-end without them.
Closing
Production-ready voice agents work when you treat them like real-time distributed systems.
Start with the baseline:
- token service + web client + real-time audio
Then layer in:
controlled client actions
safe tools
post-call automation
observability and cost controls
That’s how you ship a voice agent architecture you can operate. You now have a vendor-neutral reference architecture you can adapt to your stack, with clear trust boundaries, safe tool execution, and operational visibility.
If you’re shipping real-time AI systems, what’s been your biggest production bottleneck so far: latency, reliability, or tool safety? I’d love to hear what you’re seeing in the wild. Connect with me on LinkedIn.