By Manu Arora
An online code execution platform lets you write code in your favourite programming language and run that code on the same platform.
You can ideally see an output of the program that you've written (for example, a binary search program written in JavaScript).
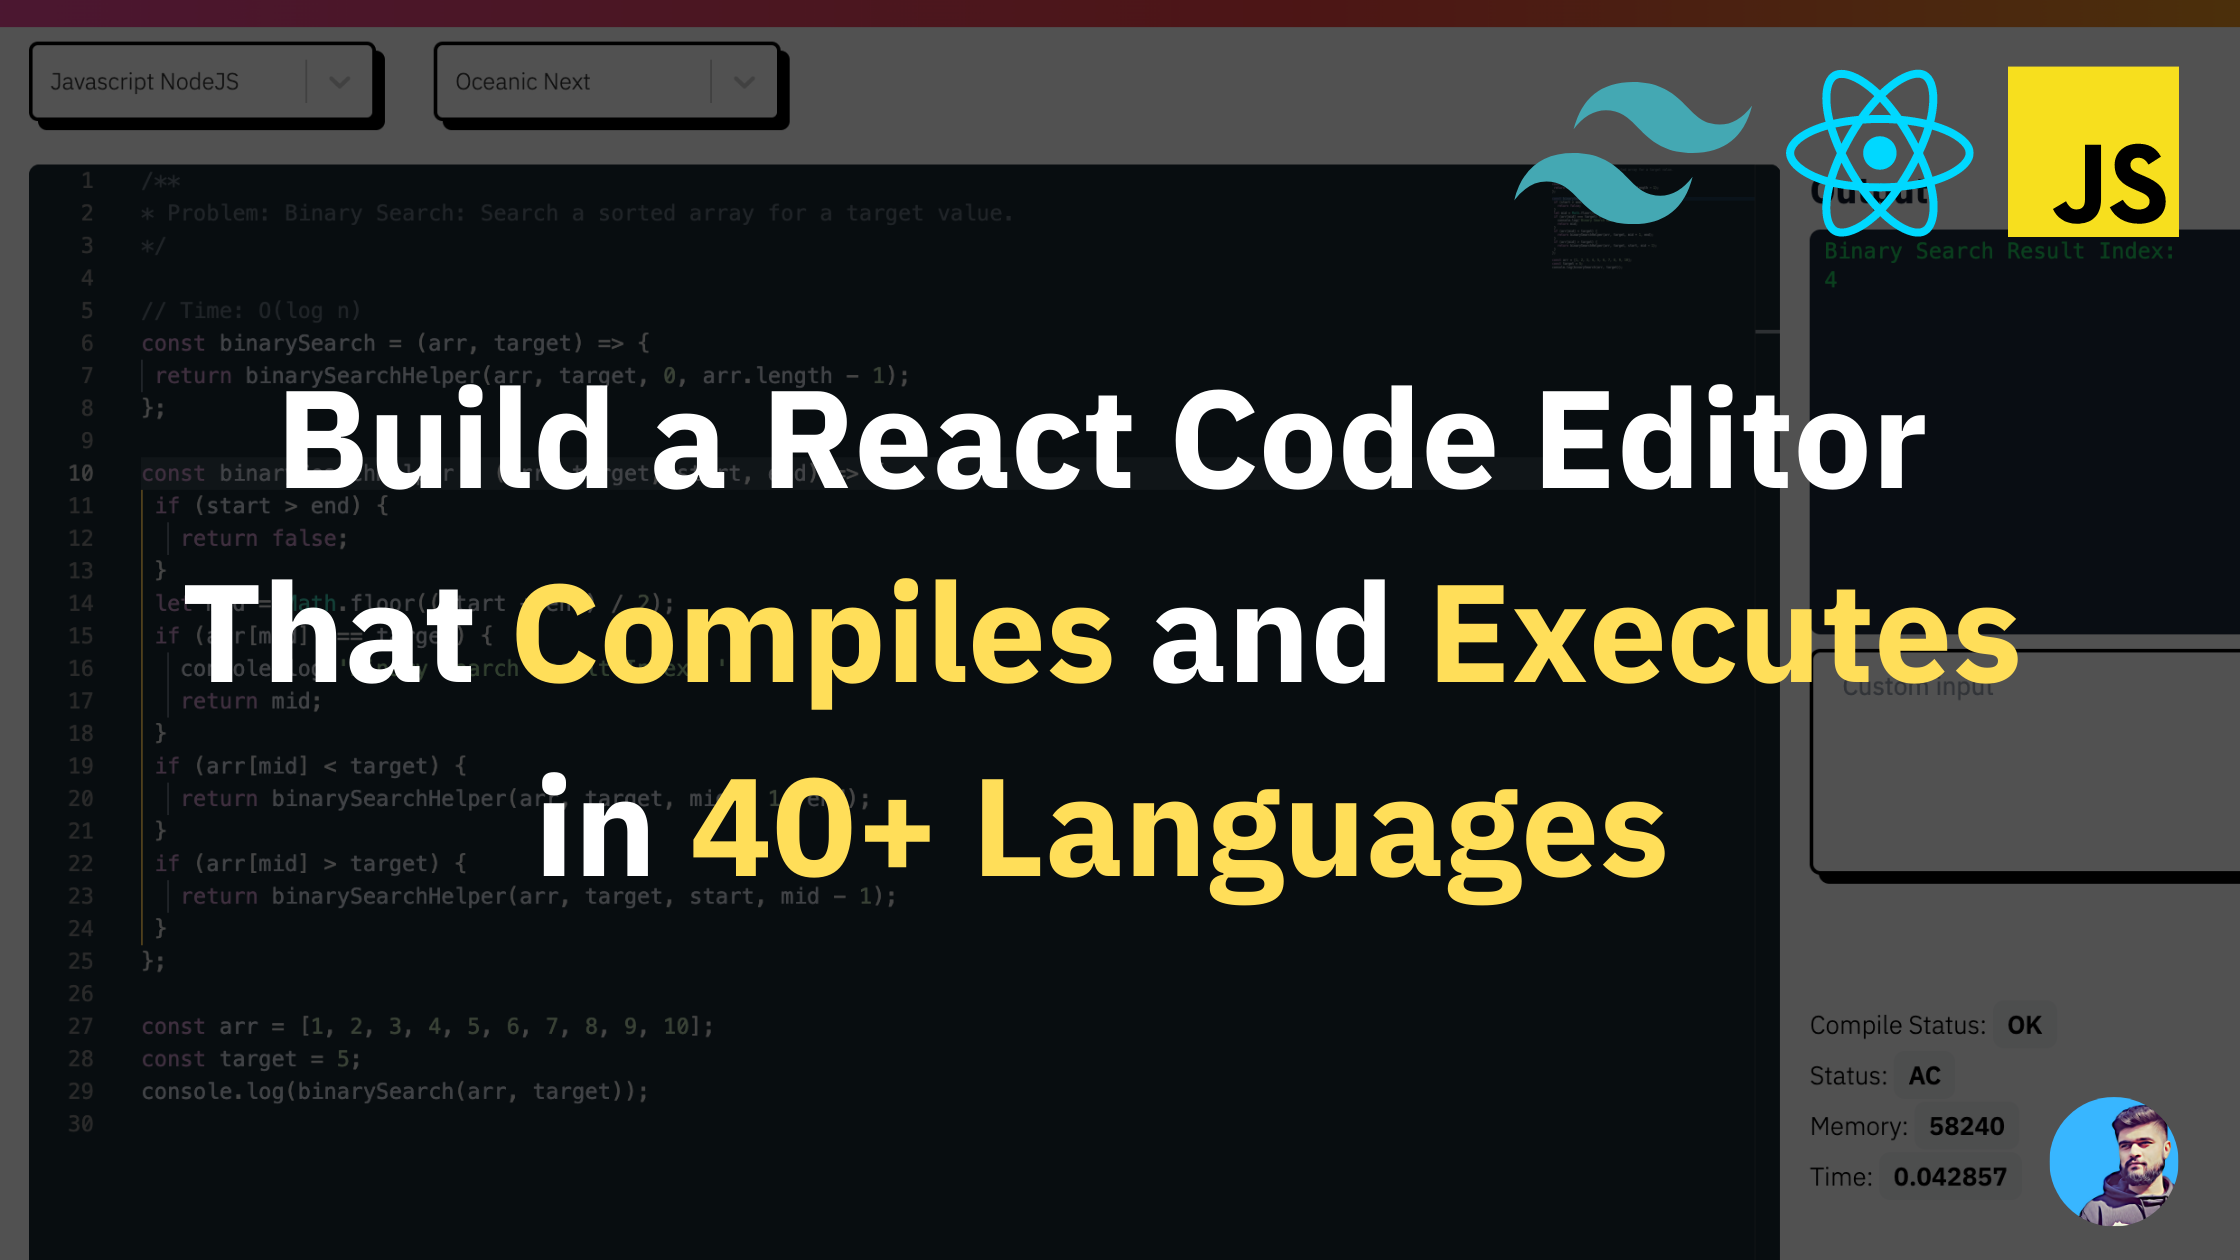
Today, we are going to build an online code execution platform called CodeRush that can compile and execute code in 40+ different programming languages.
What are we building?

We are going to build a rich code editor that has the following features:
- A Code Editor (Monaco Editor) that powers VS Code too.
- It can compile code on a web app with standard input and output with support to over 40 programming languages.
- You can change the theme of the editor from a list of available themes.
- You can get information on the code executed (time taken by the code, memory used, status, and more).
Tech Stack
For the project, we are going to use the following tech stack:
- React.js – For the front-end
- TailwindCSS – For styles
- Judge0 – For compiling and executing our code.
- RapidAPI – For quickly deploying Judge0 code.
- Monaco Editor – The code editor that powers the project
Project Structure
The project structure is fairly simple and easy to understand:
- Components: All the components / reusable code snippets live here (Example: CodeEditorWindow and Landing)
- hooks: All the custom hooks are present here. (We are going to use keypress hooks to compile our code using keyboard events)
- lib: All the library functions live here. (We'll create a function to define our theme here)
- constants: All the constants like
languageOptionsandcustomStylesfor dropdowns will go here. - utils: General utility functions to help maintain the code go here.
Flow of the application:
Before we dive deep into the code, let's understand the flow of the application and how we should go about coding it from scratch.
- A user lands on the web application and can select their preferred programming languages (default is JavaScript).
- Once the user is done writing their code, they can compile their code and see the output / results in the output window.
- They'll either see success or failure for their code snippets. Everything is visible in the code output window.
- The user can add custom inputs to their code snippets, and the judge (our online compiler) will take into account the custom input which the user supplies.
- The user can see relevant details of the code that was executed (Example: It took 5ms for the code to compile and execute, 2024 kb of memory was used, and the runtime status was a success).
Now that we are a bit more familiar with the folder structure and the flow of the application, let's dive into the code and understand how everything works.
How to Build the Code Editor Component
The code editor component primarily consists of the Monaco Editor, which is an NPM package that we can use and customize.
// CodeEditorWindow.js

import React, { useState } from "react";

import Editor from "@monaco-editor/react";

const CodeEditorWindow = ({ onChange, language, code, theme }) => {
  const [value, setValue] = useState(code || "");

  const handleEditorChange = (value) => {
    setValue(value);
    onChange("code", value);
  };

  return (
    <div className="overlay rounded-md overflow-hidden w-full h-full shadow-4xl">
      <Editor
        height="85vh"
        width={`100%`}
        language={language || "javascript"}
        value={value}
        theme={theme}
        defaultValue="// some comment"
        onChange={handleEditorChange}
      />
    </div>
  );
};
export default CodeEditorWindow;
The Editor components comes from the @monaco-editor/react package that lets us spin up a code editor with 85vh height as specified.
The Editor component takes in a bunch of props:
language: The language for which we require syntax highlighting and intellisense.theme: The colors and background of code snippet (we'll configure it in the later part of the tutorial).value: The actual code value that goes into the code editoronChange: This is triggered when the value in the code editor changes. We need to save the changed value in the state so that we can, later on, call theJudge0API to compile it.
The editor receives the props onChange, language, code, and theme from its parent component, which is Landing.js. Every time the value in the code editor changes, we call the onChange handler that is present in the parent Landing component.
How to Build the Landing Component
The landing component mostly consists of 3 parts:
- The
Actions Barwhich has theLanguagesandThemesdrop-downs components. - The
Code Editor Windowcomponent - The
Output and Custom Inputcomponents
// Landing.js

import React, { useEffect, useState } from "react";
import CodeEditorWindow from "./CodeEditorWindow";
import axios from "axios";
import { classnames } from "../utils/general";
import { languageOptions } from "../constants/languageOptions";

import { ToastContainer, toast } from "react-toastify";
import "react-toastify/dist/ReactToastify.css";

import { defineTheme } from "../lib/defineTheme";
import useKeyPress from "../hooks/useKeyPress";
import Footer from "./Footer";
import OutputWindow from "./OutputWindow";
import CustomInput from "./CustomInput";
import OutputDetails from "./OutputDetails";
import ThemeDropdown from "./ThemeDropdown";
import LanguagesDropdown from "./LanguagesDropdown";

const javascriptDefault = `// some comment`;

const Landing = () => {
  const [code, setCode] = useState(javascriptDefault);
  const [customInput, setCustomInput] = useState("");
  const [outputDetails, setOutputDetails] = useState(null);
  const [processing, setProcessing] = useState(null);
  const [theme, setTheme] = useState("cobalt");
  const [language, setLanguage] = useState(languageOptions[0]);

  const enterPress = useKeyPress("Enter");
  const ctrlPress = useKeyPress("Control");

  const onSelectChange = (sl) => {
    console.log("selected Option...", sl);
    setLanguage(sl);
  };

  useEffect(() => {
    if (enterPress && ctrlPress) {
      console.log("enterPress", enterPress);
      console.log("ctrlPress", ctrlPress);
      handleCompile();
    }
  }, [ctrlPress, enterPress]);
  const onChange = (action, data) => {
    switch (action) {
      case "code": {
        setCode(data);
        break;
      }
      default: {
        console.warn("case not handled!", action, data);
      }
    }
  };
  const handleCompile = () => {
    // We will come to the implementation later in the code
  };

  const checkStatus = async (token) => {
    // We will come to the implementation later in the code
  };

  function handleThemeChange(th) {
    // We will come to the implementation later in the code
  }
  useEffect(() => {
    defineTheme("oceanic-next").then((_) =>
      setTheme({ value: "oceanic-next", label: "Oceanic Next" })
    );
  }, []);

  const showSuccessToast = (msg) => {
    toast.success(msg || `Compiled Successfully!`, {
      position: "top-right",
      autoClose: 1000,
      hideProgressBar: false,
      closeOnClick: true,
      pauseOnHover: true,
      draggable: true,
      progress: undefined,
    });
  };
  const showErrorToast = (msg) => {
    toast.error(msg || `Something went wrong! Please try again.`, {
      position: "top-right",
      autoClose: 1000,
      hideProgressBar: false,
      closeOnClick: true,
      pauseOnHover: true,
      draggable: true,
      progress: undefined,
    });
  };

  return (
    <>
      <ToastContainer
        position="top-right"
        autoClose={2000}
        hideProgressBar={false}
        newestOnTop={false}
        closeOnClick
        rtl={false}
        pauseOnFocusLoss
        draggable
        pauseOnHover
      />
      <div className="h-4 w-full bg-gradient-to-r from-pink-500 via-red-500 to-yellow-500"></div>
      <div className="flex flex-row">
        <div className="px-4 py-2">
          <LanguagesDropdown onSelectChange={onSelectChange} />
        </div>
        <div className="px-4 py-2">
          <ThemeDropdown handleThemeChange={handleThemeChange} theme={theme} />
        </div>
      </div>
      <div className="flex flex-row space-x-4 items-start px-4 py-4">
        <div className="flex flex-col w-full h-full justify-start items-end">
          <CodeEditorWindow
            code={code}
            onChange={onChange}
            language={language?.value}
            theme={theme.value}
          />
        </div>

        <div className="right-container flex flex-shrink-0 w-[30%] flex-col">
          <OutputWindow outputDetails={outputDetails} />
          <div className="flex flex-col items-end">
            <CustomInput
              customInput={customInput}
              setCustomInput={setCustomInput}
            />
            <button
              onClick={handleCompile}
              disabled={!code}
              className={classnames(
                "mt-4 border-2 border-black z-10 rounded-md shadow-[5px_5px_0px_0px_rgba(0,0,0)] px-4 py-2 hover:shadow transition duration-200 bg-white flex-shrink-0",
                !code ? "opacity-50" : ""
              )}
            >
              {processing ? "Processing..." : "Compile and Execute"}
            </button>
          </div>
          {outputDetails && <OutputDetails outputDetails={outputDetails} />}
        </div>
      </div>
      <Footer />
    </>
  );
};
export default Landing;
Let's understand the basic structure of the landing page in more detail.
CodeEditorWindow component
As we looked at it before, the CodeEditorWindow component will take into account the code (which keeps on changing) and an onChange method which will keep track of the changes in the code.
// onChange method implementation

 const onChange = (action, data) => {
    switch (action) {
      case "code": {
        setCode(data);
        break;
      }
      default: {
        console.warn("case not handled!", action, data);
      }
    }
  };
We simply set the state of the code and keep track of the changes.
The CodeEditorWindow component also takes into account the language prop, which is the current selected language we need syntax highlighting and intellisense for.
I've created a languageOptions array which keeps track of the accepted language props by the Monaco Editor and also handles the compilation (we keep track of the languageId that is accepted by judge0 APIs).
// constants/languageOptions.js

export const languageOptions = [
  {
    id: 63,
    name: "JavaScript (Node.js 12.14.0)",
    label: "JavaScript (Node.js 12.14.0)",
    value: "javascript",
  },
  {
    id: 45,
    name: "Assembly (NASM 2.14.02)",
    label: "Assembly (NASM 2.14.02)",
    value: "assembly",
  },
    ...
    ...
    ...
    ...
    ...
    ...

  {
    id: 84,
    name: "Visual Basic.Net (vbnc 0.0.0.5943)",
    label: "Visual Basic.Net (vbnc 0.0.0.5943)",
    value: "vbnet",
  },
];
Every languageOptions object contains an id, name, label and value keys. The entire languageOptions array can be taken and put inside the dropdown and supplied as options.
Whenever the state of the dropdown changes, the onSelectChange method keeps track of the selected id and changes the state appropriately.
LanguageDropdown component

// LanguageDropdown.js

import React from "react";
import Select from "react-select";
import { customStyles } from "../constants/customStyles";
import { languageOptions } from "../constants/languageOptions";

const LanguagesDropdown = ({ onSelectChange }) => {
  return (
    <Select
      placeholder={`Filter By Category`}
      options={languageOptions}
      styles={customStyles}
      defaultValue={languageOptions[0]}
      onChange={(selectedOption) => onSelectChange(selectedOption)}
    />
  );
};

export default LanguagesDropdown;
For the dropdown, we are going to use the package react-select that takes care of the dropdowns and their change handlers.
React select takes defaultValue and options as the major parameters. options is an array (and we are going to pass languageOptions here) that automatically shows all the relevant dropdown values.
The defaultValue prop is the default value which is provided to the component. We are going to keep JavaScript as the default language (which is the first one in our array of languages).
Whenever the user changes the language, we change the language with the onSelectChange callback:
const onSelectChange = (sl) => {
    setLanguage(sl);
};
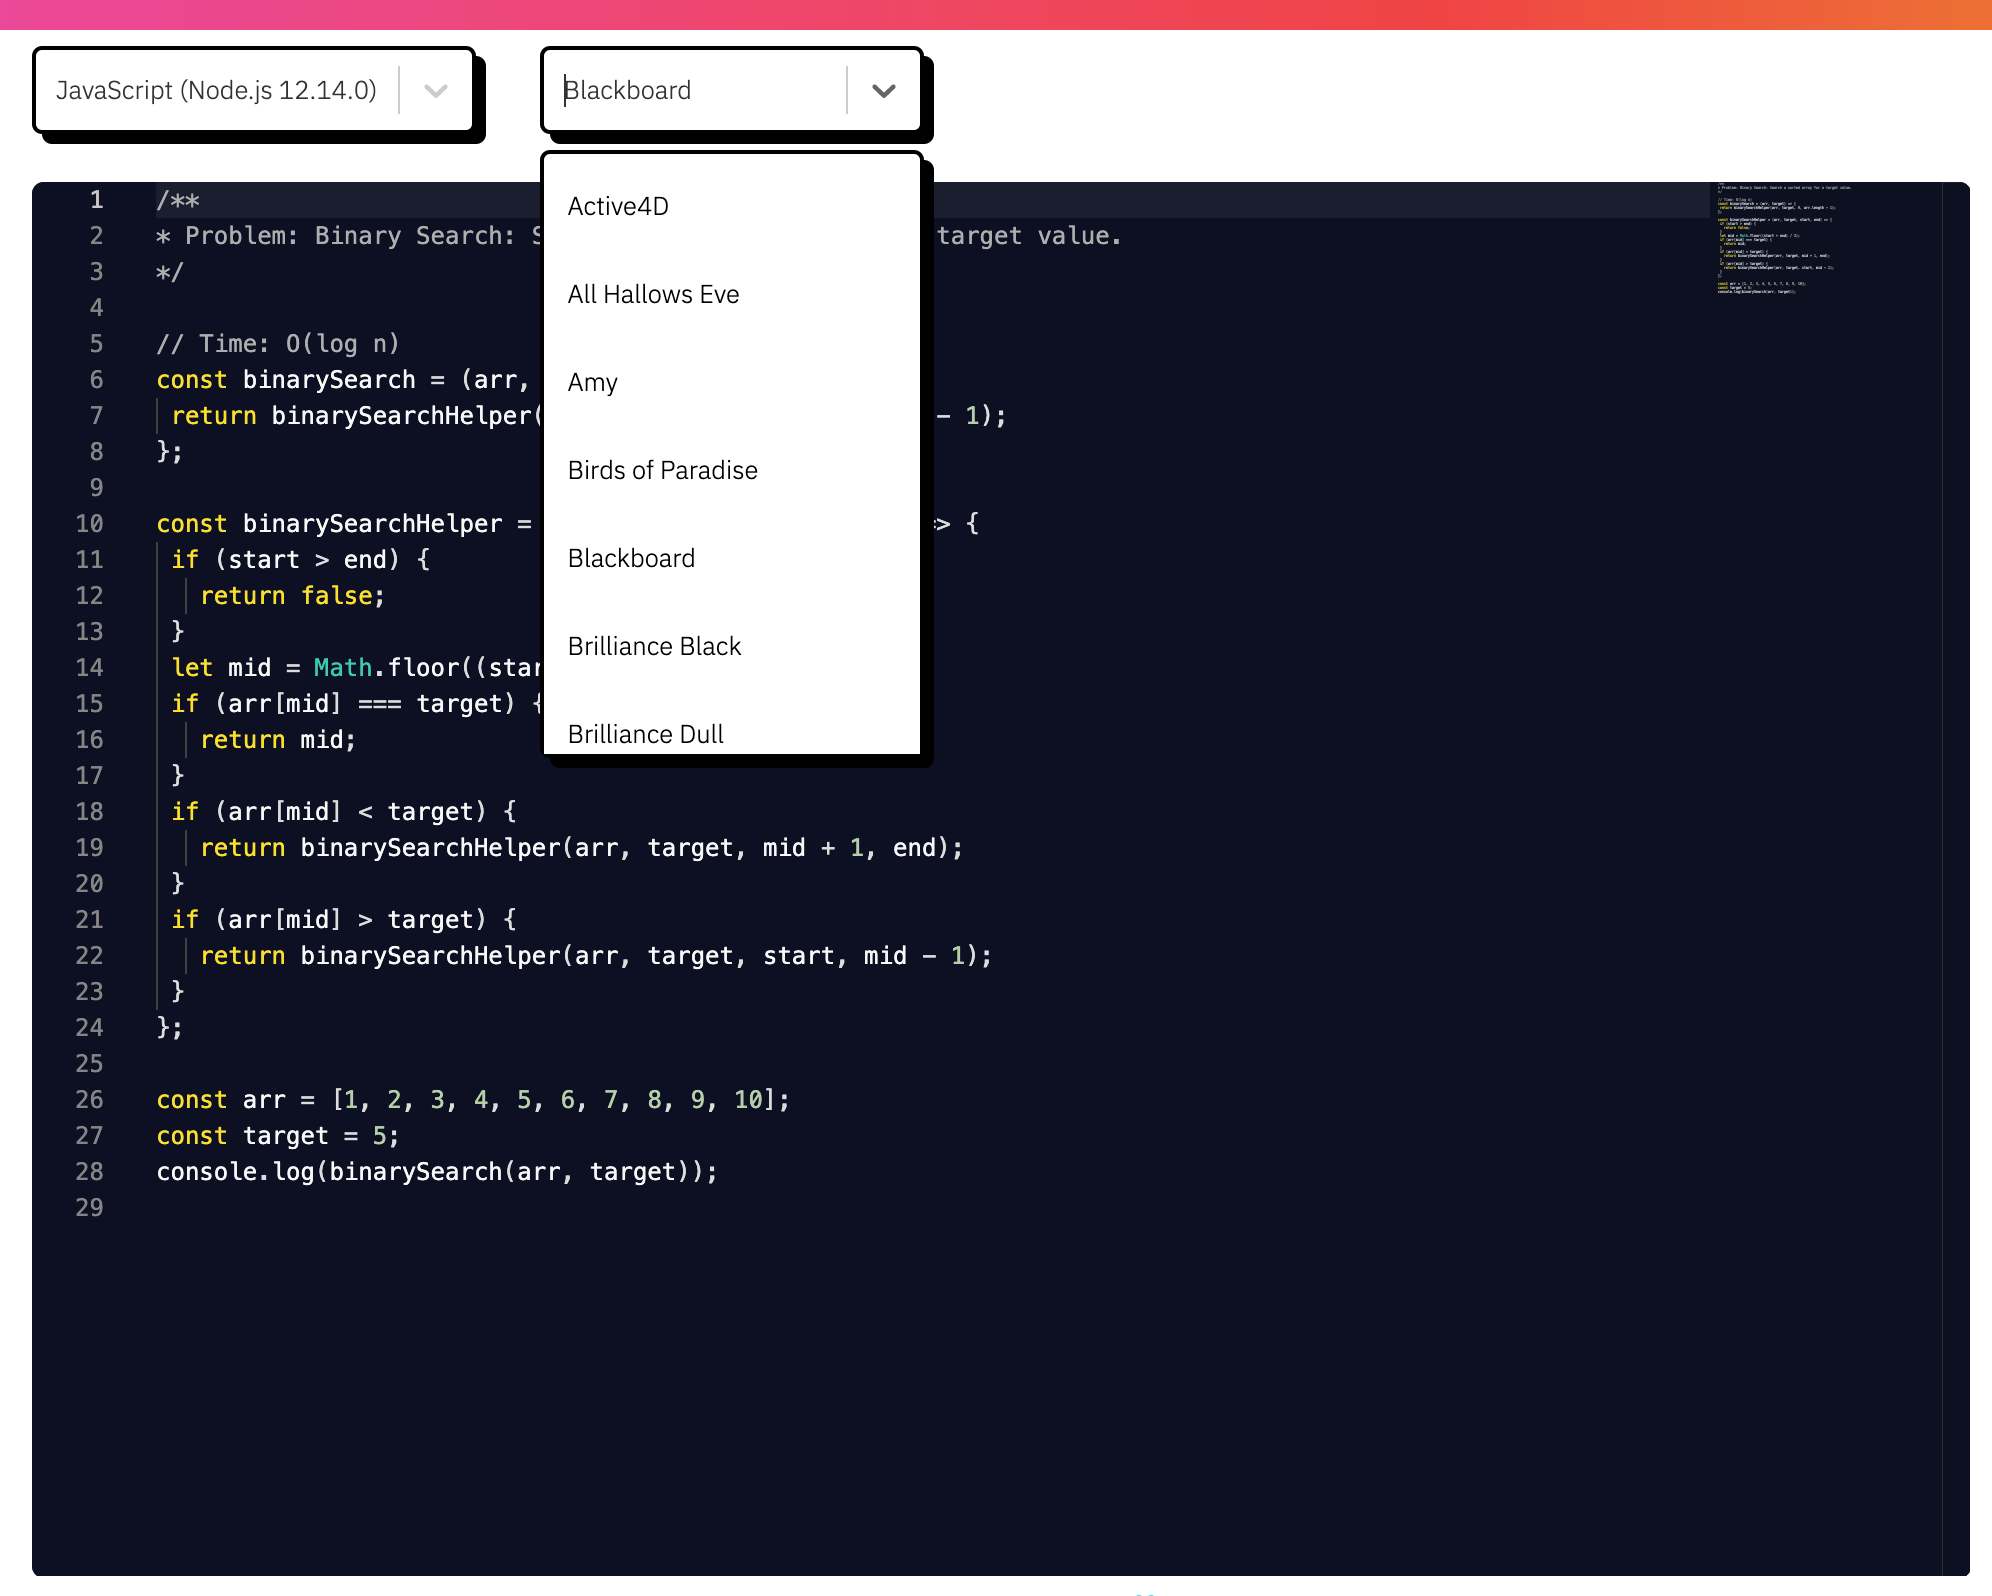
ThemeDropdown Component

The ThemeDropdown component is actually very similar to the LanguageDropdown component (with the UI and react-select package).
// ThemeDropdown.js

import React from "react";
import Select from "react-select";
import monacoThemes from "monaco-themes/themes/themelist";
import { customStyles } from "../constants/customStyles";

const ThemeDropdown = ({ handleThemeChange, theme }) => {
  return (
    <Select
      placeholder={`Select Theme`}
      // options={languageOptions}
      options={Object.entries(monacoThemes).map(([themeId, themeName]) => ({
        label: themeName,
        value: themeId,
        key: themeId,
      }))}
      value={theme}
      styles={customStyles}
      onChange={handleThemeChange}
    />
  );
};

export default ThemeDropdown;
Here, we are going to use the package monacoThemes to help us with the different beautiful themes available on the internet for Monaco Editor.
We have got a list of themes available at our disposal.
// lib/defineTheme.js

import { loader } from "@monaco-editor/react";

const monacoThemes = {
  active4d: "Active4D",
  "all-hallows-eve": "All Hallows Eve",
  amy: "Amy",
  "birds-of-paradise": "Birds of Paradise",
  blackboard: "Blackboard",
  "brilliance-black": "Brilliance Black",
  "brilliance-dull": "Brilliance Dull",
  "chrome-devtools": "Chrome DevTools",
  "clouds-midnight": "Clouds Midnight",
  clouds: "Clouds",
  cobalt: "Cobalt",
  dawn: "Dawn",
  dreamweaver: "Dreamweaver",
  eiffel: "Eiffel",
  "espresso-libre": "Espresso Libre",
  github: "GitHub",
  idle: "IDLE",
  katzenmilch: "Katzenmilch",
  "kuroir-theme": "Kuroir Theme",
  lazy: "LAZY",
  "magicwb--amiga-": "MagicWB (Amiga)",
  "merbivore-soft": "Merbivore Soft",
  merbivore: "Merbivore",
  "monokai-bright": "Monokai Bright",
  monokai: "Monokai",
  "night-owl": "Night Owl",
  "oceanic-next": "Oceanic Next",
  "pastels-on-dark": "Pastels on Dark",
  "slush-and-poppies": "Slush and Poppies",
  "solarized-dark": "Solarized-dark",
  "solarized-light": "Solarized-light",
  spacecadet: "SpaceCadet",
  sunburst: "Sunburst",
  "textmate--mac-classic-": "Textmate (Mac Classic)",
  "tomorrow-night-blue": "Tomorrow-Night-Blue",
  "tomorrow-night-bright": "Tomorrow-Night-Bright",
  "tomorrow-night-eighties": "Tomorrow-Night-Eighties",
  "tomorrow-night": "Tomorrow-Night",
  tomorrow: "Tomorrow",
  twilight: "Twilight",
  "upstream-sunburst": "Upstream Sunburst",
  "vibrant-ink": "Vibrant Ink",
  "xcode-default": "Xcode_default",
  zenburnesque: "Zenburnesque",
  iplastic: "iPlastic",
  idlefingers: "idleFingers",
  krtheme: "krTheme",
  monoindustrial: "monoindustrial",
};

const defineTheme = (theme) => {
  return new Promise((res) => {
    Promise.all([
      loader.init(),
      import(`monaco-themes/themes/${monacoThemes[theme]}.json`),
    ]).then(([monaco, themeData]) => {
      monaco.editor.defineTheme(theme, themeData);
      res();
    });
  });
};

export { defineTheme };
The monaco-themes package provides us with a bunch of themes that we can use to define how our code editor is going to look.
The defineTheme function takes care of the different themes that the user might select from. The defineTheme function returns a promise that actually sets the Monaco editor theme by using the monaco.editor.defineTheme(theme, themeData) action. This line of code is responsible for actually changing the themes inside a Monaco Editor code window.
The defineTheme function gets called with the help of the onChange callback that we saw earlier in the ThemeDropdown.js component.
// Landing.js - handleThemeChange() function

function handleThemeChange(th) {
    const theme = th;
    console.log("theme...", theme);

    if (["light", "vs-dark"].includes(theme.value)) {
      setTheme(theme);
    } else {
      defineTheme(theme.value).then((_) => setTheme(theme));
    }
  }
The handleThemeChange() function checks if the theme is light or dark. These themes are by default available on the MonacoEditor component and we don't need to call the defineTheme() method for it.
If not, we simply call the defineTheme() component and set the selected theme state.
How to Compile the Code with Judge0
Let's get into the meaty part of the application – that is compiling the code with different languages.
For compiling our code, we are going to use Judge0. Judge0 is a simple, open-source code execution system that we can interact with.
We can make a simple API call with some parameters (source code, language ID) and get the output as a response.
Let's setup Judge0 and get into the next steps:
- Head over to Judge0 and choose the Basic Plan
- Judge0 is actually hosted on RapidAPI. Go ahead and subscribe to the basic plan.
- Once you're subscribed, you can copy the
RAPIDAPI_HOSTandRAPIDAPI_KEYwhich are necessary to make the API calls to our code execution system.
The dashboard looks something like this:
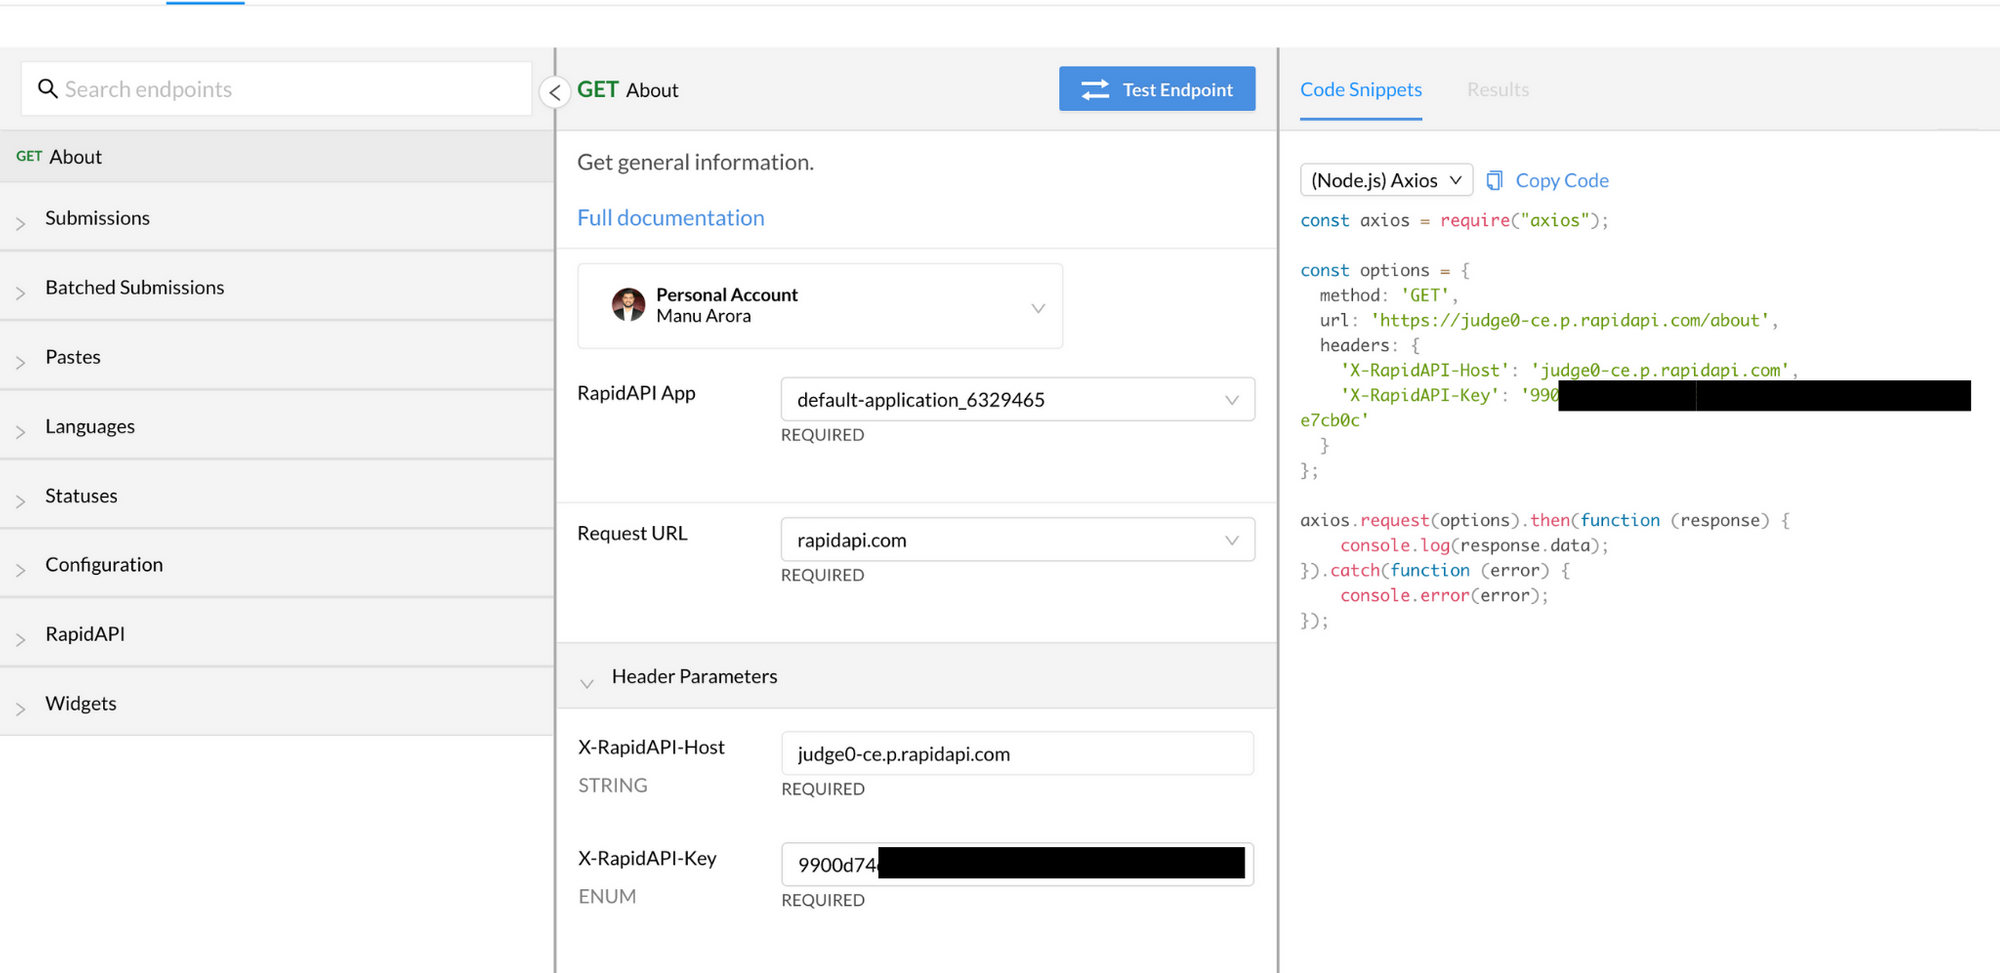
The X-RapidAPI-Host and X-RapidAPI-Key parameters will be required for our API calls. Save it for future use in .env files as:
REACT_APP_RAPID_API_HOST = YOUR_HOST_URL
REACT_APP_RAPID_API_KEY = YOUR_SECRET_KEY
REACT_APP_RAPID_API_URL = YOUR_SUBMISSIONS_URL
It is important in React that we initialize our environment variables with the REACT_APP prefix.
The SUBMISSIONS_URL is the URL that we are going to use. It basically consists of your host , followed by the /submission route.
For example: https://judge0-ce.p.rapidapi.com/submissions will be the submissions URL in our case.
Once we have the variables correctly setup, we can go ahead and handle the compilation logic.
Compilation Flow and Logic
The flow of compiling is as follows:
- When the button
Compile and Executeis clicked, a methodhandleCompile()is called. - The
handleCompile()function calls ourJudge0 RapidAPIbackend on thesubmissionsURL withlanguageId,source_code, andstdin(customInput in our case) as the body params. - the
optionsalso takes in thehostand thesecretas headers. base64_encodedandfieldsare optional parameters that can be passed.- The
submissionPOST request registers our request in the server and creates a process. The response of thepostrequest is atokenthat can be further used to check the status of our execution. (There are various statuses – Processing, Accepted, Time Limit Exceeded, Runtime Exceptions and more.) - Once our results are returned, we can conditionally check if the results are success or failure and show the results on our output screens.
Let's get into the code and understand the handleCompile() method.
const handleCompile = () => {
    setProcessing(true);
    const formData = {
      language_id: language.id,
      // encode source code in base64
      source_code: btoa(code),
      stdin: btoa(customInput),
    };
    const options = {
      method: "POST",
      url: process.env.REACT_APP_RAPID_API_URL,
      params: { base64_encoded: "true", fields: "*" },
      headers: {
        "content-type": "application/json",
        "Content-Type": "application/json",
        "X-RapidAPI-Host": process.env.REACT_APP_RAPID_API_HOST,
        "X-RapidAPI-Key": process.env.REACT_APP_RAPID_API_KEY,
      },
      data: formData,
    };

    axios
      .request(options)
      .then(function (response) {
        console.log("res.data", response.data);
        const token = response.data.token;
        checkStatus(token);
      })
      .catch((err) => {
        let error = err.response ? err.response.data : err;
        setProcessing(false);
        console.log(error);
      });
  };
As seen above, the handleCompile() method takes in languageId, source_code and stdin. Note the btoa before source_code and stdin. This is to base64 encode our strings since we are using base64_encoded: true in our params to the API.
When there's a successful response and we have a token, we call the checkStatus() method to poll the /submissions/${token} route.
const checkStatus = async (token) => {
    const options = {
      method: "GET",
      url: process.env.REACT_APP_RAPID_API_URL + "/" + token,
      params: { base64_encoded: "true", fields: "*" },
      headers: {
        "X-RapidAPI-Host": process.env.REACT_APP_RAPID_API_HOST,
        "X-RapidAPI-Key": process.env.REACT_APP_RAPID_API_KEY,
      },
    };
    try {
      let response = await axios.request(options);
      let statusId = response.data.status?.id;

      // Processed - we have a result
      if (statusId === 1 || statusId === 2) {
        // still processing
        setTimeout(() => {
          checkStatus(token)
        }, 2000)
        return
      } else {
        setProcessing(false)
        setOutputDetails(response.data)
        showSuccessToast(`Compiled Successfully!`)
        console.log('response.data', response.data)
        return
      }
    } catch (err) {
      console.log("err", err);
      setProcessing(false);
      showErrorToast();
    }
  };
To get the results of our code that we submitted earlier, we need to poll the submissions API with a token that we received as a response.
As shown above, we are going to make a GET request to the endpoint. Once we have a response, we are checking for statusId === 1 || statusId === 2. But what does it mean?
We have a total of 14 statuses associated with any piece of code that we submit to the API, and those are:
export const statuses = [
  {
    id: 1,
    description: "In Queue",
  },
  {
    id: 2,
    description: "Processing",
  },
  {
    id: 3,
    description: "Accepted",
  },
  {
    id: 4,
    description: "Wrong Answer",
  },
  {
    id: 5,
    description: "Time Limit Exceeded",
  },
  {
    id: 6,
    description: "Compilation Error",
  },
  {
    id: 7,
    description: "Runtime Error (SIGSEGV)",
  },
  {
    id: 8,
    description: "Runtime Error (SIGXFSZ)",
  },
  {
    id: 9,
    description: "Runtime Error (SIGFPE)",
  },
  {
    id: 10,
    description: "Runtime Error (SIGABRT)",
  },
  {
    id: 11,
    description: "Runtime Error (NZEC)",
  },
  {
    id: 12,
    description: "Runtime Error (Other)",
  },
  {
    id: 13,
    description: "Internal Error",
  },
  {
    id: 14,
    description: "Exec Format Error",
  },
];
So, if statusId ===1 OR statusId ===2 that means our code is still processing and we need to call the API again to check if we get any results or not.
Because of this, we have a setTimeout() in the if condition that calls the checkStatus() function again, which internally calls the API again and checks the status.
If the status is anything other that 2 or 3 that means our code's execution has completed and we have a result. Either it is a successfully compiled code or it is Time Limit Exceeded code – or maybe it is Runtime Exception. The statusId represents each scenario and we can replicate these as well.
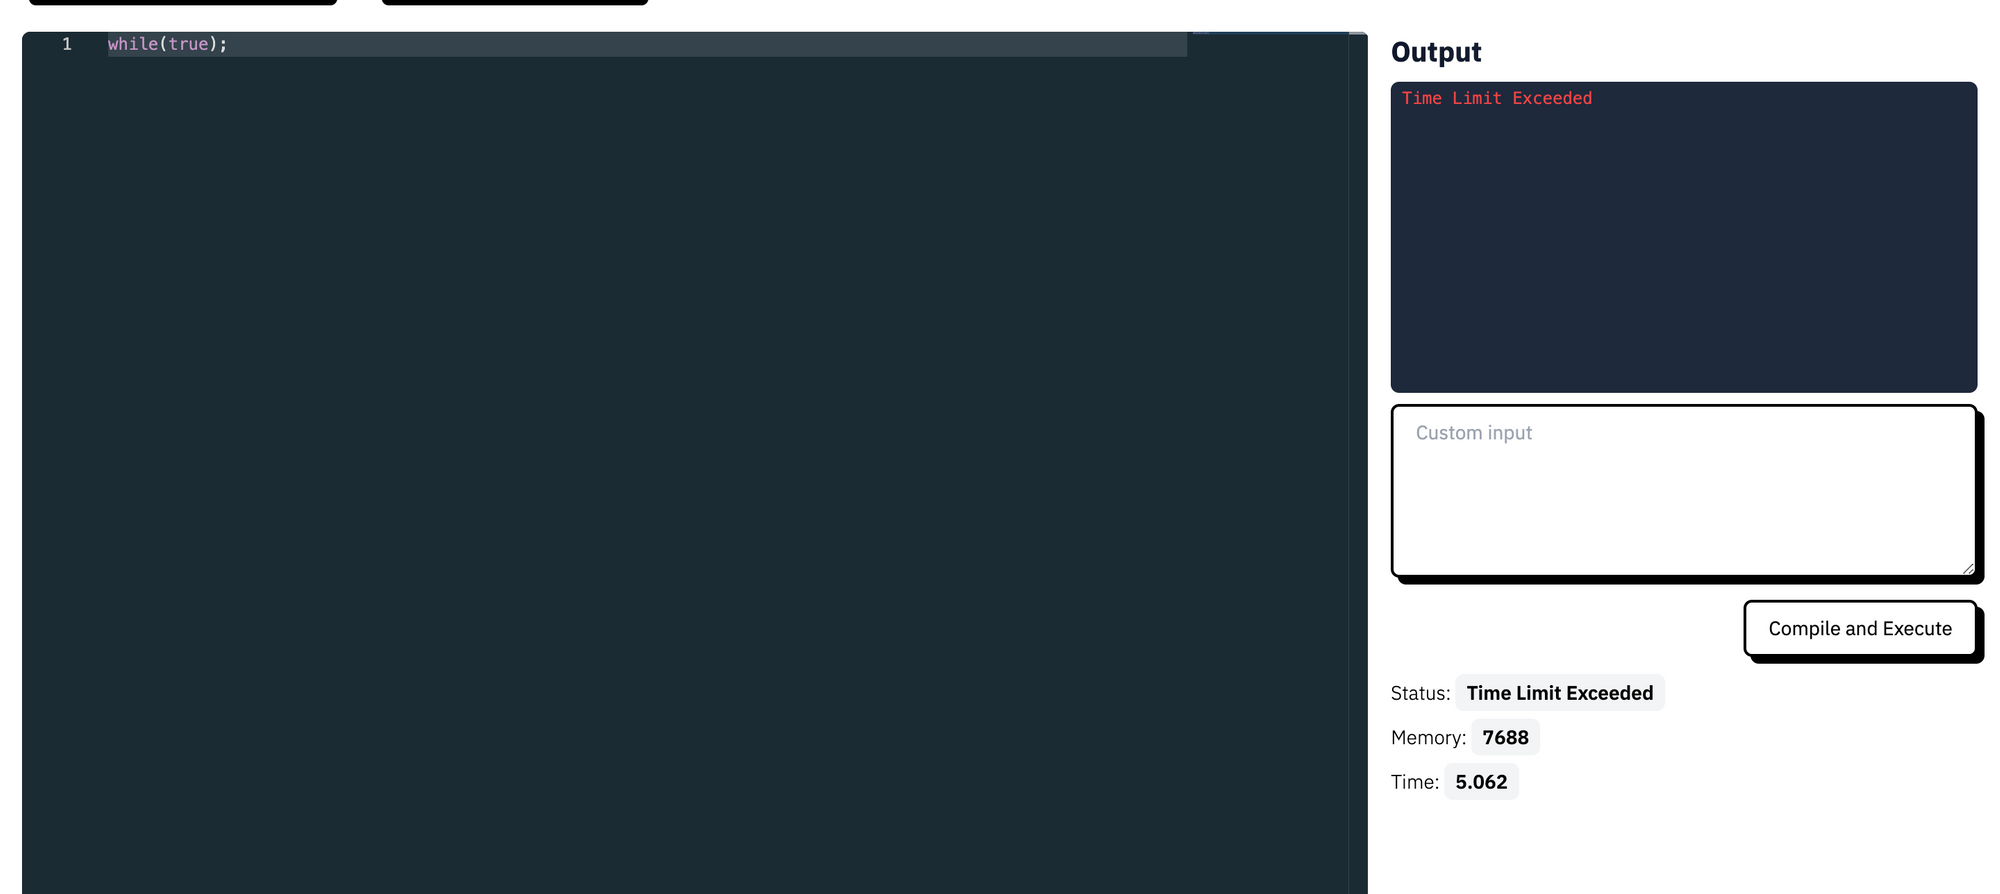
For example, while(true) will give us a time limit exceeded error:
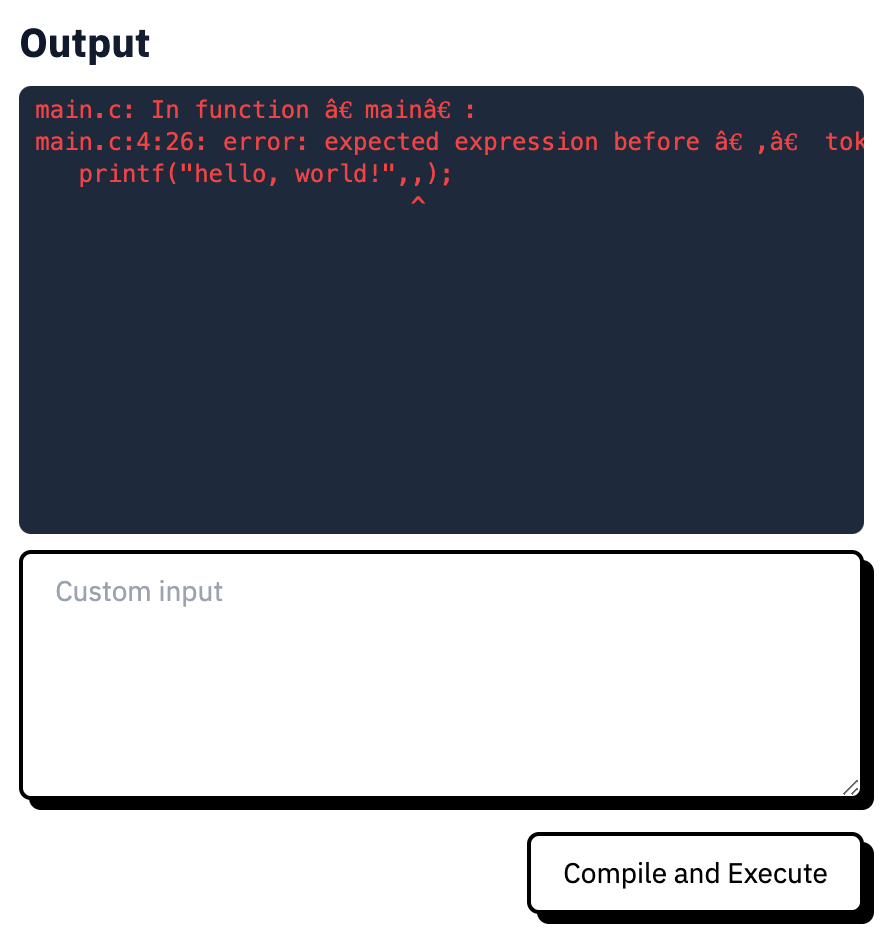
Or if we make an error in the syntax, we will get a compilation error:

Anyhow, we are going to get a result. And we are going to store this result in outputDetails state. This is to ensure that we have something to display in the right side of the screen (which is the Output Window).
Output Window Component
import React from "react";

const OutputWindow = ({ outputDetails }) => {
  const getOutput = () => {
    let statusId = outputDetails?.status?.id;

    if (statusId === 6) {
      // compilation error
      return (
        <pre className="px-2 py-1 font-normal text-xs text-red-500">
          {atob(outputDetails?.compile_output)}
        </pre>
      );
    } else if (statusId === 3) {
      return (
        <pre className="px-2 py-1 font-normal text-xs text-green-500">
          {atob(outputDetails.stdout) !== null
            ? `${atob(outputDetails.stdout)}`
            : null}
        </pre>
      );
    } else if (statusId === 5) {
      return (
        <pre className="px-2 py-1 font-normal text-xs text-red-500">
          {`Time Limit Exceeded`}
        </pre>
      );
    } else {
      return (
        <pre className="px-2 py-1 font-normal text-xs text-red-500">
          {atob(outputDetails?.stderr)}
        </pre>
      );
    }
  };
  return (
    <>
      <h1 className="font-bold text-xl bg-clip-text text-transparent bg-gradient-to-r from-slate-900 to-slate-700 mb-2">
        Output
      </h1>
      <div className="w-full h-56 bg-[#1e293b] rounded-md text-white font-normal text-sm overflow-y-auto">
        {outputDetails ? <>{getOutput()}</> : null}
      </div>
    </>
  );
};

export default OutputWindow;
This is a straightforward component that only displays the appropriate success or failure scenarios.
The getOutput() method determines what the color of the text will look like and what should be printed.
- If
statusIdis6– We have a compilation error. For that, the API returnscompile_outputthat can be used to show the error. - If
statusIdis3– We have a success scenario, which isAccepted. The API returns astdoutwhich stands for Standard Output. This is used to display the data which is returned from the code that we supplied to the API. - If
statusIdis5– We have a Time Limit Exceeded error. We simply display that there's an infinite loop condition in the code OR it exceeds the standard5seconds time for code execution. - For every other status, we are going to get a standard
stderrobject that we can use to display errors. - Notice the
atob()method being used. This is because we get the output as a base64 string. To decode it, we use theatob()method.
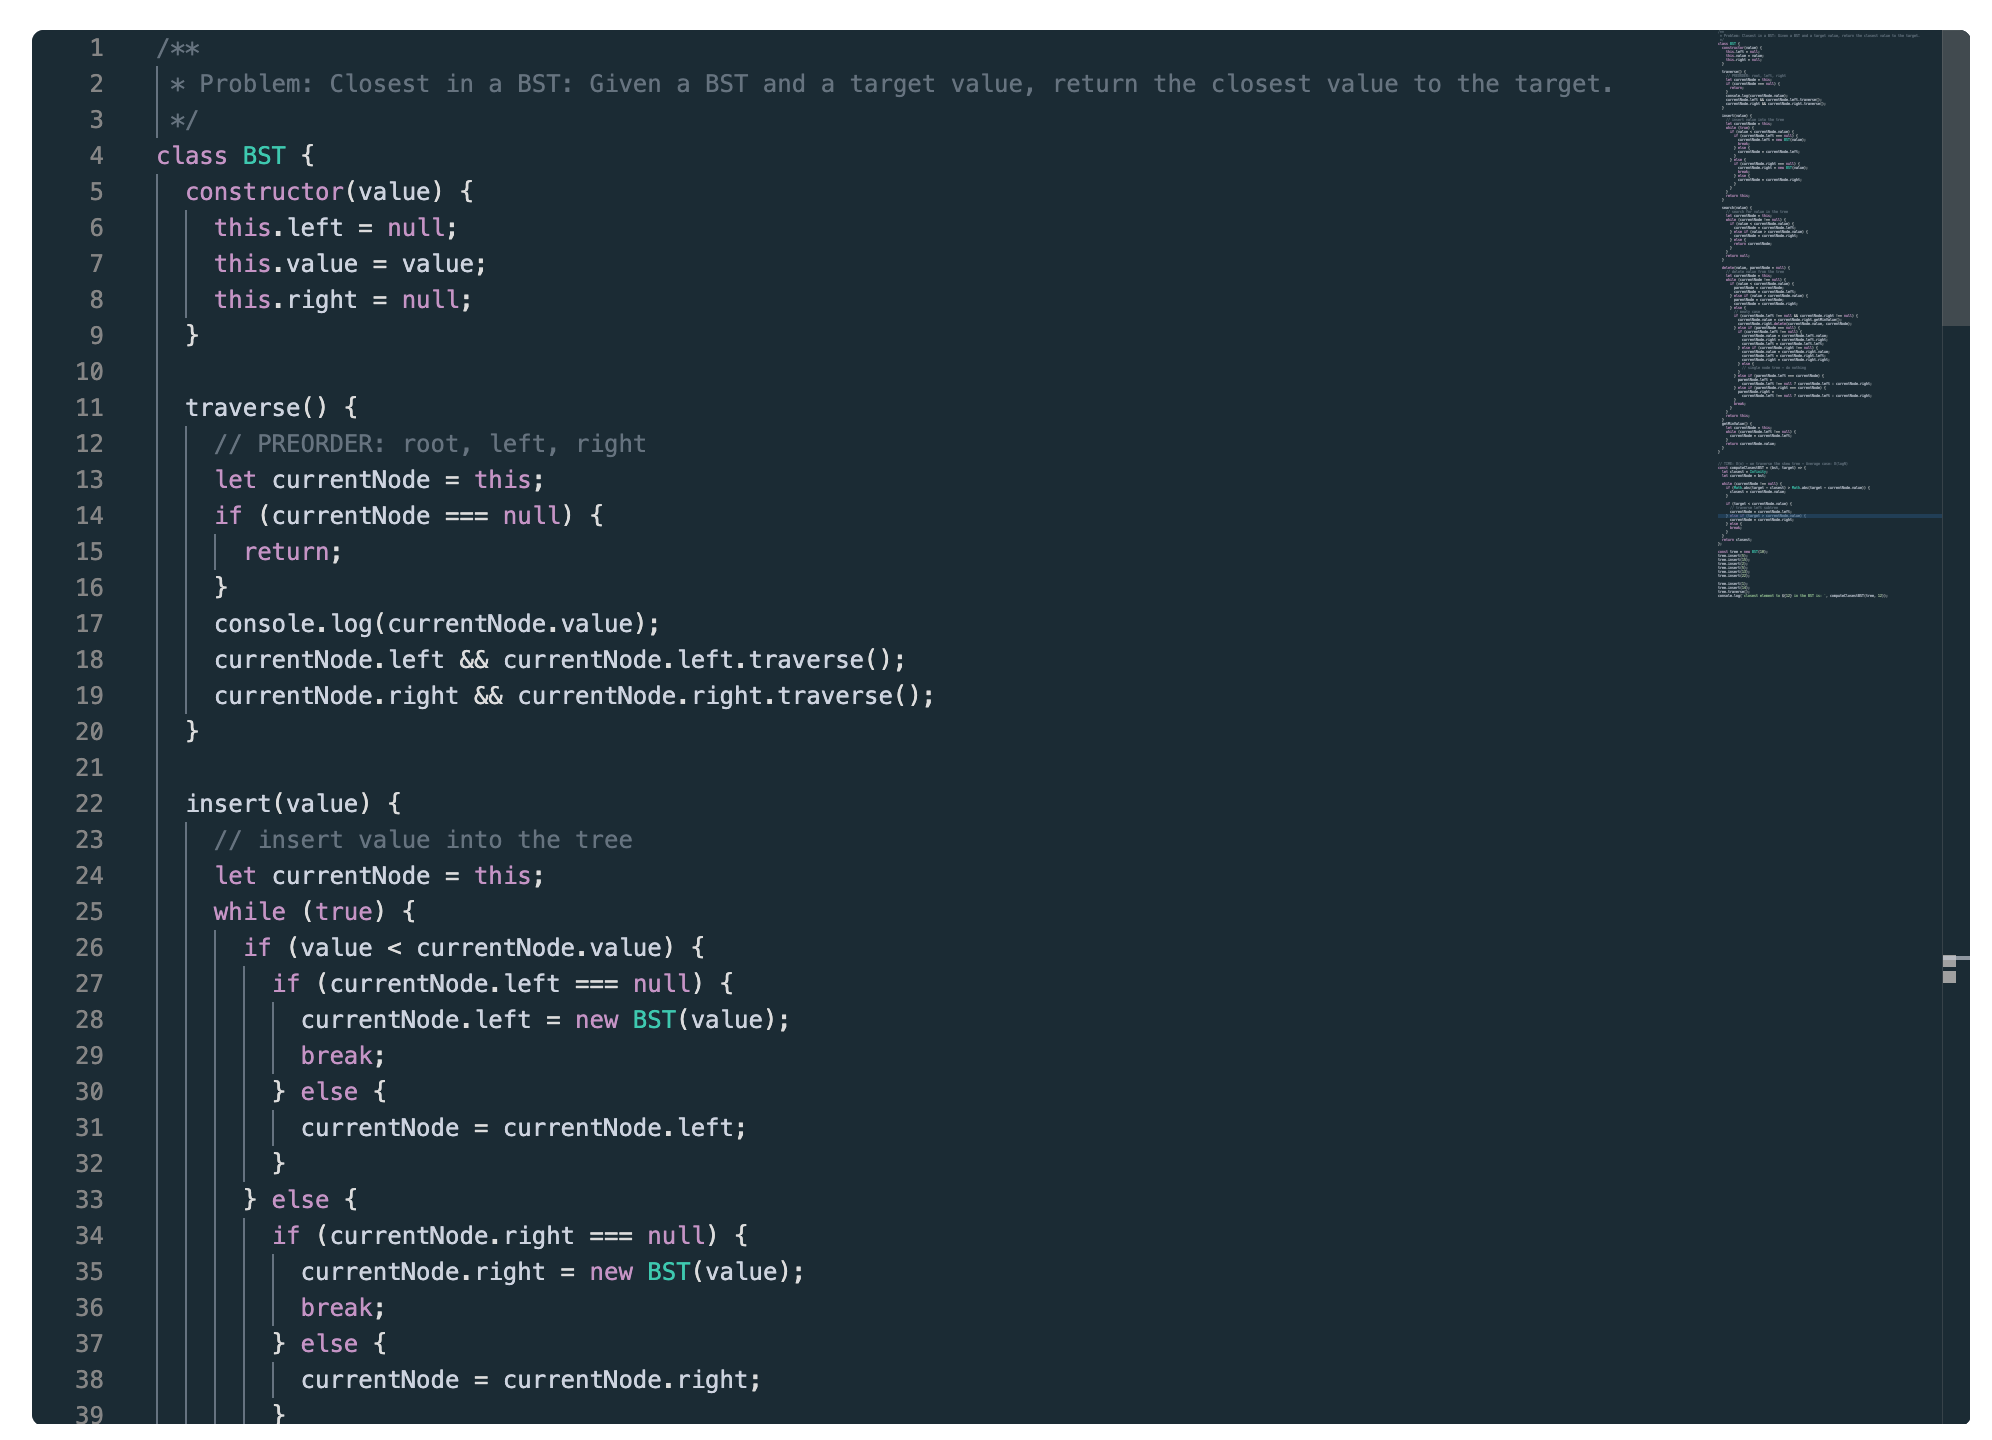
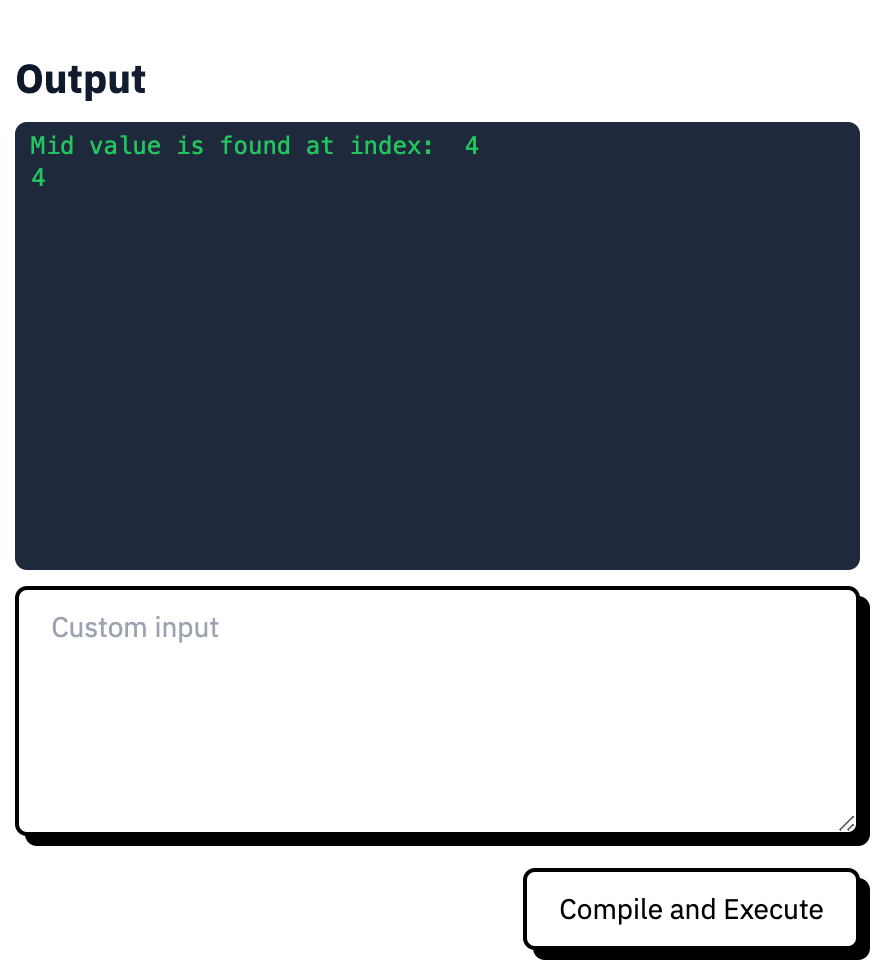
Here's a success scenario of a Binary Search program in JavaScript:
Output Details Component
The OutputDetails component is a simple mapper to show the details associated with a code snippet that we initially compiled. The data is already set in the outputDetails state variable.
import React from "react";

const OutputDetails = ({ outputDetails }) => {
  return (
    <div className="metrics-container mt-4 flex flex-col space-y-3">
      <p className="text-sm">
        Status:{" "}
        <span className="font-semibold px-2 py-1 rounded-md bg-gray-100">
          {outputDetails?.status?.description}
        </span>
      </p>
      <p className="text-sm">
        Memory:{" "}
        <span className="font-semibold px-2 py-1 rounded-md bg-gray-100">
          {outputDetails?.memory}
        </span>
      </p>
      <p className="text-sm">
        Time:{" "}
        <span className="font-semibold px-2 py-1 rounded-md bg-gray-100">
          {outputDetails?.time}
        </span>
      </p>
    </div>
  );
};

export default OutputDetails;
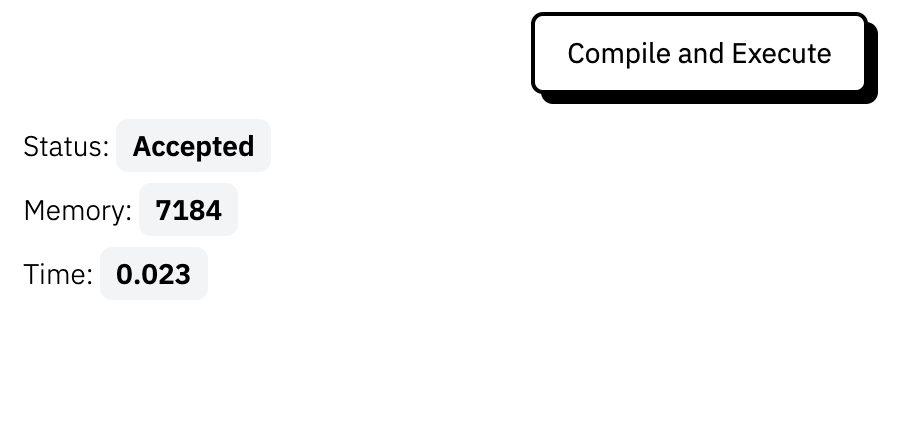
The time, memory and status.description are all received from the API response which are then stored in outputDetails and displayed.
Keyboard Events
The last thing in the application is using ctrl+enter to compile our code. For this, we are going to create a custom hook (because they're awesome and way cleaner) to listen for various keyboard events on our web application.
// useKeyPress.js

import React, { useState } from "react";

const useKeyPress = function (targetKey) {
  const [keyPressed, setKeyPressed] = useState(false);

  function downHandler({ key }) {
    if (key === targetKey) {
      setKeyPressed(true);
    }
  }

  const upHandler = ({ key }) => {
    if (key === targetKey) {
      setKeyPressed(false);
    }
  };

  React.useEffect(() => {
    document.addEventListener("keydown", downHandler);
    document.addEventListener("keyup", upHandler);

    return () => {
      document.removeEventListener("keydown", downHandler);
      document.removeEventListener("keyup", upHandler);
    };
  });

  return keyPressed;
};

export default useKeyPress;
// Landing.js

...
...
...
const Landing = () => {
    ...
    ...
      const enterPress = useKeyPress("Enter");
      const ctrlPress = useKeyPress("Control");
   ...
   ...
}
Here, we are using the native JavaScript Event Listeners to listen for our target key which we are going to use.
The Hook listens for keydown and keyup events. We initialize our hook with a target key of Enter and Control.
Since we are checking if the targetKey === key and setting the keyPressed accordingly, we can use the keyPressed returned boolean, which will be either true or false.
Now, we can listen for these events in the useEffect hook to make sure both were pressed at the same time:
useEffect(() => {
    if (enterPress && ctrlPress) {
      console.log("enterPress", enterPress);
      console.log("ctrlPress", ctrlPress);
      handleCompile();
    }
  }, [ctrlPress, enterPress]);
So whenever the user hits control and enter one after the other OR at the same time, handleCompile() method will be called.
Some things to keep in mind
This was a fun project to work with. But Judge0's basic plan has some limitations, namely 100 requests/day.
To work around this, you could spin up your own server / droplet (on Digital Ocean) and self-host the open-source project (they have excellent documentation for that).
Conclusion
In the end, we have:
- A code editor that can compile in 40+ languages
- A theme switcher to change the look of our code editor
- Interacting and Hosting APIs on RapidAPI
- Using keyboard events in React using custom hooks
- Lots and lots of fun! ;)
In the end, if you want to take the project to a deeper, here are some of the features that you could consider implementing:
- Login and Registration module – so that you can save your code in your own personal dashboard.
- A way to share code with other people over the internet
- Profile page and customizations.
- Pair programming on a single code snippet using Socket Programming and Operational Transformations.
- Bookmark favourite code snippets
- Custom dashboard of your code snippets (that are saved) - just like CodePen.
I really loved coding this application from scratch, and TailwindCSS is my absolute favourite and go to resource for styling my applications.
If this article was helpful to you, leave a ⭐️ on the GitHub Repository.
If you have any questions, please reach out to me on my Twitter and/or Website and I'd love to help.