

We've all been there: You open ChatGPT, drop a prompt. "Extract all emails from this sheet and categorize by sentiment." It gives you something close. You correct it, it apologizes, and gives you a new version. You ask for a different format, and suddenly, it's lost all context from earlier, and you're starting over.
Errors like that could be fine for little tasks, but it's a disaster for production systems. The gap between "this worked in my ChatGPT conversation" and "this runs reliably in production" is massive. It's not closed by better prompts. It's closed by engineering.
This article is about that engineering. You'll learn the architecture patterns, failure modes, and implementation strategies that separate AI experiments from AI products.
What You'll Learn
In this tutorial, you'll learn how to:
Understand why AI systems fail differently from traditional software
Identify and prevent the three critical failure modes in production AI
Implement the validator sandwich pattern for consistent outputs
Build observable pipelines with proper monitoring and alerting
Control costs at scale with rate limiting and circuit breakers
Design a complete production-ready AI architecture
Prerequisites
To get the most from this tutorial, you should have:
Basic understanding of any programming language
Familiarity with REST APIs and asynchronous programming
Experience with at least one LLM API (OpenAI, Anthropic, or similar)
Node.js installed locally (optional, for running code examples)
You don't need to be an expert in any of these. Intermediate knowledge is sufficient.
Table of Contents
What Makes AI Systems Fundamentally Different
Traditional software is deterministic. You write if (urgency > 8) { return 'high' } and it does exactly that, every single time. Same input, same output. Forever. You can write unit tests that cover every path. You can predict every failure mode.
AI systems, on the other hand, are probabilistic. You ask an large language model (LLM) to classify urgency and sometimes it says "high," sometimes "urgent," sometimes it gives you a 1–10 score, sometimes it writes a paragraph explaining its reasoning. Same input, different outputs, depending on temperature settings, model version, context window, and factors you can't fully control.
Here's what that looks like in practice:
| Challenge | Traditional systems | AI systems |
|---|---|---|
| Consistency | 100% reproducible | Varies per request |
| Debugging | Stack traces, logs | "The model just changed its behaviour." |
| Testing | Unit tests cover all paths | Can't test all possible outputs |
| Deployment | Deploy once, works forever | Degrades over time (data drift) |
| Failure modes | Predictable, finite | Creative, infinite |
The engineering challenge is: how do you build reliability on top of inherent unpredictability?
The answer is not "use a better model." The model is maybe 20% of the solution. The remaining 80% is the system you build around it.
Failure Mode #1: Inconsistent Outputs
The Problem
You ask the AI to extract a customer email from a support ticket. Sometimes you get the email back. Sometimes you get just the name. Sometimes you get a phone number. The format changes every time. Same prompt, different outputs.
Prompt: "Extract the customer email from this support ticket"

Output on Monday:    "john@example.com"
Output on Tuesday:   "Customer email: john@example.com (verified)"
Output on Wednesday:   "John Doe"
Output on Thursday: {
                       "customer_info": {
                         "email": "john@example.com"
                       }
                     }
All three outputs contain correct information, but you can't parse them programmatically. You can't route tickets, trigger workflow systems, or integrate with other code because your response data lacks consistency.
The Solution: The Validator Sandwich Pattern
The validator sandwich pattern (also called the guardrails pattern) ensures the AI system doesn't generate or process the wrong data by sandwiching your AI between two layers of deterministic code.
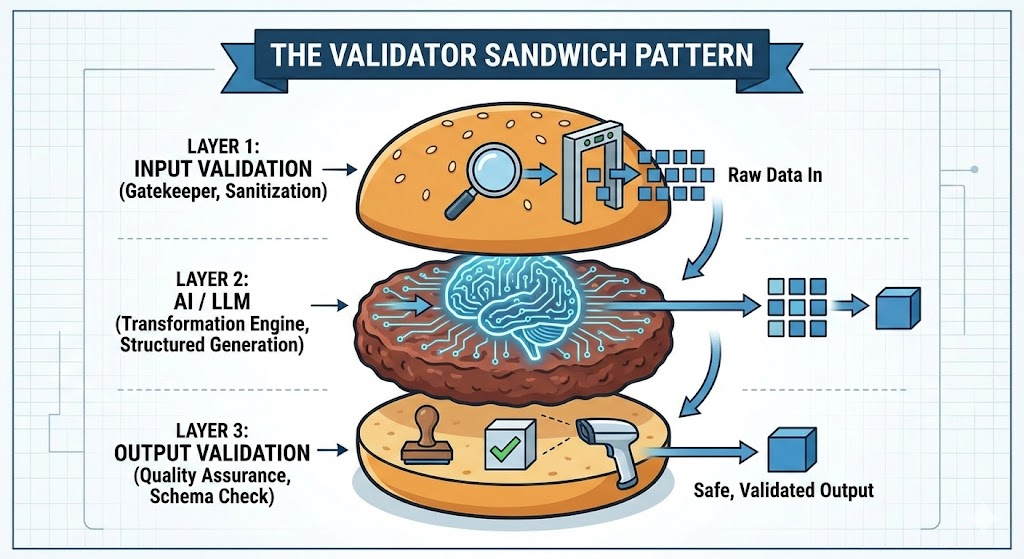
Essentially, you have three layers:
The top bun: Input guardrails (deterministic)
The meat: The LLM (probabilistic)
The bottom bun: Output guardrails (deterministic)
Let's break down each layer.
The Top Bun: Input Guardrails
Before anything touches the AI, validate it. Reject garbage immediately, fail fast and cheaply. Here's a basic example with deterministic code that checks the data being received:
function validateTicketInput(raw): TicketInput {
  // Type checks
  if (!raw.email || typeof raw.email !== "string") {
    throw new ValidationError("Missing or invalid email");
  }

  // Format checks
  if (!isValidEmail(raw.email)) {
    throw new ValidationError(`Invalid email format: ${raw.email}`);
  }

  // Range checks
  if (!raw.body || raw.body.length < 10) {
    throw new ValidationError("Ticket body too short to classify");
  }

  if (raw.body.length > 10000) {
    throw new ValidationError("Ticket body exceeds max length");
  }

  // Return typed, validated input
  return {
    email: raw.email.toLowerCase().trim(),
    subject: raw.subject?.trim() || "No subject",
    body: raw.body.trim(),
    timestamp: new Date(raw.timestamp),
  };
}
This runs before the LLM is ever called. It's fast, cheap, and deterministic. It catches easy failures immediately.
The Meat: Structured Outputs from the LLM
Stop asking the AI for free text. Force it into a schema. Most modern APIs support this directly.
So what does "free text" mean? When you prompt an LLM without constraints, it returns unstructured natural language. The model decides the format. Sometimes it's a sentence, sometimes a paragraph, sometimes it adds extra context you didn't ask for. This makes programmatic parsing nearly impossible.
Forcing it into a schema, on the other hand, means that you explicitly tell the model: "Respond only with JSON matching this exact structure", for example. Modern LLM APIs have built-in features to enforce this. Instead of hoping the AI formats its response correctly, you make it structurally impossible for it to return anything else.
Here's the difference in practice:
Without schema enforcement (free text):
const response = await openai.chat.completions.create({
  model: "gpt-4o-mini",
  messages: [{
    role: "user",
    content: "Classify this support ticket as bug, billing, or feature request: " + ticketText
  }]
});

// Response could be:
// "This appears to be a billing issue"
// "billing"
// "Category: Billing (confidence: high)"
// { "type": "billing" }  <- if you're lucky
With schema enforcement:
const response = await openai.chat.completions.create({
  model: "gpt-4o-mini",
  messages: [{
    role: "user",
    content: "Classify this support ticket: " + ticketText
  }],
  response_format: {
    type: "json_schema",
    json_schema: {
      name: "ticket_classification",
      strict: true,
      schema: {
        type: "object",
        properties: {
          category: {
            type: "string",
            enum: ["bug", "billing", "feature", "other"]
          },
          confidence: {
            type: "number",
            minimum: 0,
            maximum: 1
          },
          priority: {
            type: "integer",
            minimum: 1,
            maximum: 5
          }
        },
        required: ["category", "confidence", "priority"],
        additionalProperties: false
      }
    }
  }
});

// Response is GUARANTEED to be:
// { "category": "billing", "confidence": 0.89, "priority": 2 }
The response_format parameter forces the model to output valid JSON matching your schema. If it can't, the API will retry internally until it does. You get predictable, parseable data every single time.
The key difference: you're making the AI conform to your format instead of hoping it does the right thing.
The Bottom Bun: Output Guardrails
This is the most critical layer. LLMs will hallucinate. This layer catches those hallucinations before they break your database or confuse your users.
Guardrails are validation checks that run after the LLM responds. Think of them as safety barriers on a highway: they don't prevent the car from moving, but they can stop it from going off the road.
In AI systems, guardrails verify that:
The output matches your expected schema
The data types are correct
The values fall within acceptable ranges
The business logic makes sense
Alright, now you have a structured response. Now you'll want to validate it aggressively before you use it:
function validateClassification(raw): Classification {
  const required = ["category", "confidence", "priority", "reasoning"];
  for (const field of required) {
    if (raw[field] === undefined || raw[field] === null) {
      throw new ValidationError(`Missing required field: ${field}`);
    }
  }

  if (!["bug", "billing", "feature", "other"].includes(raw.category)) {
    throw new ValidationError(`Invalid category: ${raw.category}`);
  }

  if (typeof raw.confidence !== "number" ||
      raw.confidence < 0 || raw.confidence > 1) {
    throw new ValidationError(`Invalid confidence: ${raw.confidence}`);
  }

  if (!Number.isInteger(raw.priority) ||
      raw.priority < 1 || raw.priority > 5) {
    throw new ValidationError(`Invalid priority: ${raw.priority}`);
  }

  if (raw.category === "billing" && raw.priority > 3) {
    logger.warn("Suspicious: billing classified as low priority", raw);
  }

  return raw as Classification;
}
Validating aggressively means checking everything, not just schema compliance. You're validating:
Schema compliance: Does the JSON have the right fields?
Type safety: Is "confidence" actually a number, not a string?
Range validity: Is confidence between 0 and 1, not -5 or 999?
Business logic: Does the combination of fields make sense for your domain?
Confidence thresholds: Is the AI actually confident in this answer?
If any validation fails, you don't silently accept bad data. You have three options:
Retry with a clearer prompt: Ask the model to try again with stricter instructions
Escalate to human review: Log the failure and route to a review queue
Use a fallback: Return a safe default value that requires human attention
The Deterministic Rule
Here's a rule to follow religiously:
If it can be solved with an if-statement, don't use AI.
Email format validation? Use regex. Date parsing? Use a date library. Checking if a string contains a keyword? Use a string method. Math? Use actual math.
AI is expensive and probabilistic. Traditional code is free, instant, and deterministic. Use AI for genuinely ambiguous tasks, extracting meaning from unstructured text, generating content, and reasoning about complex inputs. Let deterministic code handle everything else.
Failure Mode #2: Silent Failures
The Problem
Model hallucinations are quite common in AI workflows, ranging from degraded accuracy to outdated training data to misclassification issues. This is the scariest failure mode because you don't know it's happening.
Consider accuracy drift. You trained your model on 2024 data. It's now mid-2026. Your vendors changed their invoice formats. Your classification accuracy has drifted from 95% down to 71%. You won't know until you do a quarterly audit. And by then, thousands of records have been processed incorrectly.
The principle is simple: you cannot fix what you cannot see.
The Solution: Observable Pipelines
Every production AI system needs observability baked in from day one. Here's how this plays out in a production system:
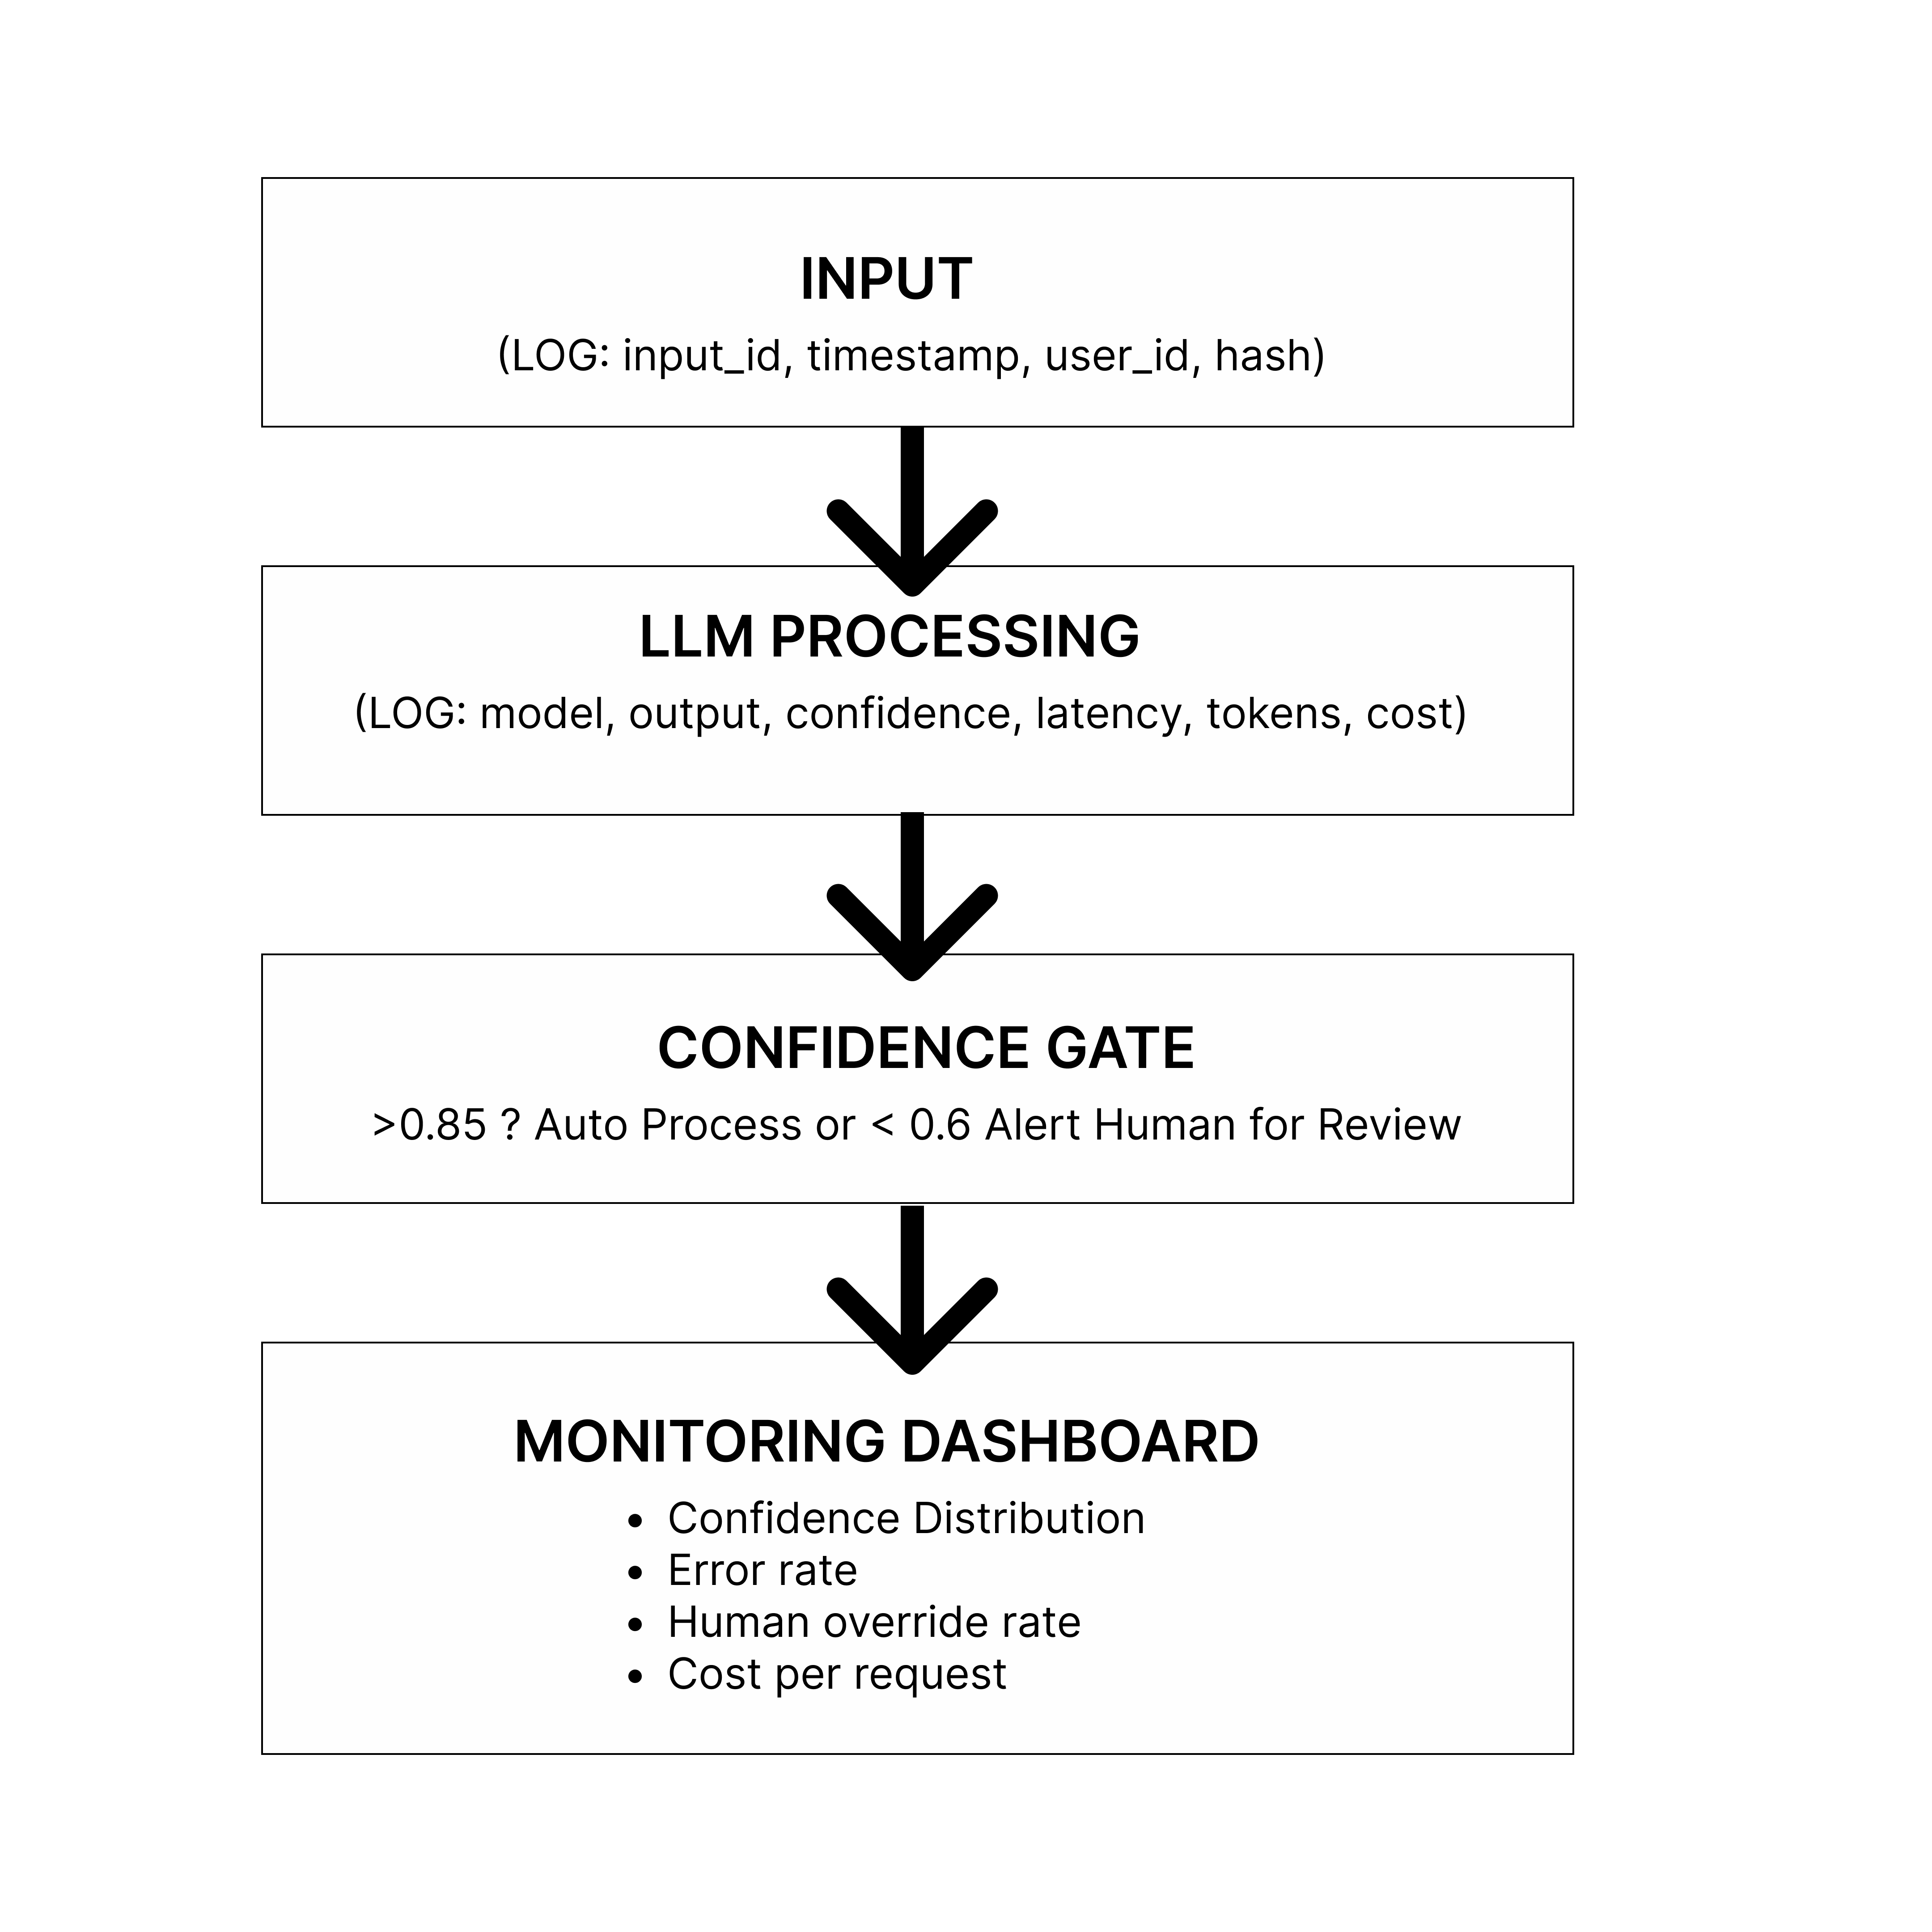
In the diagram above:
Input arrives: A user request comes in (support ticket, document, query). You log: request ID, timestamp, user ID, input hash (for deduplication).
LLM Processing: The request goes to your AI model. You log which model was called, how long it took (latency), how many tokens used, what it cost, and critically, the confidence score.
Confidence Gate: This is where you make a routing decision:
High confidence (>0.8): Auto-process and execute the action
Medium confidence (0.6-0.8): Send to human review queue
Low confidence (<0.6): Immediate escalation + alert
Monitoring Dashboard: All this data flows into your observability tools, where you track trends over time.
With monitoring, you can detect issues in your system and address them as soon as possible. Monitoring doesn't just catch problems. It gives you data to diagnose and fix them in hours instead of months.
What you're measuring and why:
| Metric | Why it Matters |
|---|---|
| Response Time | API Health, model issues |
| Confidence | Model degradation |
| Human Override Rate | Output quality problems |
| Error Rate | System Failures |
| Cost per Request | Budget control |
| Token Usage Trend | Prompt efficiency |
The goal is not to remove humans from the loop, it's to only involve humans when the system is genuinely uncertain.
Failure Mode #3: Uncontrolled Costs
The Problem
You test your workflow with 10 tickets. It works great and costs 50 cents. You deploy to production. 1,000 requests hit your API. Your bill: $500 for the day.
Or you write a retry loop incorrectly. It creates infinite API calls. Your bill: $5,000 for the day.
Or you're using the most expensive model for everything, including simple tasks that a cheaper model could handle.
The reality: "works for 10 requests" ≠ "works for 10,000 requests." Scale changes everything.
The Solution: Gated Pipelines with Circuit Breakers
To move from a fragile prototype to a robust production system, you must abandon the naive approach of directly connecting user inputs to LLM APIs. Instead, implement a gated pipeline.
Think of this architecture as a series of blast doors. A request must successfully pass through each gate before it earns the right to cost you money. If any gate closes, the request is rejected cheaply and quickly, protecting your budget and your upstream dependencies.
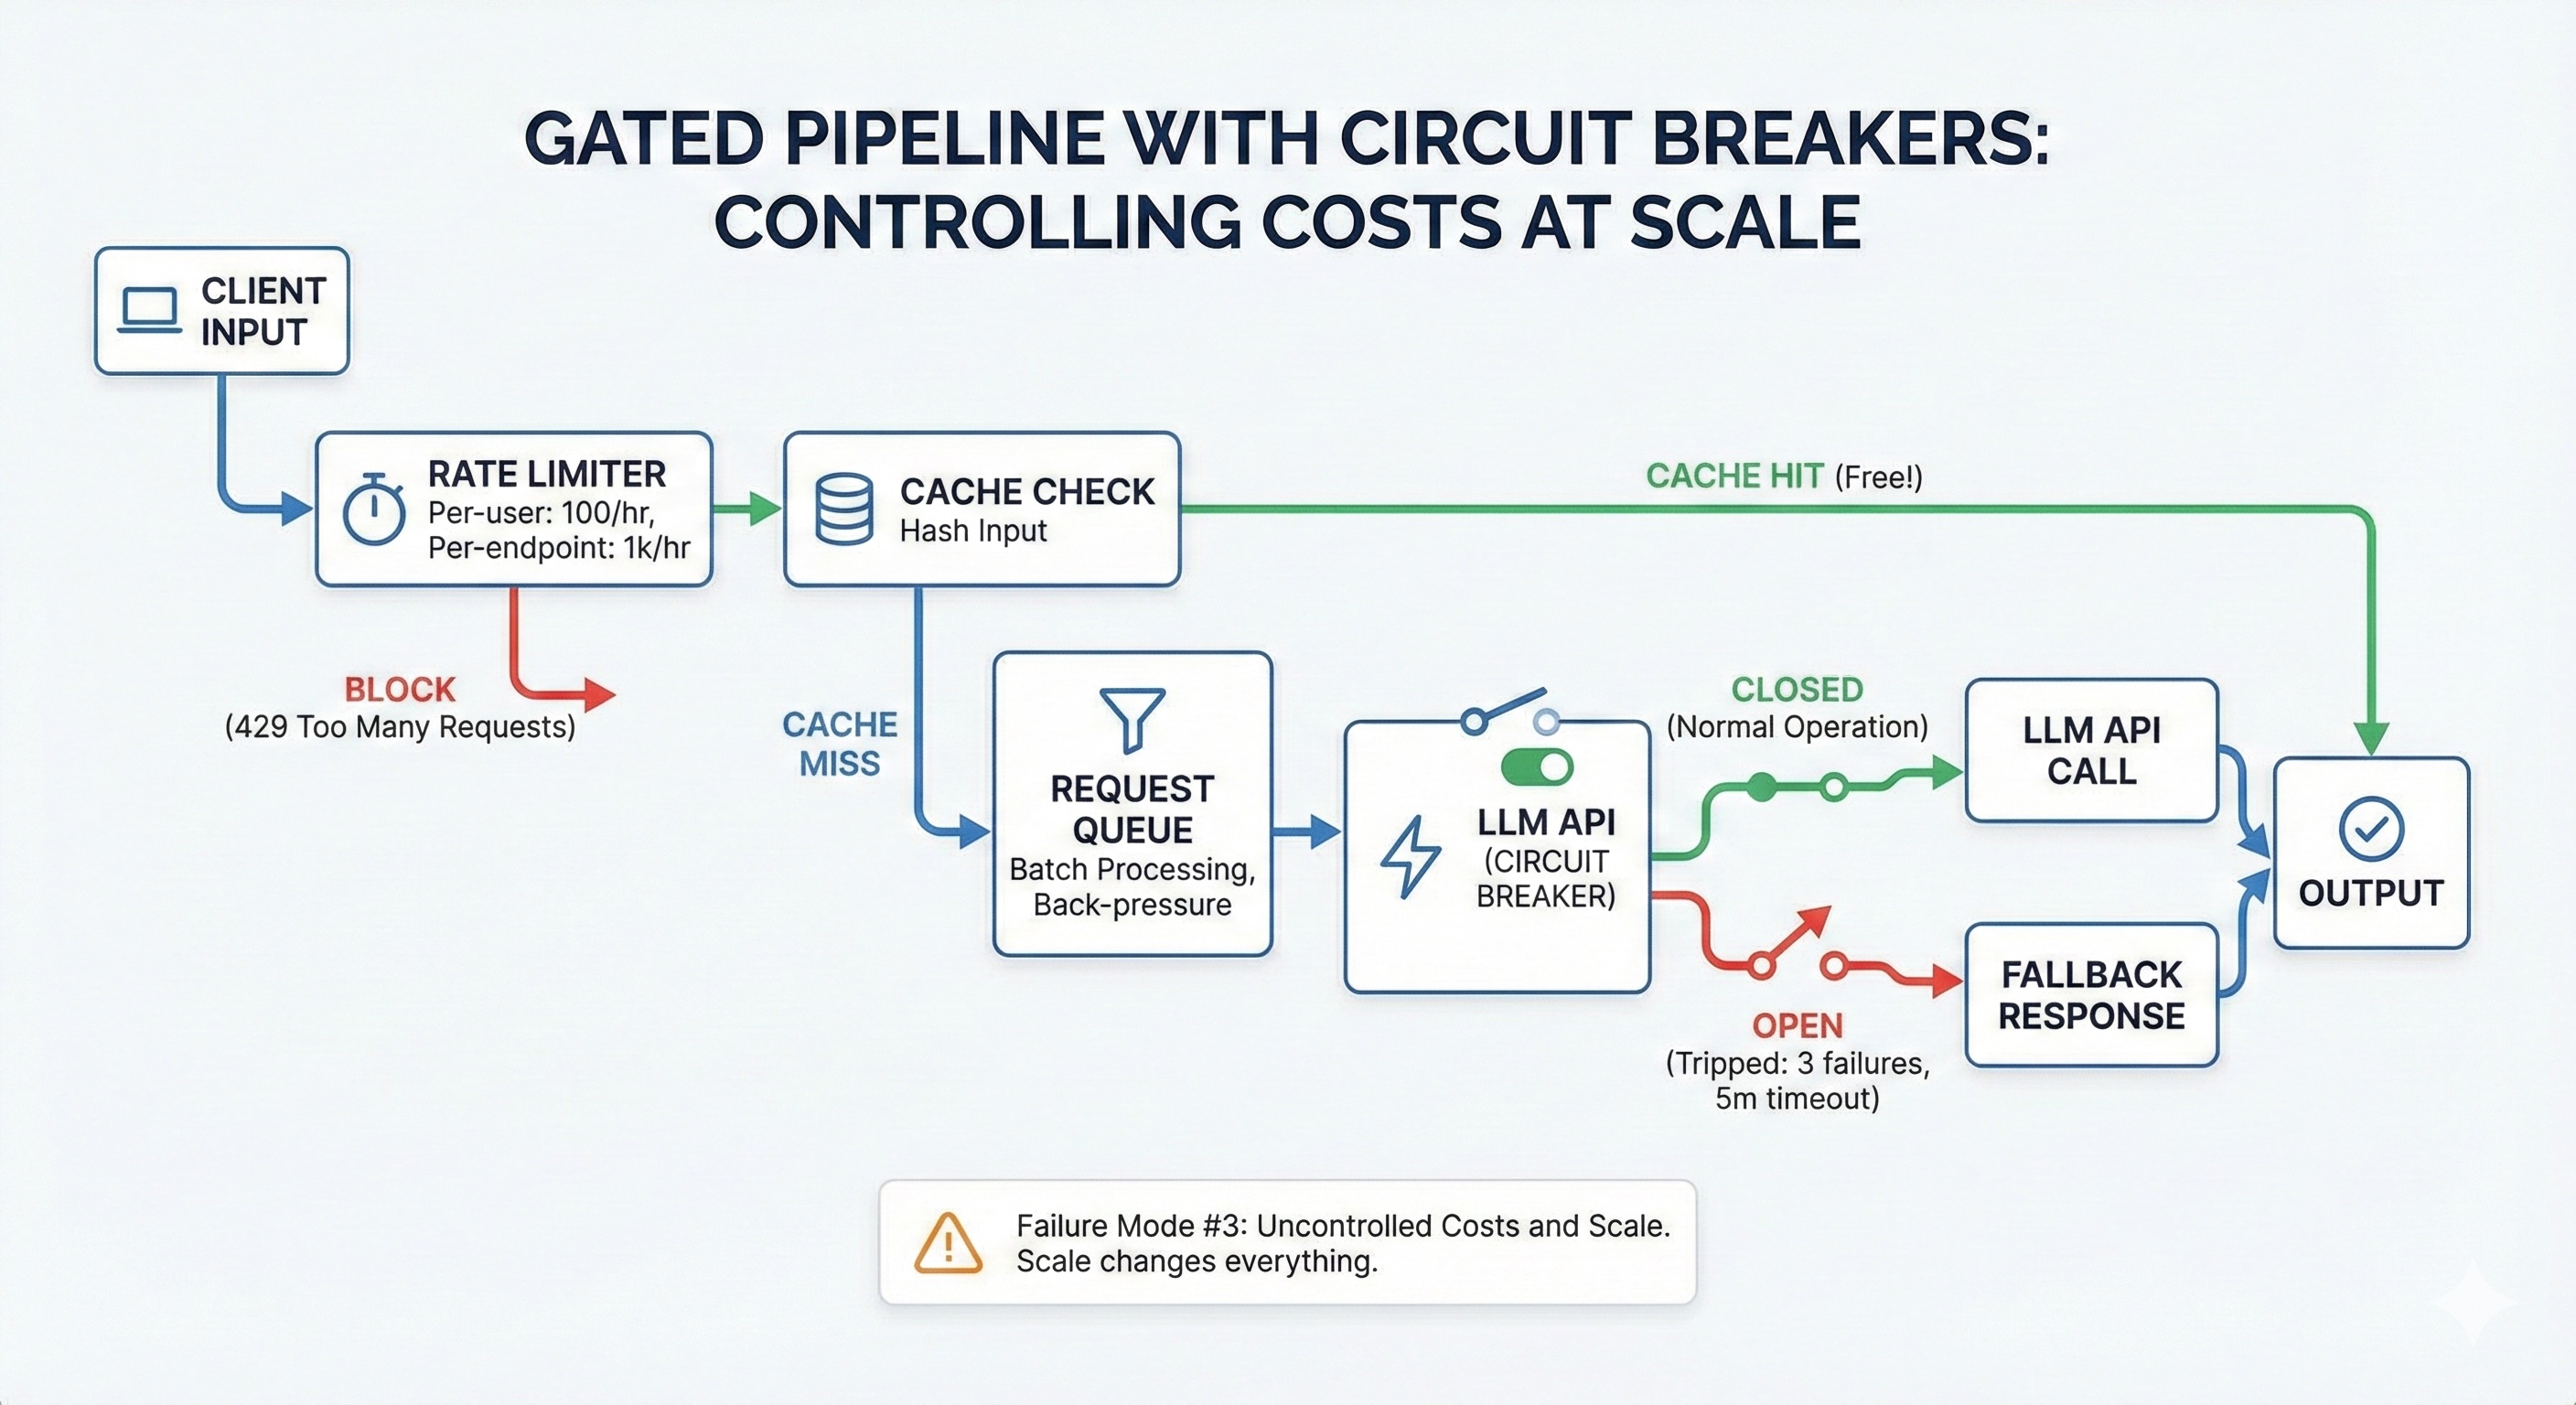
From the diagram above, these gates are:
The rate limiter
The cache check
The request queue
The circuit breaker
Let's examine each one.
Gate 1: Rate limiting
The first line of defence stops abuse before it enters your system. In standard web development, rate limiting is about protecting the server CPU. In AI development, it's about protecting your wallet.
Gate 2: Cache check
The cheapest LLM API call is the one you never have to make. Many AI requests are repeated or highly similar. Cache aggressively.
Gate 3: Request queue
LLM APIs are not like standard REST APIs; requests often take 10–30 seconds to complete. If 500 users hit "submit" simultaneously, your server cannot open 500 simultaneous connections without crashing or hitting provider concurrency limits. A request queue solves this by batching requests and processing them at a controlled rate.
Gate 4: Circuit breaker
Retry logic is necessary for transient network blips, but it is destructive during a real outage. If an LLM provider is experiencing downtime and returning 500 errors, a naive retry loop will frantically hammer their API, wasting your money on failed requests.
How to implement a gated pipeline
Here's an example implementation showing all four gates working together:
Step 1: Rate Limiter (using Redis)
import { RateLimiterRedis } from "rate-limiter-flexible";
import Redis from "ioredis";

const redis = new Redis({
  host: process.env.REDIS_HOST,
  port: 6379
});

// Rate limiting per user
const userLimiter = new RateLimiterRedis({
  storeClient: redis,
  keyPrefix: "rl:user",
  points: 100,
  duration: 3600,
  blockDuration: 60
});

// Rate limiting globally
const globalLimiter = new RateLimiterRedis({
  storeClient: redis,
  keyPrefix: "rl:global",
  points: 1000,
  duration: 3600
});
Step 2: Cache Layer
import { createHash } from "crypto";

class AICache {
  private redis: Redis;
  private ttl: number = 3600;

  hashInput(input: string): string {
    return createHash("sha256").update(input).digest("hex");
  }

  async get(input: string): Promise {
    const key = `ai:cache:${this.hashInput(input)}`;
    const cached = await this.redis.get(key);

    if (cached) {
      // Cache hit - free!
      await metrics.increment("ai.cache.hits");
      return JSON.parse(cached);
    }

    await metrics.increment("ai.cache.misses");
    return null;
  }

  async set(input: string, result: T): Promise {
    const key = `ai:cache:${this.hashInput(input)}`;
    await this.redis.setex(key, this.ttl, JSON.stringify(result));
  }
}
Step 3: Request Queue
import Queue from "bull";

const aiQueue = new Queue("ai-requests", {
  redis: {
    host: process.env.REDIS_HOST,
    port: 6379
  }
});

aiQueue.process(5, async (job) => {
  // Only 5 simultaneous LLM calls max
  const { ticket } = job.data;
  return await callLLM(ticket);
});

async function enqueueRequest(ticket: Ticket) {
  const job = await aiQueue.add(
    { ticket },
    {
      attempts: 3,
      backoff: {
        type: "exponential",
        delay: 2000
      }
    }
  );

  return job.finished();
}
Step 4: Circuit Breaker
enum CircuitState {
  CLOSED,
  OPEN,
  HALF_OPEN
}

class CircuitBreaker {
  private state = CircuitState.CLOSED;
  private failures = 0;
  private lastFailureTime?: Date;
  private successesInHalfOpen = 0;

  private readonly failureThreshold = 3;
  private readonly openDurationMs = 5 * 60 * 1000;
  private readonly halfOpenSuccesses = 2;

  async execute(
    fn: () => Promise,
    fallback?: () => T
  ): Promise {
    if (this.state === CircuitState.OPEN) {
      const elapsed = Date.now() - (this.lastFailureTime?.getTime() || 0);

      if (elapsed < this.openDurationMs) {
        // Still in open state - use fallback or throw
        if (fallback) {
          logger.warn("Circuit OPEN - using fallback");
          return fallback();
        }
        throw new Error("Circuit breaker OPEN - service unavailable");
      }

      // Transition to half-open
      this.state = CircuitState.HALF_OPEN;
      logger.info("Circuit transitioning to HALF_OPEN");
    }

    try {
      const result = await fn();
      this.onSuccess();
      return result;
    } catch (error) {
      this.onFailure();
      throw error;
    }
  }

  private onSuccess() {
    if (this.state === CircuitState.HALF_OPEN) {
      this.successesInHalfOpen++;

      if (this.successesInHalfOpen >= this.halfOpenSuccesses) {
        // Service recovered - close circuit
        this.state = CircuitState.CLOSED;
        this.failures = 0;
        this.successesInHalfOpen = 0;
        logger.info("Circuit CLOSED - service recovered");
      }
    } else {
      this.failures = 0;
    }
  }

  private onFailure() {
    this.failures++;
    this.lastFailureTime = new Date();

    if (this.state === CircuitState.HALF_OPEN) {
      // Failed during test - back to open
      this.state = CircuitState.OPEN;
      this.successesInHalfOpen = 0;
      logger.error("Circuit reopened during HALF_OPEN test");
    } else if (this.failures >= this.failureThreshold) {
      // Too many failures - open circuit
      this.state = CircuitState.OPEN;
      logger.error(`Circuit OPEN after ${this.failures} failures`);
    }
  }
}
Step 5: Putting it all together
const cache = new AICache();
const circuitBreaker = new CircuitBreaker();

async function processWithGatedPipeline(ticket: Ticket) {
  try {
    await userLimiter.consume(ticket.userId);
    await globalLimiter.consume("global");
  } catch (error) {
    throw new Error("Rate limit exceeded. Please try again later.");
  }

  const cacheKey = ticket.body;
  const cached = await cache.get(cacheKey);
  if (cached) {
    logger.info("Cache hit - returning cached result");
    return cached;
  }

  const queuedResult = await enqueueRequest(ticket);

  const result = await circuitBreaker.execute(
    async () => {
      const classification = await callLLM(ticket);
      await cache.set(cacheKey, classification);
      return classification;
    },
    () => ({
      category: "other",
      confidence: 0,
      requiresHumanReview: true,
      reason: "service_unavailable"
    })
  );

  return result;
}
What this achieves:
Rate limiting: Prevents abuse and runaway costs
Caching: 30-40% cost reduction on repeated queries
Queueing: Prevents server overload during traffic spikes
Circuit breaker: Fails fast during outages instead of wasting money on retries
Each gate is cheap to operate. Together, they protect your system from the most common production failures.
How to Build a Complete Production Architecture
When you combine all three failure mode solutions-consistent outputs, observability, and cost control, you get a complete production architecture.
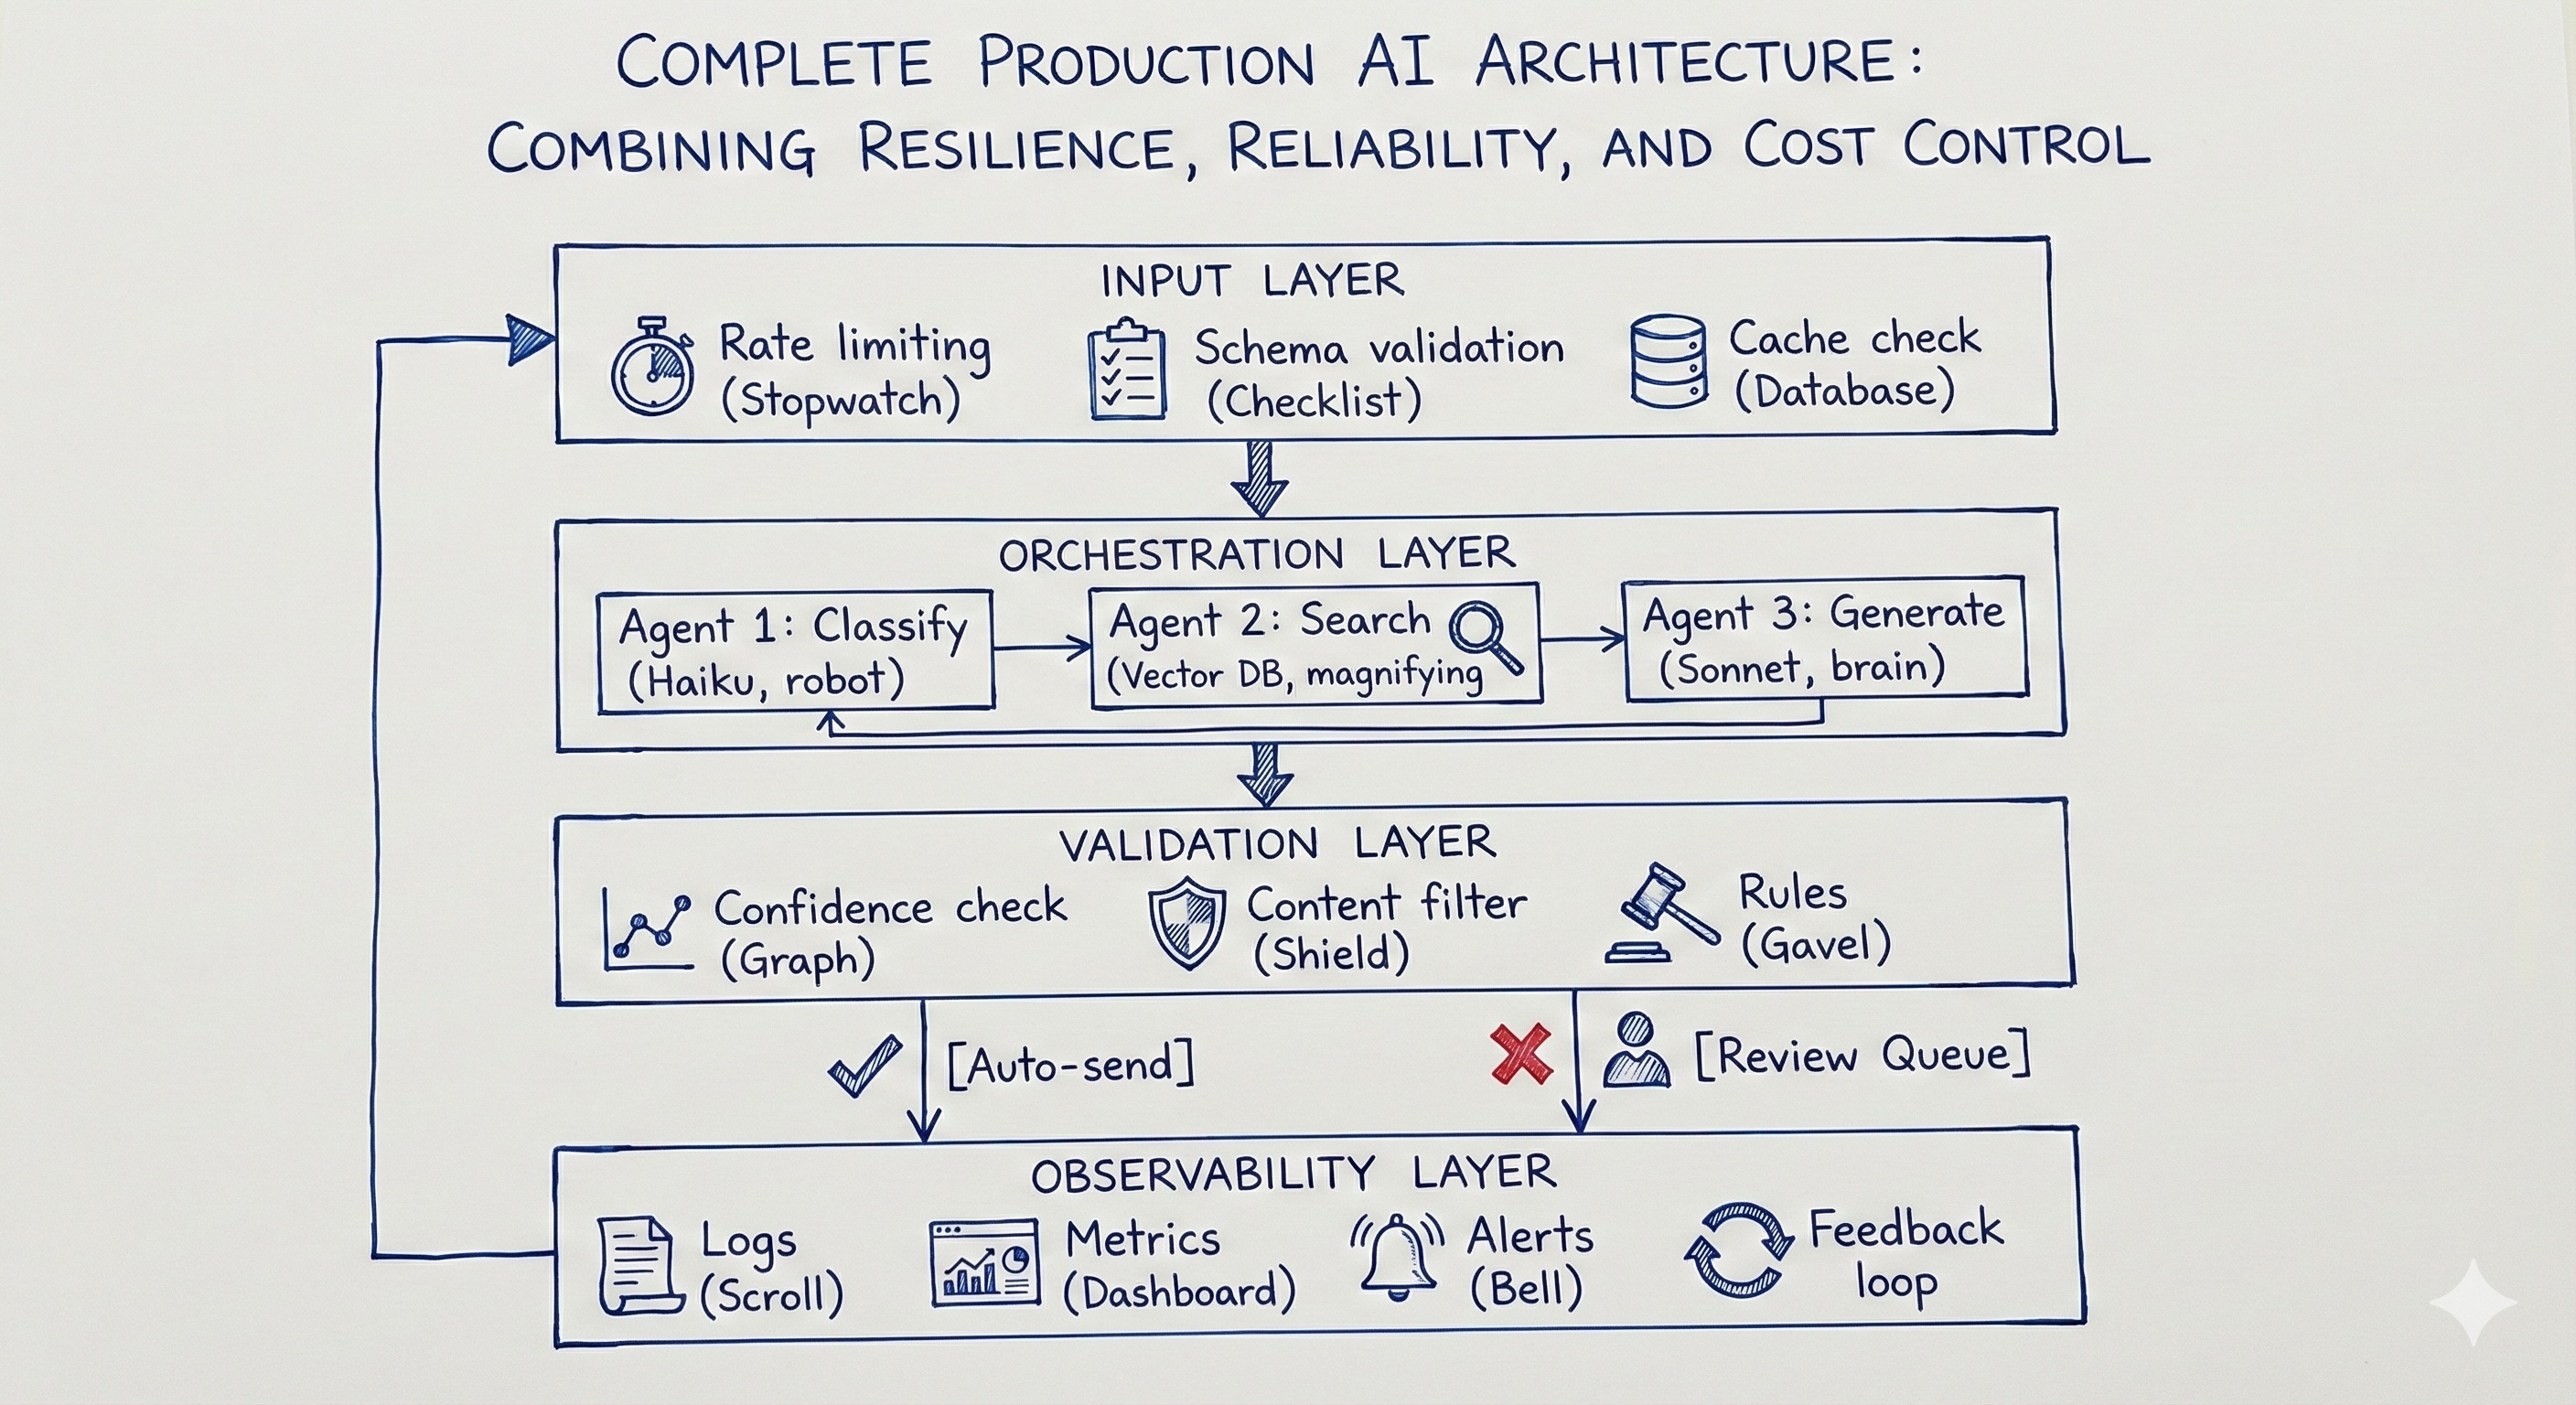
When you solve for all three major failure modes, inconsistent outputs, silent failures, and uncontrolled costs. You graduate from a simple script to a true enterprise-grade system. This architecture doesn't just generate text; it actively protects itself, manages resources, and learns from its mistakes.
The Complete Workflow Implementation
Here's how all the pieces we've covered fit together in a single workflow. This brings together the validation functions from Failure Mode #1, the observability from Failure Mode #2, and the gated pipeline from Failure Mode #3:
class TicketWorkflow {
  async processTicket(rawInput: unknown): Promise<TicketResult> {
    const requestId = generateId();
    const startTime = Date.now();

    try {
      // LAYER 1: Input validation + rate limiting + cache
      const ticket = validateTicketInput(rawInput);
      await rateLimiter.consume(ticket.userId);

      const cached = await cache.get(ticket.body);
      if (cached) return { ...cached, source: "cache" };

      // LAYER 2: AI processing with circuit breaker protection
      const classification = await circuitBreaker.execute(() =>
        classifyTicket(ticket)
      );

      // LAYER 3: Output validation + confidence routing
      const validated = validateClassification(classification);

      let action: string;
      if (validated.confidence >= 0.8) {
        await sendToAgent(ticket, validated);
        action = "auto_assigned";
      } else {
        await sendToReviewQueue(ticket, validated);
        action = "needs_review";
      }

      // LAYER 4: Log everything for observability
      await logger.log({
        requestId,
        userId: ticket.userId,
        confidence: validated.confidence,
        action,
        latencyMs: Date.now() - startTime,
        cost: calculateCost(classification.tokensUsed)
      });

      await cache.set(ticket.body, validated);
      return { classification: validated, action };

    } catch (error) {
      await logger.logError(requestId, error);
      throw error;
    }
  }
}
What each layer does:
Layer 1 (Input) protects your system from bad data and abuse:
Validates the ticket has required fields (email, subject, body)
Checks rate limits (prevents one user from overwhelming the system)
Returns cached results if we've seen this exact ticket before
Layer 2 (Orchestration) is where the AI does its work:
Calls the LLM with structured output requirements
Wrapped in a circuit breaker (fails fast if the API is down)
Uses the cheapest model that works (Haiku for classification)
Layer 3 (Validation) ensures the output is safe to use:
Validates the response matches our schema
Routes based on confidence (high confidence → auto-assign, low → human review)
Never blindly trusts AI output
Layer 4 (Observability) tracks everything:
Logs every request with latency, cost, and confidence scores
Sends metrics to your monitoring dashboard
Alerts on anomalies (confidence dropping, costs spiking)
This architecture takes you from "it worked in my ChatGPT demo" to "it runs reliably at 10,000 tickets per day." The code is more complex than a simple API call, but the complexity is intentional. It's what makes the system production-ready.
Conclusion: Engineering Over Prompting
The teams winning with AI right now aren't winning because they have better models. They're winning because they've built better systems around imperfect models.
Any company can call the OpenAI API. The ones that pull ahead are the ones who wrap that API call in validation, observability, cost controls, and thoughtful architecture — the ones who treat AI as a component in an assembly line, not a creative partner in a conversation.
The three things every production AI system needs:
Structure: Validators, schemas, deterministic layers that enforce consistency and eliminate unpredictability at the edges.
Visibility: Logging, monitoring, and alerting so you catch problems in hours, not months. Observable pipelines that let you see exactly what the system is doing and why.
Control: Rate limits, caching, circuit breakers, and cost gates so scale doesn't turn your experiment into a budget emergency.
Reliable AI workflows aren't about better prompts. They're about better architecture around unreliable components.
If you found this helpful, you can connect with me on LinkedIn or subscribe to my newsletter. You can also visit my website.