
By Adeel Imran
This article has been outdated with the new release for babel, kindly check the updated article “How to combine Webpack 4 and Babel 7 to create a fantastic React app”, last updated October 13th, 2018
In this article, I’ll go through how to set up a React application using Webpack 4. By the end of this tutorial, you’ll know on how to hot reload your application every time you press **ctrl + s** in your editor of choice.
I use Visual Studio Code (VS Code), and I love it. It is light weight, flexible, and the best part is it’s free. I love free. If you haven’t tried it out, give it a try.
Our Goal
Our goal for this tutorial is to create a React app, with some cool features like async/await. I won’t be using react-router version 4 in this tutorial, because I mainly want to focus on how to play with Webpack.
So by the end of this article, you will be good at:
- Setting up a development environment, with hot reloading using webpack-dev-server
- Adding SCSS and HTML support in your code with webpack
- Adding support for features like try/catch, async/await and rest operator
- Creating a production build — optimized and ready for deployment
- Setting up different environments in your code like stage, demo and production
Guys I am telling you that if Webpack seems a bit hard, after this that won’t be the case anymore.
Development Environment
Make the Folder
Make a folder called tutorial in your directory.
Create package.json
Open up your terminal, and go into the tutorial folder.
Type:
npm init -y
This will create a **package.json** file in your tutorial folder.
The file will look something like this:
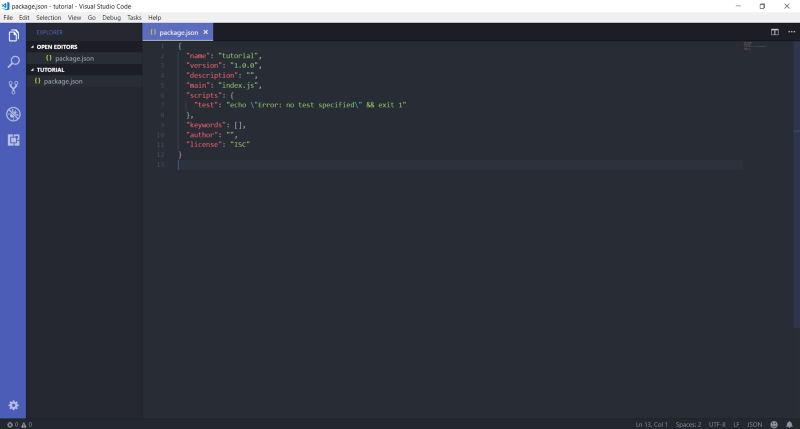 This is what your package.json file will look like initially. I am using VS Code for the purpose of this tutorial
Create the index.js file
I’ll create a folder called **src** in my **tutorial** folder.
In the **src** folder, I’ll create a file called **index.js**.
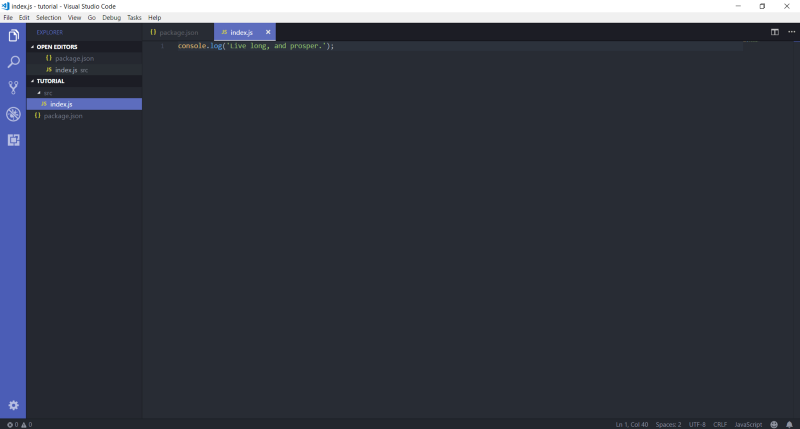 and yeah, i’ll use star trek quotes a lot during this tutorial because IT’S AWESOME :D
Bundle the code
I know this isn’t much, but bear with me. Things will get interesting pretty soon.
Now in order to bundle our code, we need to set up some configurations so that Webpack can know where to bundle the code from. For that we need to install some dependencies.
So let’s start by typing:
npm i --save-dev webpack webpack-cli webpack-dev-server @babel/core @babel/preset-env @babel/preset-react @babel/preset-stage-2 babel-loader@^8.0.0-beta
WOW! I know that was a lot of dependencies. Let’s recap why we needed these in the first place.
webpack: We need Webpack to bundle our code.
webpack-cli: We will be using some CLI features for Webpack to make our life easier while writing some scripts.
webpack-dev-server: I will create a server using the webpack-dev-server package. This is only meant to be used in the development environment, and not for production. This means while developing and working on my code, I don’t need a separate server like Node.js.
@babel/preset-env: This package behaves exactly the same as @babel/preset-latest (or @babel/preset-es2015, @babel/preset-es2016, and @babel/preset-es2017 together). Cool right?
@babel/preset-react: The name of the package sounds clear — this will add support for react while we bundle our code.
@babel/preset-stage-2: This will add stage-2 feature of the Ecma TC39 proposal. You can read more about it here.
@babel/loader: This is a dependency of Webpack. It allows transpiling Babel using Webpack.
@babel/core: This is a dependency for the @babel/loader itself.
So now you know a little bit about what we installed and why.
Your package.json file should be looking something like this:
 This is what your package.json file should be looking like right now.
Create a Babel file
We also need to add a new file called .babelrc , so let’s create it as well.
In your main folder directory, create a file .babelrc and the following code snippet. This will help Webpack when bundling your code and converting those Sassy codes that we will write.
Set up Webpack 4
Okay so the boring part has been done. Let’s move onto the main part of this tutorial: setting up Webpack 4.
To quote from Star Trek:
He tasks me. He tasks me; and I shall have him. I’ll chase him ’round the moons of Nibia and ’round the Antares maelstrom and ’round Perdition’s flames before I give him up.
So let’s create a new folder called **config** and inside that folder let’s create a file called **webpack.base.config.js**.
The reason I call this file .base is because this contains all the common features we will use in our development and different production environments. Changes in this one file will reflect in all environments. Again if this doesn’t make sense now, guys, bear with me for a couple more minutes. It will start making sense.
Without further waiting, in your config/webpack.base.config.js file write these lines of code:
The module.rules define the set of rules that Webpack will apply to certain file extensions.
In our rules array, we define a test that tells Webpack what extension to use. Here I am telling Webpack to apply a certain rule to only .js based files.
Next comes exclude. While bundling, I don’t want Webpack to transpile everything. This will become very slow, especially when I include my node_modules folder as well.
So I will exclude it using the exclude property in the rule set. The last one, which is the most important one, is the use.loader property. Here I give it the value of babel-loader. What babel-loader does is use our defined presets that we defined in our **.babelrc** file to transpile all files with a .js extension.
So far so good, yeah? We are more then halfway there…
 Even Professor Snape Applauds You. Awesome work guys, we are almost there.
Also one more thing: Webpack 4 sets the **src** folder as the default entry point and the **dist** folder as the default output point of your bundled result. Cool, right?
Go into your **tutorial** folder and run this script. This will bundle all your code and run that code in the browser:
Adeel@Frodo MINGW64 ~/Desktop/article/tutorial$ node_modules/.bin/webpack-dev-server --mode development --config config/webpack.base.config.js --open --hot --history-api-fallback
The basis for this script is that it will combine all of our code in the **src** directory and run it on the browser at this address:
http://localhost:8080/
 Hmm! That’s different. This gives an error: Cannot GET /
HTML
So when we ran the script it compiled and opened up the browser. Now it had the code that we wrote in our **index.js** file, but it didn’t have an .html file in which it could run it.
We need to add an html-webpack-plugin inside our **webpack.base.config.js** file, and an **index.html** file in our **src** directory.
First install the dependency for transpiling HTML with Webpack:
npm i --save-dev html-webpack-plugin
Your **package.json** file should look like this:
Now let’s add an HTML file in our **src** directory and name it **index.html**:
Our project directory should look like this now:
 Our project directory, should look something like this
While we are at it, let’s add that html-webpack-plugin in our **webpack.base.config.js** file.
So we added something new to our webpack config file — did you notice? I am just messing with you. I know you did.
 Good job guys, we’re almost done.
Now what does this plugin do? Well, it’s very simple. Plugins, put simply, add abilities to your Webpack. You can read more about them here.
Now I have added just this one plugin called html-webpack-plugin. The purpose of this plugin is very simple: it creates HTML files to serve your bundle file(s).
Ok so let’s run that script again (fingers crossed). “I hope no errors this time,” said every developer once.
Adeel@Frodo MINGW64 ~/Desktop/article/tutorial$ node_modules/.bin/webpack-dev-server --mode development --config config/webpack.base.config.js --open --hot --history-api-fallback
This will compile and open up your browser in the available default port. Mine is:
http://localhost:8080/
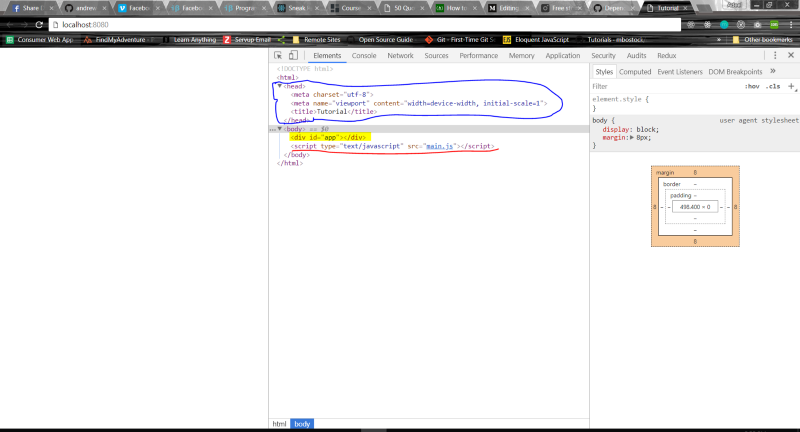 I simply clicked ctrl + shift + i this opened up the inspect element in my chrome browser
Blue part: The blue part is simply where I put in my meta tags and defined a title for the app.
Yellow part: The yellow part highlighted is the hard coded part that we wrote in our **index.html** file. This is where our future React app will reside.
Red Part: The part where I underlined in red is the most interesting part. We never wrote this in our index.html file, so where did it come from?
Webpack is very smart. It took that file in your **index.js** , bundled it all up nicely, and added it up all neatly in the file called **main.js** . Then it injected it in our **index.html** file. Super Cool!
Add React
Let’s add React and get the party going. For that, we need to install some dependencies.
Let’s start with:
npm i react react-dom --save
Now go in your **index.js** file and write:
Let’s run that script again:
Adeel@Frodo MINGW64 ~/Desktop/article/tutorial$ node_modules/.bin/webpack-dev-server --mode development --config config/webpack.base.config.js --open --hot --history-api-fallback
This will compile and open up your browser in the default port. Mine is:
http://localhost:8080/
Wow, did you see what opened in your browser? Yes! You did! Your first Webpack configured React app.
Now there is still loads of stuff to do. But man oh man. Good job!
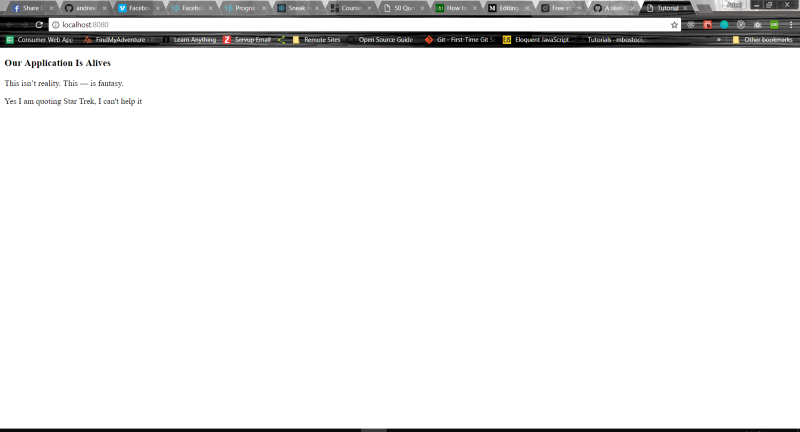 This is our react app, running Yayyyy! :)
Now here is the fun part. Go in your **index.js** file and change the title to anything of your choice. Hit **ctrl + s** and check your browser. It automatically updated your content.
Cool, right?
Let’s Recap
We have added a development environment. We added hot module reloading. We added support for .js files with React code. In the next part, we’ll add SCSS support in our Webpack.
SCSS
For SCSS support, we need to add some more dependencies in our **package.json file**.
Install the following packages:
npm i --save-dev style-loader css-loader sass-loader node-sass extract-text-webpack-plugin@^4.0.0-beta.0
sass-loader: This plugin will help us compile SCSS to CSS.
node-sass: The sass-loader required node-sass as a peer dependency.
css-loader: The CSS loader interprets @import and url() like import/require() and will resolve them.
style-loader: Adds CSS to the DOM by injecting style tag.
extract-text-webpack-plugin: It moves all the required **.css** modules into a separate CSS file.
So your styles are no longer in-lined into the JavaScript bundle, but are in a separate CSS file (**styles.css**). If your total stylesheet volume is big, it will be faster because the CSS bundle is loaded in parallel to the JavaScript bundle.
Now that our dependencies have been installed, let’s make some changes to our Webpack config file.
Let’s understand what we did here first. In our module.rules we have added a new rule. What that rule does is apply some bundling to all **.scss** files. I hope that made sense. Inside our use , we tell it extract some information.
Let’s get a bit deeper, and I’ll try to make it as simple as I can.
{ fallback: "style-loader", use: "css-loader!sass-loader" }
Try reading this piece of code from bottom-to-top.
Get all SASS code — .scss — using sass-loader and then convert it into CSS code using css-loader. Then take all that CSS code and inject it into our DOM with the