

If you are reading this, it can be safely assumed you have heard about Git.
Under your belt you have created a branch or two, you know your way around writing a decent commit message and you understand the basics of pulling and pushing commits to a branch.
If all of this jargon is practically gibberish to you, I highly recommend that you go and read up on the fundamental basics of Git.
I can also assume that you are reading this article from one of two reasons :
- You want to help others and are a truly altruistic person
- You want to make your resume more impressive
Both reasons are valid and in all fairness, if in the process of helping others, you are also benefiting yourself, there’s no harm in that, right?
Why Contribute?
If you are not yet convinced on why you should contribute to other repositories, let me present some strong evidence in favor of doing so. By contributing to any open source project:
- You will learn how to manage code and communicate with other people
- You are seen as one who is proactive and passionate about coding
- You will expose yourself to various technologies and different code methodologies
Where To Begin
Jumping into a repository can seem daunting as each project can differ in scale and in coding language. Furthermore, each project can have specific rules and guidelines for contributors. In order for you to transition easily into being a contributor, below are a few of my suggestions :
- Don’t go head first into a project that is written in a coding language that is not familiar to you. Pick a repository where you understand the in’s and out’s of the coding language
- Most open source repositories lack documentation. An easy entry point can be by editing existing documentation or helping create one for the project
- Open source repositories who need assistance have a special label placed on issues, “help wanted”. More importantly, the issues you have the most chance of being equipped to handle are the ones labeled “first timers welcome”
- Don’t be afraid to ask questions. If the development environment that is needed to run the project, is not working correctly for you, let someone know. If you are unsure on how to fix the issue or if your fix is the right approach, post a comment
- If you feel less comfortable with addressing an issue, you can always go over projects and open issues for them
The Git Contributing Cycle
Once you have chosen an issue to tackle and have notified the members of the project that you are handling that issue, it is time to get some work done. First, you will need to fork the repository.
This can be done by clicking on the fork button that is present at the top right corner of every repository. This will create a copy of the repository in your GitHub account. Then, you will need to clone the project from your account on to your machine, so you will have a local copy of the project.

Once you have achieved that, make sure to set up the development environment exactly as stated in the project’s readme. When the environment is ready to go, you can create a branch for the issue you are fixing. The most common convention for a branch’s name can either have the format of “fix/issue-that-is-going-to-be-fixed” or “feature/issue-that-is-going-to-be-fixed”. Next, make the changes in order to address the issue and commit them. Make sure to supply a descriptive commit message. Some repositories have guidelines on these as well, so make sure you are aware of them or your future pull request will be rejected.

What is left to do is push your commit into your local branch. Then, if you go to the repository inside your GitHub account, you will see at the top of the page a notification detailing your push to your branch with a button labeled “compare & pull request”.
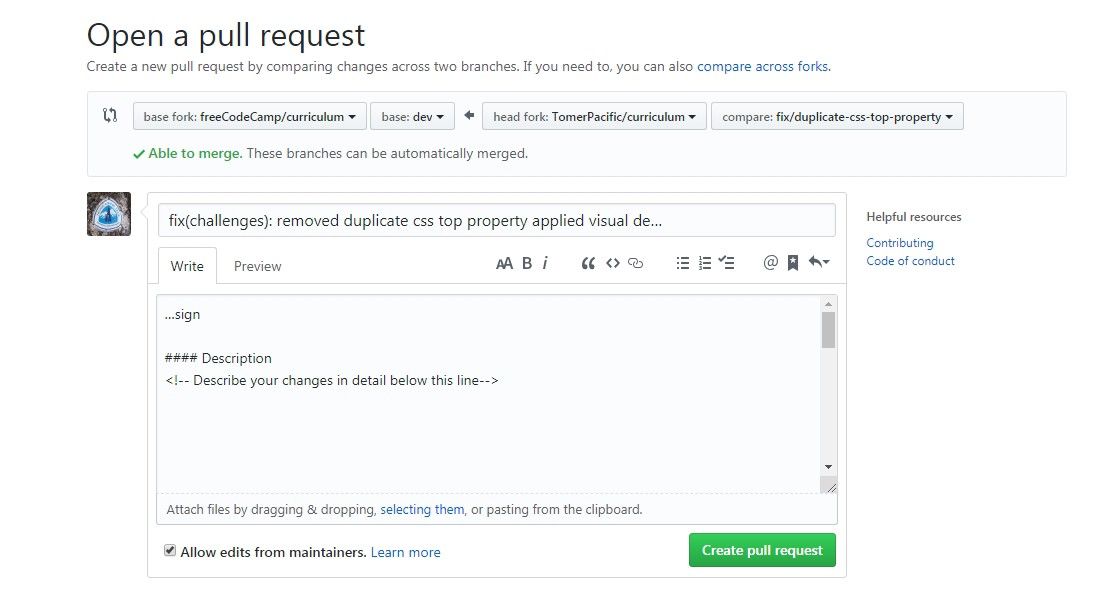
Clicking on the button will send you to a page where you will open a pull request for the owner of the repository. It is customary to detail the changes you have made and link to the issue that this pull request solves. When you have filled everything out, you can click on the button labeled “Create pull request”.
Once your changes have been approved, you can delete the branch you were working on.

Fork → Clone → Commit → Repeat
That’s it! The whole process has a slight learning curve, but once done properly, you will get the hang of it.
Where do you go from here? Well, there are a plethora of repositories which let you simulate this whole cycle.
Once you feel confident enough, you can search repositories to contribute to.
What are you waiting for? Start contributing.