By Nicholas Walsh
A friend of mine asked me to help convert articles that were previously posted to their site into Facebook Instant Articles. Afterwards, I decided to compile a guide to help nontechnical people convert their old articles, blog posts, or online content.
Even if you don’t know what Facebook Instant Articles are, you may already be using them. According to Facebook IA’s FAQ page:
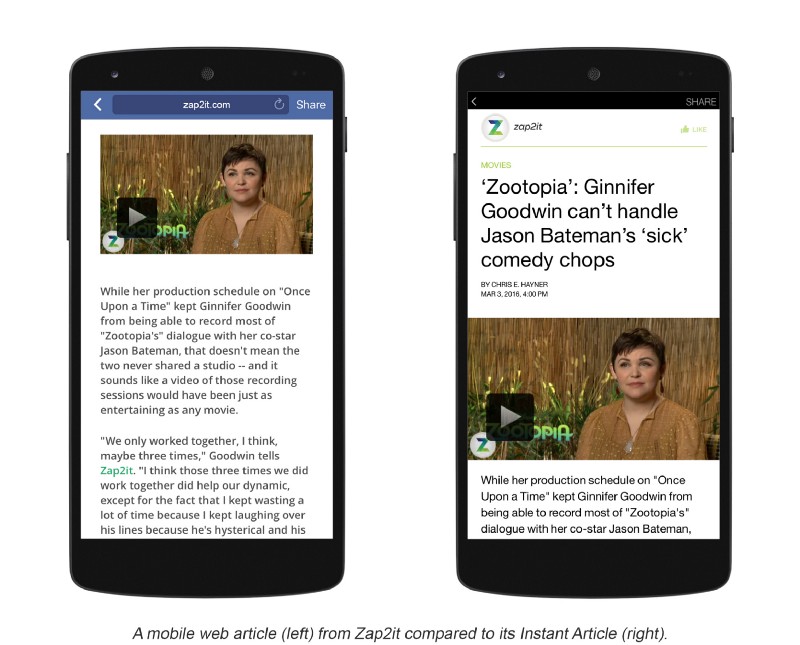
“Instant Articles is a mobile publishing format that enables news publishers to distribute articles to Facebook’s app that load and display as much as 10 times faster than the standard mobile web.”
IA’s dictate a content publishing standard that results in both a pleasing design, and optimized performance for articles opened from within the Facebook mobile app. You can read more about the benefits of IA’s.
Facebook offers a plethora of ways to fast-track IA production and conversion. Yet it seems the current guides are for developers or larger enterprises that have a more complex publishing ecosystem.
It is hard to find guides for converting previously posted articles that don’t involve using the Facebook IA API, PHP SDK, or the WordPress plugin. For non-developers, most of these tools require too much technical experience. Even when one tries to find the WordPress plugin tutorial, one has to dig into the documentation in Facebook’s developer portal . This is not ideal for non-developers who become dissuaded before they can ever find this page.
Let’s work together to convert any article already published on the web into a Facebook Instant Article! For our tutorial, we’ll be using the article about a celebrity dog from the movie ‘Anchorman’.
Let’s Groove!
Step 0: Prep
We won’t need to install any plugins or integrations, but we will need a text editor to work with the HTML source code. There are a lot of different code-oriented text editors, but for the sake of this example, I recommend Sublime. It has all the features we’ll need, and is easy to use out of the box with a fresh install.
Once you install Sublime, we’re going to want to download the code template that we’ll be using from GitHubGist.
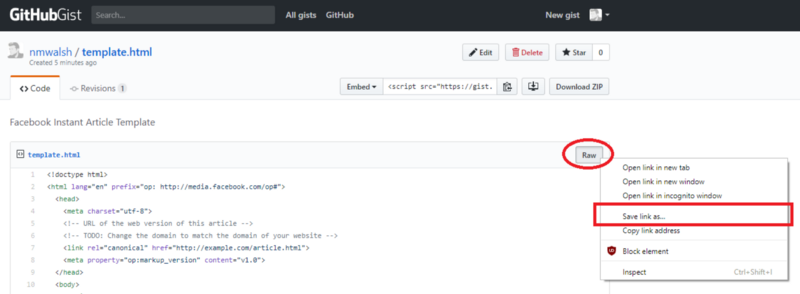
On the right side of the screen: 1. Right click the "Raw" button2. Click "Save link as..." By default, it should save as an HTML file with the name "template".
Now we’ve got the code editor and the template code that we’ll be editing!
For the last step of setup:1. Boot up Sublime2. Open the template file we downloaded
Step 1: Getting the Banner Image
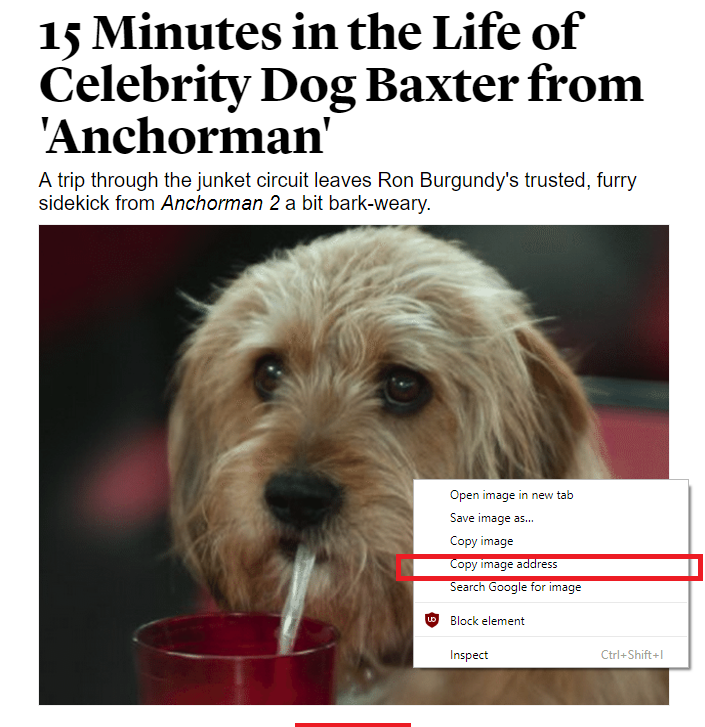
Hop back over to your internet browser and find the article you wish to convert on its’ live site. We’re going to first grab the banner image, which we’ll use at the top of the Facebook Instant Article.
To do this, right click the image, and select _“Copy image address”._
Switch back to the template that we have open in Sublime. Search for the
Highlight the original URL located between quotes on line 36, and replace it by pasting the image address that we copied from the banner image. Make sure there are double quotes on each side of the URL to preserve the format. And make sure to not delete the “ />” at the end of the line.
Edit the text inside of <figcaption> </figcaption> with the caption that you will want to appear below the image. This is often where the image attribution goes.
Notice how we’re careful not to change any of the formatting of the code. Messing around with the tags themselves will cause errors later on when we try to render the website. Sublime colorizes our code, which helps us recognize mistakes or mismatching HTML tags.
Pay extra close attention to how we replaced the text for the figure caption. We’re going to be editing lots of other values in exactly the same way.
Step 2: Retrieving the Metadata
There’s a bit of info we’ll need to collect now. Since most of this data should be retrievable without digging through the source code, manually copying this info works well. We’ll need this source code later though, so there’s no harm in opening it now.
- Original Article URL
- Article Title
- Article Subtitle
- Article Author(s)
- Date & Time article was originally published
- Date & Time article was last updated
If it’s difficult to get this info, we can use the source code from the website. How you access this data will depend on which browser you’re using.
Chrome: CTRL + U, or Right Click → View Page SourceFirefox: Right Click → View Page SourceSafari: Safari menu → Preferences → Advanced, Enable "Show Develop menu in menu bar", then Develop menu → Show Page Source
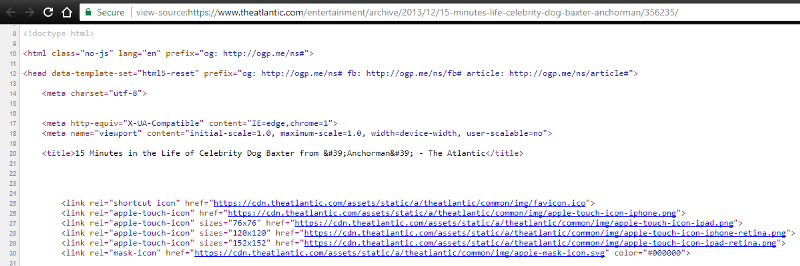 The source code should resemble this
Now that we’ve got the source code and original website up, let’s start looking for our info.
Title: Copy the title of the article, and use it to replace “Article Title” within the
tags on line 14 of the template. In the source code, this is usually within the tags. For example,
<h1>Article Title</h1>
becomes
<h1>15 Minutes in the Life of Celebrity Dog Baxter from 'Anchorman'</h1>
Subtitle: Same as above, but with the subtitle. Use this to replace “Article Subtitle” within the
tags on line 15 of the template.
URL: Copy the URL of the live website’s article. Use this to replace the URL that appears on line 7 of the template. For example:
<link rel="canonical" href="http://example.com/article.html">
becomes...
<link rel="canonical" href="https://www.theatlantic.com/entertainment/archive/2013/12/15-minutes-life-celebrity-dog-baxter-anchorman/356235/">
Publication Time: On line 18 of the template, you can name the date and time the article was originally published. Be mindful that the “datetime” parameter takes a very specific format. The data inside of datetime=_” ”_determines metadata (not displayed), whereas the text between the “> </time>” tags will dictate what date is shown (can be in any format here).
For example, <time class="op-published" datetime="2014-11-11T04:44:16Z">November 11th, 4:44 PM</time>
Displays as: November 11th, 4:44 PMLet's change it to: July 24th, 2017. 6:30 PM
<time class="op-published" datetime="2017-7-24T06:30:16Z">July 24th, 2017. 6:30 PM</time>
Last Update Time: Same plan as above, but on line 21 of the template.
Author(s): Lines 24–27 of the template represent an author whose name links to somewhere on the web. Lines 28–31 represent an author whose name is not linked. You can copy the entire block of code for that respective author, and paste it consecutive to the prior block, then edited as needed. You can also do this for multiple authors. See the example below for multiple authors with simple name + captions.
Step 3: Copying the Body Content
Now we’ll retrieve the article content that we want converted. There’s a large range of content types, such as mixed media, fancy JavaScript, embedded content. With more complicated content, the chance is higher that things won’t work without troubleshooting, so your mileage may vary.
I’m going to explain how to work with text, images (static or gifs), and video, since those are the basis for most Instant Articles that I’ve seen.
The source code is likely hundreds (or even thousands) of lines. An easy to trick for finding the start of the body content is to do a “Find” for the first few words of the article’s body text. We’ll want to copy from the
tag at the start of our body text until (and including) the
tag that follows the closing words of the article.Next, we’re going to need to dump this into our template. Near Line 58 in the template, there should be a line with the following:
<p> Article content </p>
Highlight this entire line, and paste over the body content that we copied from the live article source code. Note: we copied the opening
and closing
from the source code, which is why we’re pasting over them in the template here. There is some code within another set of tags following the body text, but it’s styling — be careful not to copy this with your body text.*Have a video you’d like to incorporate in your IA? Change the URL between the and tags beginning around line 64, like we did with the Banner Image URL back in Step 1.
Legal Notes: Line 84. This text will be very small, and at the very end of your article.
Step 4: Bells and Whistles (Ads, Analytics Trackers, and more)
I recommend skipping this step for now. If you’d like to confirm what we’ve done so far works, or if you don’t have custom ads or trackers, skip ahead to Step 5.
One of the best things about Facebook Instant Articles, compared to other proprietary article conversion tools, is that you can keep the custom analytics trackers and advertisements that you already use on your own site.
Every custom integration will be different, and will likely vary in difficulty. For this example, we’ll be using ChartBeat, a traffic analytics and tracking tool. We can use a quick Google search for “ChartBeat Documentation”, to find the Getting Started Guide.
Some companies’ documentation page may be geared towards developers. If that doesn’t work for you, search for a tutorial instead.
ChartBeat gives us all the code and instructions for how to add their integration.
In the guide, it tells us the following, so that’s what we’ll do:
Insert this script right before the closing </body> tag:
Now that we’ve add our ChartBeat tracker, we’ll need to make a few quick edits so that the tracker knows how to sync to our ChartBeat account.
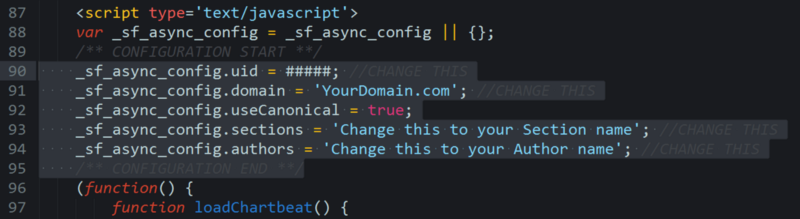 Code from the ChartBeat snippet that we’ll need to customize
Each highlighted line (except the “.useCanonical” one) will need an edit so that it can log the data.
CHANGES (to the right of the "=").uid - The unique ID for your ChartBeat account.domain - The full domain of the original article.sections - The name of the 'section/genre/tags' your article belongs to.authors - The name of the author to associate with this piece
Bingo! You’ve added the tracker and it will associate the data it’s sending with your unique ChartBeat account. Save your edited template file, and let’s get ready to publish.
Step 5: Deploying your Instant Article
On Facebook, go to the dashboard for the page you manage that you wish to post from. Navigate to Publishing Tools, and to the list of articles. Click the blue “+Create” button on the top right.
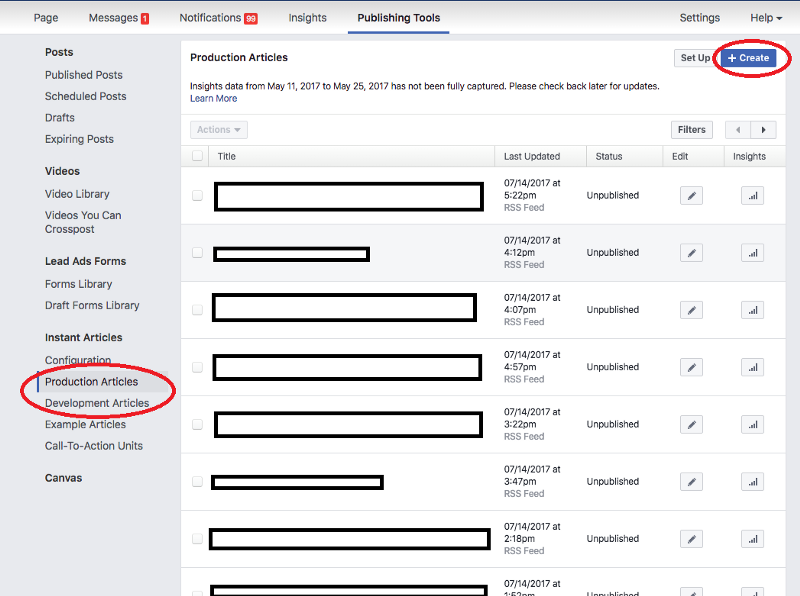 IA Dashboard
You should now be prompted to paste the code for your new article.
Select all the code from the template that we’ve been editing, and paste it in here. Hit save! You can publish that draft when you see fit, or schedule it to post at a predetermined time using the dashboard.
Congrats, you’re done! I can’t wait to read the awesome articles you’re about to publish.

Hey, I’m Nick Walsh.
I’m a Technical Evangelist for Wolfram Research and a Hackathon Coach for Major League Hacking, with a passion for technology, eSports, and empowering student developers.