By Mark Hopson
A complete guide to setting up a single-page Javascript App with React and Redux inside a Rails project.
Update (Mar 17, 2019): Added Typescript to the last step of this project.
This tutorial will show you how to create a single-page app with React (and Redux and Semantic UI) inside a Rails project.
This tutorial will also include:
Side note #1. I saw this wonderful guide recently and it inspired me to write one for Rails.
Side note #2. Here is the finished tutorial. The commit history corresponds (kind of) with the steps in this guide.
Overview
To give you a sense of what we’re going to build and how things will work, see the 2 diagrams below.
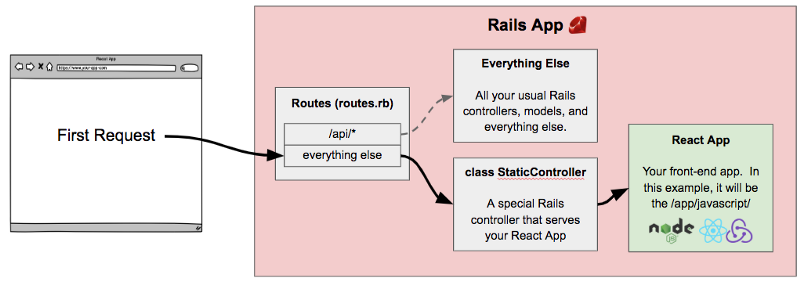
Diagram 1: Handling the first HTTP request (i.e. requests from the browser to our Rails App)
The diagram below illustrates your React App inside your Rails project, and the path (solid black line) that the first request takes to return the React App back to the client (browser).

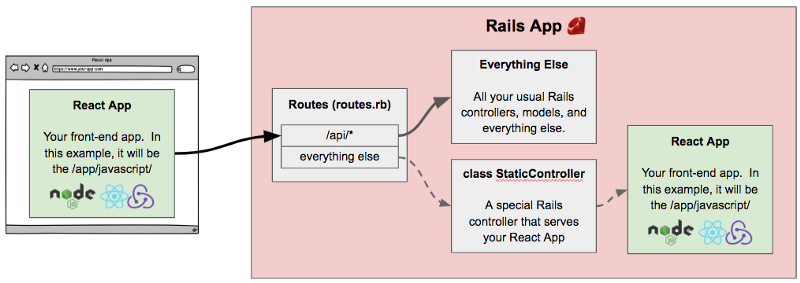
Diagram 2: Handling subsequent HTTP requests (i.e. requests from our React App to our Rails App)
After the React App is loaded in the user’s browser, the React App will be responsible for sending requests to your Rails App (solid black line). In other words, once React is loaded, requests to Rails will come from Javascript code, and not the browser.

Other Important notes before we start coding
- Think of your React App as being separate from your Rails App. The React App is strictly for the front-end and runs in the user’s browser. The Rails part is strictly for the back-end and runs on the server. The Rails App does not know anything about the React App except for when to return its static assets (Webpack compiled HTML, JS, and CSS).
- Once your React App is loaded by your browser, all the logic to make HTTP requests (retrieve data, and turn that data into a view) is done in the front-end (i.e. browser).
- Your Rails App effectively does not serve any views except for the one that serves your React App. In this tutorial, the only Rails view is
/app/views/static/index.html.erb - All
/api/*paths gets handled by the Rails App, while all other paths gets handled by React inside the browser (after your browser has loaded the first request). For example,[http://your-app.com/something](http://your-app.com/something)will be sent to the Rails App, and then returned back to your React App (the HTML/JS/CSS that has already loaded in the browser), which will decide what to show on the screen. - Considerations for building a single-page app. Not necessary for this tutorial but useful.
- React Component design patterns. Again, not necessary but useful.
System Requirements
FYI here’s my system config. Not saying you need this, but something similar will make this tutorial experience smoother.
- macOS 10.13.6 (High Sierra)
- Ruby 2.5.1
- Rails 5.2.1 (and Bundler 1.16.6)
- gem install bundler -v 1.16.6
- Node 9.8.0
Finally, on to the code!
Step 1: Create a new Rails project with Webpack and React
Create a new Rails app. I’ve named mine rails-react-tutorial.
rails new rails-react-tutorial --webpack=react
See here for more info on the --webpack=react flag introduced in Rails 5.1.
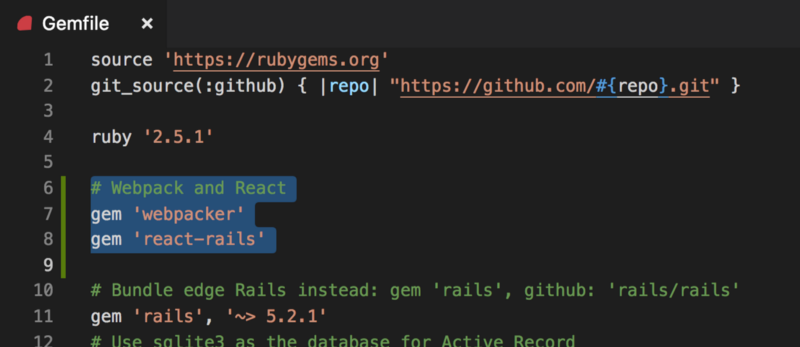
Step 2: Make sure the Webpacker and React-Rails gems are installed
Check if the Webpacker and React-Rails gems are in your Gemfile. If the gems are not there, then add it:
Now run these commands to install everything.
bundle install
# This command might not be necessary.# If already installed, then it will# ask you to override some files.rails webpacker:install
rails webpacker:install:react rails generate react:installyarn install
Now run rails server -p 3000 and visit [http://localhost:3000](http://localhost:3000) to make sure our project is working.
Pro Tip #1: run ./bin/webpack-dev-server in a separate window while coding to have any changes automatically build and reload the browser.
Pro Tip #2: If you get this error can’t activate sqlite3 (~> 1.3.6), already activated sqlite3–1.4.0 then add gem ‘sqlite3’, ‘~> 1.3.6’ to Gemfile. See this link for more info.
Step 3: Add a Controller class, and Route, to our Rails app
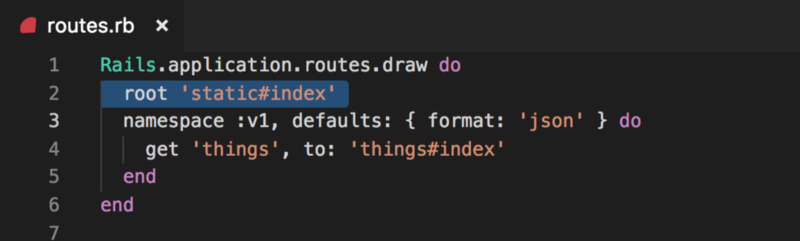
Add a new route to our Rails app. For this example, we will add GET /v1/things endpoint to `config/routes.rb``.
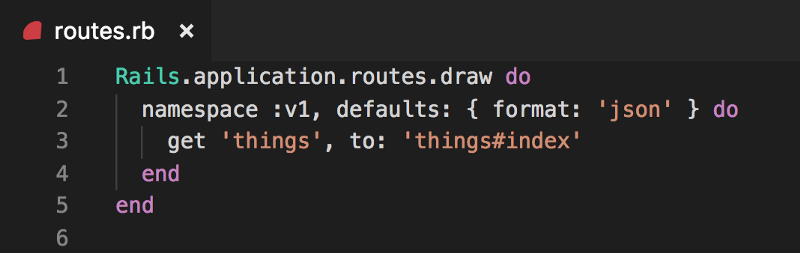
config/routes.rb file
This new route will require a ThingsController. Create a new app/controllers/v1/things_controller.rb file. Remember, it should be in the v1 folder because it belongs to our Rails API.
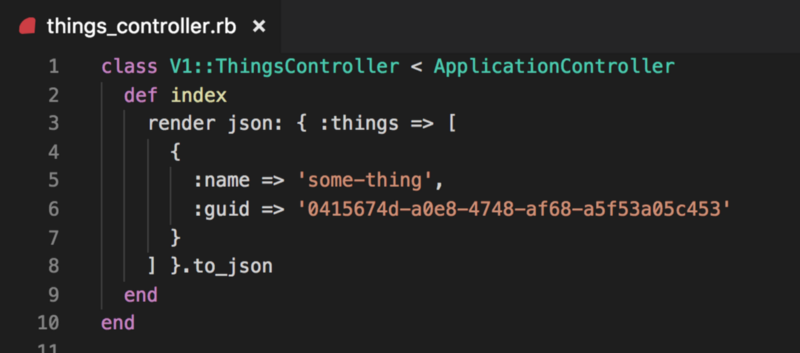
Our Things controller will return a hard-coded response for GET /v1/things.
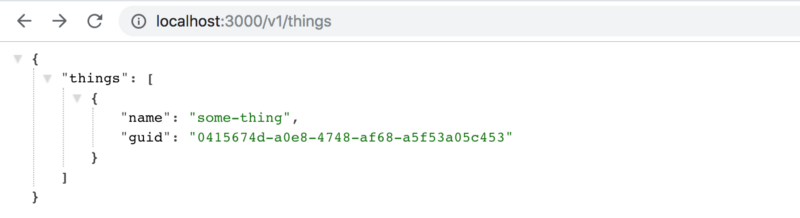
At this point, you should be able to re-run rails server -p 3000 and visit [http://localhost:3000/v1/things](http://localhost:3000/v1/things).
Next, we will create a new React component.
Step 4: Generate a new React component
Create a HelloWorld React component that accepts a String parameter named greeting by running the following command:
rails generate react:component HelloWorld greeting:string
A file should be created: app/javascript/components/HelloWorld.js.
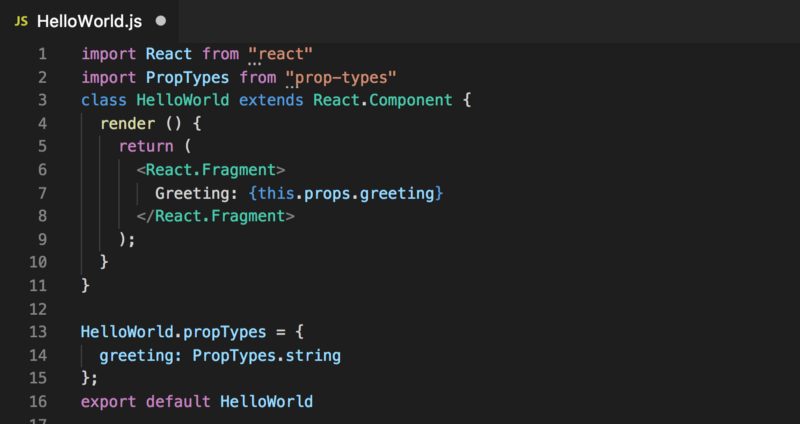
app/javascript/components/HelloWorld.js file
Step 5: Use our HelloWorld component
To use and see our new HelloWorld component we need to 2 things: create a view embeds this component, and add a route to point to this view.
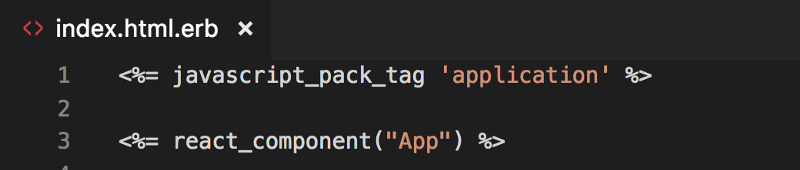
To create a view, create the file app/views/static/index.html.erb and add the following:

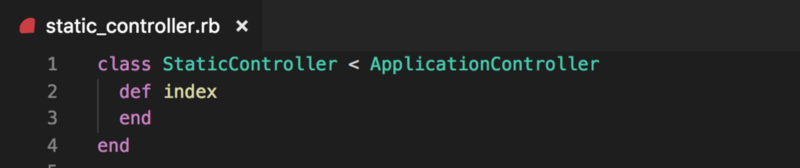
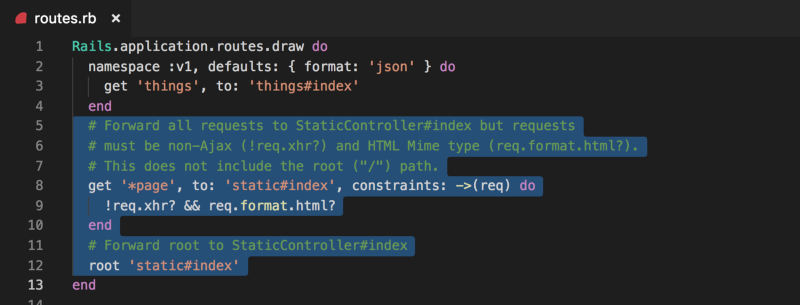
For our new route, add the following line to our routes.rb file, and an empty StaticController to support it.
Add this to app/controllers/static_controller.rb:
You should now be able to re-run rails server -p 3000 and visit [http://localhost:3000/](http://localhost:3000/v1/things) to see your new React component (remember to run ./bin/webpack-dev-server in a separate window to have an Javascript changes automatically get packaged by webpack).
Now that we have a React component that renders in our view, let’s expand our app to support multiple views with react-router.
Step 6: Add React-Router
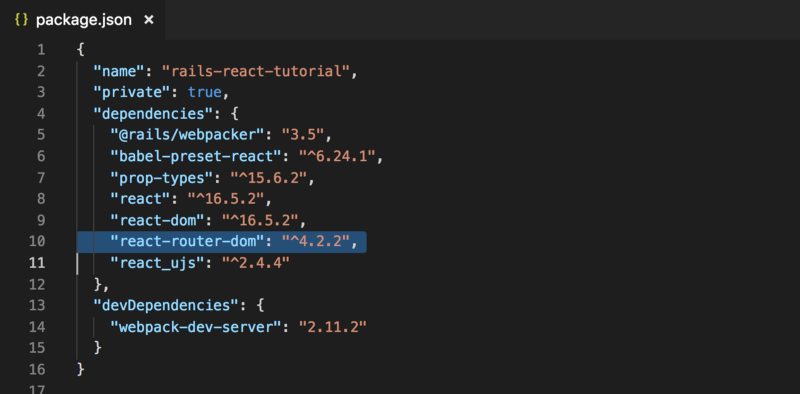
First, run this command to add react-router-dom, which includes and exports all of react-router and some additional helper components for web browsing. More info here.
npm install --save react-router-domyarn install
This command should add the following line to your package.json file. Note, 4.2.2 was used here, but your version could be different.
Now let’s use React Router to make some routes for our React Front-End.
Step 6: Using React-Router
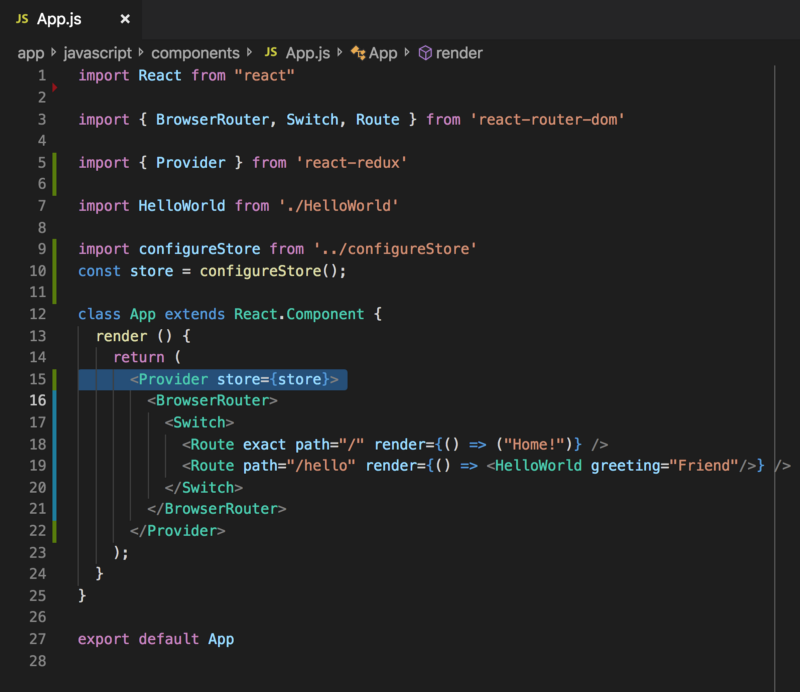
[react-router](https://github.com/ReactTraining/react-router) allows us to manage all our UI routes strictly with Javascript. This means that we will need a single “App” component that encapsulates our entire application. “App” will also use React-Router to present the correct “Page” component for the URL being requested.
To start, run this command to add an App component that will represent our entire front-end application.
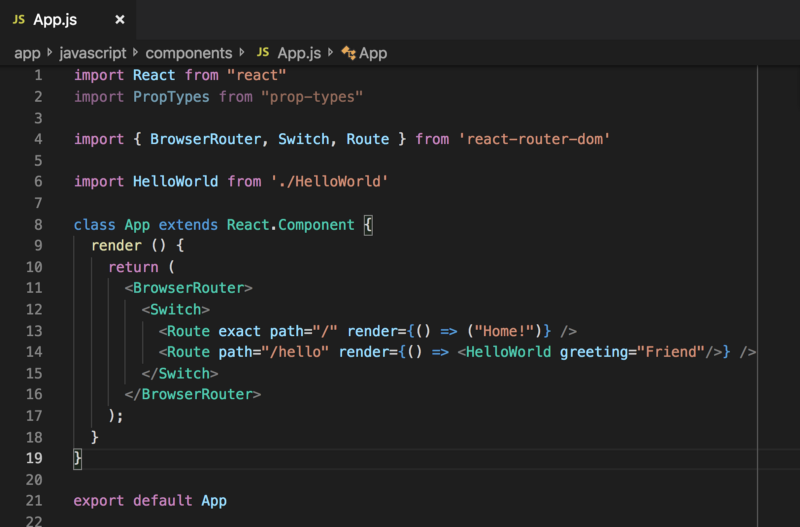
rails generate react:component App
Next, open the file for the newly created React component, app/javascript/components/App.js, and add the following …
Now change index.html.erb to point to our new App component.
Lastly, edit your routes.rb to have Rails send all requests that are not for the API to our App component (via StaticController#index).
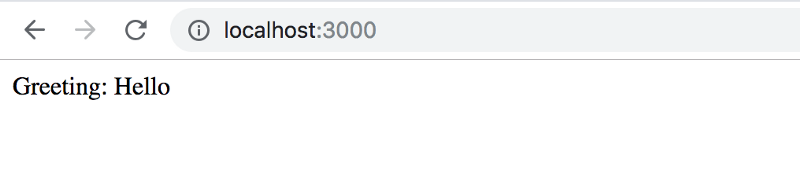
We can now run rails server -p 3000 and visit [http://localhost/](http://localhost/) and [http://localhost/](http://localhost/)hello to see React-Router working (remember ./bin/webpack-dev-server enables auto-webpacking).
Next, we’ll need to install some additional dependencies before we can connect our React front-end to our Rails API.
Step 7: Adding Redux, Sagas, Babel Polyfill, and Axios
Now let’s add the following Javascript libraries for our front-end.
- Redux to manage the global state of our application.
- Babel-Polyfill to enable fancy Javascript features that might not otherwise be available on older web browsers.
- Reselect and React-Redux to make working with Redux easier.
To install everything, run the following:
npm install --save redux babel-polyfill reselect react-reduxyarn install
Now we will use these tools to set up a Redux State Store, then add some Actions and Reducers to use it.
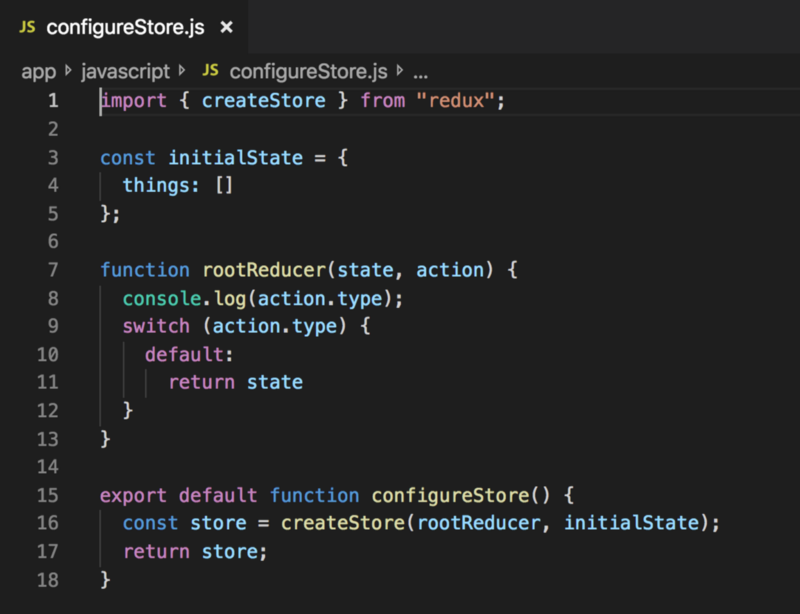
Step 8: Set up Redux State Store
In this step, we will set up the Redux State Store for our app with the following template (we will add and remove “things” in the next steps).
{ "things": [ { "name": "...", "guid": "..." } ]}
First, create a configureStore.js file. This will initialize our Redux Store.
Now import and use configureStore() in the App Component to create a Redux State and hook it up to our App.
Now you have Redux installed in your app! Next, we will create an Action and a Reducer, and begin to write and read from our Redux State.
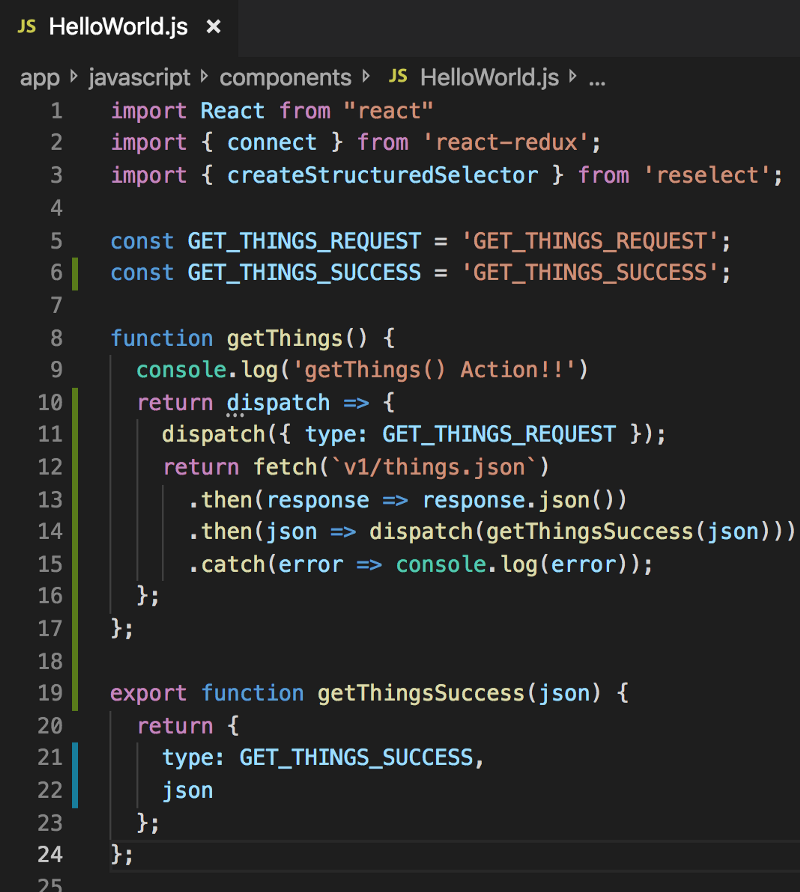
Step 9: Add an Action and a Reducer
Now that the App has a Redux State, we will add a <button> to HelloWorld that dispatches an Action (that we will define here) that will be received by the rootReducer().
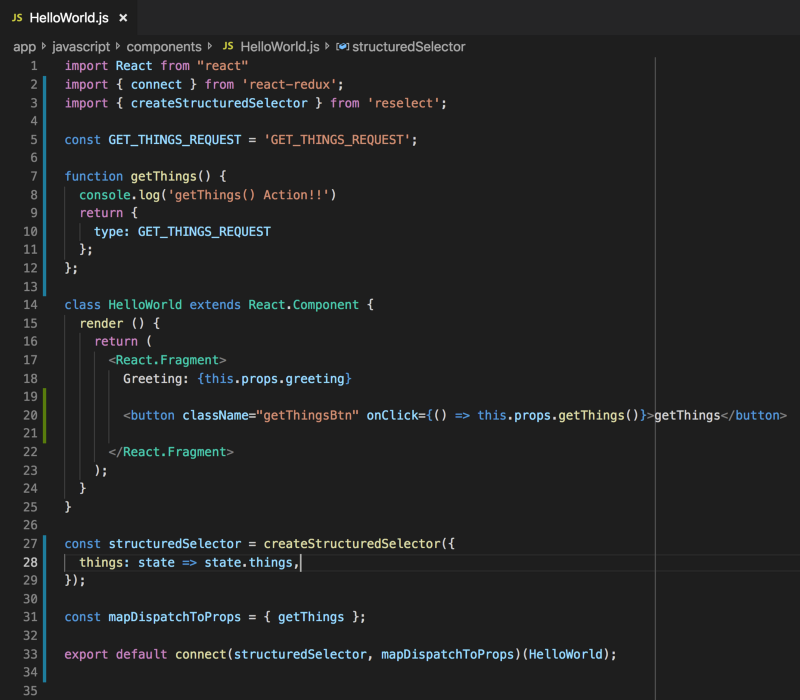
First, add getThings() Action definition and import createStructuredSelector() and connect() into theHelloWorld Component. This maps parts of the Redux State, and Actions (i.e. dispatching getThings()) , to HelloWorld’s prop.
Next, add a <button> to HelloWorld that dispatches a getThings() Action (from ./actions/index.js) on every click.
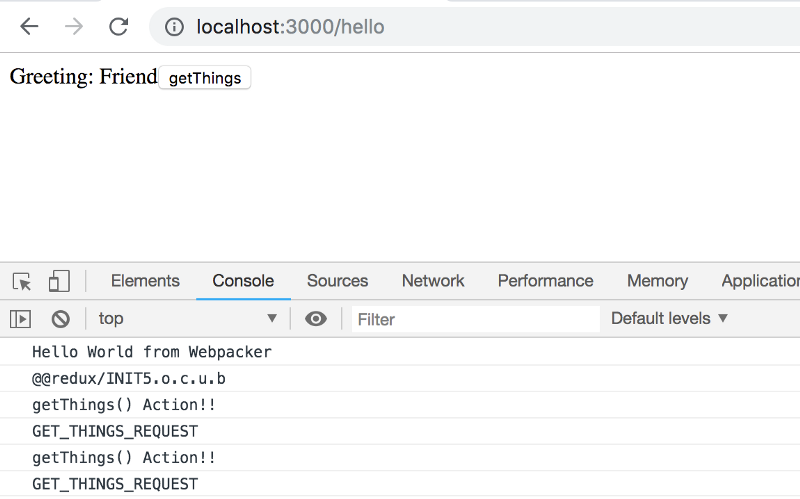
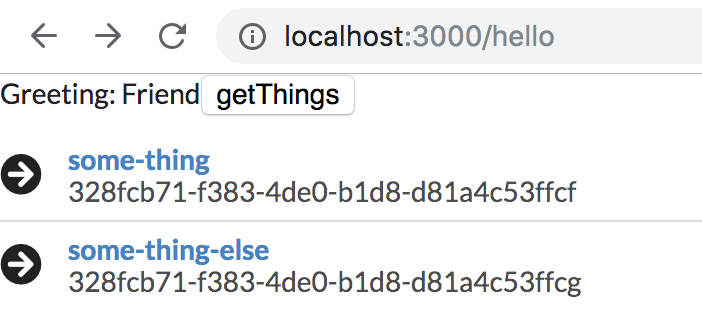
After everything is added to HelloWorld, go to [http://localhost:3000/hello](http://localhost:3000/hello), open the Console, and click the “getThings” button to see your Action and Reducer functions being called.
Now that you can send an Action that can be received by a Reducer, let’s have the Reducer alter the Redux State.
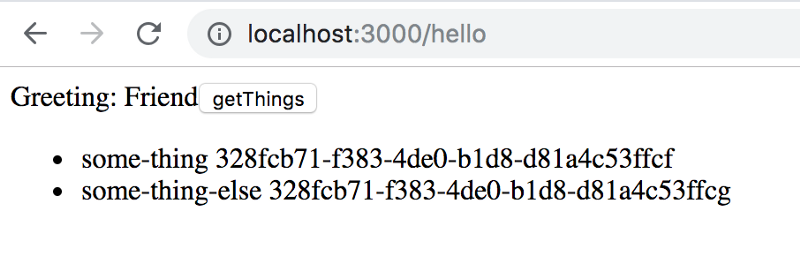
Step 10: Have HelloWorld read React State and display “things”
Insert a List <ul> in HelloWorld and fill it with “things” from your Redux State.
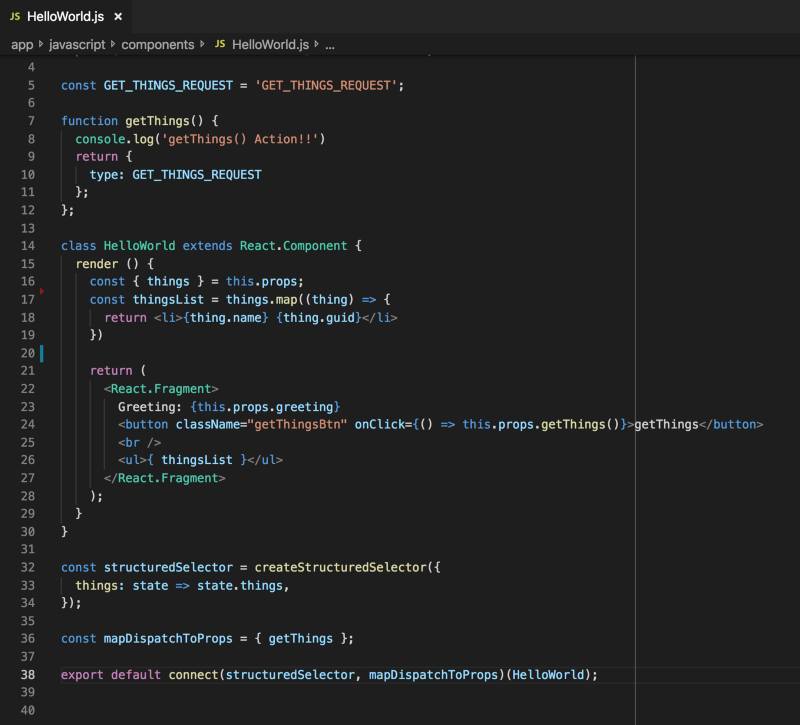
To test if this is actually working, we can initialize with some “things” data. Once this is done, we can refresh the page and see it in our list.

Now that we have a simple Action and Reducer working, we will extend this so that the Action queries our Rails API and the Reducer sets the content of “things” with the API response.
Step 11: Install Redux-Thunk
We will need Redux-Thunk to allow async workflows (like an HTTP request) to dispatch Actions.
Install redux-thunk by running this command:
npm install --save redux-thunkyarn install
Now, let’s use Thunk in our Action!
Step 12: Use redux-thunk and fetch() to query API and set React State with results
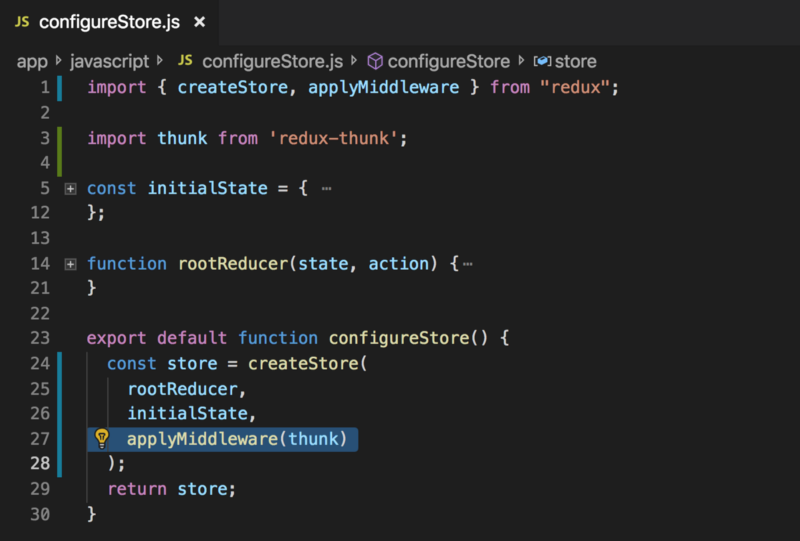
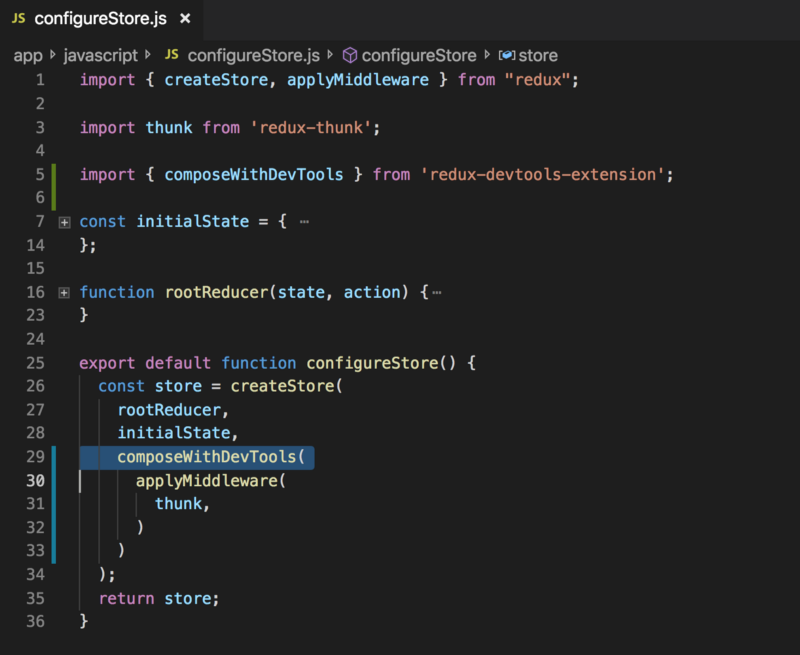
First, let’s import redux-thunk in configureStore.js and install it our Redux Store so our App can handle “Thunk” Actions.
Now test that everything is working by starting the App and loading a page.
Next, let’s change the getThings() Action to return a function that performs the following (instead of returning the Action object):
- Dispatch the original Action object
- Make a call to our Rails API.
- Dispatch a new Action
getThingsSuccess(json)when the call succeeds.
For this step, we will also need to add the getThingsSuccess(json) Action.
Of course, this does nothing to the Redux State since our Reducer is not making any changes. To fix this, change the Reducer to handle the GET_THINGS_SUCCESS Action and return the new State (with the response from the Rails API).

Now if you start your App, navigate to localhost:3000/hello and click the button, your list should change!
There you have it. A Rails API hooked up to a React+Redux App.
(Bonus) Step 13: Installing Redux Dev Tools
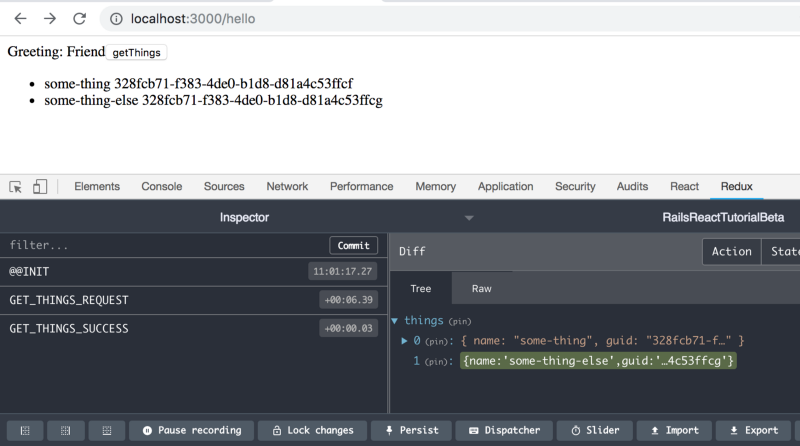
Maybe I should’ve put this step earlier, but Redux Dev Tools is essential for debugging the Actions your App is sending, and how those Actions are changing your State.
This is how you install it. First, install the proper extension for your browser (Chrome, Firefox).
Next, run the following to install the library.
npm install --save-dev redux-devtools-extensionyarn install
Now, use it to initialize your Redux State Store.
After all this is done, you should be able to see a new tab, Redux, in your Chrome (or Firefox) dev tools, that lets you see which Actions were dispatched, and how each one changed the App’s State. The React tab will also show you all your components and their props and states.
Happy debugging!
(Bonus) Step 14: Semantic UI
Semantic is a great library for UI components that makes it really easy to build nice looking websites quickly.
To install this library, run the following.
npm install --save semantic-ui-css semantic-ui-reactyarn install
Add this to app/javascript/packs/application.js:
import 'semantic-ui-css/semantic.min.css';
And add this to app/views/static/index.html.erb:
<%= stylesheet_pack_tag "application", :media => 'all' %

(Bonus) Step 15: Using a Reasonable Directory Structure
This step is totally optional, and it has nothing to do with the function of the App. Just my opinion on how you should organize your files.
So as you can probably guess, stuffing your Actions into the same file as your Components, and having a single reducer for your entire App, does not scale very nicely when your App grows. Here is my suggested file structure:
app|-- javascript |-- actions |-- index.js |-- things.js |-- components |-- packs |-- reducers |-- index.js |-- things.js
(Bonus — Mar 17 2019 Update) Step 16: Install Typescript!
Typescript is just like Javascript but with types! It is described as a “strict syntactical superset of Javascript”, meaning that Javascript is considered valid Typescript, and the “type features” are all optional.
IMO Typescript is fantastic for large Javscript projects, such as a big React front-end. Below are instructions on how to install it, and a small demo of it inside our project.
First, run the following commands (taken from the Webpacker Readme):
bundle exec rails webpacker:install:typescriptyarn add @types/react @types/react-dom
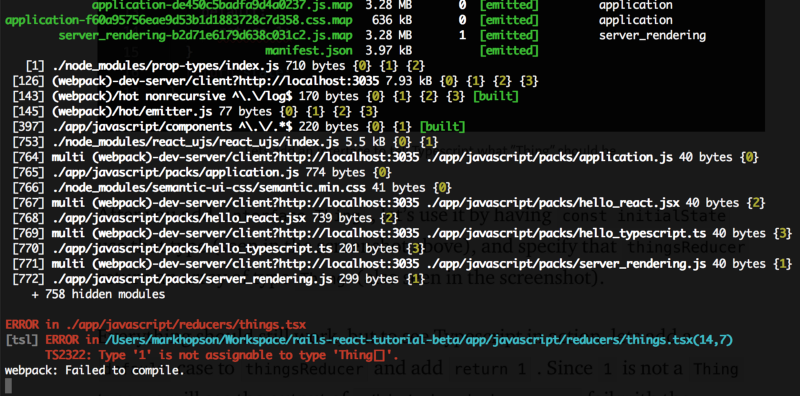
Now, to see it in action, let’s rename app/javascript/reducers/things.js to things.tsx and add the following lines to the top of the file:

After you add interface Thing , let’s use it by having const initialState use that type (seen in the screenshot above), and specify that thingsReducer return an array of type Thing (also seen in the screenshot).
Everything should still work, but to see Typescript in action, lets add a default case to thingsReducer and add return 1 . Since 1 is not a Thing type we will see the output of ./bin/webpack-dev-server fail with the following:
And that’s it! You can now add Typescript .tsx files to your project and start using Types with your project.
Here’s a great overview of Typescript and why you should use it.
The End
You made it! You’ve made a Rails App that uses React and Redux. That’s pretty much it for the tutorial. I hope you had fun and learned something along the way.
If you build something with React and Rails, please do share it in the comments below — along with any questions or comments you may have for me.
Thanks for reading!