

_This article is based on a chapter from my free online book, Solving for Technology: how to quickly learn valuable new skills in a madly changing technology world. There’s lots more where that came from at my Bootstrap IT site, including links to my book, Linux in Action, and a hybrid course called Linux in Motion that’s made up of more than two hours of video and around 40% of the text of Linux in Action._
Have you ever completely hosed your workstation or main laptop while testing out a new technology? Or do you have so many packages and their dependencies installed that you no longer have any idea what it is that makes your experiments succeed or fail?
Virtualization can provide you with a clean, quick, lightweight environment where you can test to your heart’s content. You’re not even restricted to the operating system that’s running on your host machine, so this is also a great way to see how things work on multiple platforms.
When you’re done — or if everything collapses in glorious failure — you can simply kill off your environment and fire up a new one to replace it. No harm done.
In this article, I’ll explore VirtualBox and Linux Containers (LXCs) as tools for providing easily replicated and sharable virtual operating system environments. I’ll finish up with a few thoughts about writing code and building software stacks directly within virtual environments
VirtualBox
So say “hello” to Oracle’s free VirtualBox cross-platform hypervisor product and, in particular, to some advanced tricks for squeezing more value out of your (no-cost) investment. VirtualBox is something you can use on any operating system to create virtualized computers running just about any flavor of Windows or Linux.
You do still have to get a license for any Windows image you decide to run, although you’re generally free to install and use copies without activating the license for a month or so.
If you’ve already read my Linux in Action book and some of this material feels a bit familiar, it’s because this chapter is a scaled down version of Linux in Action’s chapter 2. The content has been made available through kind permission from Manning Publications.
Getting started with VirtualBox
VirtualBox provides an environment within which you can launch as many virtual computers as your physical system resources can handle. And, of course, it’s a particularly useful tool for safely testing and learning new administration skills — which is our primary goal right now.
Installing VirtualBox
Want to try all this out from a Windows PC? Head over to the VirtualBox website and download the executable archive. Click the file you’ve downloaded and then work through a few setup steps (the default values should all work). Finally, you’ll be asked whether you’re OK with a possible reset of your network interfaces and then whether you want to install VirtualBox. Of course you are and do.
Getting VirtualBox happily installed on an Ubuntu Linux machine is even simpler. Just two commands:
sudo apt updatesudo apt install virtualbox
Defining a virtual machine
I’m not sure whether you’ve ever put together a physical computer from components, but it can get involved. Defining a new virtual machine within VirtualBox works pretty much the same way. The only significant difference is that, rather than having to get down on your hands and knees with a flashlight clenched between your teeth to manually add RAM and a storage drive to your box, VirtualBox lets you define your VM’s “hardware” specs by clicking your mouse.
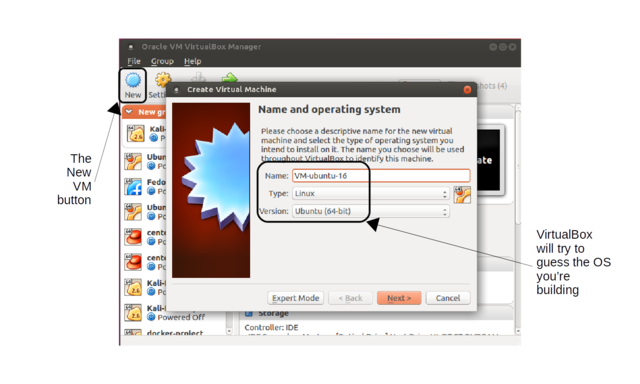
After clicking New in the VirtualBox interface, you will give the VM you’re about to build a descriptive name and, as you can see in the figure, the software should be able to correctly populate the Type and Version fields automatically. The Type and Version you select here won’t install an actual operating system, but are simply used to apply appropriate hardware emulation settings.
On the next screen you’ll allocate RAM to your VM. Unless you’re planning something particularly demanding — like hosting a container swarm or running a busy web server — the default amount (768 MB) should be fine. You can certainly give it more RAM if necessary, but don’t forget to leave enough over for your host machine and any other VMs that might already live on it. So if your host only has 4 GB of physical RAM, you probably won’t want to give half of that to your VM.
Keep these limits in mind if you eventually decide to run multiple VMs at a time — something that will be useful for testing more complex infrastructure projects. Even if each VM is only using the default amount of memory, two or three of them can start to eat away at RAM needed for normal host operations.
Defining your virtual hard disk
What’s a computer without a hard disk? The VirtualBox setup process will now ask you if you’d like to create a new virtual disk for your VM or use one that already exists. There may be times when you want to share a single disk between two VMs but for this exercise I’m guessing that you’ll want to start from scratch. So select “Create a virtual hard disk now”.
The next screen lets you choose a hard disk file format for the disk you’re about to create. Unless you’re planning to eventually export the disk to use within some other virtualization environment, the default VirtualBox Disk Image (VDI) format will work fine.
I’ve also never regretted going with the default “Dynamically allocated” option to determine how the virtual drive will consume space on the host. By “dynamic” they mean that space on the host storage disk will be allocated to the VM only as-needed. Should the VM disk usage remain low, less host space will be allocated.
A fixed sized disk, on the other hand, will be given its full maximum amount of space right away, regardless of how much it’s actually using. The only advantage of “Fixed size” is application performance, but since I generally only use VirtualBox VMs for testing and experiments, I’m fine avoiding the trade off.
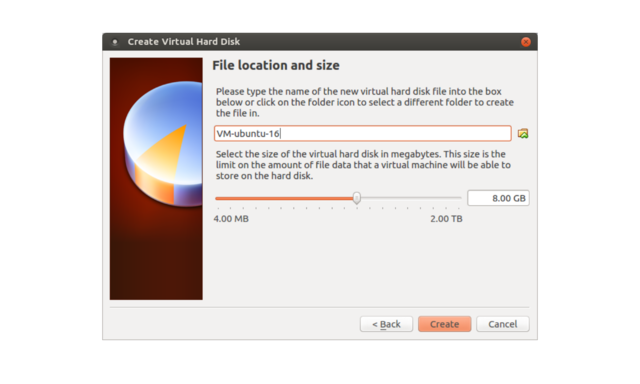
When VirtualBox knows it’s Linux you’re after — and because Linux makes such efficient use of storage space — VirtualBox will probably offer you only 8 GB of total disk size on the next screen (shown below). Unless you’ve got unusually big plans for the VM (like, say, you’re going to be working with some serious database operations), that will probably be fine. On the other hand, if you had chosen Windows as your operating system, the default choice would have been 25 GB, and for good reason: Windows isn’t shy about demanding lots of resources. That’s a great illustration of one way Linux is so well suited to virtual environments.
You can also edit the name and location VirtualBox will use for your disk on this screen.
When you’re done, click Create and the new VM will appear in the list of VMs on the left side of the VirtualBox manager. Enjoy the taste of success, but you’re not done: that was just the machine. Now you’ll need an operating system to bring it to life.
Downloading an operating system
Now that you’ve defined your new VM’s virtual hardware profile, here’s what still needs doing:
- Download a file (in ISO format) containing the image of the operating system you want to use.
- Boot the new VM using a virtual DVD drive containing the ISO you downloaded
- Work through the standard OS installation process
- Boot the VM and launch the OS you just installed
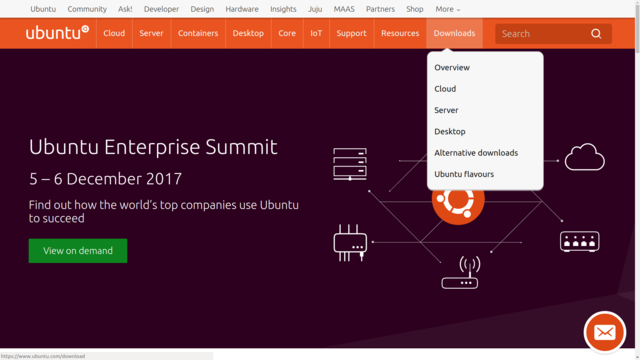
You’ll need to download a .ISO file containing the operating system files and installation program. Finding the right file is usually just a matter of searching the internet for the distribution name and the word “download”. In the case of Ubuntu, you could alternatively just go to the ubuntu.com page and click on the Downloads tab as you see in the figure. Notice the various flavors of Ubuntu that are available. If you’re going to be using this VM for administration tasks, then the small and fast Server version is probably a better choice than Desktop.
Validate the ISO archive you downloaded
Large files can sometimes become corrupted during the download process. If even a single byte within your .ISO has been changed, there’s a chance the installation simply won’t work. Because you don’t want to invest time and energy only to discover that there was a problem with the download, it’s always a good idea to immediately calculate the checksum (or hash) for the .ISO you’ve downloaded to confirm that everything is as it was.
To do that, you’ll need to get the appropriate SHA or MD5 checksum — which is a long string looking something like this:
4375b73e3a1aa305a36320ffd7484682922262b3
In the case of Ubuntu, getting that will mean going to the web page at releases.ubuntu.com, clicking the directory matching the version you downloaded, and then clicking one of the links to a checksum (like, for instance, SHA1SUMS).
You should compare the appropriate string from that page with the results of a command run from the same directory as your downloaded .ISO that might look like this:
$ shasum ubuntu-16.04.2-server-amd64.iso
If they match, you’re in business. If they don’t — and you’ve double checked to make sure you’re looking at the right version — then you might have to download the .ISO a second time.
Installing an operating system
Once your .ISO file is in place, head back to VirtualBox. With the VM you just created highlighted in the left panel, click the green Start button at the top of the app. You’ll be prompted to select a .ISO file from your file system to use as a virtual DVD drive. Naturally, you’ll choose the one you just downloaded. The new VM will read this DVD and launch an OS installation.
Most of the time the installation process will go fine. However, describing solutions to each of the many small things that could go wrong would require a whole whack of articles. So if you do have trouble you can consult the documentation and guides that are available for your operating system or share your question with the online community.
When everything is nicely installed, there might still be a few more things to take care of before you can successfully boot into your VM. With your VM’s entry highlighted, click the yellow Settings icon. Here’s where you can play with your VM’s environment and hardware settings.
Clicking on Network, for example, allows you to define network connectivity. If you want your VM to have full internet access through the host machine’s network interface then, as shown below, you can select “Bridged Adapter” from the Attached drop-down, and then the name of your host’s adapter.
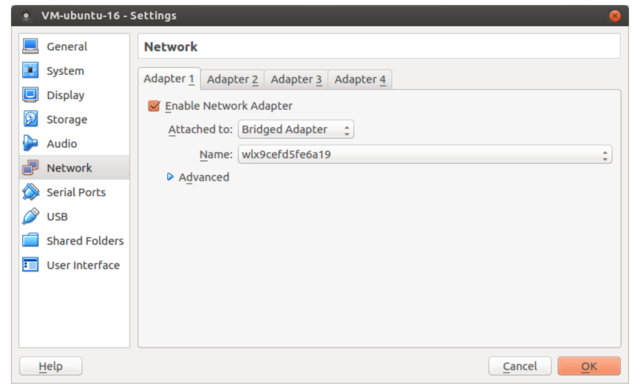
Using a bridged adapter might not always be your first choice, and it might sometimes present a security risk. In fact, choosing “NAT Network” is a more common way to provide a VM with internet access. However a bridged network is the easiest way to gain full network connectivity so, for testing at least, it’s a useful approach.
These next sections are a bit bonus-y, but who doesn’t like free stuff? I’m going to tell you about two related tricks: how to organize your VirtualBox VMs to make spinning up new ones as quick as possible, and how to use the command line to share VMs across a network.
Cloning VMs for quick starts
One of the most obvious advantages of working with VMs is the ability to quickly access a fresh, clean OS environment. But if accessing that environment requires going through the full install process, than I don’t see a whole lot of “quickly.”
Until, that is, you throw cloning into the mix. Why not keep your original VM in its clean post-install state, and simply create an identical clone whenever you want to do some real work?
It’s easy. Take another look at the VirtualBox App. Select the (stopped) VM you want to use as a master copy, click the Machine menu link, and then Clone. You’ll confirm the name you’d like to give your clone and then, after clicking Next, whether you want to create a Full clone (meaning entirely new file copies will be created for the new VM) or Linked clone (meaning the new VM will share all the base files with its master, while maintaining your new work separately).
Selecting the Linked option will go much faster and take up much less room on your hard disk. The only down side is that you’ll be unable to move this particular clone to a different computer later. It’s your choice.
Now click Clone, and a new VM will show up in the VM panel. Start it the way you normally would and then log in using the same credentials you set on the master.
Managing VMs from the command line
VirtualBox comes with its own command line shell that’s invoked using vboxmanage. Why bother with the command line? Because, among other benefits, it will allow you to work on remote servers - which can greatly increase the scope of possible projects. To see how vboxmanage works, use list vms to list all the VMs currently available on your system. Here's how that looks on my machine:
$ vboxmanage list vms
“Ubuntu-16.04-template” {c00d3b2b-6c77–4919–85e2–6f6f28c63d56}
“centos-7-template” {e2613f6d-1d0d-489c-8d9f-21a36b2ed6e7}
“Kali-Linux-template” {b7a3aea2–0cfb-4763–9ca9–096f587b2b20}
“website-project” {2387a5ab-a65e-4a1d-8e2c-25ee81bc7203}
“Ubuntu-16-lxd” {62bb89f8–7b45–4df6-a8ea-3d4265dfcc2f}
vboxmanage clonevm will pull off the same kind of clone action I described above using the GUI. Here, I'm making a clone of the Kali-Linux-template VM, naming the copy "newkali":
$ vboxmanage clonevm Kali-Linux-template --name newkali
That will work nicely as long as I only need to use the new VM here on my local computer. But suppose I wanted other members of my team to have an exact copy of that VM — perhaps so they could test something I’ve been working on. For that, I’ll need to convert the VM to some standardized file format. Here’s how I might export a local VM to a file using the Open Virtualization Format (.OVA):
$ vboxmanage export website-project -o website.ova
0%…10%…20%…30%…40%…50%…60%…70%…80%…90%…100%
Successfully exported 1 machine(s).
Next, you’ll need to copy the .OVA file to your colleague’s computer. Bear in mind that the file won’t, by any standard, be considered small and dainty. If you haven’t got network bandwidth to spare for a multiple GB transfer, then consider moving it via a USB device.
Once the transfer is complete, all that’s left is, from the remote computer, to import the VM into that machine’s VirtualBox. The command is simple:
$ vboxmanage import docker.ova
Confirm that the import operation worked using list vms and try launching the VM from the desktop.
$ vboxmanage list vms“docker-project” {30ec7f7d-912b-40a9–8cc1-f9283f4edc61}
If you don’t need any fancy remote access, you can also share a VM from the GUI. With the machine you want to share highlighted, click on the File menu and then on Export Appliance.
Coming next: the wondrous and mysterious world of LXC.
VirtualBox is great for running operations requiring kernel access, for when you need GUI desktop sessions, or for testing niche market edge-case operating systems. But if you’re on a Linux machine and you just need fast access to a clean Linux environment and you’re not looking for any special release version, then you’d be hard pressed to beat Linux Containers.
Just how fast are LXC containers? You’ll see for yourself soon enough. But, because they skillfully share many system resources with both the host and other containers, they work like full-bore standalone servers while using only minimal storage space and memory.
NOTE: We’re going to discuss the classic LXC, but you should be aware that there’s a similar environment from the same developers called LXD. LXD is essentially a newer implementation of the LXC interface. It still uses LXC under the hood, but provides a different set of commands that extend functionality to remote network administration.
Getting started with LXC
Install LXC on your Ubuntu workstation? Piece of cake:
sudo apt updatesudo apt install lxc
That’s it. We’re ready to get down to business. The basic LXC skill set is actually quite simple. I’m going to show you the three or four commands you’ll need to make it all work, and then an insider tip that, once you understand how LXC organizes itself, will just blow you away.
Launch your first container
Why not dive right in and create your first container? The value given to -nsets the name I want to use for the container, and -t tells LXC to build the container from the Ubuntu template.
$ sudo lxc-create -n mycont -t ubuntu
If you decided to create, say, a CentOS container, then you should make a note of the final few lines of the output, as it contains information about the password you should use to log in:
$ sudo lxc-create -n centos_lxc -t centos
[...]
The temporary root password is stored in:
        '/var/lib/lxc/centos_lxc/tmp_root_pass'
You will log in using the user name “root” and the password contained in that file. If, on the other hand, your container used the Ubuntu template, then you’ll use “ubuntu” for both your user name and password. Naturally, if you plan to use this container for anything serious, you’ll want to change that password right away.
Use lxc-ls --fancy to check the status of your container:
$ sudo lxc-ls --fancy
NAME    STATE   AUTOSTART GROUPS IPV4    IPV6
mycont  STOPPED 0         -      -       -
Well, it exists, but apparently it needs starting. As before, the -n specifies by name the container you want to start. -d stands for "detach" - meaning you don't want to be automatically dropped into an interactive session as the container starts.
$ sudo lxc-start -d -n mycont
Listing your containers should now display something like this:
$ sudo lxc-ls --fancy
NAME    STATE   AUTOSTART GROUPS IPV4        IPV6
mycont  RUNNING 0         -      10.0.3.142  -
This time, the container is running and has been given an IP address. You could use this address to log in using a secure shell session.
$ ssh ubuntu@10.0.3.142
Alternatively, you can launch a root shell session within a running container using lxc-attach.
$ sudo lxc-attach -n mycontroot@mycont:/#
When you’re done playing with your new container, you can either run exitto log out leaving the container running:
root@mycont:/# exitexit
…or shut the container down using shutdown -h now.
But before you do that, let’s find out just how blazing fast LXC containers are. The -hflag I added to shutdown just before stands for "halt". If I would use rinstead, rather than shutting down for good, the container would reboot. So let's run reboot and then try to log in again right away to see how long it takes for the container to get back up on its feet.
root@mycont:/# shutdown -r nowsudo lxc-attach -n mycont
How did that go? I’ll bet that, by the time you managed to retype the lxc-attachcommand, mycont was awake and ready for action. But did you know that hitting the up arrow key in Bash will populate the command line with the previous command. Using that would make it even faster to request a login. In my case, there was no noticeable delay. The container shut down and fully rebooted in less than 2 seconds!
Linux containers are also really easy on system resources. Unlike my experience with VirtualBox VMs — where running three concurrently already starts to seriously impact my 8GB host workstation performance — I can launch all kinds of LXC containers without suffering any slowdown.
Fixing a cold LXC container
Now what about that insider tip I promised you? Well, back in a terminal on the host machine (as opposed to the container), you’ll need to open an administrator shell using sudo su. From here on in - until you type exit - you will be sudo full-time.
$ sudo su[sudo] password for username:#
Now change directory to /var/lib/lxc/ and list the contents. You should see a directory with the name of your container. If you've got other containers on the system, they'll have their own directories as well.
# cd /var/lib/lxc
# ls
mycont
Move to your container directory and list its contents. There will be a file called “config” and a directory called “rootfs”. The “fs” stands for “file system”.
# cd mycont
# ls
config rootfs
It’s the rootfs directory that I really want you to see right now:
# cd rootfs
# ls
bin   dev  home  lib64  mnt  proc  run   srv  tmp  var
boot  etc  lib   media  opt  root  sbin  sys  usr
All those subdirectories that fill rootfs…do they look familiar to you? Of course! They’re all part of the Linux Filesystem Hierarchy Standard. This is essentially the container’s root (/) directory…but within the host’s file system. As long as you have admin permissions on the host, you’ll be able to browse through those directories and edit any files you want — even when the container isn’t running.
There are all kinds of things you’ll be able to do with this access, but here’s one that can quite possibly save your (professional) life one day. Suppose you do something dumb on a container and lock yourself out, there’s now nothing stopping you from navigating through the file system, fixing the configuration file that you messed up, and getting back to work. Go ahead: tell me that’s not cool.
Need to mount a single process on a stopped container? Just use chroot the way I describe in this article.
But it gets better. It’s true that the Docker ecosystem has gained many layers of features and sophistication since the technology moved out from under LXC’s shadow some years ago. Under the hood, however, it’s still built on top of a basic structural paradigm that will be instantly recognizable to anyone familiar with LXC.
Which means that, should you be inclined to test drive the fastest-growing virtualization technology of the decade, you’ve already got skin in the game.
Writing code on a remote server
Now that you’ve got those virtual environment thingies all figured out, what can you do with ‘em? Well, it’s obvious that such setups are perfect for playing with system tools and architectures.
Suppose you’re not into system stuff, but you would like a safe place to build applications. What do I mean by “safe?” I’m talking about an environment where you can freely install libraries and dependency packages without having to worry about destabilizing your personal work computer.
But there are limits to how far that can take you. There’s a lot going on beneath the surface of IDEs like Eclipse or Visual Studio, and people become very attached to their convenience. But expecting to be able to easily run all those layers of complexity over a remote connection — and especially on a headless remote server — is perhaps a bit ambitious.
But still, wouldn’t it be nice to work on the IDE on your laptop and have the code saved, compiled, and run remotely…say, on a hosted VM or cloud instance? That way you could build your applications on the servers where they’ll actually be run without having to risk the stability of your own workstation.
It can be done. Generally, the trick is to get your IDE to ride on top of a Secure Shell (SSH) session. For details, search the internet for something like “eclipse edit java code on remote server”.
_This article is based on a chapter from my free online book, Solving for Technology: how to quickly learn valuable new skills in a madly changing technology world. There’s lots more where that came from at my Bootstrap IT site, including links to my book, Linux in Action, and a hybrid course called Linux in Motion that’s made up of more than two hours of video and around 40% of the text of Linux in Action._